

Summary of ASP.NET MVC solutions to exception handling
ASP.NET MVC is a very extensible development framework. In this article, I will integrate it with EntLib through its extension and provide a complete solution for exception handling.
EntLib's Exception Handling Application Block is a good exception handling framework that allows us to define exception handling strategies through configuration. ASP.NET MVC is a very extensible development framework. In this article, I will integrate it with EntLib through its extension and provide a complete exception handling solution.
1. Basic exception handling strategy
Let’s first discuss the specific exception handling strategy adopted by our solution:
For exceptions thrown by executing an Action method of the Controller, we will handle them according to the specified configuration strategy. We can adopt common exception handling methods such as logging, exception replacement and encapsulation;
For handled exceptions, if the exception handling policy stipulates that they need to be thrown, they will be automatically redirected to the Error page matching exception type. We will maintain a matching relationship between the exception type and the Error View;
For the handled exception, if the exception handling policy stipulates that it does not need to be thrown, an operation matching the current Action operation will be executed. Error handling Action is used to handle the error. The exception handling Action method uses the naming rule "On{Action}Error" by default, and the current context will be bound to the parameters of the exception handling action method. In addition, we will set the error information of the current ModelState;
If the user has not defined the corresponding exception handling Action, the "error page redirection" method will still be used for exception handling.
2. Handling exceptions through custom Action
In order to give readers a deep understanding of the exception handling page introduced above, let’s Conduct an example demonstration. This instance is used to simulate user login. We define the following Model that contains only two attributes: username and password: LoginInfoModel.
  namespace Artech.Mvc.ExceptionHandling.Models
   {
     public class LoginInfo
     {
       [Display(Name ="User Name")]
       [Required(ErrorMessage = "User Name is manadatory!")]
       public string UserName { get; set; }

       [Display(Name = "Password")]
      [DataType(DataType.Password)]
      [Required(ErrorMessage = "Password is manadatory!")]
      public string Password { get; set; }
    }
}We define the following AccountController, which is a subclass of our custom BaseController. When AccountController calls the base class constructor during construction, the specified parameters represent the configuration name of the exception handling strategy. The SignIn method represents the "login" operation, and OnSignInError represents the exception handling operation corresponding to the operation. If the exception thrown in the SignIn operation is handled and no longer needs to be thrown, OnSignInError will be called, and the ModelState has been set with the corresponding error message.
  public class AccountController BaseController
   {
     public AccountController()
       base("myPolicy")
     { }

     public ActionResult SignIn()
     {
       return View(new LoginInfo());
    }
    [HttpPost]
    public ActionResult SignIn(LoginInfo loginInfo)
    {
      if (!ModelState.IsValid)
      {
        return this.View(new LoginInfo { UserName = loginInfo.UserName });
      }

      if (loginInfo.UserName != "Foo")
      {
        throw new InvalidUserNameException();
      }

      if (loginInfo.Password != "password")
      {
        throw new UserNamePasswordNotMatchException();
      }

      ViewBag.Message = "Authentication Succeeds!";
      return this.View(new LoginInfo { UserName = loginInfo.UserName });
    }

    public ActionResult OnSignInError(string userName)
    {
      return this.View(new LoginInfo { UserName = userName });
    }
}The authentication logic specifically defined in the SignIn operation method is as follows: if the user name is not "Foo", an InvalidUserNameException will be thrown; if the password is not "password", then Throws UserNamePasswordNotMatchException. The following is the definition of the View corresponding to the SignIn operation:
  @model Artech.Mvc.ExceptionHandling.Models.LoginInfo
   @{
     ViewBag.Title = "SignIn";
   }
   @Html.ValidationSummary()
   @if (ViewBag.Messages != null)
   {
     @ViewBag.Messages
   }
  @using (Html.BeginForm())
  {
    @Html.EditorForModel()
    <input type="submit" value="SignIn" />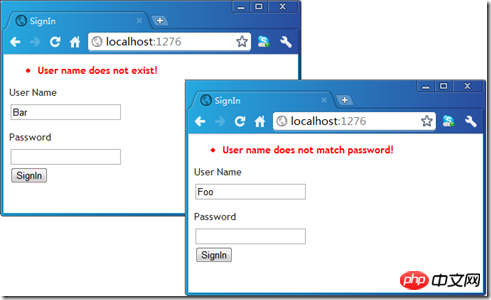
}The exception handling policy "myPolicy" specified when the AccountController is initialized is defined in the following configuration. We specifically handle the InvalidUserNameException and UserNamePasswordNotMatchException thrown by the SignIn operation method, and the ErrorMessageSettingHandler is our custom exception handler, which is only used to set the error message. As shown in the code snippet below, if the above two types of exceptions are thrown, the final error messages will be specified as "User name does not exist!" and "User name does not match password!".
  <exceptionHandling>
    <exceptionPolicies>
     <add name="myPolicy">
      <exceptionTypes>
       <add name="InvalidUserNameException"
          type="Artech.Mvc.ExceptionHandling.Models.InvalidUserNameException, Artech.Mvc.ExceptionHandling"
         postHandlingAction="None">
        <exceptionHandlers>
         <add name="ErrorMessageSettingHandler"
           type="Artech.Mvc.ExceptionHandling.ErrorMessageSettingHandler, Artech.Mvc.ExceptionHandling"
           errorMessage="User name does not exist!"/>
       </exceptionHandlers>
      </add>
      <add name="UserNamePasswordNotMatchException"
          type="Artech.Mvc.ExceptionHandling.Models.UserNamePasswordNotMatchException, Artech.Mvc.ExceptionHandling"
         postHandlingAction="None">
       <exceptionHandlers>
        <add name="ErrorMessageSettingHandler"
           type="Artech.Mvc.ExceptionHandling.ErrorMessageSettingHandler, Artech.Mvc.ExceptionHandling"
           errorMessage="User name does not match password!"/>
       </exceptionHandlers>
      </add>
     </exceptionTypes>
    </add>
   </exceptionPolicies>
</exceptionHandling>Now after we set AccountController and Sign as the default Controller and Action through route mapping, we start our application. If you enter an incorrect username and incorrect password, you will automatically get the corresponding error message in the ValidationSummary.
3. Handling exceptions through the configured Error View
In the above configuration, for the two exceptions InvalidUserNameException and UserNamePasswordNotMatchException The configuration strategy of the type all sets the PostHandlingAction attribute to "None", which means that the original exception and the handled exception will not be re-thrown. Now we set this property to "ThrowNewException", which means that we will rethrow the handled exception.
  <exceptionHandling>
    <exceptionPolicies>
     <add name="myPolicy">
      <exceptionTypes>
       <add name="InvalidUserNameException" type="Artech.Mvc.ExceptionHandling.Models.InvalidUserNameException, Artech.Mvc.ExceptionHandling"
         postHandlingAction="ThrowNewException">
       ...
       <add name="UserNamePasswordNotMatchException" type="Artech.Mvc.ExceptionHandling.Models.UserNamePasswordNotMatchException, Artech.Mvc.ExceptionHandling"
         postHandlingAction="ThrowNewException">
       ...
      </add>
     </exceptionTypes>
    </add>
   </exceptionPolicies>
</exceptionHandling>According to our exception handling strategy above, in this case we will use the "error page" method for exception handling. HandleErrorAttribute is also handled in a similar way. We support the matching relationship between exception types and Error Views, which are defined through configuration similar to the following. It is worth mentioning that the exception type here is an exception that is re-thrown after handling.
  <artech.exceptionHandling>
    <add exceptionType="Artech.Mvc.ExceptionHandling.Models.InvalidUserNameException, Artech.Mvc.ExceptionHandling"
       errorView="InvalideUserNameError"/>
    <add exceptionType="Artech.Mvc.ExceptionHandling.Models.UserNamePasswordNotMatchException, Artech.Mvc.ExceptionHandling"
       errorView="UserNamePasswordNotMatchError"/>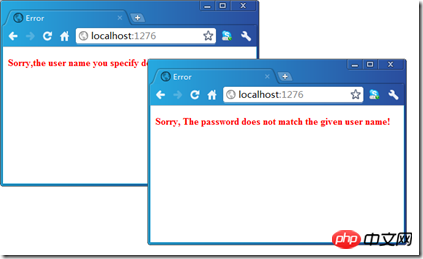
</artech.exceptionHandling>As shown in the above configuration, we have defined different Error Views for the two exception types InvalidUserNameException and UserNamePasswordNotMatchException, which are "InvalideUserNameError" and "UserNamePasswordNotMatchError" respectively. The detailed definition is as follows:
  @{
     Layout = null;
   }
   <!DOCTYPE html>
   <html>
   <head>
     <title>Error</title>
   </head>
   <body>
    <p style="colorRed; font-weightbold">Sorry,the user name you specify does not exist!</p>
  </body>
  </html>

  @{
    Layout = null;
  }
  <!DOCTYPE html>
  <html>
  <head>
    <title>Error</title>
  </head>
  <body>
    <p style="colorRed; font-weightbold">Sorry, The password does not match the given user name!</p>
  </body>
</html>现在我们按照上面的方式运行我们的程序,在分别输入错误的用户名和密码的情况下会自动显现相应的错误页面。
四、自定义ActionInvoker:ExceptionActionInvoker
对于上述的两种不同的异常处理方式最终是通过自定义的ActionInvoker来实现的,我们将其命名为ExceptionActionInvoker。如下面的代码片断所式,ExceptionActionInvoker直接继承自ControllerActionInvoker。属性ExceptionPolicy是一个基于指定的异常策略名称创建的ExceptionPolicyImpl 对象,用于针对EntLib进行的异常处理。而属性GetErrorView是一个用于获得作为错误页面的ViewResult对象的委托。整个异常处理的核心定义在InvokeAction方法中,该方法中指定的handleErrorActionName参数代表的是“异常处理操作名称”,整个方法就是按照上述的异常处理策略实现的。
  using System;
   using System.Collections.Generic;
   using System.Linq;
   using System.Web;
   using System.Web.Mvc;
   using Artech.Mvc.ExceptionHandling.Configuration;
   using Microsoft.Practices.EnterpriseLibrary.Common.Configuration;
   using Microsoft.Practices.EnterpriseLibrary.ExceptionHandling;
   namespace Artech.Mvc.ExceptionHandling
  {
    public class ExceptionActionInvoker ControllerActionInvoker
    {
      protected ExceptionHandlingSettings ExceptionHandlingSettings{get; private set;}
      protected virtual Func<string, HandleErrorInfo, ViewResult> GetErrorView { get; private set; }
      public ExceptionPolicyImpl ExceptionPolicy { get; private set; }
      public ExceptionActionInvoker(string exceptionPolicy,Func<string, HandleErrorInfo, ViewResult> getErrorView)
      {
        this.ExceptionPolicy = EnterpriseLibraryContainer.Current.GetInstance<ExceptionPolicyImpl>(exceptionPolicy);
        this.GetErrorView = getErrorView;
        this.ExceptionHandlingSettings = ExceptionHandlingSettings.GetSection();
      }

      public override bool InvokeAction(ControllerContext controllerContext, string handleErrorActionName)
      {
        ExceptionContext exceptionContext = controllerContext as ExceptionContext;
        if (null == exceptionContext)
        {
          throw new ArgumentException("The controllerContext must be ExceptionContext!", "controllerContext");
        }
        try
        {
          exceptionContext.ExceptionHandled = true;
          if (this.ExceptionPolicy.HandleException(exceptionContext.Exception))
          {
            HandleRethrownException(exceptionContext);
          }
          else
          {
            if (ExceptionHandlingContext.Current.Errors.Count == 0)
            {
              ExceptionHandlingContext.Current.Errors.Add(exceptionContext.Exception.Message);
            }
            ControllerDescriptor controllerDescriptor = this.GetControllerDescriptor(exceptionContext);
            ActionDescriptor handleErrorAction = FindAction(exceptionContext, controllerDescriptor, handleErrorActionName);
            if (null != handleErrorAction)
            {
              IDictionary<string, object> parameters = GetParameterValues(controllerContext, handleErrorAction);
              exceptionContext.Result = this.InvokeActionMethod(exceptionContext, handleErrorAction, parameters);
            }
            else
            {
              HandleRethrownException(exceptionContext);
            }
          }
          return true;
        }
        catch (Exception ex)
        {
          exceptionContext.Exception = ex;
          HandleRethrownException(exceptionContext);
          return true;
        }
      }
      protected virtual void HandleRethrownException(ExceptionContext exceptionContext)
      {
        string errorViewName = this.GetErrorViewName(exceptionContext.Exception.GetType());
        string controllerName = (string)exceptionContext.RouteData.GetRequiredString("controller");
        string action = (string)exceptionContext.RouteData.GetRequiredString("action");
        HandleErrorInfo handleErrorInfo = new HandleErrorInfo(exceptionContext.Exception, controllerName, action);
        exceptionContext.Result = this.GetErrorView(errorViewName, handleErrorInfo);
      }
      protected string GetErrorViewName(Type exceptionType)
      {
        ExceptionErrorViewElement element = ExceptionHandlingSettings.ExceptionErrorViews
          .Cast<ExceptionErrorViewElement>().FirstOrDefault(el=>el.ExceptionType == exceptionType);
        if(null != element)
        {
          return element.ErrorView;
        }
        if(null== element && null != exceptionType.BaseType!= null)
        {
          return GetErrorViewName(exceptionType.BaseType);
        }
        else
        {
          return "Error";
        }
      }
    }
}五、自定义Controller:BaseController
ExceptionActionInvoker最终在我们自定义的Controller基类BaseController中被调用的。ExceptionActionInvoker对象在构造函数中被初始化,并在重写的OnException方法中被调用。
  using System;
   using System.Web.Mvc;
   namespace Artech.Mvc.ExceptionHandling
   {
     public abstract class BaseController Controller
     {
       public BaseController(string exceptionPolicy)
       {
         Func<string, HandleErrorInfo, ViewResult> getErrorView = (viewName, handleErrorInfo) => this.View(viewName, handleErrorInfo);
        this.ExceptionActionInvoker = new ExceptionActionInvoker(exceptionPolicy,getErrorView);
      }
      public BaseController(ExceptionActionInvoker actionInvoker)
      {
        this.ExceptionActionInvoker = actionInvoker;
      }

      public virtual ExceptionActionInvoker ExceptionActionInvoker { get; private set; }

      protected virtual string GetHandleErrorActionName(string actionName)
      {
        return string.Format("On{0}Error", actionName);
      }

      protected override void OnException(ExceptionContext filterContext)
      {
        using (ExceptionHandlingContextScope contextScope = new ExceptionHandlingContextScope(filterContext))
        {
          string actionName = RouteData.GetRequiredString("action");
          string handleErrorActionName = this.GetHandleErrorActionName(actionName);
          this.ExceptionActionInvoker.InvokeAction(filterContext, handleErrorActionName);
          foreach (var error in ExceptionHandlingContext.Current.Errors)
          {
            ModelState.AddModelError(Guid.NewGuid().ToString() ,error.ErrorMessage);
          }
        }
      }
    }
}值得一提的是:整个OnException方法中的操作都在一个ExceptionHandlingContextScope中进行的。顾名思义, 我们通过ExceptionHandlingContextScope为ExceptionHandlingContext创建了一个范围。ExceptionHandlingContext定义如下,我们可以通过它获得当前的ExceptionContext和ModelErrorCollection,而静态属性Current返回当前的ExceptionHandlingContext对象。
  public class ExceptionHandlingContext
   {
     [ThreadStatic]
     private static ExceptionHandlingContext current;

     public ExceptionContext ExceptionContext { get; private set; }
     public ModelErrorCollection Errors { get; private set; }

     public ExceptionHandlingContext(ExceptionContext exceptionContext)
    {
      this.ExceptionContext = exceptionContext;
      this.Errors = new ModelErrorCollection();
    }
    public static ExceptionHandlingContext Current
    {
      get { return current; }
      set { current = value; }
    }
}在BaseController的OnException方法中,当执行了ExceptionActionInvoker的InvokeAction之后,我们会将当前ExceptionHandlingContext的ModelError转移到当前的ModelState中。这就是为什么我们会通过ValidationSummary显示错误信息的原因。对于我们的例子来说,错误消息的指定是通过如下所示的ErrorMessageSettingHandler 实现的,而它仅仅将指定的错误消息添加到当前ExceptionHandlingContext的Errors属性集合中而已。
  [ConfigurationElementType(typeof(ErrorMessageSettingHandlerData))]
   public class ErrorMessageSettingHandler IExceptionHandler
   {
     public string ErrorMessage { get; private set; }
     public ErrorMessageSettingHandler(string errorMessage)
     {
       thisErrorMessage = errorMessage;
     }
     public Exception HandleException(Exception exception, Guid handlingInstanceId)
    {
      if (null == ExceptionHandlingContextCurrent)
      {
        throw new InvalidOperationException("");
      }

      if (stringIsNullOrEmpty(thisErrorMessage))
      {
        ExceptionHandlingContextCurrentErrorsAdd(exceptionMessage);
      }
      else
      {
        ExceptionHandlingContextCurrentErrorsAdd(thisErrorMessage);
      }
      return exception;
    }
}The above is the detailed content of Summary of ASP.NET MVC solutions to exception handling. For more information, please follow other related articles on the PHP Chinese website!

Hot AI Tools

Undresser.AI Undress
AI-powered app for creating realistic nude photos

AI Clothes Remover
Online AI tool for removing clothes from photos.

Undress AI Tool
Undress images for free

Clothoff.io
AI clothes remover

AI Hentai Generator
Generate AI Hentai for free.

Hot Article
Hot Tools

Notepad++7.3.1
Easy-to-use and free code editor

SublimeText3 Chinese version
Chinese version, very easy to use

Zend Studio 13.0.1
Powerful PHP integrated development environment

Dreamweaver CS6
Visual web development tools

SublimeText3 Mac version
God-level code editing software (SublimeText3)
Hot Topics
 1377
1377
 52
52

 Five tips to teach you how to solve the problem of Black Shark phone not turning on!
Mar 24, 2024 pm 12:27 PM
Five tips to teach you how to solve the problem of Black Shark phone not turning on!
Mar 24, 2024 pm 12:27 PM
As smartphone technology continues to develop, mobile phones play an increasingly important role in our daily lives. As a flagship phone focusing on gaming performance, the Black Shark phone is highly favored by players. However, sometimes we also face the situation that the Black Shark phone cannot be turned on. At this time, we need to take some measures to solve this problem. Next, let us share five tips to teach you how to solve the problem of Black Shark phone not turning on: Step 1: Check the battery power. First, make sure your Black Shark phone has enough power. It may be because the phone battery is exhausted
 How to write a novel in the Tomato Free Novel app. Share the tutorial on how to write a novel in Tomato Novel.
Mar 28, 2024 pm 12:50 PM
How to write a novel in the Tomato Free Novel app. Share the tutorial on how to write a novel in Tomato Novel.
Mar 28, 2024 pm 12:50 PM
Tomato Novel is a very popular novel reading software. We often have new novels and comics to read in Tomato Novel. Every novel and comic is very interesting. Many friends also want to write novels. Earn pocket money and edit the content of the novel you want to write into text. So how do we write the novel in it? My friends don’t know, so let’s go to this site together. Let’s take some time to look at an introduction to how to write a novel. Share the Tomato novel tutorial on how to write a novel. 1. First open the Tomato free novel app on your mobile phone and click on Personal Center - Writer Center. 2. Jump to the Tomato Writer Assistant page - click on Create a new book at the end of the novel.
 How to enter bios on Colorful motherboard? Teach you two methods
Mar 13, 2024 pm 06:01 PM
How to enter bios on Colorful motherboard? Teach you two methods
Mar 13, 2024 pm 06:01 PM
Colorful motherboards enjoy high popularity and market share in the Chinese domestic market, but some users of Colorful motherboards still don’t know how to enter the bios for settings? In response to this situation, the editor has specially brought you two methods to enter the colorful motherboard bios. Come and try it! Method 1: Use the U disk startup shortcut key to directly enter the U disk installation system. The shortcut key for the Colorful motherboard to start the U disk with one click is ESC or F11. First, use Black Shark Installation Master to create a Black Shark U disk boot disk, and then turn on the computer. When you see the startup screen, continuously press the ESC or F11 key on the keyboard to enter a window for sequential selection of startup items. Move the cursor to the place where "USB" is displayed, and then
 The driver cannot be loaded on this device. How to solve it? (Personally tested and valid)
Mar 14, 2024 pm 09:00 PM
The driver cannot be loaded on this device. How to solve it? (Personally tested and valid)
Mar 14, 2024 pm 09:00 PM
Everyone knows that if the computer cannot load the driver, the device may not work properly or interact with the computer correctly. So how do we solve the problem when a prompt box pops up on the computer that the driver cannot be loaded on this device? The editor below will teach you two ways to easily solve the problem. Unable to load the driver on this device Solution 1. Search for "Kernel Isolation" in the Start menu. 2. Turn off Memory Integrity, and it will prompt "Memory Integrity has been turned off. Your device may be vulnerable." Click behind to ignore it, and it will not affect the use. 3. The problem can be solved after restarting the machine.
 How to solve the problem of automatically saving pictures when publishing on Xiaohongshu? Where is the automatically saved image when posting?
Mar 22, 2024 am 08:06 AM
How to solve the problem of automatically saving pictures when publishing on Xiaohongshu? Where is the automatically saved image when posting?
Mar 22, 2024 am 08:06 AM
With the continuous development of social media, Xiaohongshu has become a platform for more and more young people to share their lives and discover beautiful things. Many users are troubled by auto-save issues when posting images. So, how to solve this problem? 1. How to solve the problem of automatically saving pictures when publishing on Xiaohongshu? 1. Clear the cache First, we can try to clear the cache data of Xiaohongshu. The steps are as follows: (1) Open Xiaohongshu and click the "My" button in the lower right corner; (2) On the personal center page, find "Settings" and click it; (3) Scroll down and find the "Clear Cache" option. Click OK. After clearing the cache, re-enter Xiaohongshu and try to post pictures to see if the automatic saving problem is solved. 2. Update the Xiaohongshu version to ensure that your Xiaohongshu
 How to recover deleted contacts on WeChat (simple tutorial tells you how to recover deleted contacts)
May 01, 2024 pm 12:01 PM
How to recover deleted contacts on WeChat (simple tutorial tells you how to recover deleted contacts)
May 01, 2024 pm 12:01 PM
Unfortunately, people often delete certain contacts accidentally for some reasons. WeChat is a widely used social software. To help users solve this problem, this article will introduce how to retrieve deleted contacts in a simple way. 1. Understand the WeChat contact deletion mechanism. This provides us with the possibility to retrieve deleted contacts. The contact deletion mechanism in WeChat removes them from the address book, but does not delete them completely. 2. Use WeChat’s built-in “Contact Book Recovery” function. WeChat provides “Contact Book Recovery” to save time and energy. Users can quickly retrieve previously deleted contacts through this function. 3. Enter the WeChat settings page and click the lower right corner, open the WeChat application "Me" and click the settings icon in the upper right corner to enter the settings page.
 The secret of hatching mobile dragon eggs is revealed (step by step to teach you how to successfully hatch mobile dragon eggs)
May 04, 2024 pm 06:01 PM
The secret of hatching mobile dragon eggs is revealed (step by step to teach you how to successfully hatch mobile dragon eggs)
May 04, 2024 pm 06:01 PM
Mobile games have become an integral part of people's lives with the development of technology. It has attracted the attention of many players with its cute dragon egg image and interesting hatching process, and one of the games that has attracted much attention is the mobile version of Dragon Egg. To help players better cultivate and grow their own dragons in the game, this article will introduce to you how to hatch dragon eggs in the mobile version. 1. Choose the appropriate type of dragon egg. Players need to carefully choose the type of dragon egg that they like and suit themselves, based on the different types of dragon egg attributes and abilities provided in the game. 2. Upgrade the level of the incubation machine. Players need to improve the level of the incubation machine by completing tasks and collecting props. The level of the incubation machine determines the hatching speed and hatching success rate. 3. Collect the resources required for hatching. Players need to be in the game
 Quickly master: How to open two WeChat accounts on Huawei mobile phones revealed!
Mar 23, 2024 am 10:42 AM
Quickly master: How to open two WeChat accounts on Huawei mobile phones revealed!
Mar 23, 2024 am 10:42 AM
In today's society, mobile phones have become an indispensable part of our lives. As an important tool for our daily communication, work, and life, WeChat is often used. However, it may be necessary to separate two WeChat accounts when handling different transactions, which requires the mobile phone to support logging in to two WeChat accounts at the same time. As a well-known domestic brand, Huawei mobile phones are used by many people. So what is the method to open two WeChat accounts on Huawei mobile phones? Let’s reveal the secret of this method. First of all, you need to use two WeChat accounts at the same time on your Huawei mobile phone. The easiest way is to
