

Detailed explanation of SpringMVC

In this series of tutorials, we will introduce SpringMVC in detail. I believe that after completing this series of tutorials, you will be able to use it freely in actual development.
1. What is SpringMVC?
Before introducing what SpringMVC is, let’s first take a look at the basic architecture of Spring. As shown below:
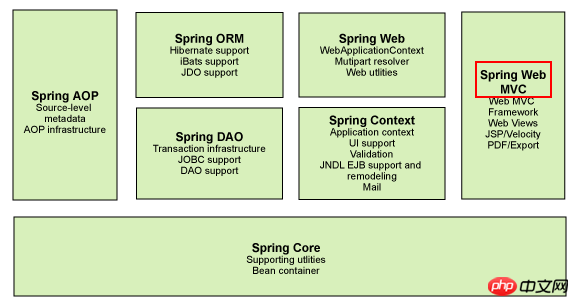
We can see that in the basic architecture of Spring, the Spring Web MVC circled in red is the protagonist of this series, SpringMVC, which belongs to Spring It is a component of the basic architecture and is a follow-up product of SpringFrameWork. It has been integrated into Spring Web Flow, so when we integrate it with Spring later, there is almost no need for any other configuration.
SpringMVC is an MVC framework similar to Struts2. In actual development, it receives the browser's request response, processes the data, and then returns the page for display, but it is much easier to get started than Struts2. And due to the security issues exposed by Struts2, SpringMVC has become the preferred framework for most enterprises.
Without saying much, let’s take a look at the magic of SpringMVC directly through an example.
ps: Download link for the source code of this blog: http://pan.baidu.com/s/1c1OJi5E Password: 9hnc
2. Create a web project and Import the corresponding jar package.
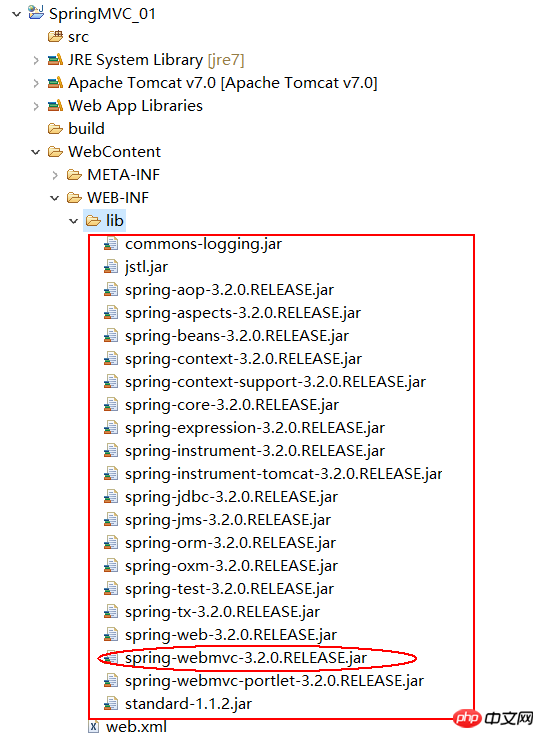
Here we have added all the jar packages of Spring 3.2, which just proves that SpringMVC mentioned above is part of the Spring architecture. Note: it must be circled in red ovals spring-webmvc-3.2.0.RELEASE.jar
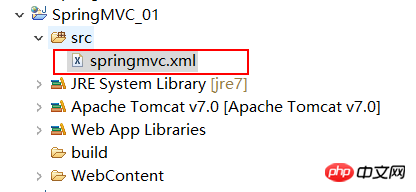
3. Create a new SpringMVC global configuration file
Create a new springmvc.xml file in the src directory and add the following Code:
<?xml version="1.0" encoding="UTF-8"?>
<beans xmlns="http://www.springframework.org/schema/beans"
       xmlns:xsi="http://www.w3.org/2001/XMLSchema-instance"
       xmlns:mvc="http://www.springframework.org/schema/mvc"
       xmlns:context="http://www.springframework.org/schema/context"
       xmlns:aop="http://www.springframework.org/schema/aop"
       xmlns:tx="http://www.springframework.org/schema/tx"
       xsi:schemaLocation="http://www.springframework.org/schema/beans
        http://www.springframework.org/schema/beans/spring-beans-4.2.xsd
        http://www.springframework.org/schema/mvc
        http://www.springframework.org/schema/mvc/spring-mvc-4.2.xsd
        http://www.springframework.org/schema/context
        http://www.springframework.org/schema/context/spring-context.xsd
        http://www.springframework.org/schema/aop
        http://www.springframework.org/schema/aop/spring-aop-4.2.xsd
        http://www.springframework.org/schema/tx
        http://www.springframework.org/schema/tx/spring-tx.xsd">


</beans>
4. Configure the front-end filter in the web.xml file
<?xml version="1.0" encoding="UTF-8"?>
<web-app xmlns:xsi="http://www.w3.org/2001/XMLSchema-instance"
	 xmlns="http://java.sun.com/xml/ns/javaee"
	 xsi:schemaLocation="http://java.sun.com/xml/ns/javaee
	 http://java.sun.com/xml/ns/javaee/web-app_3_0.xsd" id="WebApp_ID" version="3.0">
  <display-name>SpringMVC_01</display-name>
  <!-- 配置前端控制器DispatcherServlet -->
  <servlet>
    <servlet-name>springmvc</servlet-name>
    <servlet-class>org.springframework.web.servlet.DispatcherServlet</servlet-class>
    <init-param>
        <param-name>contextConfigLocation</param-name>
        <!-- 对应上一步创建全局配置文件的文件名以及目录 -->
        <param-value>classpath:springmvc.xml</param-value>
    </init-param>
  </servlet>

  <servlet-mapping>
    <servlet-name>springmvc</servlet-name>
    <url-pattern>*.do</url-pattern>
  </servlet-mapping>
</web-app>
5. Write the processor Handler
package com.ys.controller;

import javax.servlet.http.HttpServletRequest;
import javax.servlet.http.HttpServletResponse;

import org.springframework.web.servlet.ModelAndView;
import org.springframework.web.servlet.mvc.Controller;

public class HelloController implements Controller{

	@Override
	public ModelAndView handleRequest(HttpServletRequest request,
			HttpServletResponse response) throws Exception {
		ModelAndView modelView = new ModelAndView();
		//类似于 request.setAttribute()
		modelView.addObject("name","张三");
		modelView.setViewName("/WEB-INF/view/index.jsp");
		return modelView;
	}

}
6. Configure Handler, processor mapper, processor adapter, and attempt parser in the springmvc.xml file
In springmvc.xml Add the following code to the file:
<!-- 配置Handler -->
<bean name="/hello.do" class="com.ys.controller.HelloController" />
   <!-- 配置处理器映射器
   	将bean的name作为url进行查找,需要在配置Handler时指定bean name(就是url)-->
<bean class="org.springframework.web.servlet.handler.BeanNameUrlHandlerMapping" />
   <!-- 配置处理器适配器,所有适配器都得实现 HandlerAdapter接口 -->
   <bean class="org.springframework.web.servlet.mvc.SimpleControllerHandlerAdapter" />

<!-- 配置视图解析器
   	进行jsp解析,默认使用jstl标签,classpath下得有jstl的包-->
<bean class="org.springframework.web.servlet.view.InternalResourceViewResolver" />
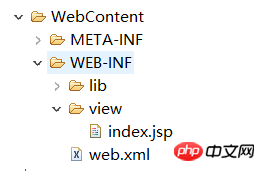
7. Create the index.jsp file in the /WEB-INF/view directory
<%@ page language="java" contentType="text/html; charset=UTF-8"
pageEncoding="UTF-8"%>
<!DOCTYPE html PUBLIC "-//W3C//DTD HTML 4.01 Transitional//EN" "http://www.w3.org/TR/html4/loose.dtd">
<html>
<head>
<meta http-equiv="Content-Type" content="text/html; charset=UTF-8">
<title>Insert title here</title>
</head>
<body>
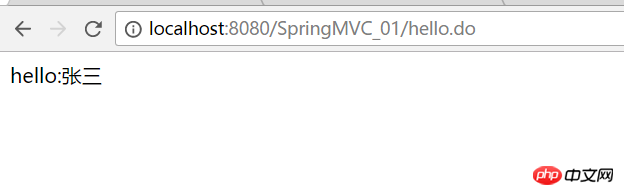
hello:${name}
</body>
</html>
8. Enter http://localhost:8080/SpringMVC_01/hello.do in the browser
Following the above steps, I believe you have built a simple instance of SpringMVC, so why do you write it like this? Please see the next blog for breakdown! ! !
The above is the detailed content of Detailed explanation of SpringMVC. For more information, please follow other related articles on the PHP Chinese website!

Hot AI Tools

Undresser.AI Undress
AI-powered app for creating realistic nude photos

AI Clothes Remover
Online AI tool for removing clothes from photos.

Undress AI Tool
Undress images for free

Clothoff.io
AI clothes remover

Video Face Swap
Swap faces in any video effortlessly with our completely free AI face swap tool!

Hot Article
Hot Tools

Notepad++7.3.1
Easy-to-use and free code editor

SublimeText3 Chinese version
Chinese version, very easy to use

Zend Studio 13.0.1
Powerful PHP integrated development environment

Dreamweaver CS6
Visual web development tools

SublimeText3 Mac version
God-level code editing software (SublimeText3)
Hot Topics
 1387
1387
 52
52

 Detailed explanation of obtaining administrator rights in Win11
Mar 08, 2024 pm 03:06 PM
Detailed explanation of obtaining administrator rights in Win11
Mar 08, 2024 pm 03:06 PM
Windows operating system is one of the most popular operating systems in the world, and its new version Win11 has attracted much attention. In the Win11 system, obtaining administrator rights is an important operation. Administrator rights allow users to perform more operations and settings on the system. This article will introduce in detail how to obtain administrator permissions in Win11 system and how to effectively manage permissions. In the Win11 system, administrator rights are divided into two types: local administrator and domain administrator. A local administrator has full administrative rights to the local computer
 Detailed explanation of the mode function in C++
Nov 18, 2023 pm 03:08 PM
Detailed explanation of the mode function in C++
Nov 18, 2023 pm 03:08 PM
Detailed explanation of the mode function in C++ In statistics, the mode refers to the value that appears most frequently in a set of data. In C++ language, we can find the mode in any set of data by writing a mode function. The mode function can be implemented in many different ways, two of the commonly used methods will be introduced in detail below. The first method is to use a hash table to count the number of occurrences of each number. First, we need to define a hash table with each number as the key and the number of occurrences as the value. Then, for a given data set, we run
 Detailed explanation of division operation in Oracle SQL
Mar 10, 2024 am 09:51 AM
Detailed explanation of division operation in Oracle SQL
Mar 10, 2024 am 09:51 AM
Detailed explanation of division operation in OracleSQL In OracleSQL, division operation is a common and important mathematical operation, used to calculate the result of dividing two numbers. Division is often used in database queries, so understanding the division operation and its usage in OracleSQL is one of the essential skills for database developers. This article will discuss the relevant knowledge of division operations in OracleSQL in detail and provide specific code examples for readers' reference. 1. Division operation in OracleSQL
 Comparison and difference analysis between SpringBoot and SpringMVC
Dec 29, 2023 am 11:02 AM
Comparison and difference analysis between SpringBoot and SpringMVC
Dec 29, 2023 am 11:02 AM
SpringBoot and SpringMVC are both commonly used frameworks in Java development, but there are some obvious differences between them. This article will explore the features and uses of these two frameworks and compare their differences. First, let's learn about SpringBoot. SpringBoot was developed by the Pivotal team to simplify the creation and deployment of applications based on the Spring framework. It provides a fast, lightweight way to build stand-alone, executable
 Detailed explanation of remainder function in C++
Nov 18, 2023 pm 02:41 PM
Detailed explanation of remainder function in C++
Nov 18, 2023 pm 02:41 PM
Detailed explanation of the remainder function in C++ In C++, the remainder operator (%) is used to calculate the remainder of the division of two numbers. It is a binary operator whose operands can be any integer type (including char, short, int, long, etc.) or a floating-point number type (such as float, double). The remainder operator returns a result with the same sign as the dividend. For example, for the remainder operation of integers, we can use the following code to implement: inta=10;intb=3;
 Detailed explanation of the usage of Vue.nextTick function and its application in asynchronous updates
Jul 26, 2023 am 08:57 AM
Detailed explanation of the usage of Vue.nextTick function and its application in asynchronous updates
Jul 26, 2023 am 08:57 AM
Detailed explanation of the usage of Vue.nextTick function and its application in asynchronous updates. In Vue development, we often encounter situations where data needs to be updated asynchronously. For example, data needs to be updated immediately after modifying the DOM or related operations need to be performed immediately after the data is updated. The .nextTick function provided by Vue emerged to solve this type of problem. This article will introduce the usage of the Vue.nextTick function in detail, and combine it with code examples to illustrate its application in asynchronous updates. 1. Vue.nex
 Detailed explanation of the role and usage of PHP modulo operator
Mar 19, 2024 pm 04:33 PM
Detailed explanation of the role and usage of PHP modulo operator
Mar 19, 2024 pm 04:33 PM
The modulo operator (%) in PHP is used to obtain the remainder of the division of two numbers. In this article, we will discuss the role and usage of the modulo operator in detail, and provide specific code examples to help readers better understand. 1. The role of the modulo operator In mathematics, when we divide an integer by another integer, we get a quotient and a remainder. For example, when we divide 10 by 3, the quotient is 3 and the remainder is 1. The modulo operator is used to obtain this remainder. 2. Usage of the modulo operator In PHP, use the % symbol to represent the modulus
 Detailed explanation of the linux system call system() function
Feb 22, 2024 pm 08:21 PM
Detailed explanation of the linux system call system() function
Feb 22, 2024 pm 08:21 PM
Detailed explanation of Linux system call system() function System call is a very important part of the Linux operating system. It provides a way to interact with the system kernel. Among them, the system() function is one of the commonly used system call functions. This article will introduce the use of the system() function in detail and provide corresponding code examples. Basic Concepts of System Calls System calls are a way for user programs to interact with the operating system kernel. User programs request the operating system by calling system call functions
