

Examples of text center alignment components in vue widgets

After many months, I continue to learn Vue. This time it is the production process of a component
Let us first take a look at the expectations of the component Effect
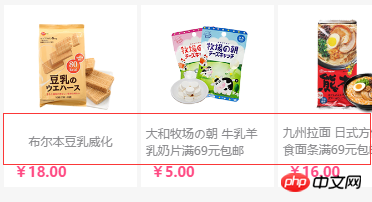
The picture above is a screenshot of a certain part of a WeChat mall operated by the company. You can see that there is a lot of text in the red box. Rows and single lines are centered and aligned. What we have to do now is to use Vue to make the text module inside into a reusable component.
First we take down the css part
css:
.word-v-middle{
margin-bottom: 0;
font-size: 12px;
min-height: 31px;
display: flex;
align-items: center;
justify-content: center;
height: 31px;
margin-top: 5px;
color: #87878a;
white-space: normal;}
.word-v-middle span{
text-align: left;
font-size: 10px;
text-overflow: -o-ellipsis-lastline;
overflow: hidden;
text-overflow: ellipsis;
display: -webkit-box;
-webkit-line-clamp: 2;
-webkit-box-orient: vertical;
}The top is the core css of the component, which is the css that centers the text up and down , then we first encapsulate it into a Vue component
html part
<p class="word-v-middle"><span>文字内容</span></p>
We first register this part as a component, here we use the local registration method of the component
var wordMiddle = {
  template:'<p class="word-v-middle"><span>文字内容</span></p>',
};After instantiation
html:
<p id="exp">
  <word-v-middle></word-v-middle>
</p>
js:
new Vue({
  el:"#exp",
  components:{
    'word-v-middle':wordMiddle
  }
});In this way, even if the first step is completed, the rendering is as follows

The second step is to bind dynamic data to the component. We first add a props method when the component is registered so that the component can accept data, and then use the data method to add data to the component
var wordMiddle = {
template:'<p class="word-v-middle"><span>{{msg}}</span></p>',
props:['data'],
data:function(){
return {
msg:this.data
};
}
};In this way, our component can receive data and bind the data to the content. The code during instantiation should also be changed accordingly
html part
<p id="exp"> <word-v-middle :data='aaa' ></word-v-middle> </p>
js part
new Vue({
  el:"#exp",
  data:{
    aaa:'hello',
  },
  components:{
    'word-v-middle':wordMiddle
  }
})The single dynamic data component is now complete, but this alignment method is generally used in projects with multi-column block structures, so we will write another multi-column example and use a loop. Bind multiple data
css part
#example2{
  width: 100%;
  overflow: hidden;
}
#example2 p{
  float: left;
  width: 25%;
}html part
<p id="example2"> <p v-for='aaa in sites'> <word-v-middle :data='aaa' ></word-v-middle> </p> </p>
js part
new Vue({
el:"#example2",
data:{
sites:[
"洗发水洗发水洗发水",
"洗发水洗发水",
"洗发水洗发水洗发水洗发水洗发水",
        "洗发水洗发水",
       ]
    },  components:{
    'word-v-middle':wordMiddle
    }})
The effect is as shown above , in the above code, the css part is to make the code into four parallel columns. The v-for method is used in html to loop data, and the data output by the loop is received through: data='aaa' in the component, and the source of the data is the parent element The array named sites in the data being instantiated. In the actual project, the binding of the background data can be achieved by replacing the data in the sites with the array output by the background.
The above is the detailed content of Examples of text center alignment components in vue widgets. For more information, please follow other related articles on the PHP Chinese website!

Hot AI Tools

Undresser.AI Undress
AI-powered app for creating realistic nude photos

AI Clothes Remover
Online AI tool for removing clothes from photos.

Undress AI Tool
Undress images for free

Clothoff.io
AI clothes remover

Video Face Swap
Swap faces in any video effortlessly with our completely free AI face swap tool!

Hot Article
Hot Tools

Notepad++7.3.1
Easy-to-use and free code editor

SublimeText3 Chinese version
Chinese version, very easy to use

Zend Studio 13.0.1
Powerful PHP integrated development environment

Dreamweaver CS6
Visual web development tools

SublimeText3 Mac version
God-level code editing software (SublimeText3)
Hot Topics
 1386
1386
 52
52

 How to make round pictures and text in ppt
Mar 26, 2024 am 10:23 AM
How to make round pictures and text in ppt
Mar 26, 2024 am 10:23 AM
First, draw a circle in PPT, then insert a text box and enter text content. Finally, set the fill and outline of the text box to None to complete the production of circular pictures and text.
 How to add dots to text in word?
Mar 19, 2024 pm 08:04 PM
How to add dots to text in word?
Mar 19, 2024 pm 08:04 PM
When we create Word documents on a daily basis, we sometimes need to add dots under certain words in the document, especially when there are test questions. To highlight this part of the content, the editor will share with you the tips on how to add dots to text in Word. I hope it can help you. 1. Open a blank word document. 2. For example, add dots under the words "How to add dots to text". 3. We first select the words "How to add dots to text" with the left mouse button. Note that if you want to add dots to that word in the future, you must first use the left button of the mouse to select which word. Today we are adding dots to these words, so we have chosen several words. Select these words, right-click, and click Font in the pop-up function box. 4. Then something like this will appear
 Golang Image Processing: Learn How to Add Watermarks and Text
Aug 17, 2023 am 08:41 AM
Golang Image Processing: Learn How to Add Watermarks and Text
Aug 17, 2023 am 08:41 AM
Golang Image Processing: Learn How to Add Watermarks and Text Quotes: In the modern era of digitalization and social media, image processing has become an important skill. Whether for personal use or business operations, adding watermarks and text are common needs. In this article, we will explore how to use Golang for image processing and learn how to add watermarks and text. Background: Golang is an open source programming language known for its concise syntax, efficient performance and powerful concurrency capabilities. it has become the subject of many developments
 C++ object layout is aligned with memory to optimize memory usage efficiency
Jun 05, 2024 pm 01:02 PM
C++ object layout is aligned with memory to optimize memory usage efficiency
Jun 05, 2024 pm 01:02 PM
C++ object layout and memory alignment optimize memory usage efficiency: Object layout: data members are stored in the order of declaration, optimizing space utilization. Memory alignment: Data is aligned in memory to improve access speed. The alignas keyword specifies custom alignment, such as a 64-byte aligned CacheLine structure, to improve cache line access efficiency.
 How to modify text on pictures
Aug 29, 2023 am 10:29 AM
How to modify text on pictures
Aug 29, 2023 am 10:29 AM
Modifying the text on the image can be done by using image editing software, online tools or screenshot tools. The specific steps are: 1. Open the picture editing software and import the picture that needs to be modified; 2. Select the text tool; 3. Click the text area on the picture to create a text box; 4. Enter the text you want in the text box. 5. If you just want to delete the text on the picture, you can use the eraser tool or the selection tool to select and delete the text area.
 How to set WPS table centering
Mar 19, 2024 pm 09:34 PM
How to set WPS table centering
Mar 19, 2024 pm 09:34 PM
As the functions of WPS become more and more powerful, we encounter more and more problems about the use of functions. In WPS, we often use WPS tables. If we need to print the WPS table, in order to make the table look beautiful, we need to center the table at this time. So, the question is, how do we center the WPS table? Today I am sharing a tutorial here, I hope it can help you! Step details: 1. I will explain it through practical operations. The following is a simple table I made using a WPS table. 2. Through print preview, we can find that the WPS table is on the left by default. What if we want to center the table? 3. At this time, we need to click [Page Layout] in the [Toolbar]
 Detailed method for setting up PPT slides by moving the mouse to text to display pictures
Mar 26, 2024 pm 03:40 PM
Detailed method for setting up PPT slides by moving the mouse to text to display pictures
Mar 26, 2024 pm 03:40 PM
1. First set a custom animation for the picture object. 2. If you want to make the effect more realistic, please use the animation effect [Appear] as shown above. After setting the custom effect for the picture object, we will see the name of the custom animation on the right side of the window, such as [1good] in the picture. Now use the left button of the mouse to click on the small triangle facing downwards in the direction of the picture, and a pop-up will appear as follows Figure menu list. 3. In the menu shown above, select [Effect Options], and a pop-up will appear as shown in the picture. 4. In the picture above, switch to the [Timing] tab, click [Trigger], then select [Start the effect when the following objects are clicked] below, and select [Title 1: Picture 1] on the right. This setting means that when playing the slideshow, click on the text in [Picture 1], and it will
 Semantic role annotation issues in text semantic understanding technology
Oct 08, 2023 am 09:53 AM
Semantic role annotation issues in text semantic understanding technology
Oct 08, 2023 am 09:53 AM
The problem of semantic role annotation in text semantic understanding technology requires specific code examples. Introduction In the field of natural language processing, text semantic understanding technology is a core task. Among them, semantic role annotation is an important technology, which is used to identify the semantic role of each word in the sentence in the context. This article will introduce the concepts and challenges of semantic role annotation and provide a concrete code example to solve the problem. 1. What is semantic role labeling? Semantic role labeling (SemanticRoleLabeling) refers to sentences
