

Example showing DIV+CSS implementation of radio station list
This article mainly introduces the sample code of p+CSS to implement radio station list design. The editor thinks it is quite good, so I will share it with you now and give it as a reference. Let’s follow the editor and take a look
CSS Spite technology: that is, CSS sprite technology. In fact, CSS sprites are icon elements in pictures. These icons can make buttons, labels, logos, etc. . This technology has been applied to many websites, which can effectively reduce the number of transmission requests. The required icons are summarized in one image, and can be applied to the entire page once downloaded
The following examples are mainly the application of CSS wizard technology. Direct Po code:
<!DOCTYPE html>
<html>
<head>
<meta charset="utf-8">
<title>酷狗电台列表设计</title>
<style>
#frm{
margin:0;
padding:0;
list-style-type: none;
width: 500px;
border:1px solid #000;
overflow: hidden;
}
#frm *{
margin:0;
padding: 0;
font-size: 12px;
}
#frm li{
padding:4px 0;
width: 47%;
float: left;
margin:5px 15px 5px 0;
cursor: pointer;
}
#frm li span{
color:#999;
position: relative;
}
#frm li .d{
width: 38px;
height: 38px;
float: left;
margin:0px 12px 6px 0;
background-image: url(img/spite2.jpg);
position: relative;
}
#frm li .cont{
position: relative;
height: 37px;
overflow: hidden;
}
.cont p{
margin:5px 0 5px 0;
}
.d p{
position: absolute;
width: 100%;
height: 100%;
}
.d .img,.d .play{
background-image: url(img/spite2.jpg);
}
.l1 .d .img{
background-position: 38px 0;
}
.l2 .d .img{
background-position: 76px 0;
}
.l3 .d .img{
background-position: 114px 0;
}
.l4 .d .img{
background-position: 152px 0;
}
.l5 .d .img{
background-position: 190px 0;
}
.l6 .d .img{
background-position: 228px 0;
}
.l7 .d .img{
background-position: 266px 0;
}
.l8 .d .img{
background-position: 304px 0;
}
.l9 .d .img{
background-position: 342px 0;
}
.ll .d .img{
background-position: 380px 0;
}
.d .mask,.d .play{
visibility: hidden;
}
.choose .d{
background-position: 38px 0;
outline: 1px solid rgb(233,243,250);
}
.choose .d .mask{
background-color: #000;
filter:alpha(Opacity=50);
opacity: 0.5;
height: 32px;
width: 32px;
top:3px;
left: 3px;
visibility: visible;
}
.choose .d .play{
background-position: 418px 0;
visibility: visible;
}
.choose .cont p{
font-weight: bold;
color:rgb(0,155,250);
}
</style>
<script>
function mouseoverhandle(obj){
obj.className += ' choose';
}
function mouseouthandle(obj){
obj.className = obj.className.substring(0,2);
}
</script>
</head>
<body>
<ul id="frm">
<li class="l1" onmouseover="mouseoverhandle(this)" onmouseout="mouseouthandle(this)">
<p class="d">
<p class="img"></p>
<p class="mask"></p>
<p class="play"></p>
</p>
<p class="cont">
<p>酷狗热歌</p>
<span href="#">徐朗 - 小夜曲</span>
</p>
</li>
<li class="l2" onmouseover="mouseoverhandle(this)" onmouseout="mouseouthandle(this)">
<p class="d">
<p class="img"></p>
<p class="mask"></p>
<p class="play"></p>
</p>
<p class="cont">
<p>DJ热碟</p>
<span href="#">曾春年 - 最幸福的人</span>
</p>
</li>
<li class="l3" onmouseover="mouseoverhandle(this)" onmouseout="mouseouthandle(this)">
<p class="d">
<p class="img"></p>
<p class="mask"></p>
<p class="play"></p>
</p>
<p class="cont">
<p>网络红歌</p>
<span href="#">徐志强 - 想你的时候</span>
</p>
</li>
<li class="l4" onmouseover="mouseoverhandle(this)" onmouseout="mouseouthandle(this)">
<p class="d">
<p class="img"></p>
<p class="mask"></p>
<p class="play"></p>
</p>
<p class="cont">
<p>新歌</p>
<span href="#">孙俪 - 美丽信号</span>
</p>
</li>
<li class="l5" onmouseover="mouseoverhandle(this)" onmouseout="mouseouthandle(this)">
<p class="d">
<p class="img"></p>
<p class="mask"></p>
<p class="play"></p>
</p>
<p class="cont">
<p>经典</p>
<span href="#">游鸿明 - 寻你</span>
</p>
</li>
<li class="l6" onmouseover="mouseoverhandle(this)" onmouseout="mouseouthandle(this)">
<p class="d">
<p class="img"></p>
<p class="mask"></p>
<p class="play"></p>
</p>
<p class="cont">
<p>怀旧粤语</p>
<span href="#">陈慧娴 - 人生何处不相逢</span>
</p>
</li>
<li class="l7" onmouseover="mouseoverhandle(this)" onmouseout="mouseouthandle(this)">
<p class="d">
<p class="img"></p>
<p class="mask"></p>
<p class="play"></p>
</p>
<p class="cont">
<p>钢琴</p>
<span href="#">July - My Soul</span>
</p>
</li>
<li class="l8" onmouseover="mouseoverhandle(this)" onmouseout="mouseouthandle(this)">
<p class="d">
<p class="img"></p>
<p class="mask"></p>
<p class="play"></p>
</p>
<p class="cont">
<p>KTV必点</p>
<span href="#">蔡健雅 - 无底洞</span>
</p>
</li>
<li class="l9" onmouseover="mouseoverhandle(this)" onmouseout="mouseouthandle(this)">
<p class="d">
<p class="img"></p>
<p class="mask"></p>
<p class="play"></p>
</p>
<p class="cont">
<p>思念</p>
<span href="#">张杰 - 这就是爱</span>
</p>
</li>
<li class="ll" onmouseover="mouseoverhandle(this)" onmouseout="mouseouthandle(this)">
<p class="d">
<p class="img"></p>
<p class="mask"></p>
<p class="play"></p>
</p>
<p class="cont">
<p>DJ外文舞曲</p>
<span href="#">Jean Cloud Ades</span>
</p>
</li>
</ul>
<script>
var ul = document.getElementById('frm');
var li = document.getElementsByTagName('li');
var spans;
for(var i=0;i<li.length;i++){
spans = li[i].getElementsByTagName('span');
li[i].span_obj = spans[0];
}
var index = -1;
function showup(){
if(li[index].span_obj.style.top == ''){
li[index].span_obj.style.top = '13px';
}
if(parseInt(li[index].span_obj.style.top)<=0){
li[index].span_obj.style.top = '';
setTimeout('shownext()',1000);
}else{
li[index].span_obj.style.top = parseInt(li[index].span_obj.style.top)-1 +'px';
setTimeout('showup()',100);
}
}
function shownext(){
index++;
index = index%li.length;
showup();
}
setTimeout(shownext,1000);
</script>
</body>
</html>Generation effect:
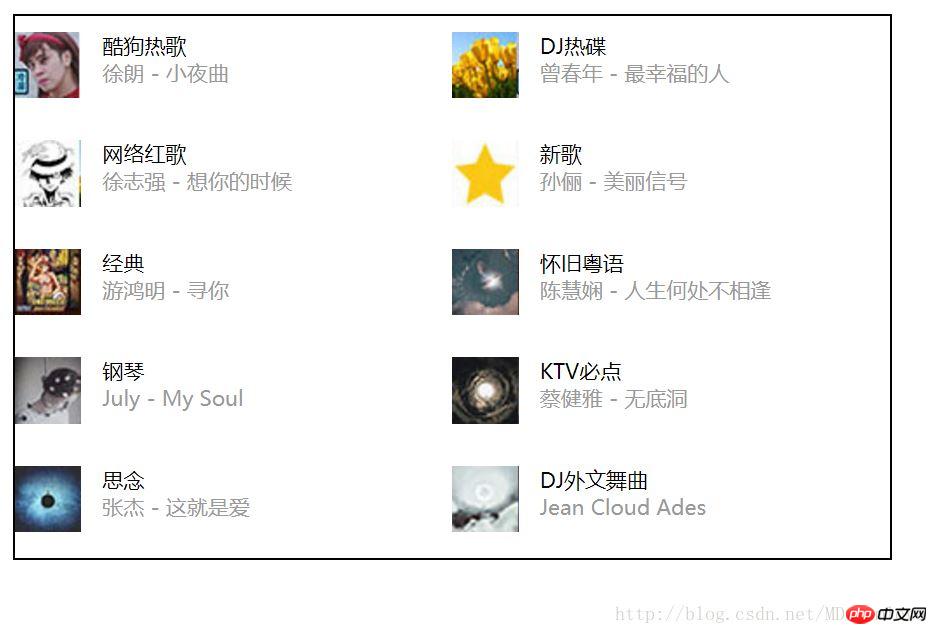
## Code analysis:
1.ul tag contains 10 li tags inside. Because the icon of each li tag is a different sub-picture, different class attributes are added to each li tag. 2. The p tag whose class attribute is d for each li tag contains three p tags. Their class attributes are img, mask and play. These three tags are theme icon, mask in turn. icon and play icon, and their parent node p (class attribute is d) has a background image as a border. 3. Each li tag has added onmouseover and onmouseout event response letters. 4. The last piece of js code is to simulate the effect of the song name rising when the music box switches songs. First, the program obtains the tag with the id of frm, and obtains all li sub-tags of the tag. At the same time, it obtains all li span tags, and binds the first span tag to span_obj of the li tag object. Two timeout functions: showext() and showup(). The showup() function is responsible for producing the song title raising effect, and the function showext() is responsible for switching to the playback of the song on the next music station. The method of an object cannot set itself as a timeout functionThe above is the detailed content of Example showing DIV+CSS implementation of radio station list. For more information, please follow other related articles on the PHP Chinese website!

Hot AI Tools

Undresser.AI Undress
AI-powered app for creating realistic nude photos

AI Clothes Remover
Online AI tool for removing clothes from photos.

Undress AI Tool
Undress images for free

Clothoff.io
AI clothes remover

AI Hentai Generator
Generate AI Hentai for free.

Hot Article
Hot Tools

Notepad++7.3.1
Easy-to-use and free code editor

SublimeText3 Chinese version
Chinese version, very easy to use

Zend Studio 13.0.1
Powerful PHP integrated development environment

Dreamweaver CS6
Visual web development tools

SublimeText3 Mac version
God-level code editing software (SublimeText3)
Hot Topics
 1385
1385
 52
52

 How to use bootstrap in vue
Apr 07, 2025 pm 11:33 PM
How to use bootstrap in vue
Apr 07, 2025 pm 11:33 PM
Using Bootstrap in Vue.js is divided into five steps: Install Bootstrap. Import Bootstrap in main.js. Use the Bootstrap component directly in the template. Optional: Custom style. Optional: Use plug-ins.
 The Roles of HTML, CSS, and JavaScript: Core Responsibilities
Apr 08, 2025 pm 07:05 PM
The Roles of HTML, CSS, and JavaScript: Core Responsibilities
Apr 08, 2025 pm 07:05 PM
HTML defines the web structure, CSS is responsible for style and layout, and JavaScript gives dynamic interaction. The three perform their duties in web development and jointly build a colorful website.
 How to write split lines on bootstrap
Apr 07, 2025 pm 03:12 PM
How to write split lines on bootstrap
Apr 07, 2025 pm 03:12 PM
There are two ways to create a Bootstrap split line: using the tag, which creates a horizontal split line. Use the CSS border property to create custom style split lines.
 Understanding HTML, CSS, and JavaScript: A Beginner's Guide
Apr 12, 2025 am 12:02 AM
Understanding HTML, CSS, and JavaScript: A Beginner's Guide
Apr 12, 2025 am 12:02 AM
WebdevelopmentreliesonHTML,CSS,andJavaScript:1)HTMLstructurescontent,2)CSSstylesit,and3)JavaScriptaddsinteractivity,formingthebasisofmodernwebexperiences.
 How to resize bootstrap
Apr 07, 2025 pm 03:18 PM
How to resize bootstrap
Apr 07, 2025 pm 03:18 PM
To adjust the size of elements in Bootstrap, you can use the dimension class, which includes: adjusting width: .col-, .w-, .mw-adjust height: .h-, .min-h-, .max-h-
 How to set up the framework for bootstrap
Apr 07, 2025 pm 03:27 PM
How to set up the framework for bootstrap
Apr 07, 2025 pm 03:27 PM
To set up the Bootstrap framework, you need to follow these steps: 1. Reference the Bootstrap file via CDN; 2. Download and host the file on your own server; 3. Include the Bootstrap file in HTML; 4. Compile Sass/Less as needed; 5. Import a custom file (optional). Once setup is complete, you can use Bootstrap's grid systems, components, and styles to create responsive websites and applications.
 How to insert pictures on bootstrap
Apr 07, 2025 pm 03:30 PM
How to insert pictures on bootstrap
Apr 07, 2025 pm 03:30 PM
There are several ways to insert images in Bootstrap: insert images directly, using the HTML img tag. With the Bootstrap image component, you can provide responsive images and more styles. Set the image size, use the img-fluid class to make the image adaptable. Set the border, using the img-bordered class. Set the rounded corners and use the img-rounded class. Set the shadow, use the shadow class. Resize and position the image, using CSS style. Using the background image, use the background-image CSS property.
 How to use bootstrap button
Apr 07, 2025 pm 03:09 PM
How to use bootstrap button
Apr 07, 2025 pm 03:09 PM
How to use the Bootstrap button? Introduce Bootstrap CSS to create button elements and add Bootstrap button class to add button text
