Login and registration are the most common modules we use in web development, and they are also functions we often come into contact with in our daily lives. Through this article, I will share with you the BootStrap form function of login registration in PHP. Friends who need it can refer to it
Related recommendations: "Bootstrap Tutorial"
Preface
The previous articles briefly introduced some knowledge points about the front-end and PHP. Form submission in the front-end is a very important module. In this article I will introduce some knowledge about forms. If you have not mastered the previous content well and have not practiced a lot, I think you'd better write down all the labels first.

Project Introduction
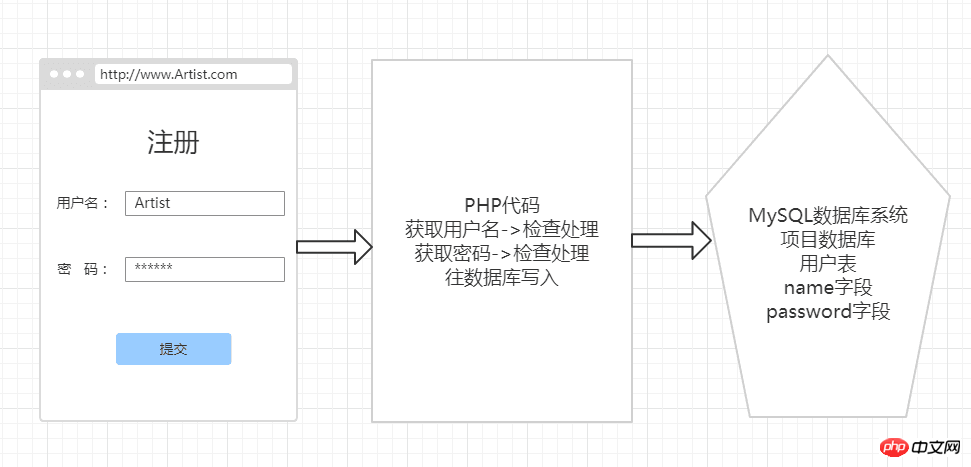
Login and registration are the most common modules we use in web development, and they are also Functions that we often come into contact with in our daily lives. The user fills in the content through the front-end form page and submits it to the backend through POST. Then, after the submitted content is processed by the PHP code, the login or registration logic continues.
Login and registration diagram


<html>
<head>
  <meta charset="UTF-8">
  <title>Register</title>
</head>
<body>
</body>
</html>

<html>
<head>
  <meta charset="UTF-8">
  <title>Register</title>
  <!-- 最新版本的 Bootstrap 核心 CSS 文件 -->
  <link rel="stylesheet" href="https://cdn.bootcss.com/bootstrap/3.3.7/css/bootstrap.min.css" integrity="sha384-BVYiiSIFeK1dGmJRAkycuHAHRg32OmUcww7on3RYdg4Va+PmSTsz/K68vbdEjh4u" crossorigin="anonymous">
</head>
<body>
</body>
</html>
<html>
<head>
  <meta charset="UTF-8">
  <title>Register</title>
  <!-- 最新版本的 Bootstrap 核心 CSS 文件 -->
  <link rel="stylesheet" href="https://cdn.bootcss.com/bootstrap/3.3.7/css/bootstrap.min.css" integrity="sha384-BVYiiSIFeK1dGmJRAkycuHAHRg32OmUcww7on3RYdg4Va+PmSTsz/K68vbdEjh4u" crossorigin="anonymous">
  <style>
    body {
     padding-top: 40px;
     padding-bottom: 40px;
     background-color: #eee;
    }

    .form-signin {
     max-width: 330px;
     padding: 15px;
     margin: 0 auto;
    }
  </style>
</head>
<body>
    <p class="container">
   <form class="form-signin" action="" method="post">
    <h2 class="form-signin-heading">Please sign in</h2>
    <label for="inputEmail" class="sr-only">Email address</label>
    <br>
    <input type="email" name="email" id="inputEmail" class="form-control" placeholder="Email address" required autofocus>
    <br>
    <label for="inputPassword" class="sr-only">Password</label>
    <input type="password" name="password" id="inputPassword" class="form-control" placeholder="Password" required>
    <br>
    <input type="submit" class="btn btn-lg btn-primary btn-block" type="submit" value="Sign in">
   </form>
  </p>
</body>
</html> ## is wrapped in CSS. If you have any doubts, you can look at Baidu one by one, or you can not write CSS first, and then Add CSS code bit by bit to see the effect. Let's analyze the form in HTML.
•The form tag ==> is used to wrap the form content and is also the starting tag of the form.
•The attribute action==>action="xxx" of the form tag fills in the file address where the PHP code for processing the form is located. After clicking the submit button, the form will send the data to this address.
•The attribute method==> of the form tag is a bit difficult to understand. Just remember to fill in post when submitting the form, method="post". If you are interested, you can check it on Baidu.
•input tag ==> Careful friends can see that input exists alone. The tag specifies the input field in which the user can enter data. The element is used within the