phpstudy usage instructions tutorial

黄舟
Release: 2021-09-16 16:02:21
Original
305401 people have browsed it

Today our php Chinese website will introduce to you the main interface introduction and button function description of the phpStudy tutorial! (Recommended topic: phpstudy usage tutorial)

Related recommendations:
1. phpstudy V8 usage video tutorial (new)
2. phpstudy usage video tutorial
3. Xiaopi panel (for linux) usage Video tutorial

1. First, the phpStudy program has been installed and ensured to run normally. Open the main interface of phpstudy. In the upper left corner, the status of the current program is displayed. Green represents running. Normal, red means abnormal or stopped state.
phpstudy usage instructions tutorial

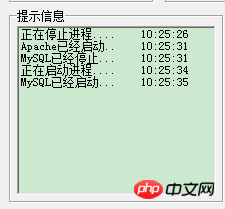
2. The prompt information is displayed under the display status, which will show you what operations you have performed on the program, or it will also explain if an abnormal problem occurs

phpstudy usage instructions tutorial

3. In the upper right corner, there are three buttons to start, stop and restart the program. In addition, right-click the mouse on the button to start Apache and MySQL separately. Or stop and restart, very convenient to use!

phpstudy usage instructions tutorial

4. There is a running mode in the lower right corner: there is system mode and non-system mode. Select the "System Mode" option, which means that after the computer is turned on, the program will run automatically in the background, which means that the system mode was selected before. Then the next time the computer is turned on, you do not need to open the phpStudy program to access the web server. Web page; the opposite is true for non-system mode

phpstudy usage instructions tutorial

##5. In the picture above, we can see that there is a green word "php version" behind the running mode. Clicking "php version" will pop up the php version and web server combination selection panel, so you can choose the combination you need!

phpstudy usage instructions tutorial## 6. At the far right of the main panel There is a "MySQL Manager" button in the lower corner, and there is also an "Other options in the menu". Let's first introduce to you a function in the "MySQL Manager" button~

When we click "mysql management When the button is pressed, the following figure will appear:

phpstudy usage instructions tutorial1. First, let’s take a look at the MySQL-Front option

MySQL-Front: Yes A database management tool! Click the MySQL-Front option to enter:

##2. The next one is the PHPmyadmin option; phpstudy usage instructions tutorial

PHPmyadmin is similar to MySQL-Front , is also a database management tool, but PHPmyadmin can achieve remote management; click the PHPmyadmin button to enter the PHPmyadmin login page:

Enter the password account, the default account password is "root" ", log in to the management page, phpstudy usage instructions tutorial

3. Next is the import and export of the MySQL database, click the "mysql import and export" button to enter the operation page: phpstudy usage instructions tutorial

As shown in the picture above, you only need to follow the above prompts to import and export the MySQL database! phpstudy usage instructions tutorial

4. The last step is site domain name management! : Manage the site website, add a new website or modify the website directory, port, etc., as shown in the figure below:

The options in "MySQL Manager" have been introduced here. ! 1phpstudy usage instructions tutorial

7. In the lower right corner of the main interface, there is an "Other Options Menu" button under "MySQL Manager". Let's start with the options!

1.My Home Page option; 1phpstudy usage instructions tutorial

My Home Page opens the default address http://localhost/ which is the same as http://127.0.0.1;

2 .View phpinfo options:

View phpinfo to display the configuration information of the php server;

1phpstudy usage instructions tutorial

3.phpMyAdmin: This is also a database manager, the same as phpMyAdmin in the MySql manager button, so I won’t introduce it here!

4.phpStudy settings selection, there are other options:

1phpstudy usage instructions tutorial

4.1 First, let’s take a look at the “Port General Settings”:

1phpstudy usage instructions tutorial

As shown in the picture above, set the default port, website directory, default document, and some settings for PHP and MySql. In addition, you can also modify the MySql password here and follow the prompts to complete. Isn’t it very simple and convenient?

4.2 Specify the default browser

1phpstudy usage instructions tutorial

As shown in the picture above, you can choose a browser you are used to!

4.3 Language selection

1phpstudy usage instructions tutorial

Just choose the language you need!

8.phpStudy extension and settings:

PHP extension, parameter switch settings, parameter value settings, Apache module settings, etc.;

1phpstudy usage instructions tutorial

9. Site domain name management:

Manage the site website, add a new website or modify the website directory, port, etc. This is the same as phpMyAdmin in the MySql manager button, so I won’t introduce it here!

10. Open the configuration file:

Open some configuration files for PHP (php.ini), Apache (httpd.conf), MySql (mysql.ini), vhosts.conf;

11. PHP version switching:

is the same as the main interface PHP version switching; I won’t introduce it here!

12. Open the file location:

You can quickly enter the phpStudy, apache, php, MySql installation directory;

13. cmd command line:

Can quickly open the CMD command line;

1phpstudy usage instructions tutorial

##14. Other advanced applications: Composer is a dependency management tool for PHP5 and above; PEAR; fpt download page, etc.;

phpstudy usage instructions tutorial

15. Environmental port detection:

Used when an exception occurs in the program or a port conflict occurs;

2phpstudy usage instructions tutorial

16. Service Manager:

is similar to the main interface or controls the start and stop of phpStudy here. I won’t introduce it here!

17. Uninstall related services:

You can uninstall phase difference services here;

18. Open hosts:

You can quickly open the hosts configuration file ;

2phpstudy usage instructions tutorial

19. MySQL Tools

2phpstudy usage instructions tutorial

The MySQL tools here are basically the same as the options in "MySQL Management" almost!

1. Set and modify the password:

2phpstudy usage instructions tutorial

Follow the prompts and your own needs~

2. Quickly create a database:

2phpstudy usage instructions tutorial

As shown in the figure, enter the database name to be created to create the database~

20. Website root directory

Yes Quickly open the website root directory;

2phpstudy usage instructions tutorial

Twenty-one: phpStudy official website:

Enter the phpStudy official website;

Twenty-two: Exit the program :

Click the button to exit the program immediately.

This is the end of the introduction to the phpStudy interface menu. I hope it can help my friends!

The above is the detailed content of phpstudy usage instructions tutorial. For more information, please follow other related articles on the PHP Chinese website!

Related labels:
source:php.cn
Statement of this Website
The content of this article is voluntarily contributed by netizens, and the copyright belongs to the original author. This site does not assume corresponding legal responsibility. If you find any content suspected of plagiarism or infringement, please contact admin@php.cn
Popular Tutorials
More>
Latest Downloads
More>
Web Effects
Website Source Code
Website Materials
Front End Template