

PHP form file iframe asynchronous upload tutorial explanation
This article mainly introduces the php form file iframe asynchronous upload example for everyone in detail. It has certain reference value. Interested friends can refer to it.
The example in this article shares the php form file with everyone. The specific code for iframe asynchronous upload is for your reference. The specific content is as follows
1. Place the iframe element in the form;
2. When the content of the file upload control changes, the JS is triggered to set the action of the form to process the file upload. img_upload_process.php file, and set the target of the form to iframe, so that the iframe can be submitted to the server for file upload;
3. After the file upload is successfully processed in img_upload_process.php, the file path that was successfully uploaded and saved is returned to Hidden fields in the form;
4. When the form submit button is clicked, JS sets the form action to the form_process.php file that receives the form data, and the target of the form is set to _self.
Form: asyn_uplaod.html
<!DOCTYPE html>
<html>
<head>
<meta charset="UTF-8">
<title>图片异步上传</title>
</head>
<body>
<!-- application/x-www-form-urlencoded 缺省编码类型 -->
<!-- multipart/form-data 多媒体传输协议 ,方法必须是post 既可以发送文本数据,也支持二进制数据上载 -->
<form action="" method="post" enctype="multipart/form-data">
用户名: <input type="text" name="username" /><br />
上传头像: <input type="file" id="avator" name="avator" onchange="startUpload(this.form)" />
<iframe frameborder='0' width='0' height='0' name="uploadframe"></iframe>
<input type="hidden" id="save_path" name="save_path" />
<span id="loading"></span> <br />
<img src="/static/imghw/default1.png" data-src="http://files.jb51.net/file_images/article/201707/2017726114715894.jpg?2017626114725" class="lazy" style="max-width:90%"PHP form file iframe asynchronous upload tutorial explanation" > <br />
<input type="submit" name="submitted" value="提交" onclick="formSubmit(this.form)" />
</form>
<script>
function startUpload(formObj){
document.getElementById('loading').innerHTML = '上传中...';
formObj.action = 'img_upload_process.php';
formObj.target = 'uploadframe';
formObj.submit();
}
function formSubmit(formObj) {
formObj.action = 'form_process.php';
formObj.target = '_self';
//清空文件上传内容,防止重复提交
var fileObj = document.getElementById('avator') ;
// for IE, Opera, Safari, Chrome
if (fileObj.outerHTML) {
fileObj.outerHTML = fileObj.outerHTML;
} else { // FF(包括3.5)
fileObj.value = "";
}
formObj.submit();
}
</script>
</body>
</html>Process file upload: img_upload_process.php
<?php
include 'Upload.class.php';
$file = $_FILES['avator'];
$upload = new Upload();//上传工具类对象
if($save_path = $upload->up($file)){//上传成功
echo <<<STR
<script>
window.parent.document.getElementById('uploaded_img').src = "$save_path";
window.parent.document.getElementById('loading').innerHTML = '上传成功';
window.parent.document.getElementById('save_path').value = "$save_path";
</script>
STR;
}else{
$error = $upload->error();
echo <<<STR
<script>
window.parent.document.getElementById('uploaded_img').src = "";
window.parent.document.getElementById('loading').innerHTML = "上传失败: $error";
</script>
STR;
}File upload tool class: Upload.class.php
<?php
class Upload{
private $path; //文件上传目录
private $max_size; //上传文件大小限制
private $errno; //错误信息号
private $mime = array('image/jpeg','image/png','image/gif');//允许上传的文件类型
/**
* 构造函数,
* @access public
* @param $path string 上传的路径
*/
public function __construct($path = './' ){
$this->path = $path;
$this->max_size = 1000000;
}
/**
* 文件上传的方法,分目录存放文件
* @access public
* @param $file array 包含上传文件信息的数组
* @return mixed 成功返回上传的文件名,失败返回false
*/
public function up($file){
//判断文件是否是通过 HTTP POST 上传,防止恶意欺骗
/*
if (! is_uploaded_file($file['tmp_name'])) {
$this->errno = 5; //设置错误信息号为5,表示非法上传
return false;
}
*/
//判断是否从浏览器端成功上传到服务器端
if ($file['error'] == 0) {
# 上传到临时文件夹成功,对临时文件进行处理
//上传类型判断
if (!in_array($file['type'], $this->mime)) {
# 类型不对
$this->errno = -1;
return false;
}
//判断文件大小
if ($file['size'] > $this->max_size) {
# 大小超出配置文件的中的上传限制
$this->errno = -2;
return false;
}
//获取存放上传文件的目录
$sub_path = date('Ymd').'/';
if (!is_dir($this->path . $sub_path)) {
# 不存在该目录,创建之
mkdir($this->path . $sub_path);
}
//文件重命名,由当前日期 + 随机数 + 后缀名
$file_name = date('YmdHis').uniqid().strrchr($file['name'], '.');
//准备就绪了,开始上传
if (move_uploaded_file($file['tmp_name'], $this->path . $sub_path . $file_name)) {
# 移动成功
return $sub_path . $file_name;
} else {
# 移动失败
$this->errno = -3;
return false;
}
} else {
# 上传到临时文件夹失败,根据其错误号设置错误号
$this->errno = $file['error'];
return false;
}
}
/**
* 多文件上传方法
* @access public
* @param $file array 包含上传文件信息的数组,是一个二维数组
* @return array 成功返回上传的文件名构成的数组, ?如果有失败的则不太好处理了
*/
public function multiUp($files){
//在多文件上传时,上传文件信息 又是一个多维数组,如$_FILES['userfile']['name'][0],$_FILES['userfile']['name'][1]
//我们只需要遍历该数组,得到每个上传文件的信息,依次调用up方法即可
foreach ($files['name'] as $key => $value) {
# code...
$file['name'] = $files['name'][$key];
$file['type'] = $files['type'][$key];
$file['tmp_name'] = $files['tmp_name'][$key];
$file['error'] = $files['error'][$key];
$file['size'] = $files['size'][$key];
//调用up方法,完成上传
$filename[] = $this->up($file);
}
return $filename;
}
/**
* 获取错误信息,根据错误号获取相应的错误提示
* @access public
* @return string 返回错误信息
*/
public function error(){
switch ($this->errno) {
case -1:
return '请检查你的文件类型,目前支持的类型有'.implode(',', $this->mime);
break;
case -2:
return '文件超出系统规定的大小,最大不能超过'. $this->max_size;
break;
case -3:
return '文件移动失败';
break;
case 1:
return '上传的文件超过了 php.ini 中 upload_max_filesize 选项限制的值,其大小为'.ini_get('upload_max_filesize');
break;
case 2:
return '上传文件的大小超过了 HTML 表单中 MAX_FILE_SIZE 选项指定的值,其大小为' . $_POST['MAX_FILE_SIZE'];
break;
case 3:
return '文件只有部分被上传';
break;
case 4:
return '没有文件被上传';
break;
case 5:
return '非法上传';
break;
case 6:
return '找不到临时文件夹';
break;
case 7:
return '文件写入临时文件夹失败';
break;
default:
return '未知错误,灵异事件';
break;
}
}
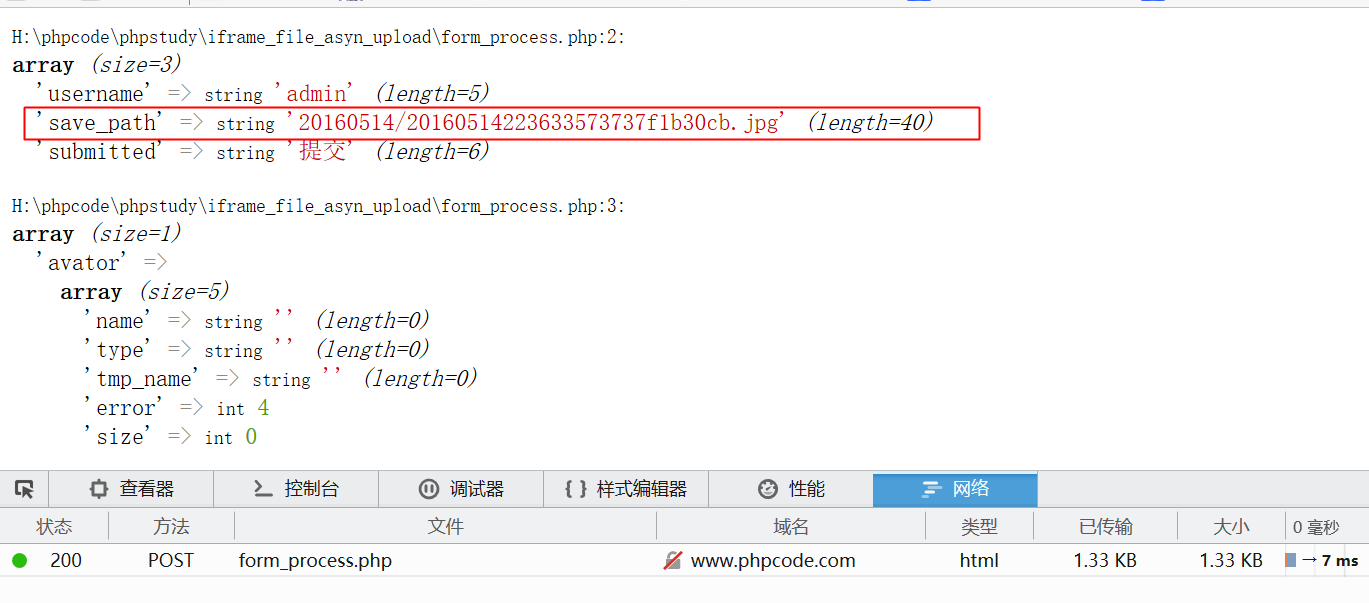
}Processing form submission: form_process.php
<?php
var_dump($_REQUEST);
var_dump($_FILES);

Click the form submit button Result:
The above is the detailed content of PHP form file iframe asynchronous upload tutorial explanation. For more information, please follow other related articles on the PHP Chinese website!

Hot AI Tools

Undresser.AI Undress
AI-powered app for creating realistic nude photos

AI Clothes Remover
Online AI tool for removing clothes from photos.

Undress AI Tool
Undress images for free

Clothoff.io
AI clothes remover

AI Hentai Generator
Generate AI Hentai for free.

Hot Article
Hot Tools

Notepad++7.3.1
Easy-to-use and free code editor

SublimeText3 Chinese version
Chinese version, very easy to use

Zend Studio 13.0.1
Powerful PHP integrated development environment

Dreamweaver CS6
Visual web development tools

SublimeText3 Mac version
God-level code editing software (SublimeText3)
Hot Topics
 1371
1371
 52
52

 CakePHP Project Configuration
Sep 10, 2024 pm 05:25 PM
CakePHP Project Configuration
Sep 10, 2024 pm 05:25 PM
In this chapter, we will understand the Environment Variables, General Configuration, Database Configuration and Email Configuration in CakePHP.
 PHP 8.4 Installation and Upgrade guide for Ubuntu and Debian
Dec 24, 2024 pm 04:42 PM
PHP 8.4 Installation and Upgrade guide for Ubuntu and Debian
Dec 24, 2024 pm 04:42 PM
PHP 8.4 brings several new features, security improvements, and performance improvements with healthy amounts of feature deprecations and removals. This guide explains how to install PHP 8.4 or upgrade to PHP 8.4 on Ubuntu, Debian, or their derivati
 CakePHP Date and Time
Sep 10, 2024 pm 05:27 PM
CakePHP Date and Time
Sep 10, 2024 pm 05:27 PM
To work with date and time in cakephp4, we are going to make use of the available FrozenTime class.
 CakePHP Working with Database
Sep 10, 2024 pm 05:25 PM
CakePHP Working with Database
Sep 10, 2024 pm 05:25 PM
Working with database in CakePHP is very easy. We will understand the CRUD (Create, Read, Update, Delete) operations in this chapter.
 CakePHP File upload
Sep 10, 2024 pm 05:27 PM
CakePHP File upload
Sep 10, 2024 pm 05:27 PM
To work on file upload we are going to use the form helper. Here, is an example for file upload.
 CakePHP Routing
Sep 10, 2024 pm 05:25 PM
CakePHP Routing
Sep 10, 2024 pm 05:25 PM
In this chapter, we are going to learn the following topics related to routing ?
 Discuss CakePHP
Sep 10, 2024 pm 05:28 PM
Discuss CakePHP
Sep 10, 2024 pm 05:28 PM
CakePHP is an open-source framework for PHP. It is intended to make developing, deploying and maintaining applications much easier. CakePHP is based on a MVC-like architecture that is both powerful and easy to grasp. Models, Views, and Controllers gu
 CakePHP Creating Validators
Sep 10, 2024 pm 05:26 PM
CakePHP Creating Validators
Sep 10, 2024 pm 05:26 PM
Validator can be created by adding the following two lines in the controller.
