

Brief analysis and practical operation of Ajax
Those words at the beginning
Purpose
First of all, I am a information manager, and I studied SSH framework background java development as an undergraduate (I learned it in a mess). Usually when developing web projects, JSP is used to directly display the page, and then various forms are submitted and actions jump. As a result, once the data needs to be updated, the page must be refreshed, even in a small part. This is very troublesome and affects the user experience. I have always wanted to use a technology to solve this problem. So I fiddled with it in private for a while, looked at ajax, and found that struts2 perfectly supports ajax, so I wrote this article for reference for people who have had the same story as me! (ps: I usually have classmates ask me about it privately at work, so I just sorted it out for reference!)
Preparation in advance
This article mainly talks about ajax applications in the struts2 environment. . So you need to import all related jar packages of struts2 into your Web project in advance. Anyone who has studied this knows that, so I won’t go into details here; in addition, you need to import an additional jar package to support the json data format. ;I will send the jar package as an attachment. Basically, once you’ve done this, you’re ready to start!
Specific implementation
I will talk about two examples specifically, one is used to describe the specific process of ajax request, and the other is related to the actual application-returning the corresponding according to the parameters data.
Page code (HTML+CSS+JS)
Post code 1 first (for convenience, I did not post the jsp code, in fact, it is just the tag Just some configuration items, readers can copy them by themselves)
<!DOCTYPE html><html lang="zh-CN"><head>
<meta charset="UTF-8">
<title>XHR</title>
<meta name="viewport" content="width=device-width, initial-scale=1.0">
<meta http-equiv="X-UA-Compatible" content="ie=edge">
<style>
form, .box {
margin: 50px;
padding: 20px;
}
form p {
margin: 20px 0;
}
.box {
background-color: rgba(0, 0, 0, 0.2);
height: 40px;
width: 300px;
}
</style></head><body>
<form id="form">
<p><label for="nick">昵称:</label> <input value="jero" name="nick" id="nick" type="text" required></p>
<p><label for="love">爱好:</label> <input value="coding" name="love" id="love" type="text" required></p>
<p>
<button type="button" name="get">Get 提交</button>
<button type="button" name="post">Post 提交</button>
</p>
</form>
<p id="box" class="box"></p>
<script>
var byId = (id) => document.getElementById(id); // ES6 箭头函数
var form = byId('form'); var box = byId('box'); /**
* 表单的数据收集起来
*/
function getData(type) {
var result = [];
var isFill = false; // 都是文本框的 name
['nick', 'love'].forEach((fieldName) => {
var v = form[fieldName].value;
var obj = {};
if (v) {
obj[fieldName] = v;
result.push(obj);
isFill = true;
} else {
isFill = false;
}
}); if (!isFill) { // 没填的话要返回没填的结果 false
return false;
}
result = JSON.stringify(result);
result = "info" + '=' + encodeURIComponent(result)
return result;
} function request(type, callback) {
var data = getData(type);
if (!data) { // 没填的话直接警告
return alert("完成表单!");
} var xhr = new XMLHttpRequest();
xhr.onreadystatechange = () => {
if (xhr.readyState === 4) {
callback(JSON.parse(xhr.responseText), xhr);
} else {
console.log(xhr.status);
}
}
xhr.open(type, './xhr' + (type === 'get' ? `?${data}` : '')); // get 的参数直接拼在 url 的末尾
// 模拟 post 请求,必须设置个请求头
if (type === 'post') {
xhr.setRequestHeader('Content-Type', 'application/x-www-form-urlencoded')//可以自己根据实际情况改变取值
}
xhr.send(type === 'get' ? null : data);
} /**
* 绑定事件抽象下
*/
function click(btn, callback) {
btn.addEventListener('click', () => {
request(btn.name, (data) => {
var data = JSON.parse(data);
box.innerHTML = `success by ${data[0].type} method!<br>
${data[0].infoStr}`;
console.log(data);
});
});
}
// 绑定事件,代码可以从这里看
click(form.get);
click(form.post) </script></body></html>Page running effect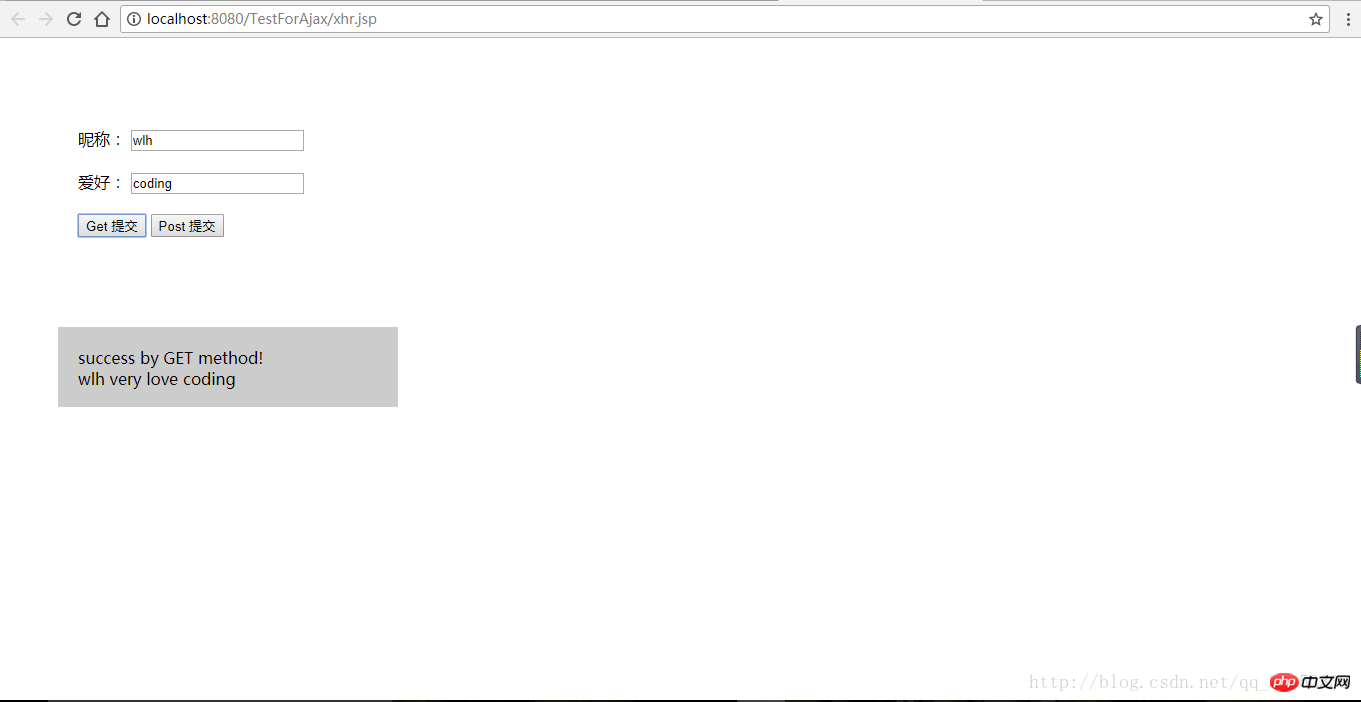
There are several points in the above code that I will talk about here. 1.encodeURIComponent()This function is used to convert variables into strings in url addresses to avoid garbled characters when passing values. 2. When using var form = document.getElementById('form') to obtain the form form node, we can directly use form.nick or form[nick]To directly obtain the nickname input box node, of course, the premise is that the element in the form form has the name attribute set.
Then let’s focus on interpreting this code:
function request(type, callback) {      var data = getData(type);//参数列表字符串

      if (!data) { // 没填的话直接警告
        return alert('完成表单!');
      }      var xhr = new XMLHttpRequest();//生成XHR对象

      xhr.onreadystatechange = () => {        if (xhr.readyState === 4) {
          callback(JSON.parse(xhr.responseText), xhr);//数据成功接收后的回调函数
        } else {
          console.log(xhr.status);
        }
      }

      xhr.open(type, './xhr' + (type === 'get' ? `?${data}` : '')); // get 的参数直接拼在 url 的末尾

      // 模拟 post 请求,必须设置个请求头
      if (type === 'post') {
        xhr.setRequestHeader('Content-Type', 'application/x-www-form-urlencoded')//可以自己根据实际情况改变取值
      }

      xhr.send(type === 'get' ? null : data);
}First of all, let’s make it clear that the function of this function is to send an ajax request; here I use the native XHR object to implement the ajax request, the purpose is to let everyone Be able to deeply understand what ajax is all about; generally speaking, sending an ajax request is divided into four steps:
1. Create an XHR object
IE7 and above and now mainstream browsers support it Native XHR object, so we can directly use var xhr = new XMLHttpRequest(); to create an XHR object, and use some methods encapsulated by the XHR object to implement ajax requests. As for the cancer below IE7, I will never consider it! If you insist on making it compatible with IE7 or below, you can refer to the ajax chapter of the js red book. It is created through ActiveX objects!
2. Bind the listening function
xhr.onreadystatechangeThe stage in which the monitoring request response process is implemented. Mainly through the readyState attribute of the Call send() method)
2-Send (call send() method, but no response, no data received)
3-Receive (partial data received)
4-Complete (get all Response data)
Whenever the attribute value changes, a readystatechange event is triggered. So we can use the value of this attribute to determine whether the data we need is ready. In order to render the data we requested into the page in a timely manner.
And
xhr.status
returns the status code of the HTTP request (students who have studied networking should all know this), which makes it easier for us to detect whether the request is successful, or to determine the reason for the request failure. callback(JSON.parse(xhr.responseText), xhr);
This is the callback function to be executed when we receive all the data. It is mainly used to process the received data and render the page. You can follow it in actual application. The focus is on writing the callback function in the binding function. You should write it according to actual needs. 3. Start the request
xhr.open(type, './xhr' + (type === 'get' ??${data}: ''));The first parameter mainly sets whether the request uses the get method or the post method. (ps: A recent article said that there is no difference between the two. Here we For now, follow the old routine), and the second one is the target address of the request. A ternary operation is used to distinguish get and post. Because the parameters of the get method are sent to the background by putting the parameters in the url, so we have to Concatenate strings; and post is passed through the Form Data in the request header; as shown below:
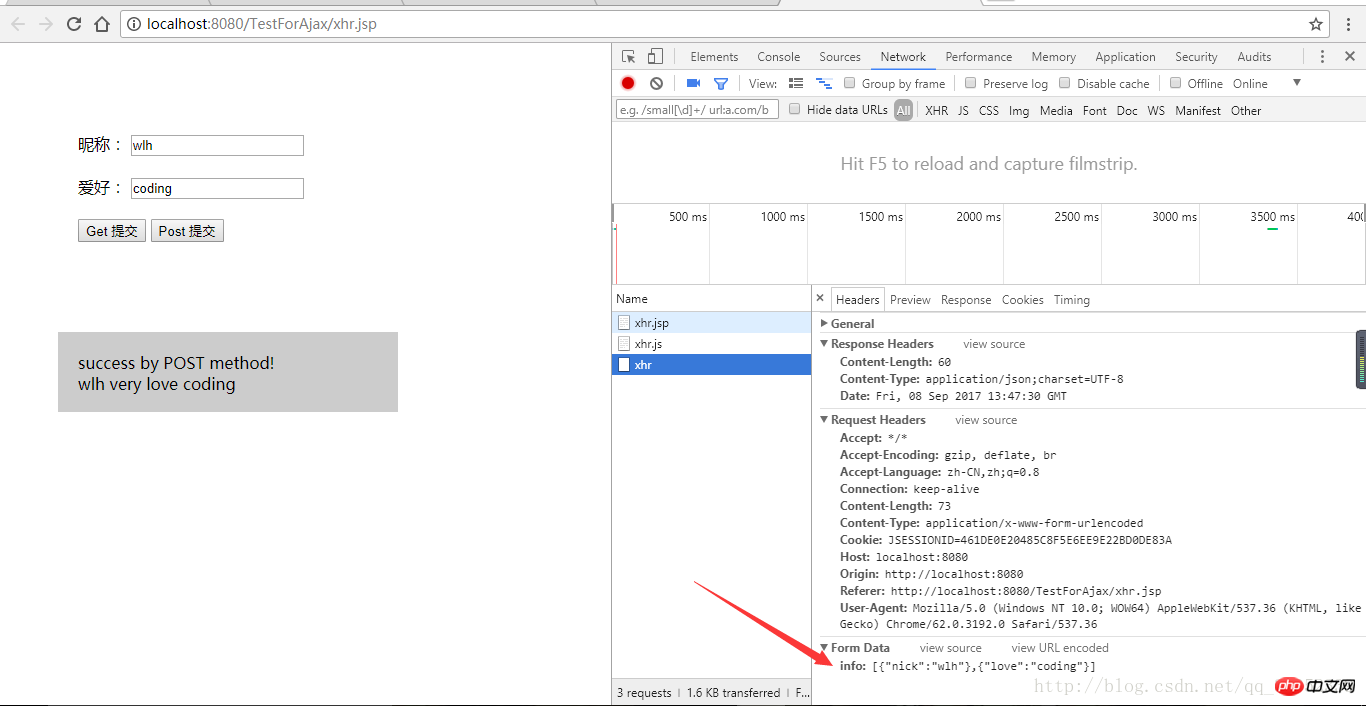
四、发送请求
xhr.send(type === 'get' ? null : data);最后一个环节,上面说到的post传参就要在这传入,get则不用,所以在这里同样用了一个三目运算。
基本上,原生的XHR对象实现ajax请求就如上所说;是不是觉得有点复杂?那么不用慌,喜欢“偷懒”的高端程序猿已经帮我们实现了封装;没错就是当初影响世界的jQuery。话不多说,直接上代码:
$.ajax(function() {
    url: 'xhr',
    type: 'get',
    dataType: 'json',//返回数据类型
    data: {info: data},//传参
    success: function(data) {
        /***/
    },
    error: function() {
        console.log('error!');
    }
});jQuery提供了很多种写法,包括更简单的$.getJSON();至于我为什么要推荐这种写法,大家可以理解成我很笨,但是其中的含义大家用过就明白了!(吹个小牛皮)
后台代码(action+struts.xml)
上面说了这么多,一是让大家了解原生的是怎样的一个东西,二是因为上述部分是学习后台同学没有接触过的,所以尽可能的讲清楚点;这部分,我想代码一贴出来,大家都懂了!
action
package com.testforajax.demo.action;import java.util.ArrayList;import java.util.HashMap;import java.util.Map;import org.apache.struts2.ServletActionContext;import net.sf.json.JSONArray;import net.sf.json.JSONObject;import com.opensymphony.xwork2.ActionSupport;public class AjaxDemo extends ActionSupport {
    private String info;    public String getInfo() {        return info;
    }    public void setInfo(String info) {        this.info = info;
    }    public String execute() throws Exception {
        String method = ServletActionContext.getRequest().getMethod();
        HashMap<String, String> map = new HashMap<String, String>();
        String name;
        String love;
        JSONArray json = JSONArray.fromObject(info);
        name = json.getJSONObject(0).getString("nick");
        love = json.getJSONObject(1).getString("love");
        json.clear();
        String result = name + " very love " + love;
        map.put("type", method);
        map.put("infoStr", result);
        json.add(map);
        info = json.toString();
        System.out.println(this.info);        return "success";
    }
}struts.xml
<?xml version="1.0" encoding="UTF-8" ?><!DOCTYPE struts PUBLIC "-//Apache Software Foundation//DTD Struts Configuration 2.1//EN" "http://struts.apache.org/dtds/struts-2.1.dtd"><struts>
    <!-- XHR演示 -->
    <package name="xhrTest" extends="json-default, struts-default">
        <action name="xhr" class="com.testforajax.demo.action.AjaxDemo">
            <result type="json">
                <param name="root">info</param>
            </result>
        </action>
        <!--
        <action name="newxhr" class="com.testforajax.demo.action.AjaxDemo2">
            <result type="json">
                <param name="root">queryId</param>
            </result>
        </action>
        -->
</package></struts>在这里只强调一点,struts2的自动打包传值,一定要保证参数名一致!即你在前台封装json数据格式时,对应的key值要和struts.xml配置文件中<param name="root">info一致,同时在action类中也要有对应的属性,以及getter和setter。
还有,在使用json数据格式时要做到传参时记得JSON.stringify(),渲染响应数据时记得JSON.parse()。封装时,一定要按照标准格式,后台封装的话,推荐我写的那种先用map做处理。
The above is the detailed content of Brief analysis and practical operation of Ajax. For more information, please follow other related articles on the PHP Chinese website!

Hot AI Tools

Undresser.AI Undress
AI-powered app for creating realistic nude photos

AI Clothes Remover
Online AI tool for removing clothes from photos.

Undress AI Tool
Undress images for free

Clothoff.io
AI clothes remover

Video Face Swap
Swap faces in any video effortlessly with our completely free AI face swap tool!

Hot Article
Hot Tools

Notepad++7.3.1
Easy-to-use and free code editor

SublimeText3 Chinese version
Chinese version, very easy to use

Zend Studio 13.0.1
Powerful PHP integrated development environment

Dreamweaver CS6
Visual web development tools

SublimeText3 Mac version
God-level code editing software (SublimeText3)
Hot Topics
 1392
1392
 52
52

 How to solve the 403 error encountered by jQuery AJAX request
Feb 20, 2024 am 10:07 AM
How to solve the 403 error encountered by jQuery AJAX request
Feb 20, 2024 am 10:07 AM
Title: Methods and code examples to resolve 403 errors in jQuery AJAX requests. The 403 error refers to a request that the server prohibits access to a resource. This error usually occurs because the request lacks permissions or is rejected by the server. When making jQueryAJAX requests, you sometimes encounter this situation. This article will introduce how to solve this problem and provide code examples. Solution: Check permissions: First ensure that the requested URL address is correct and verify that you have sufficient permissions to access the resource.
 How to solve jQuery AJAX request 403 error
Feb 19, 2024 pm 05:55 PM
How to solve jQuery AJAX request 403 error
Feb 19, 2024 pm 05:55 PM
jQuery is a popular JavaScript library used to simplify client-side development. AJAX is a technology that sends asynchronous requests and interacts with the server without reloading the entire web page. However, when using jQuery to make AJAX requests, you sometimes encounter 403 errors. 403 errors are usually server-denied access errors, possibly due to security policy or permission issues. In this article, we will discuss how to resolve jQueryAJAX request encountering 403 error
 PHP and Ajax: Building an autocomplete suggestion engine
Jun 02, 2024 pm 08:39 PM
PHP and Ajax: Building an autocomplete suggestion engine
Jun 02, 2024 pm 08:39 PM
Build an autocomplete suggestion engine using PHP and Ajax: Server-side script: handles Ajax requests and returns suggestions (autocomplete.php). Client script: Send Ajax request and display suggestions (autocomplete.js). Practical case: Include script in HTML page and specify search-input element identifier.
 How to solve the problem of jQuery AJAX error 403?
Feb 23, 2024 pm 04:27 PM
How to solve the problem of jQuery AJAX error 403?
Feb 23, 2024 pm 04:27 PM
How to solve the problem of jQueryAJAX error 403? When developing web applications, jQuery is often used to send asynchronous requests. However, sometimes you may encounter error code 403 when using jQueryAJAX, indicating that access is forbidden by the server. This is usually caused by server-side security settings, but there are ways to work around it. This article will introduce how to solve the problem of jQueryAJAX error 403 and provide specific code examples. 1. to make
 How to get variables from PHP method using Ajax?
Mar 09, 2024 pm 05:36 PM
How to get variables from PHP method using Ajax?
Mar 09, 2024 pm 05:36 PM
Using Ajax to obtain variables from PHP methods is a common scenario in web development. Through Ajax, the page can be dynamically obtained without refreshing the data. In this article, we will introduce how to use Ajax to get variables from PHP methods, and provide specific code examples. First, we need to write a PHP file to handle the Ajax request and return the required variables. Here is sample code for a simple PHP file getData.php:
 PHP vs. Ajax: Solutions for creating dynamically loaded content
Jun 06, 2024 pm 01:12 PM
PHP vs. Ajax: Solutions for creating dynamically loaded content
Jun 06, 2024 pm 01:12 PM
Ajax (Asynchronous JavaScript and XML) allows adding dynamic content without reloading the page. Using PHP and Ajax, you can dynamically load a product list: HTML creates a page with a container element, and the Ajax request adds the data to that element after loading it. JavaScript uses Ajax to send a request to the server through XMLHttpRequest to obtain product data in JSON format from the server. PHP uses MySQL to query product data from the database and encode it into JSON format. JavaScript parses the JSON data and displays it in the page container. Clicking the button triggers an Ajax request to load the product list.
 What are the ajax versions?
Nov 22, 2023 pm 02:00 PM
What are the ajax versions?
Nov 22, 2023 pm 02:00 PM
Ajax is not a specific version, but a technology that uses a collection of technologies to asynchronously load and update web page content. Ajax does not have a specific version number, but there are some variations or extensions of ajax: 1. jQuery AJAX; 2. Axios; 3. Fetch API; 4. JSONP; 5. XMLHttpRequest Level 2; 6. WebSockets; 7. Server-Sent Events; 8, GraphQL, etc.
 PHP and Ajax: Ways to Improve Ajax Security
Jun 01, 2024 am 09:34 AM
PHP and Ajax: Ways to Improve Ajax Security
Jun 01, 2024 am 09:34 AM
In order to improve Ajax security, there are several methods: CSRF protection: generate a token and send it to the client, add it to the server side in the request for verification. XSS protection: Use htmlspecialchars() to filter input to prevent malicious script injection. Content-Security-Policy header: Restrict the loading of malicious resources and specify the sources from which scripts and style sheets are allowed to be loaded. Validate server-side input: Validate input received from Ajax requests to prevent attackers from exploiting input vulnerabilities. Use secure Ajax libraries: Take advantage of automatic CSRF protection modules provided by libraries such as jQuery.
