

Write a simple memo using jquery and bootstrap
Words written in front
    经过这一个星期的努力,我终于把这个简陋的tudolist做出来了。(好吧,我承认是自己比较菜。)
    通过写博客的方式,我想把这一个星期里来调试的收获和对编程的感悟记录下来,回顾自己走过的路会对以后要走的路有所启示的。
    如果你和我一样是初窥前端的一个怀抱梦想的初学者,我希望我走过的这段路能对你有些许的启示,让你对前端收获一点感悟。如果你是一个前端的大牛,也由衷的希望你能留下些许的指教。
Thank you very much for reading this article, and I hope you can continue reading...
Project name
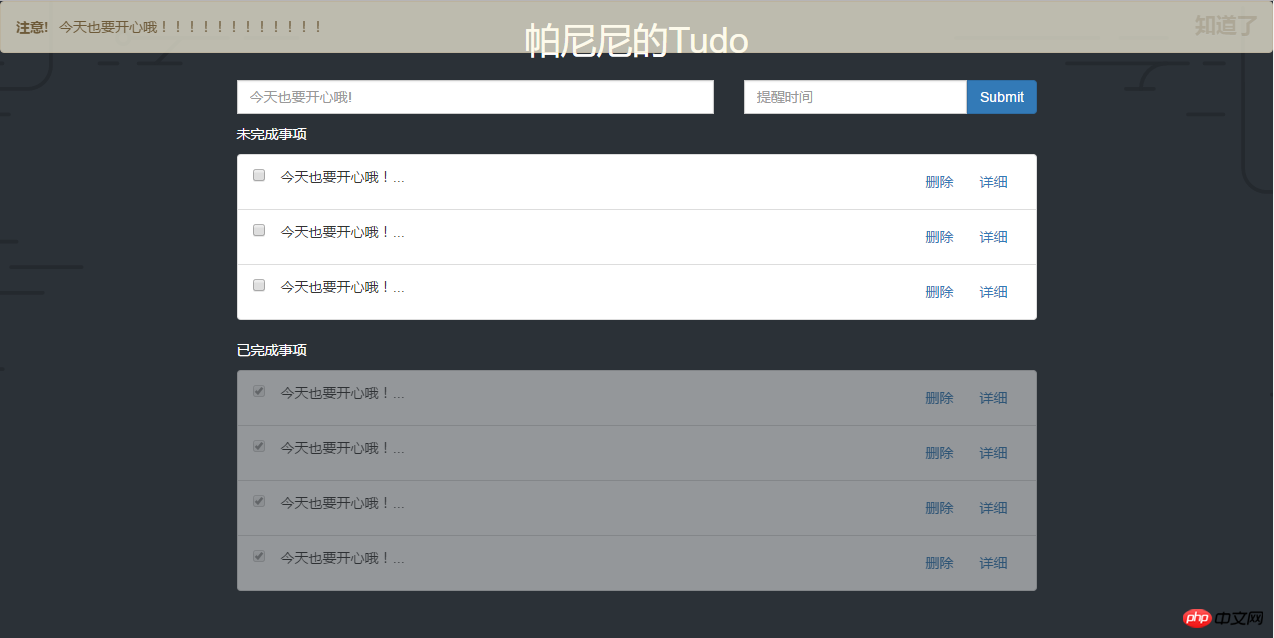
帕尼尼的备忘录
HTML structure
<p class="tudo">
        <!-- 标题部分开始 -->
        <header>
            <h1 id="帕尼尼的Tudo">帕尼尼的Tudo</h1>
        </header>
        <!-- 标题部分结束 -->
        <!-- 提交部分开始 -->
        <section>
        </section>
        <!-- 提交部分结束 -->
        <!-- 列表部分开始 -->
        <section>
            <!-- 列表条目 -->
            <p class="tudo-list">
                <p>未完成事项</p>
            </p>
            <ul class="list-group" id="tList"></ul>
            <!-- 已完成列表条目 -->
            <p class="tudo-list">
                <p>已完成事项</p>
            </p>
            <ul class="list-group" id="fList"></ul>
            <!-- 事件提醒条目 -->
            <ul class="list-group" id="rList"></ul>
            <!-- 模态框 事项信息框-->
            <p class="modal fade" id="modal_list" tabindex="-1" role="dialog">
            </p>
            <!-- 模态框 提示框-->
            <p class="modal fade" id="modal_sure" tabindex="-1" role="dialog">
            </p>
        </section>
        <!-- 列表部分结束 -->
        <!-- 脚注部分开始 -->
        <footer>
        </footer>
        <!-- 脚注部分结束 -->
        <video src="alert.mp3" class="alert"></video>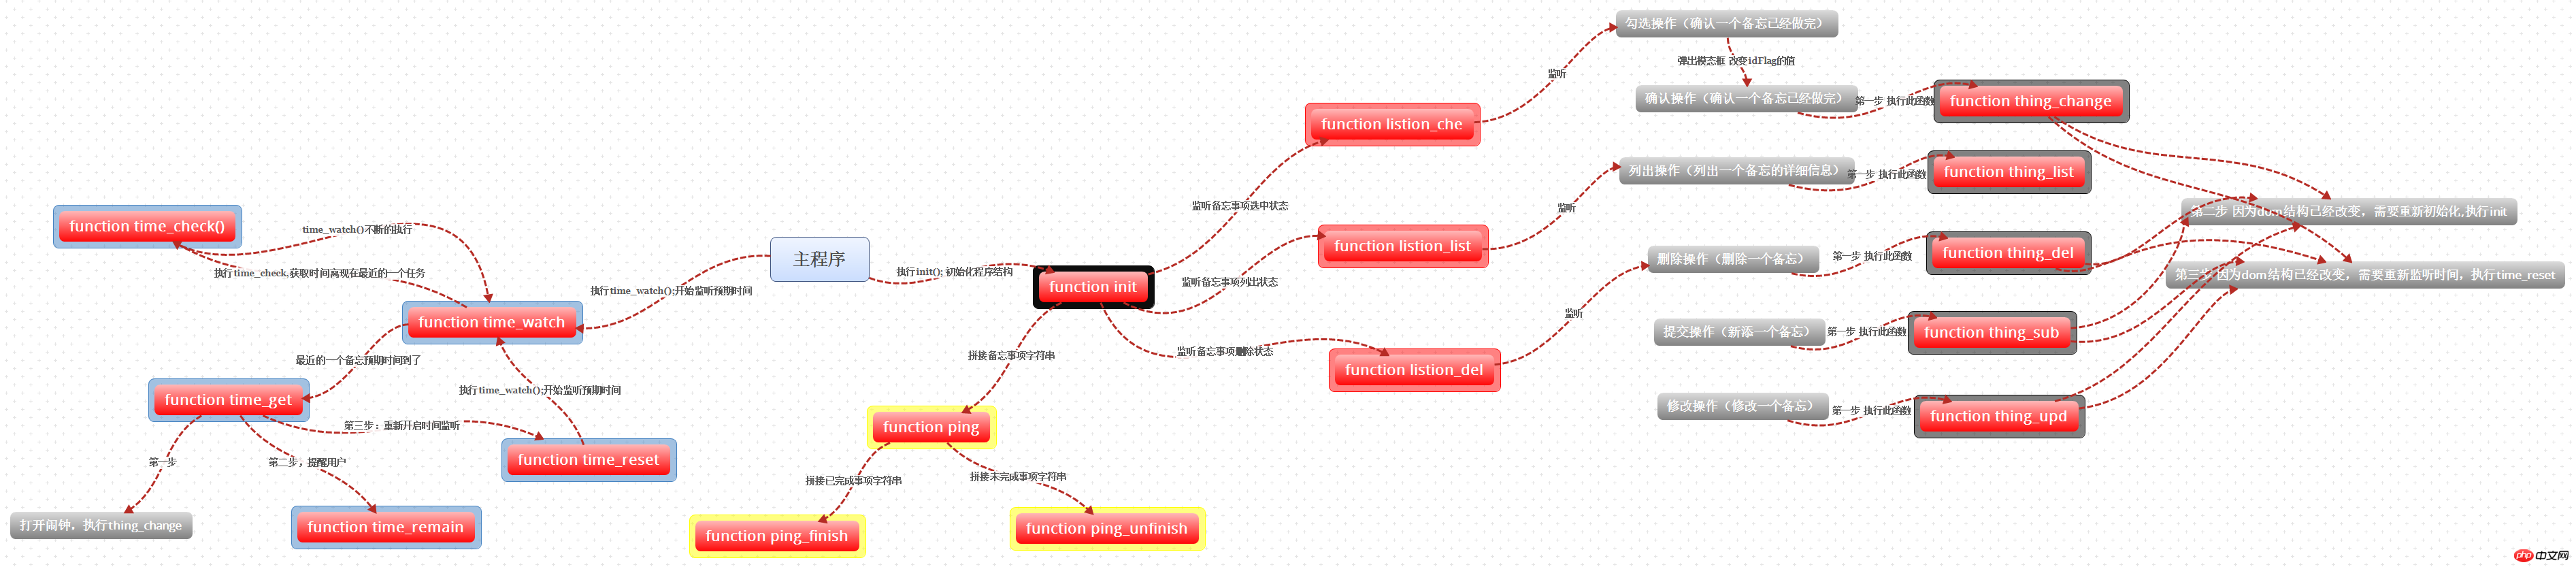
</p>js function
//初始化function init(){}
//事件列表拼接function ping(){}
//未完成事件拼接function ping_unfinish(object,i){}
//已完成事件拼接function ping_finish(object,i){}
//删除事件监听function listion_del(){}
//列出事件监听function listion_all(){}
//勾选事件监听function listion_che(){}
//事件删除操作function thing_del(id){}
//事件列出操作function thing_all(id){}
//事件提交操作function thing_sub(){}
//事件修改操作function thing_upd(){}
//事件状态改变操作function thing_change(){}
//时间监视function time_watch(){}
//时间检查(获取离现在最近的一个任务)function time_check(){}
//时间达到预定后处理function time_get(){}
//重新监听时间function time_reset(){}
//显示提醒面板function time_remain(){}Mind map
Run Rendering
The above is the detailed content of Write a simple memo using jquery and bootstrap. For more information, please follow other related articles on the PHP Chinese website!

Hot AI Tools

Undresser.AI Undress
AI-powered app for creating realistic nude photos

AI Clothes Remover
Online AI tool for removing clothes from photos.

Undress AI Tool
Undress images for free

Clothoff.io
AI clothes remover

AI Hentai Generator
Generate AI Hentai for free.

Hot Article
Hot Tools

Notepad++7.3.1
Easy-to-use and free code editor

SublimeText3 Chinese version
Chinese version, very easy to use

Zend Studio 13.0.1
Powerful PHP integrated development environment

Dreamweaver CS6
Visual web development tools

SublimeText3 Mac version
God-level code editing software (SublimeText3)
Hot Topics
 1378
1378
 52
52

 How to get the bootstrap search bar
Apr 07, 2025 pm 03:33 PM
How to get the bootstrap search bar
Apr 07, 2025 pm 03:33 PM
How to use Bootstrap to get the value of the search bar: Determines the ID or name of the search bar. Use JavaScript to get DOM elements. Gets the value of the element. Perform the required actions.
 How to do vertical centering of bootstrap
Apr 07, 2025 pm 03:21 PM
How to do vertical centering of bootstrap
Apr 07, 2025 pm 03:21 PM
Use Bootstrap to implement vertical centering: flexbox method: Use the d-flex, justify-content-center, and align-items-center classes to place elements in the flexbox container. align-items-center class method: For browsers that do not support flexbox, use the align-items-center class, provided that the parent element has a defined height.
 How to write split lines on bootstrap
Apr 07, 2025 pm 03:12 PM
How to write split lines on bootstrap
Apr 07, 2025 pm 03:12 PM
There are two ways to create a Bootstrap split line: using the tag, which creates a horizontal split line. Use the CSS border property to create custom style split lines.
 How to use bootstrap in vue
Apr 07, 2025 pm 11:33 PM
How to use bootstrap in vue
Apr 07, 2025 pm 11:33 PM
Using Bootstrap in Vue.js is divided into five steps: Install Bootstrap. Import Bootstrap in main.js. Use the Bootstrap component directly in the template. Optional: Custom style. Optional: Use plug-ins.
 How to insert pictures on bootstrap
Apr 07, 2025 pm 03:30 PM
How to insert pictures on bootstrap
Apr 07, 2025 pm 03:30 PM
There are several ways to insert images in Bootstrap: insert images directly, using the HTML img tag. With the Bootstrap image component, you can provide responsive images and more styles. Set the image size, use the img-fluid class to make the image adaptable. Set the border, using the img-bordered class. Set the rounded corners and use the img-rounded class. Set the shadow, use the shadow class. Resize and position the image, using CSS style. Using the background image, use the background-image CSS property.
 How to resize bootstrap
Apr 07, 2025 pm 03:18 PM
How to resize bootstrap
Apr 07, 2025 pm 03:18 PM
To adjust the size of elements in Bootstrap, you can use the dimension class, which includes: adjusting width: .col-, .w-, .mw-adjust height: .h-, .min-h-, .max-h-
 How to set up the framework for bootstrap
Apr 07, 2025 pm 03:27 PM
How to set up the framework for bootstrap
Apr 07, 2025 pm 03:27 PM
To set up the Bootstrap framework, you need to follow these steps: 1. Reference the Bootstrap file via CDN; 2. Download and host the file on your own server; 3. Include the Bootstrap file in HTML; 4. Compile Sass/Less as needed; 5. Import a custom file (optional). Once setup is complete, you can use Bootstrap's grid systems, components, and styles to create responsive websites and applications.
 How to use bootstrap button
Apr 07, 2025 pm 03:09 PM
How to use bootstrap button
Apr 07, 2025 pm 03:09 PM
How to use the Bootstrap button? Introduce Bootstrap CSS to create button elements and add Bootstrap button class to add button text
