

Introduction to WeChat Mini Program Template
微信小程序 template模板详解及实例
首先看一些官方的一些介绍。
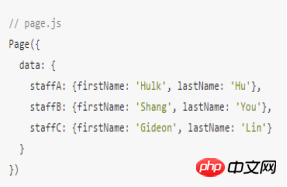
模板:模板功能是通过对template 标签的属性 name=”” 去创建不同模板,通过is=”name的值”来使用。

通过上面两张图,大概能看出,使用模板可以为大量类似的布局带来便利。下面看一下我自己的一个Demo.
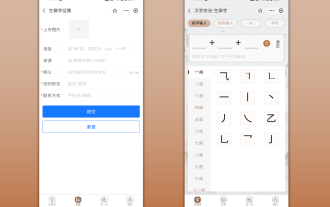
先放出效果图(数据来自聚合数据)

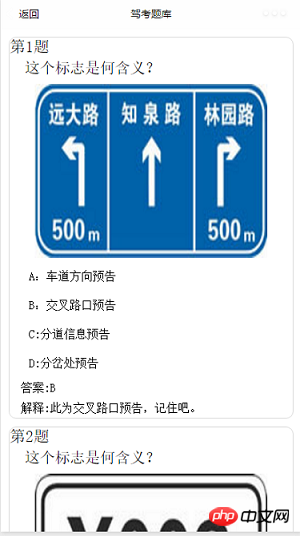
可以看到,除了选项个数的差别之外,其他布局是相同的。
下面的每一道题的模板。
<template name="carItem">
 <view class="timu">
  <view class="title">第pw_item.id题</view>
  <view class='question'>pw_item.question</view>
  <view class="img" wx:if="pw_item.url!=''"><image src="pw_item.url" /></view>
  <view class='select'>A:pw_item.item1</view>
  <view class='select'>B:pw_item.item2</view>
  <view class='select' wx:if="pw_item.item3!=''">C:pw_item.item3</view>
  <view class='select' wx:if="pw_item.item4!=''">D:pw_item.item4</view>
  <view class='content'>答案:pw_item.answer</view>
  <view class='content'>解释:pw_item.explains</view>
 </view>
</template>
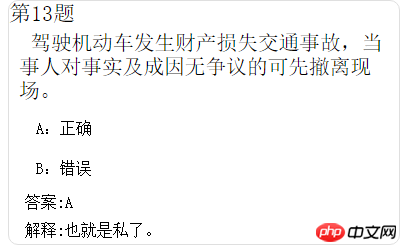
在我们上面的代码中,除了使用template标签定义模板外,还是用了条件渲染。例如当题目为判断题的时候。CD选项是没有数据的,所以就不能显示出来,我们可以通过if语句判断是否为空来决定显示与否。
下面放出代码。
CarUtils.js
/**
 * 网络请求
 */
function request(url, subject, model, testType, success, fail) {
  if (typeof success != 'function' || typeof fail != 'function') {
    return
  }
  wx.request({
    url: url,
    data: {
      key: "5f0c9315c43385f5baaa3f49b79caa8f",
      subject: subject,
      model: model,
      testType: testType,


    },
    success: function (res) {
      if (res.data.error_code == 0) {
        console.log("获取数据成功"),
          success(res.data)
      } else {
        wx.showModal({
          title: '提示',
          content: 'res.data.reason'+'请重新选择',
          success: function (res) {
            if (res.confirm) {
              console.log('用户点击确定')
            }
          }
        })
        console.log("失败原因" + res.data.reason)
        fail(res.data.reason)
      }
    },
    fail: function () {
      fail('网络出现问题')
    },
  })
}
function getanswer(url,success,fail){
   if( typeof success != 'function' || typeof fail != 'function' ) {
  return
 }
   wx.request({
    url:url,
    data: {
      key:"0794b823b484d6e1b4186d150834ae1b",
    },
    success: function(res){
     if( res.data.error_code == 0 ) {
        console.log("获取数据成功"),
        success( res.data )
      } else {
        console.log("失败原因"+res.data.reason)
        fail( res.data.reason )
      }
    },
    fail: function() {
      fail( '网络出现问题' )
    },
   })
}
module.exports = {
  request: request,
  getanswer:getanswer
}template.wxml
<template name="carItem">
 <view class="timu">
  <view class="title">第pw_item.id题</view>
  <view class='question'>pw_item.question</view>
  <view class="img" wx:if="pw_item.url!=''"><image src="pw_item.url" /></view>
  <view class='select'>A:pw_item.item1</view>
  <view class='select'>B:pw_item.item2</view>
  <view class='select' wx:if="pw_item.item3!=''">C:pw_item.item3</view>
  <view class='select' wx:if="pw_item.item4!=''">D:pw_item.item4</view>
  <view class='content'>答案:pw_item.answer</view>
  <view class='content'>解释:pw_item.explains</view>
 </view>
</template>
选择界面 drivercar.js
Page({
 data:{
  subject: [
   {name: '1', value: '科目一',checked: 'true'},
   {name: '4', value: '科目四'},


  ],
  model: [
   {name: 'c1', value: 'c1',checked: 'true'},
   {name: 'c2', value: 'c2'},
   {name: 'a1', value: 'a1'},
   {name: 'a2', value: 'a2'},
   {name: 'b1', value: 'b1'},
   {name: 'b2', value: 'b2'},


  ],
  testType: [
   {name: 'rand', value: '随机(100条)',checked: 'true'},
   {name: 'order', value: '全部(全部)'},
  ],


 },
 onLoad:function(options){
 var that = this;
  that.setData({
   subject1:"1",
   model1:"c1",
   testType1:"rand"
  })
 },
 confirm(){
  var that=this;
   wx.navigateTo({
   url: 'detail/detail?subject='+that.data.subject1+'&model='+that.data.model1+'&testType='+that.data.testType1,
  });
 },
  confirm1(){
  var that=this;
   wx.navigateTo({
   url: 'detail_1/detail_1?subject='+that.data.subject1+'&model='+that.data.model1+'&testType='+that.data.testType1,
  });
 },
 //科目类型
 subjectChange(e){
  var that = this;
  console.log('科目类型:'+e.detail.value);
  that.setData({
   subject1:e.detail.value,


  })
 } ,
  //驾照类型
  modelChange(e){
  var that = this;
  console.log('驾照类型:'+e.detail.value);
  that.setData({
   model1:e.detail.value,
  })
 } ,
 //测试类型
  testTypeChange(e){
   var that = this;
  console.log('测试类型:'+e.detail.value);
  that.setData({
   testType1:e.detail.value,
  })
 } ,


})选择界面drivercar.wxml
<view class="container">
<!--radio-->
 <view class="radio">
 <text>请选择考试类型:</text>
  <radio-group class="radio-group" bindchange="subjectChange">
    <label class="radio" wx:for="pw_subject" wx:key="subject">
      <radio value="pw_item.name" checked="pw_item.checked"/>pw_item.value
   </label>
  </radio-group>
 </view>
 <view class="radio">
 <text>请选择驾照类型:</text>
  <radio-group class="radio-group" bindchange="modelChange" >
     <label class="radio" wx:for="pw_model" wx:key="model">
        <radio value="pw_item.name" checked="pw_item.checked"/>pw_item.value
     </label>
   </radio-group>
 </view>
 <view class="radio">
 <text>请选择模式:</text>
  <radio-group class="radio-group" bindchange="testTypeChange" >
     <label class="radio" wx:for="pw_testType" wx:key="testType">
        <radio value="pw_item.name" checked="pw_item.checked"/>pw_item.value
     </label>
   </radio-group>
 </view>
  <!--button-->
  <text class="nav" bindtap="confirm">确定选择</text>
</view>选择界面drivercar.wxss
.radio{ margin: 20rpx;}
.radio text{margin: 20rpx;}
.nav {
   border: 1px solid #DFDFDF;
  border-radius: 10px;
  text-align: center;
  width: 50%;
  float: left;
  height: 60rpx;
  line-height: 60rpx;
  margin-bottom:30rpx;
  margin-top: 30rpx;
  margin-left:25%;
  margin-right:25%;


}题目界面detail.js
var util = require('../../../../Utils/CarUtils.js')
var url = 'http://api2.juheapi.com/jztk/query'
var answerurl = "http://api2.juheapi.com/jztk/answers"
Page({
  data: {
    loadingHide: false,
    ResList: {
      "error_code": 0,
      "reason": "success",
      "result": {
        1: "A",
        2: "B",
        3: "C",
        4: "D",
        7: "AB",
        8: "AC",
        9: "AD",
        10: "BC",
        11: "BD",
        12: "CD",
        13: "ABC",
        14: "ABD",
        15: "ACD",
        16: "BCD",
        17: "ABCD"
      }
    },
  },
  onLoad: function (options) {


    var that = this
    var z=1;
    var mTimuLIs={}
    util.request(url, options.subject, options.model, options.testType, function (dataJson) {
      console.log(options.model + "model");
      console.log(options.testType + "testType");
      console.log(options.subject + "subject");
      console.log("请求成功00");


      mTimuLIs=dataJson["result"];
      console.log(mTimuLIs.length);
      for (var i = 0; i < mTimuLIs.length; i++) {


        //console.log(that.data.ResList.result[1]);
var y= parseInt(mTimuLIs题目界面 detail.wxml
<import src="../../../../common/templet.wxml"/>
<scroll-view scroll-y="true" class="page-body" >
   <template is="carItem" data="pw_item" wx:for="pw_mTimuLIs" wx:key="TimuList"/>
</scroll-view>
<loading hidden="pw_loadingHide">
  加载中...
</loading>
全局样式 app.wxss
.container {
 height:100%;
 flex: 1;
 display: flex;
 flex-direction: column;
 box-sizing: border-box;
 background-size: 100%;
}
.item-view{
  padding: 10px;
  display: flex;
  flex-direction: column;
  border-top: 1px solid #DEDEDE;
  border-left: 1px solid #DEDEDE;
  box-shadow: 2px 2px 2px #C7C7C7;
  margin: 10px;
  border-radius: 5px;
}


.item-view .content{color: black;}
.item-view .date{ color: grey;margin-top: 10px;}
.item-view image{width: 100%;height: 400rpx;margin-top: 10rpx;}
.loading-view{display: flex;flex-direction: row; justify-content: center;align-items: center;padding: 10px;}
.timu{border: 1px solid #DFDFDF;margin: 20rpx;border-radius: 10px;}
.timu .title{font-size: 40rpx; }
.timu .question{text-indent: 20rpx;margin-left: 10rpx; padding: 10rpx;}
.timu .img{width: 100%;display:flex;flex-direction: column;align-items: center;margin: 0 auto;padding-top: 10rpx;padding-bottom: 10rpx;}
.timu .content{font-size: 30rpx;padding: 10rpx;margin-left: 20rpx }
.timu .select{font-size: 30rpx;margin-left: 30rpx;margin-right: 30rpx; padding: 20rpx; }The above is the detailed content of Introduction to WeChat Mini Program Template. For more information, please follow other related articles on the PHP Chinese website!

Hot AI Tools

Undresser.AI Undress
AI-powered app for creating realistic nude photos

AI Clothes Remover
Online AI tool for removing clothes from photos.

Undress AI Tool
Undress images for free

Clothoff.io
AI clothes remover

AI Hentai Generator
Generate AI Hentai for free.

Hot Article
Hot Tools

Notepad++7.3.1
Easy-to-use and free code editor

SublimeText3 Chinese version
Chinese version, very easy to use

Zend Studio 13.0.1
Powerful PHP integrated development environment

Dreamweaver CS6
Visual web development tools

SublimeText3 Mac version
God-level code editing software (SublimeText3)
Hot Topics
 1378
1378
 52
52

 Detailed introduction to what wapi is
Jan 07, 2024 pm 09:14 PM
Detailed introduction to what wapi is
Jan 07, 2024 pm 09:14 PM
Users may have seen the term wapi when using the Internet, but for some people they definitely don’t know what wapi is. The following is a detailed introduction to help those who don’t know to understand. What is wapi: Answer: wapi is the infrastructure for wireless LAN authentication and confidentiality. This is like functions such as infrared and Bluetooth, which are generally covered near places such as office buildings. Basically they are owned by a small department, so the scope of this function is only a few kilometers. Related introduction to wapi: 1. Wapi is a transmission protocol in wireless LAN. 2. This technology can avoid the problems of narrow-band communication and enable better communication. 3. Only one code is needed to transmit the signal
 Detailed explanation of whether win11 can run PUBG game
Jan 06, 2024 pm 07:17 PM
Detailed explanation of whether win11 can run PUBG game
Jan 06, 2024 pm 07:17 PM
Pubg, also known as PlayerUnknown's Battlegrounds, is a very classic shooting battle royale game that has attracted a lot of players since its popularity in 2016. After the recent launch of win11 system, many players want to play it on win11. Let's follow the editor to see if win11 can play pubg. Can win11 play pubg? Answer: Win11 can play pubg. 1. At the beginning of win11, because win11 needed to enable tpm, many players were banned from pubg. 2. However, based on player feedback, Blue Hole has solved this problem, and now you can play pubg normally in win11. 3. If you meet a pub
 Introduction to Python functions: Introduction and examples of exec function
Nov 03, 2023 pm 02:09 PM
Introduction to Python functions: Introduction and examples of exec function
Nov 03, 2023 pm 02:09 PM
Introduction to Python functions: Introduction and examples of exec function Introduction: In Python, exec is a built-in function that is used to execute Python code stored in a string or file. The exec function provides a way to dynamically execute code, allowing the program to generate, modify, and execute code as needed during runtime. This article will introduce how to use the exec function and give some practical code examples. How to use the exec function: The basic syntax of the exec function is as follows: exec
 Detailed introduction to whether i5 processor can install win11
Dec 27, 2023 pm 05:03 PM
Detailed introduction to whether i5 processor can install win11
Dec 27, 2023 pm 05:03 PM
i5 is a series of processors owned by Intel. It has various versions of the 11th generation i5, and each generation has different performance. Therefore, whether the i5 processor can install win11 depends on which generation of the processor it is. Let’s follow the editor to learn about it separately. Can i5 processor be installed with win11: Answer: i5 processor can be installed with win11. 1. The eighth-generation and subsequent i51, eighth-generation and subsequent i5 processors can meet Microsoft’s minimum configuration requirements. 2. Therefore, we only need to enter the Microsoft website and download a "Win11 Installation Assistant" 3. After the download is completed, run the installation assistant and follow the prompts to install Win11. 2. i51 before the eighth generation and after the eighth generation
 Implement card flipping effects in WeChat mini programs
Nov 21, 2023 am 10:55 AM
Implement card flipping effects in WeChat mini programs
Nov 21, 2023 am 10:55 AM
Implementing card flipping effects in WeChat mini programs In WeChat mini programs, implementing card flipping effects is a common animation effect that can improve user experience and the attractiveness of interface interactions. The following will introduce in detail how to implement the special effect of card flipping in the WeChat applet and provide relevant code examples. First, you need to define two card elements in the page layout file of the mini program, one for displaying the front content and one for displaying the back content. The specific sample code is as follows: <!--index.wxml-->&l
 Alipay launched the 'Chinese Character Picking-Rare Characters' mini program to collect and supplement the rare character library
Oct 31, 2023 pm 09:25 PM
Alipay launched the 'Chinese Character Picking-Rare Characters' mini program to collect and supplement the rare character library
Oct 31, 2023 pm 09:25 PM
According to news from this site on October 31, on May 27 this year, Ant Group announced the launch of the "Chinese Character Picking Project", and recently ushered in new progress: Alipay launched the "Chinese Character Picking-Uncommon Characters" mini program to collect collections from the society Rare characters supplement the rare character library and provide different input experiences for rare characters to help improve the rare character input method in Alipay. Currently, users can enter the "Uncommon Characters" applet by searching for keywords such as "Chinese character pick-up" and "rare characters". In the mini program, users can submit pictures of rare characters that have not been recognized and entered by the system. After confirmation, Alipay engineers will make additional entries into the font library. This website noticed that users can also experience the latest word-splitting input method in the mini program. This input method is designed for rare words with unclear pronunciation. User dismantling
 Introducing the latest Win 11 sound tuning method
Jan 08, 2024 pm 06:41 PM
Introducing the latest Win 11 sound tuning method
Jan 08, 2024 pm 06:41 PM
After updating to the latest win11, many users find that the sound of their system has changed slightly, but they don’t know how to adjust it. So today, this site brings you an introduction to the latest win11 sound adjustment method for your computer. It is not difficult to operate. And the choices are diverse, come and download and try them out. How to adjust the sound of the latest computer system Windows 11 1. First, right-click the sound icon in the lower right corner of the desktop and select "Playback Settings". 2. Then enter settings and click "Speaker" in the playback bar. 3. Then click "Properties" on the lower right. 4. Click the "Enhance" option bar in the properties. 5. At this time, if the √ in front of "Disable all sound effects" is checked, cancel it. 6. After that, you can select the sound effects below to set and click
 How uniapp achieves rapid conversion between mini programs and H5
Oct 20, 2023 pm 02:12 PM
How uniapp achieves rapid conversion between mini programs and H5
Oct 20, 2023 pm 02:12 PM
How uniapp can achieve rapid conversion between mini programs and H5 requires specific code examples. In recent years, with the development of the mobile Internet and the popularity of smartphones, mini programs and H5 have become indispensable application forms. As a cross-platform development framework, uniapp can quickly realize the conversion between small programs and H5 based on a set of codes, greatly improving development efficiency. This article will introduce how uniapp can achieve rapid conversion between mini programs and H5, and give specific code examples. 1. Introduction to uniapp unia
