

How to get and set custom attributes in H5
Customizing attributes for elements is a new feature added in HTML5. Simply put, the custom data attribute specification specifies that any attribute name starting with data- must be assigned a value. Custom data attributes are used to save private custom data of a page or application. These custom data attributes are saved in the DOM and have no impact on the layout and performance of the entire DOM. However, they can facilitate the interaction and control of the entire web page. expression effect.
For example, we get all the cities in a certain area through an object, but we also need to get other information about the city to facilitate the next operation. We can add a custom attribute to the label of this city to store it. For other information in this area, we can directly get the value through the attribute name we set during operation, which can greatly increase the operation volume of us and the computer.
When storing a value in an attribute, please note that it must be a string or an object, so when the data that needs to be stored is an object, remember to convert it into a string.
var cityStr = JSON.stringify(cityObj);
For the acquisition and setting of data attribute values, JQ provides two Methods attr() and data()
When only one parameter is passed, this parameter is the attribute name and is used to obtain the value of the attribute.
When passing two parameters, the attribute name and attribute value are set.
$(selector).attr(attribute,value)
The following is a small case of using data to access custom attributes:
<p id="box1"></p><button id="btn1">click1</button><button id="btn2">click2</button></body><script src="../assets/jquery-1.9.1.min.js"></script><script>
    //点击click1向box添加属性student,属性值为tom
    $("#btn1").click(function () {
        $("#box1").data("student","tom")
    });    //通过属性名获取属性值
    $("#btn2").click(function () {
        alert($("#box1").data("student"));
});</script>Use attr to achieve the same effect.
<script>
    $("#btn").click(function () {
        $("#box1").attr("data-student","tom")
    });
    $("#btn2").click(function () {
        alert($("#box1").attr("data-student"));
    });</script>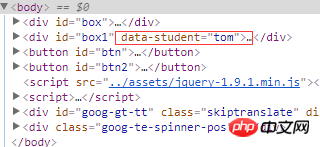
You can see through the developer tools that when you click the save button (click1), custom attributes are automatically added to box1. When adding them using the data method, there are no custom attributes here. You will see data-student="tom", and you can still use it to get the value "tom". There is not much difference between the two, just the reference method is different. Adding data- in front of the attribute name is the H5 standard way of writing, and it is best to add it.
It should also be noted here that
1. The custom attribute name cannot be the same as the system attribute name, eg: class, name….
2. All attribute values can only be String, whether system or custom
3. Html5 stipulates that when customizing data attributes for an element, the attribute name starts with data-, but the real attribute name does not include data-
The above is the detailed content of How to get and set custom attributes in H5. For more information, please follow other related articles on the PHP Chinese website!

Hot AI Tools

Undresser.AI Undress
AI-powered app for creating realistic nude photos

AI Clothes Remover
Online AI tool for removing clothes from photos.

Undress AI Tool
Undress images for free

Clothoff.io
AI clothes remover

Video Face Swap
Swap faces in any video effortlessly with our completely free AI face swap tool!

Hot Article
Hot Tools

Notepad++7.3.1
Easy-to-use and free code editor

SublimeText3 Chinese version
Chinese version, very easy to use

Zend Studio 13.0.1
Powerful PHP integrated development environment

Dreamweaver CS6
Visual web development tools

SublimeText3 Mac version
God-level code editing software (SublimeText3)
Hot Topics
 1389
1389
 52
52

 Table Border in HTML
Sep 04, 2024 pm 04:49 PM
Table Border in HTML
Sep 04, 2024 pm 04:49 PM
Guide to Table Border in HTML. Here we discuss multiple ways for defining table-border with examples of the Table Border in HTML.
 Nested Table in HTML
Sep 04, 2024 pm 04:49 PM
Nested Table in HTML
Sep 04, 2024 pm 04:49 PM
This is a guide to Nested Table in HTML. Here we discuss how to create a table within the table along with the respective examples.
 HTML margin-left
Sep 04, 2024 pm 04:48 PM
HTML margin-left
Sep 04, 2024 pm 04:48 PM
Guide to HTML margin-left. Here we discuss a brief overview on HTML margin-left and its Examples along with its Code Implementation.
 HTML Table Layout
Sep 04, 2024 pm 04:54 PM
HTML Table Layout
Sep 04, 2024 pm 04:54 PM
Guide to HTML Table Layout. Here we discuss the Values of HTML Table Layout along with the examples and outputs n detail.
 HTML Input Placeholder
Sep 04, 2024 pm 04:54 PM
HTML Input Placeholder
Sep 04, 2024 pm 04:54 PM
Guide to HTML Input Placeholder. Here we discuss the Examples of HTML Input Placeholder along with the codes and outputs.
 Moving Text in HTML
Sep 04, 2024 pm 04:45 PM
Moving Text in HTML
Sep 04, 2024 pm 04:45 PM
Guide to Moving Text in HTML. Here we discuss an introduction, how marquee tag work with syntax and examples to implement.
 HTML Ordered List
Sep 04, 2024 pm 04:43 PM
HTML Ordered List
Sep 04, 2024 pm 04:43 PM
Guide to the HTML Ordered List. Here we also discuss introduction of HTML Ordered list and types along with their example respectively
 HTML onclick Button
Sep 04, 2024 pm 04:49 PM
HTML onclick Button
Sep 04, 2024 pm 04:49 PM
Guide to HTML onclick Button. Here we discuss their introduction, working, examples and onclick Event in various events respectively.
