

Introduction to the installation method of Mysql5.7.19 under Centos7
This article mainly introduces the detailed installation tutorial of Mysql5.7.19 under Centos7. The editor thinks it is very good. I hereby share it on the Script Home platform. Friends who need it can refer to it
1. Download
Download mysql-5.7.19-linux-glibc2.12-x86_64.tar.gz from the official website, the version is 5.7.19
Download address:
https://dev.mysql.com/get/Downloads/MySQL-5.7/mysql-5.7.19-linux-glibc2.12-x86_64.tar.gzLinux
2. Create mysql user group and user
l Create mysql user group
1 |
|
l in mysql Create mysql user under the user group
1 |
|
3. Determine the installation directory and data directory
My The mysql installation directory is /data/mysql, and the data directory is /data/mysql/data.
4. Upload the installation file to the server
putmysql-5.7.19-linux-glibc2.12-x86_64.tar The .gz file is placed in the /data/installfiles directory through the ftp tool.
5. Unzip the tar.gz file/data directory
1 2 |
|
6. Modify the directory name
Rename mysql-5.7.19-linux-glibc2.12-x86_64 to mysql and move it to /usr/local/ under mysql.
1 |
|
7. Create a data directory
Create a data directory under /data/mysql
1 |
|
8. Authorize the mysql user
Change the mysql directory and the files and subdirectories below Change the file owner to mysql
1 2 |
|
Give the mysql directory and the files and subdirectories below it 755 permission
1 |
|
9. Compile, install and initialize mysql, and remember the temporary password
1 |
|
The temporary password installed at that time was: root@localhost:3?2YBeSg:Nte
10. Create a log file directory
1 2 3 4 5 6 |
|
11. Start the mysql service
1 |
|
12. Log in to msyql and enter the password (the password is the initialization password in step 9)
1 |
|
13. Change the password to “123456”
1 2 3 4 5 |
|
14. Modify the /etc/my.cnf file
##
1 2 3 4 5 6 7 8 9 10 11 12 13 14 15 16 17 18 19 |
|
The above is the detailed content of Introduction to the installation method of Mysql5.7.19 under Centos7. For more information, please follow other related articles on the PHP Chinese website!

Hot AI Tools

Undresser.AI Undress
AI-powered app for creating realistic nude photos

AI Clothes Remover
Online AI tool for removing clothes from photos.

Undress AI Tool
Undress images for free

Clothoff.io
AI clothes remover

Video Face Swap
Swap faces in any video effortlessly with our completely free AI face swap tool!
Hot Article
Hot Tools

Notepad++7.3.1
Easy-to-use and free code editor

SublimeText3 Chinese version
Chinese version, very easy to use

Zend Studio 13.0.1
Powerful PHP integrated development environment

Dreamweaver CS6
Visual web development tools

SublimeText3 Mac version
God-level code editing software (SublimeText3)
Hot Topics
 1393
1393
 52
52

 Detailed introduction to what wapi is
Jan 07, 2024 pm 09:14 PM
Detailed introduction to what wapi is
Jan 07, 2024 pm 09:14 PM
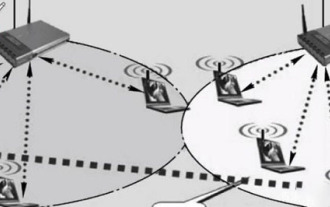
Users may have seen the term wapi when using the Internet, but for some people they definitely don’t know what wapi is. The following is a detailed introduction to help those who don’t know to understand. What is wapi: Answer: wapi is the infrastructure for wireless LAN authentication and confidentiality. This is like functions such as infrared and Bluetooth, which are generally covered near places such as office buildings. Basically they are owned by a small department, so the scope of this function is only a few kilometers. Related introduction to wapi: 1. Wapi is a transmission protocol in wireless LAN. 2. This technology can avoid the problems of narrow-band communication and enable better communication. 3. Only one code is needed to transmit the signal
 CentOS7 various version image download addresses and version descriptions (including Everything version)
Feb 29, 2024 am 09:20 AM
CentOS7 various version image download addresses and version descriptions (including Everything version)
Feb 29, 2024 am 09:20 AM
When loading CentOS-7.0-1406, there are many optional versions. For ordinary users, they don’t know which one to choose. Here is a brief introduction: (1) CentOS-xxxx-LiveCD.ios and CentOS-xxxx- What is the difference between bin-DVD.iso? The former only has 700M, and the latter has 3.8G. The difference is not only in size, but the more essential difference is that CentOS-xxxx-LiveCD.ios can only be loaded into the memory and run, and cannot be installed. Only CentOS-xxx-bin-DVD1.iso can be installed on the hard disk. (2) CentOS-xxx-bin-DVD1.iso, Ce
 Detailed explanation of whether win11 can run PUBG game
Jan 06, 2024 pm 07:17 PM
Detailed explanation of whether win11 can run PUBG game
Jan 06, 2024 pm 07:17 PM
Pubg, also known as PlayerUnknown's Battlegrounds, is a very classic shooting battle royale game that has attracted a lot of players since its popularity in 2016. After the recent launch of win11 system, many players want to play it on win11. Let's follow the editor to see if win11 can play pubg. Can win11 play pubg? Answer: Win11 can play pubg. 1. At the beginning of win11, because win11 needed to enable tpm, many players were banned from pubg. 2. However, based on player feedback, Blue Hole has solved this problem, and now you can play pubg normally in win11. 3. If you meet a pub
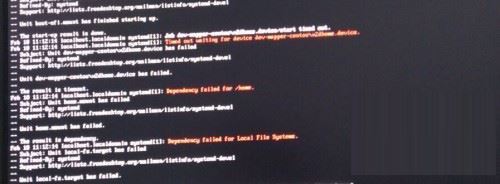 Steps to enter CentOS 7 emergency repair mode
Jan 13, 2024 am 09:36 AM
Steps to enter CentOS 7 emergency repair mode
Jan 13, 2024 am 09:36 AM
Open the centos7 page and appear: welcome to emergency mode! afterloggingin, type "journalctl -xb" to viewsystemlogs, "systemctlreboot" toreboot, "systemctldefault" to tryagaintobootintodefaultmode. giverootpasswordformaintenance(??Control-D???): Solution: execute r
 How to set password rules in centos7? How to set password rules in centos7
Jan 07, 2024 pm 01:17 PM
How to set password rules in centos7? How to set password rules in centos7
Jan 07, 2024 pm 01:17 PM
Set password rules for security reasons Set the number of days after which passwords expire. User must change password within days. This setting only affects created users, not existing users. If setting to an existing user, run the command "chage -M (days) (user)". PASS_MAX_DAYS60#Password expiration time PASS_MIN_DAYS3#Initial password change time PASS_MIN_LEN8#Minimum password length PASS_WARN_AGE7#Password expiration prompt time Repeat password restriction use [root@linuxprobe~]#vi/etc/pam.d/system-auth#nearline15:
 How to install mbstring extension under CENTOS7?
Jan 06, 2024 pm 09:59 PM
How to install mbstring extension under CENTOS7?
Jan 06, 2024 pm 09:59 PM
1.UncaughtError:Calltoundefinedfunctionmb_strlen(); When the above error occurs, it means that we have not installed the mbstring extension; 2. Enter the PHP installation directory cd/temp001/php-7.1.0/ext/mbstring 3. Start phpize(/usr/local/bin /phpize or /usr/local/php7-abel001/bin/phpize) command to install php extension 4../configure--with-php-config=/usr/local/php7-abel
 Detailed explanation of decompression file command (zip) under centos7
Jan 07, 2024 pm 06:30 PM
Detailed explanation of decompression file command (zip) under centos7
Jan 07, 2024 pm 06:30 PM
1. The compressed folder is a zip file [root@cgls]#zip-rmydata.zipmydata2. Unzip mydata.zip into the mydatabak directory [root@cgls]#unzipmydata.zip-dmydatabak3.mydata01 folder and mydata02.txt are compressed into mydata.zip[root@cgls]#zipmydata.zipmydata01mydata02.txt4. Decompress the mydata.zip file directly [root@cgls]#unzipmydata.zip5. View myd
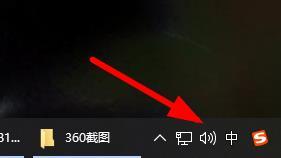 Introducing the latest Win 11 sound tuning method
Jan 08, 2024 pm 06:41 PM
Introducing the latest Win 11 sound tuning method
Jan 08, 2024 pm 06:41 PM
After updating to the latest win11, many users find that the sound of their system has changed slightly, but they don’t know how to adjust it. So today, this site brings you an introduction to the latest win11 sound adjustment method for your computer. It is not difficult to operate. And the choices are diverse, come and download and try them out. How to adjust the sound of the latest computer system Windows 11 1. First, right-click the sound icon in the lower right corner of the desktop and select "Playback Settings". 2. Then enter settings and click "Speaker" in the playback bar. 3. Then click "Properties" on the lower right. 4. Click the "Enhance" option bar in the properties. 5. At this time, if the √ in front of "Disable all sound effects" is checked, cancel it. 6. After that, you can select the sound effects below to set and click
