
 Database
Mysql Tutorial
Detailed explanation of decompression, installation, backup and restoration of MySQL in Windows environment
Database
Mysql Tutorial
Detailed explanation of decompression, installation, backup and restoration of MySQL in Windows environment
Detailed explanation of decompression, installation, backup and restoration of MySQL in Windows environment

This article mainly introduces the decompression, installation, backup and restoration of mysql in the windows environment. Friends in need can refer to the following
The system environment is server2012
1. Download the decompression version of mysql. Unzip the installation package to the specified directory
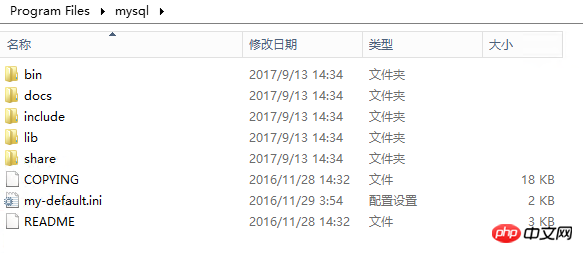
2. In the above directory, copy a copy of the my-default.ini file, rename it to my.ini, and make the following modifications (according to Required):
[mysqld]
# 服务端的编码方式
character_set_server=utf8
# These are commonly set, remove the # and set as required.
#数据文件存放目录
basedir = C:\Program Files\mysql
#数据文件存放目录
datadir = C:\Program Files\mysql\data
port = 3306
# server_id = .....
# Remove leading # to set options mainly useful for reporting servers.
# The server defaults are faster for transactions and fast SELECTs.
# Adjust sizes as needed, experiment to find the optimal values.
# join_buffer_size = 128M
# sort_buffer_size = 2M
# read_rnd_buffer_size = 2M
sql_mode=NO_ENGINE_SUBSTITUTION,STRICT_TRANS_TABLES
# 允许最大连接数
max_connections=200
3. Add environment variables and add C:\Program Files\mysql\bin to the system’s environment variable Path
4 , execute the command mysqld -install
<img src="/static/imghw/default1.png" data-src="https://img.php.cn/upload/article/000/000/194/b2f31546b96637e8c86469c8ce6510de-1.png" class="lazy" alt=""/>
in the command line and the corresponding uninstall command: mysqld -- remove
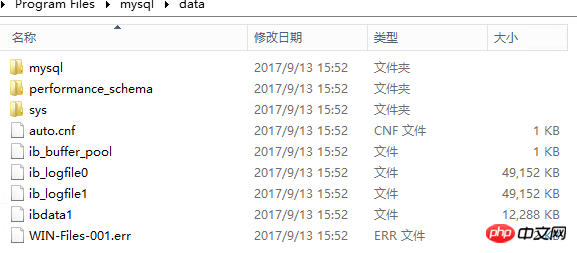
5. mysql data initialization
Execute the mysqld --initialize-insecure --user=mysql command to create a root account with an empty password. Note that if the mysqld --initialize command is executed, a random password user will be created.

The initialization data will generate a data folder in the installation directory, as shown below:
Because the setting in the above configuration file is datadir = C:\Program Files\mysql\data, so the folder name is data.
6. Run net start mysql to start the service.

7. Set the password. Execute the mysqladmin -u root -p password new password command to set the password for the root user. Here it is 123.
Note that the original password is entered at Enter password and is empty here.

8. Log in

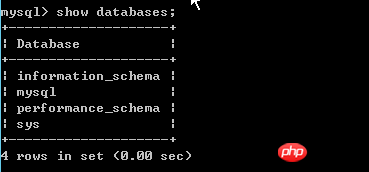
9. View the database
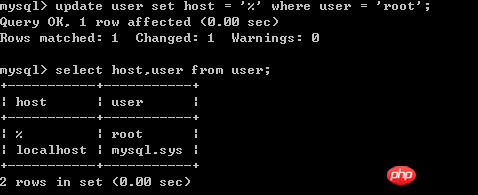
10. Set up remote login
View the user table, as follows:
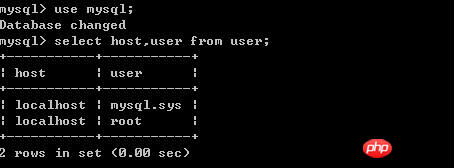
Execute the command in the database update user set host = '%' where user = 'root';
As shown below:
It is best to refresh the permissionsmysql> flush privileges;
Finally restart the mysql service and you can log in remotely (if remote login is not possible, restarting will usually solve the problem).
C:\Program Files\mysql\bin>net stop mysql
MySQL 服务正在停止..
MySQL 服务已成功停止。
C:\Program Files\mysql\bin>net start mysql
MySQL 服务正在启动 .
MySQL 服务已经启动成功。
11. Forgot password processing
As shown below, open the configuration file my.ini, add skip-grant-tables under mysqld, save and exit, and Restart the mysql service.

After that, you can use mysql -u root -p to log in without using a password. After
enter the database and execute use mysql The command switches to the mysql database.
Then execute the following command
update MySQL.user set authentication_string=password('123') where user='root' ;
flush privileges;

After making the changes, re-modify the my.ini file and add the skip-grant-tables Delete this line, save and exit, and restart the mysql service.
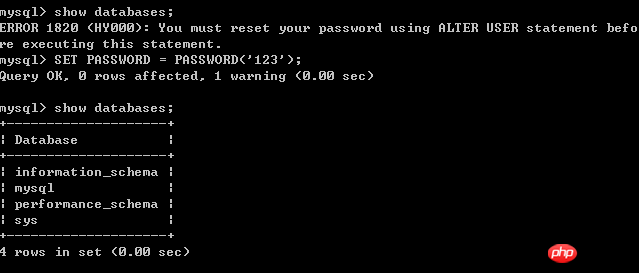
It is worth noting that you may encounter an 1820 error when re-entering the database, requiring you to reset your password, as shown below. At this time, you only need to execute the command SET PASSWORD = PASSWORD('123'); That’s it
12. Backup and restore
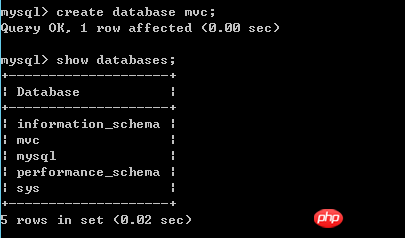
For testing, create a database mvc
Restore, the syntax is as follows:
mysql -u root -p [dbname] < backup.sql
In the example below, restore the mvc database
The command executed is mysql -u root -p mvc < e:\mvc201709120200.sql

备份,语法如下:
备份一个数据库多个表
mysqldump -u root -p dbname table1 table2 ... > bakname.sql
备份多个数据库 加上了--databases选项,后面跟多个数据库
mysqldump -u root -p --databases dbname1 dbname2... > bakname.sql
备份所有数据库
mysqldump -u root -p -all-databases > bakname.sql
下图中的示例,只备份一个数据库mvc,同时指定字符集为utf8
mysqldump -u root -p --default-character-set=utf8 mvc >e:\mvcbak.sql

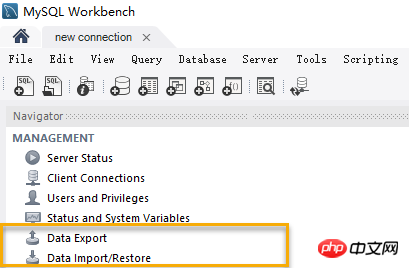
通常,可以使用一些工具进行数据备份与还原,例如Workbench
如果要定时将数据备份到其他服务器,可以使用mysqlbackupftp这个软件。
总结
The above is the detailed content of Detailed explanation of decompression, installation, backup and restoration of MySQL in Windows environment. For more information, please follow other related articles on the PHP Chinese website!

Hot AI Tools

Undresser.AI Undress
AI-powered app for creating realistic nude photos

AI Clothes Remover
Online AI tool for removing clothes from photos.

Undress AI Tool
Undress images for free

Clothoff.io
AI clothes remover

AI Hentai Generator
Generate AI Hentai for free.

Hot Article
Hot Tools

Notepad++7.3.1
Easy-to-use and free code editor

SublimeText3 Chinese version
Chinese version, very easy to use

Zend Studio 13.0.1
Powerful PHP integrated development environment

Dreamweaver CS6
Visual web development tools

SublimeText3 Mac version
God-level code editing software (SublimeText3)
Hot Topics


 How to update the latest version of Bybit Exchange? Will there be any impact if it is not updated?
Feb 21, 2025 pm 10:54 PM
How to update the latest version of Bybit Exchange? Will there be any impact if it is not updated?
Feb 21, 2025 pm 10:54 PM
The way to update ByBit exchanges varies by platform and device: Mobile: Check for updates and install in the app store. Desktop Client: Check for updates in the Help menu and install automatically. Web page: You need to manually access the official website for updates. Failure to update the exchange can lead to security vulnerabilities, functional limitations, compatibility issues and reduced transaction execution efficiency.
 Pi Node Teaching: What is a Pi Node? How to install and set up Pi Node?
Mar 05, 2025 pm 05:57 PM
Pi Node Teaching: What is a Pi Node? How to install and set up Pi Node?
Mar 05, 2025 pm 05:57 PM
Detailed explanation and installation guide for PiNetwork nodes This article will introduce the PiNetwork ecosystem in detail - Pi nodes, a key role in the PiNetwork ecosystem, and provide complete steps for installation and configuration. After the launch of the PiNetwork blockchain test network, Pi nodes have become an important part of many pioneers actively participating in the testing, preparing for the upcoming main network release. If you don’t know PiNetwork yet, please refer to what is Picoin? What is the price for listing? Pi usage, mining and security analysis. What is PiNetwork? The PiNetwork project started in 2019 and owns its exclusive cryptocurrency Pi Coin. The project aims to create a one that everyone can participate
 How to install deepseek
Feb 19, 2025 pm 05:48 PM
How to install deepseek
Feb 19, 2025 pm 05:48 PM
There are many ways to install DeepSeek, including: compile from source (for experienced developers) using precompiled packages (for Windows users) using Docker containers (for most convenient, no need to worry about compatibility) No matter which method you choose, Please read the official documents carefully and prepare them fully to avoid unnecessary trouble.
 Coinsuper exchange software channel official website entrance
Feb 21, 2025 pm 10:39 PM
Coinsuper exchange software channel official website entrance
Feb 21, 2025 pm 10:39 PM
The official website entrance of the Coinsuper Exchange: https://www.coinsuper.com. The client download channels are: Windows client, macOS client, and mobile (iOS/Android). Registration requires an email, mobile phone number and password, and you need to complete real-name authentication before you can trade. The platform provides a variety of digital asset transactions, including Bitcoin, Ethereum, etc., with the transaction fee rate of 0.1% for both orders and acceptors. Security safeguards include cold wallet storage, dual-factor verification, anti-money laundering and anti-terrorism financing measures, and with security public
 BITGet official website installation (2025 beginner's guide)
Feb 21, 2025 pm 08:42 PM
BITGet official website installation (2025 beginner's guide)
Feb 21, 2025 pm 08:42 PM
BITGet is a cryptocurrency exchange that provides a variety of trading services including spot trading, contract trading and derivatives. Founded in 2018, the exchange is headquartered in Singapore and is committed to providing users with a safe and reliable trading platform. BITGet offers a variety of trading pairs, including BTC/USDT, ETH/USDT and XRP/USDT. Additionally, the exchange has a reputation for security and liquidity and offers a variety of features such as premium order types, leveraged trading and 24/7 customer support.
 Ouyi okx installation package is directly included
Feb 21, 2025 pm 08:00 PM
Ouyi okx installation package is directly included
Feb 21, 2025 pm 08:00 PM
Ouyi OKX, the world's leading digital asset exchange, has now launched an official installation package to provide a safe and convenient trading experience. The OKX installation package of Ouyi does not need to be accessed through a browser. It can directly install independent applications on the device, creating a stable and efficient trading platform for users. The installation process is simple and easy to understand. Users only need to download the latest version of the installation package and follow the prompts to complete the installation step by step.
 Get the gate.io installation package for free
Feb 21, 2025 pm 08:21 PM
Get the gate.io installation package for free
Feb 21, 2025 pm 08:21 PM
Gate.io is a popular cryptocurrency exchange that users can use by downloading its installation package and installing it on their devices. The steps to obtain the installation package are as follows: Visit the official website of Gate.io, click "Download", select the corresponding operating system (Windows, Mac or Linux), and download the installation package to your computer. It is recommended to temporarily disable antivirus software or firewall during installation to ensure smooth installation. After completion, the user needs to create a Gate.io account to start using it.
 The latest version download of gate.io
Mar 05, 2025 pm 07:51 PM
The latest version download of gate.io
Mar 05, 2025 pm 07:51 PM
Need to download the Gate.io app to start your cryptocurrency journey? This guide details the latest version download steps for iOS, Android, and Windows devices. Simply visit the official website, find the download link and select the appropriate option based on your device. For iOS, it will go directly to the App Store, while Android and Windows users will download the APK or installer for manual installation. Once installed, you can launch the app and set up your account to step into the world of cryptocurrency.
