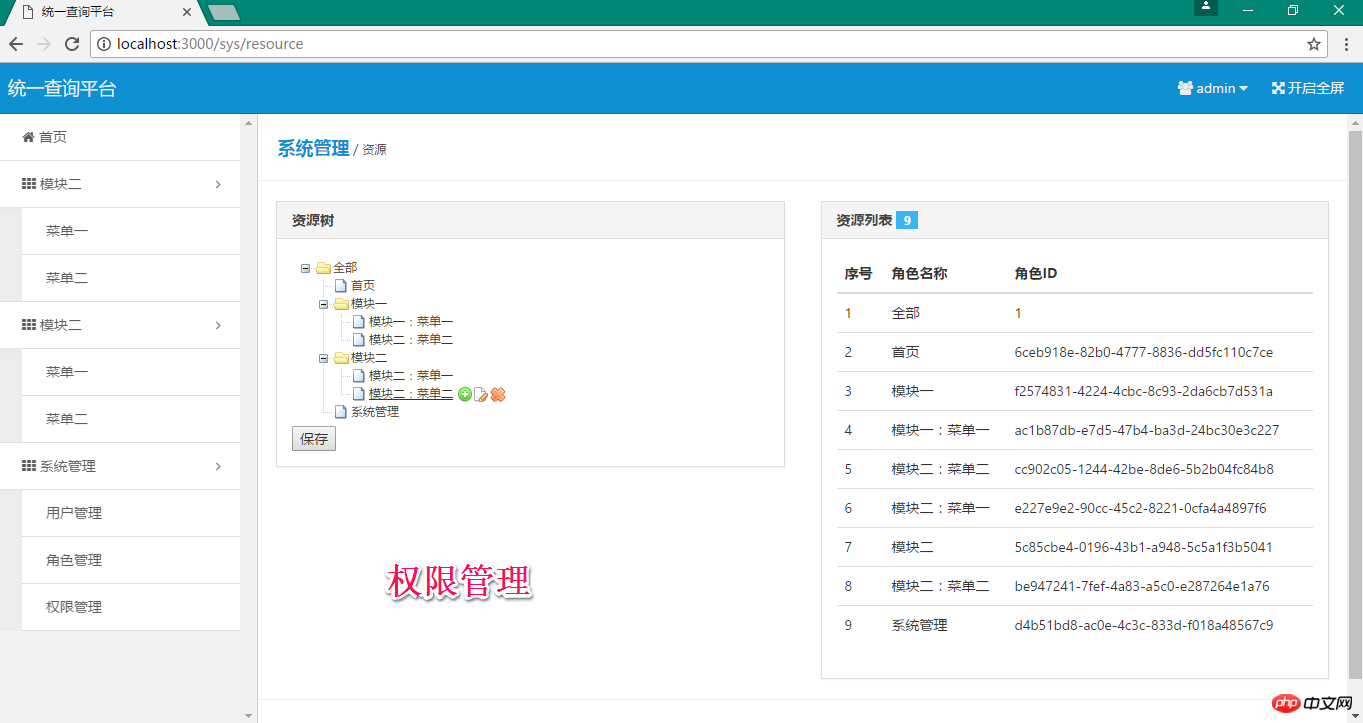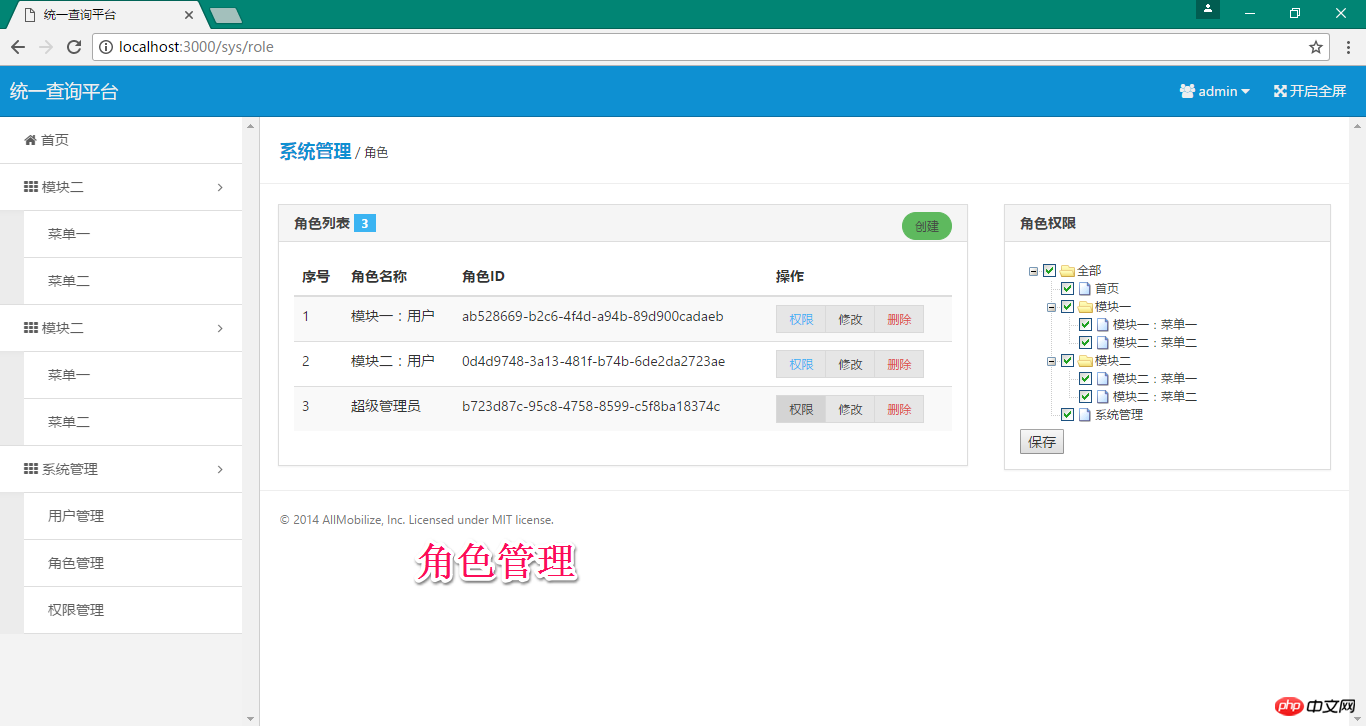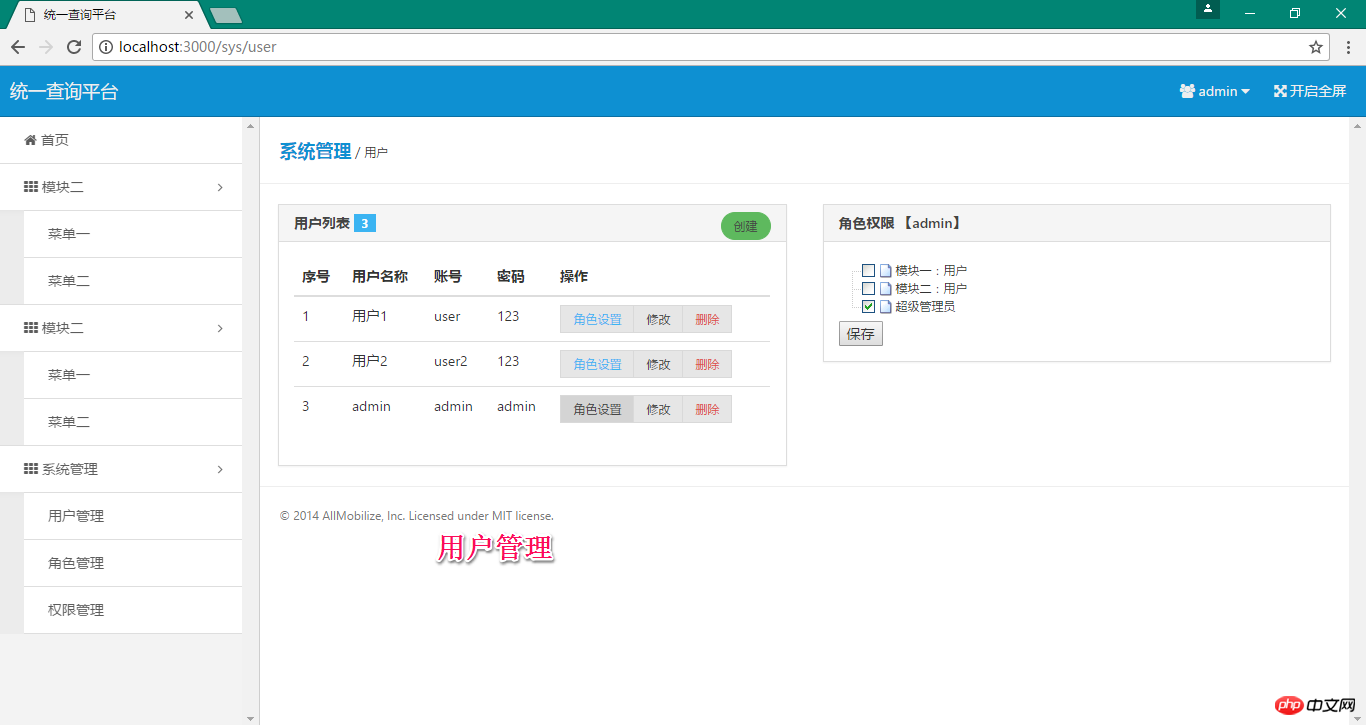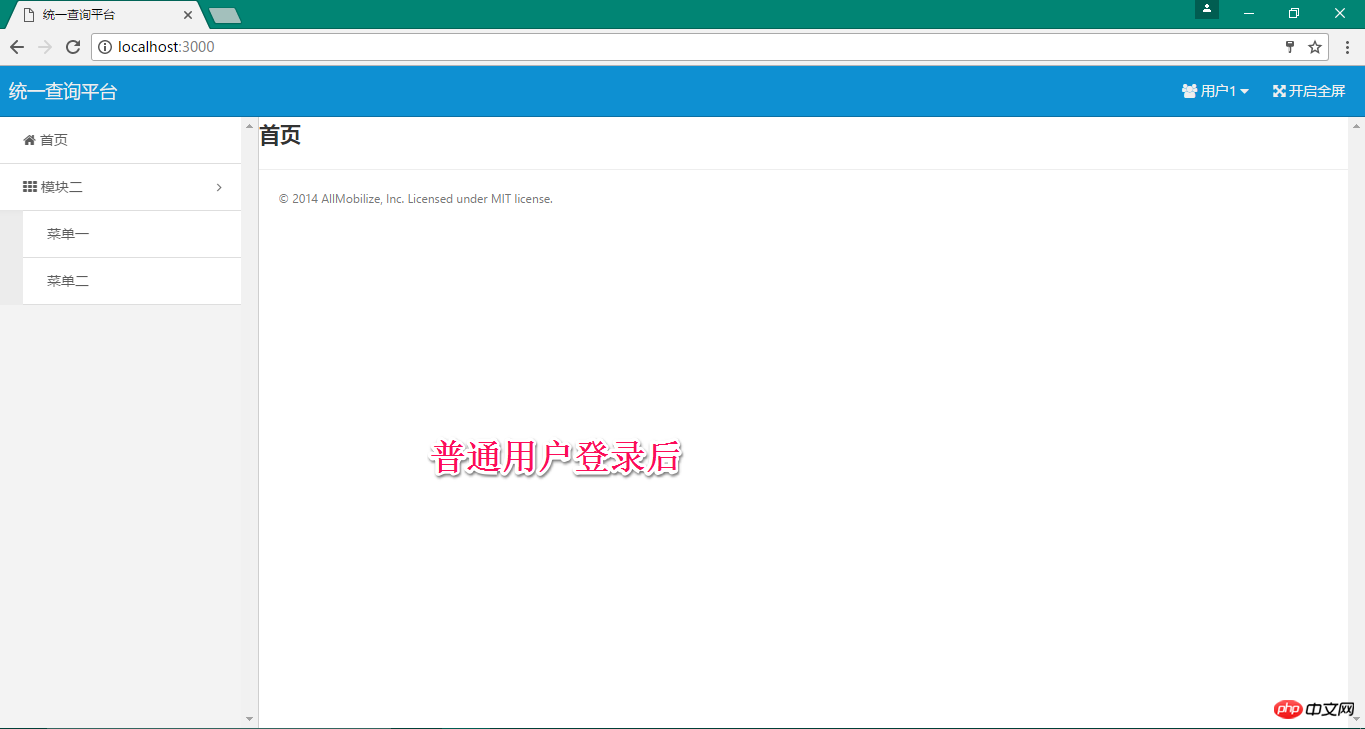
This article mainly introduces the detailed explanation of express's permission management system. The editor thinks it is quite good. Now I will share it with you and give you a reference. Let’s follow the editor and take a look.
Permission management is a common component in the management system. It is usually necessary to define resources and allocate resources to users. This is achieved by determining whether the user has permission to add, delete, modify, and check.
Original intention:
There are more than 20 large and small projects developed using express, and each of the previous projects existed independently. Recently, the leader suggested integrating these small projects into a large platform, granting permissions to various departments, and allowing them to operate on one platform. The benefits of doing so are firstly to facilitate project management, and secondly to save development costs. But it seems that there is not much information on using nodejs for permission management at present. I am sharing it here for reference only.
At first, I wandered among the node_acl, Connect Roles, and rbac frameworks, and finally chose the node_acl framework, but node_acl only helps you with part of the permission management work, and only saves users, roles, and resources. The relationships between users, roles, and resources themselves are not saved. What we have to do is to complete the addition, deletion, modification, and check of users, roles, and resources, and it will be a complete permission management system.
Expected results:
After the super administrator logs in, he can perform all operations and see all menu bars;
Ordinary users only have partial permissions after logging in. Only part of the menu bar or action buttons are visible.
Main modules:
express: node framework
express-hbs: template engine
node_acl: the core of the permission management system
mongodb: database
sails-mongodb: connection mongodb's engine
Front-end:
Amaze ui, angular, Z-Tree
Source code address: https:// github.com/wuwanyu/aclDemo
Running prerequisites:
Install mongodb database
Run
1. Data preparation
(1) Copy the contents of the sql folder in the source code directory to the bin directory of the mongodb installation directory
(2) Enter the bin directory of the mongodb installation directory using the command line and run mongorestore -d acltest acltest.dmp/acltest, import data into acltest table
2. Install dependent packages: npm install
3. Run: npm start
4. Browse Server input: http://localhost:3000 (username/password: admin/admin or user/123)
Partial screenshot


Interface Document
Resource related:
1. Save resource tree
2. Get resource list
Role related:
1.Add role
2.Modify role
3.Query role list
4.Delete role
4.Query role details (including role permission list)
User related:
1.User login
2.User Exit
3.Add user
4.Modify user
5.Delete user
6.Get user list
7.Query user details (including user permission list)
8.Give User adds role
9. Get user role
Resource
1. Save resource tree (add, modify, delete are all in this method)
/api/acl_resource/addArray
参数:
{
 list:JSON.stringify(nodeList)
}
返回值:
{
 code:"200",
 msg:"创建成功!"
}2. Get the resource list
##
/api/acl_resource/getList
参数:无
返回值:
{
 "code": "200",
 "msg": "获取详情成功",
 "result": [
  {
   "pId": "0",
   "name": "全部",
   "pinyin_name": "quanbu",
   "createdAt": "2017-05-26T09:49:03.139Z",
   "updatedAt": "2017-05-27T07:17:41.959Z",
   "id": "1"
  },
  {
   "pId": "1",
   "name": "首页",
   "pinyin_name": "shouye",
   "createdAt": "2017-05-26T09:49:03.141Z",
   "updatedAt": "2017-05-27T07:17:41.961Z",
   "id": "41cd1dce-66c9-4aca-91c2-9135fba291c3"
  },
  {
   "pId": "1",
   "name": "经适房",
   "pinyin_name": "jingshifang",
   "createdAt": "2017-05-26T09:49:03.142Z",
   "updatedAt": "2017-05-27T07:17:41.962Z",
   "id": "d2da6e56-f005-43cf-b109-af3a966fb059"
  },
  {
   "pId": "d2da6e56-f005-43cf-b109-af3a966fb059",
   "name": "经适房首页",
   "pinyin_name": "jingshifangshouye",
   "createdAt": "2017-05-26T09:49:03.142Z",
   "updatedAt": "2017-05-27T07:17:41.963Z",
   "id": "74a7970a-d53e-494b-9671-4b7b415c3469"
  },
  {
   "pId": "d2da6e56-f005-43cf-b109-af3a966fb059",
   "name": "经适房历史",
   "pinyin_name": "jingshifanglishi",
   "createdAt": "2017-05-26T09:49:03.143Z",
   "updatedAt": "2017-05-27T07:17:41.964Z",
   "id": "15862997-acef-43c1-a1c3-3af4b8e6588b"
  },
  {
   "pId": "1",
   "name": "对账单",
   "pinyin_name": "duizhangdan",
   "createdAt": "2017-05-26T09:51:48.411Z",
   "updatedAt": "2017-05-27T07:17:41.965Z",
   "id": "78aa4788-f42f-42b6-9db1-e8ff0ad5b5df"
  },
  {
   "pId": "78aa4788-f42f-42b6-9db1-e8ff0ad5b5df",
   "name": "对账单首页",
   "pinyin_name": "duizhangdanshouye",
   "createdAt": "2017-05-26T09:51:48.412Z",
   "updatedAt": "2017-05-27T07:17:41.966Z",
   "id": "c0f68fa4-81cd-4908-8005-97c88445d7b3"
  },
  {
   "pId": "78aa4788-f42f-42b6-9db1-e8ff0ad5b5df",
   "name": "对账单管理",
   "pinyin_name": "duizhangdanguanli",
   "createdAt": "2017-05-26T09:51:48.412Z",
   "updatedAt": "2017-05-27T07:17:41.966Z",
   "id": "5fe3e266-5a2a-47a4-b309-ee6f15db49ec"
  },
  {
   "pId": "1",
   "name": "系统管理",
   "pinyin_name": "xitongguanli",
   "createdAt": "2017-05-26T09:51:48.413Z",
   "updatedAt": "2017-05-27T07:17:41.966Z",
   "id": "fbe848c4-950e-402d-92c5-6fe067fd1bac"
  },
  {
   "pId": "fbe848c4-950e-402d-92c5-6fe067fd1bac",
   "name": "用户管理",
   "pinyin_name": "yonghuguanli",
   "createdAt": "2017-05-26T09:51:48.416Z",
   "updatedAt": "2017-05-27T07:17:41.967Z",
   "id": "1fd06306-6539-48e5-bf10-99ecd337e143"
  },
  {
   "pId": "fbe848c4-950e-402d-92c5-6fe067fd1bac",
   "name": "资源管理",
   "pinyin_name": "ziyuanguanli",
   "createdAt": "2017-05-26T09:51:48.416Z",
   "updatedAt": "2017-05-27T07:17:41.969Z",
   "id": "5de41a10-f31f-4eb2-91ba-25da102a25aa"
  },
  {
   "pId": "fbe848c4-950e-402d-92c5-6fe067fd1bac",
   "name": "角色管理",
   "pinyin_name": "jiaoseguanli",
   "createdAt": "2017-05-26T09:51:48.416Z",
   "updatedAt": "2017-05-27T07:17:41.970Z",
   "id": "9ffb5a8a-c304-403a-a724-f47cc73a9162"
  },
  {
   "pId": "1",
   "name": "new node1",
   "pinyin_name": "new node1",
   "createdAt": "2017-05-27T07:17:41.971Z",
   "updatedAt": "2017-05-27T07:17:41.971Z",
   "id": "d336dd69-80c7-492f-aee7-78a651b8305e"
  }
 ],
 "count": 13
}/api/acl_role/getList:获取角色列表
参数:无
返回值:
{
"code": "200",
"msg": "获取详情成功",
"result": [
{
"name": "经适房用户",
"createdAt": "2017-05-26T09:49:22.361Z",
"updatedAt": "2017-05-26T09:49:22.361Z",
"id": "27aab6d9-325c-4c88-be4a-5da516dc9613"
},
{
"name": "对账单用户",
"createdAt": "2017-05-26T09:52:15.061Z",
"updatedAt": "2017-05-26T09:52:15.061Z",
"id": "ba306957-9c80-4abb-89fd-17be828dd5f5"
},
{
"name": "对账单管理员",
"createdAt": "2017-05-26T09:52:26.914Z",
"updatedAt": "2017-05-26T09:52:26.914Z",
"id": "fc154424-2264-4de9-9a7c-1b1df048f802"
},
{
"name": "超级管理员",
"createdAt": "2017-05-26T09:52:39.894Z",
"updatedAt": "2017-05-26T09:52:39.894Z",
"id": "442cfc56-23a9-4cb9-85b5-641bc161c4c3"
}
],
"count": 4
}/api/acl_role/update
参数:
{
id:xxx,
name:xxx,
}
返回值:
{
code:"200",
msg:"修改成功!",
result:data.update
}/api/acl_role/getOne
参数:
id:27aab6d9-325c-4c88-be4a-5da516dc9613
返回值:
{
"code": "200",
"msg": "获取详情成功",
"result": {
"info": {
"name": "经适房用户",
"createdAt": "2017-05-26T09:49:22.361Z",
"updatedAt": "2017-05-26T09:49:22.361Z",
"id": "27aab6d9-325c-4c88-be4a-5da516dc9613"
},
"resources": {
"1": ["*"],
"74a7970a-d53e-494b-9671-4b7b415c3469":["*"],
"15862997-acef-43c1-a1c3-3af4b8e6588b": ["*"],
"d2da6e56-f005-43cf-b109-af3a966fb059": ["*"],
"d336dd69-80c7-492f-aee7-78a651b8305e":["*"]
}
}
}##
/api/acl_role/delete
① db删除角色
② acl删除该角色和资源的关系removeAllow、删除角色removeRole
参数:
{
 id:xxx,
}
返回值:
{
code:"200",
msg:"删除成功!",
result:result
}/api/acl_role/allow
① 删除角色和资源的关系acl.removeAllow
② 给角色和资源添加关系acl.allow
参数:
{
role:xxx,
resources:xxx
}
返回值:
{
code:"200",
msg:"成功!"
}
User related:
1. User login
/api/acl_user/login
参数:
{
 account:xxx,
 password:xxx
}
返回值:
{
code:200,
msg:"登录成功"
}
{
code:400,
msg:"密码错误"
}
{
code:400,
msg:"账号不存在"
}2. User exit
/api/acl_user/logout
参数:{}
返回值:
{
code:200,
msg:"退出成功!"
}3.Add user
/api/acl_user/add
参数:
{
 name:xxx,
 account:xxx,
 password:xxx
}
返回值:
{
code:"200",
msg:"创建成功!",
result:data.save
}4. Modify user
/api/acl_user/update
参数:
{
 id:xxx,
 name:xxx,
 account:xxx,
 password:xxx
}
返回值:
{
code:"200",
msg:"修改成功!",
result:data.save
}5. Query user details (including user permission list)
/api/acl_user/getOne
① db获取用户信息
② acl获取用户权限allowedPermissions
参数:
{
 id:xxx,
 name:xxx,
 account:xxx,
 password:xxx
}
返回值:
{
code:"200",
msg:"修改成功!",
result:data.save
}6. Get user list
/api/acl_user/getList
参数:
{

}
返回值:
{
 "code": "200",
 "msg": "获取详情成功",
 "result": [
  {
   "name": "wuwanyu",
   "createdAt": "2017-05-27T02:14:19.994Z",
   "updatedAt": "2017-05-27T02:50:56.309Z",
   "account": "120",
   "password": "123",
   "id": "7daa4635-9f9d-4c79-9f15-c827097ac15a"
  }
 ],
 "count": 1
}7. Delete user
/api/acl_user/delete
① db删除用户
② acl删除用户角色关系removeUserRoles、删除用户removeUser

参数:
{
 id:xxx
}
返回值:
{
code:"200",
msg:"删除成功!",
result:result
}8. Obtain user permissions
/api/acl_user/allowedPermissions
参数:
userId:xxx
resources:xxx
返回值:
{
code:"200",
msg:"成功!",
result:result
}9. Add roles to users
/api/acl_user/addUserRoles
① 获取用户所有角色acl.userRoles、删除用户所有角色acl.removeUserRoles
② 添加新的角色acl.addUserRoles
参数:
userId:xxx
roles:xxx
返回值:
{
code:"200",
msg:"成功!",
result:result
}10. Add roles to users
/api/acl_user/userRoles
① 获取用户所有角色acl.userRoles
参数:
userId:xxx
返回值:
{
code:"200",
msg:"成功!",
result:result
}nodejs open source permission management framework reference:
Advantages: Support express
Connect Roles (564 stars): https://github.com/ForbesLindesay/connect-roles
Comments: To support express, passport.js also needs to be introduced
rbac (309 stars): https://github.com/CherryProjects/rbac
Advantages: supports express
The above is the detailed content of Detailed explanation of building permission management system in express in nodejs. For more information, please follow other related articles on the PHP Chinese website!


