 Database
 Mysql Tutorial
 Detailed example of MYSQL dual-master full database synchronous replication
Detailed example of MYSQL dual-master full database synchronous replication
Environment:
The two servers A and B are installed with the mysql-5.7.18 server respectively and configured to synchronize each other's master and slave.
The linux system version is CentOS7
A server ip: 192.168.1.7 Host name: test1
B server ip: 192.168.1.8 Host name: test2
(Under the same LAN)
1. Preparation
1. Modify the host name
Command: hostnamectl set-hostname xxx
(View host name command :hostname)
2. Turn off the firewall
1) Check the firewall status
Command: firewall-cmd --state
Result: running
2) The firewall is running. First, shut down the firewall service. ## 4) Check the firewall status
Command: firewall-cmd --state
Result: not running
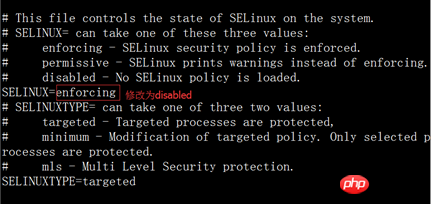
3. Turn off selinux policy
1) Check selinux running status
Command: getenforce
Result: Enforcing
2) Permanently shut down (need to restart the computer), edit selinux File vi /etc/sysconfig/selinux modify SELINUX=disabled
3) To the closed state
2. Configuration Master server (master) slave server (slave) 
log-bin=mysql-bin
   log-bin-index=mysql-bin
 [In the B server my.cnf file mysqld], add the content in the above picture, and only change the server-id value.
 server-id=2 log-bin=mysql-bin log-bin-index=mysql-bin
touch /var/lib/mysql/all.sql
 Backup command:
 [root@test1 mysql]# mysqldump -uroot -p123 --all-databases > /var/lib/mysql/all.sql
Copy the all.sql file to a path in server B (use the /var/lib/mysql path (for example) to restore.
Restore command:
[root@test2 /]# mysql -uroot -p123 < /var/lib/mysql/all.sql
3. Create users in mysql of servers A and B for synchronization.
Create user:
mysql> create user 'tongbu'@'%' identified by 'tongbu';
Authorization:
mysql> grant all on *.* to 'tongbu'@'%';
Delete user:
mysql> drop user '用户名'@'%';
After the A and B server users are created, test whether the users can remotely access each other Log in to mysql.
[root@test1 /]# mysql -utongbu -ptongbu -h192.168.1.8
   [root@test2 /]# mysql -utongbu -ptongbu -h192.168.1.7
Restart the mysql service in servers A and B after testing without problems: [root@test /]# service mysqld restart
4. Set A as the master server and B as the slave server.
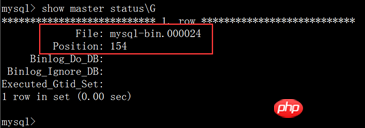
1) View the binary log name and offset value in server A mysql
Command: mysql> show master status\G
As shown below
## 2) Configure the connection server in server B
mysql> stop slave;
    mysql> change master to
      -> master_host='192.168.1.7',
      -> master_user='tongbu',
      -> master_password='tongbu',
      -> master_log_file='mysql-bin.000024',
      -> master_log_pos=154;
    mysql> start slave;
mysql> show slave status\G Enter this command to check whether the values of Slave_IO_Running and Slave_SQL_Running are Yes, as shown below
 5. Set B as the master server and A as the slave server.
1) View the binary log name and offset in server B mysql
Command: mysql> show master status\G

2 ) Configure the connection server in server A.
mysql> stop slave;
    mysql> change master to
      -> master_host='192.168.1.8',
      -> master_user='tongbu',
      -> master_password='tongbu',
      -> master_log_file='mysql-bin.000027',
      -> master_log_pos=154;
    mysql> start slave;
    mysql> show slave status\G 查看Slave_IO_Running和Slave_SQL_Running的值是否为Yes
At this point, the master-slave synchronization configuration of the two mysql databases is completed.
Error troubleshooting:
主键冲突、表已存在等错误代码如1062,1032,1060等,可以在mysql配置文件指定略过此类异常并继续下条sql同步,这样可以避免很多主从同步的异常中断。打开/etc/ mysql下的my.cnf文件,在[mysqld]后添加如下代码:
slave-skip-errors = 1062,1032,1060
3. 跳过异常恢复同步
mysql >slave stop;
 mysql >SET GLOBAL sql_slave_skip_counter = 1;
 mysql >slave start;
The above is the detailed content of Detailed example of MYSQL dual-master full database synchronous replication. For more information, please follow other related articles on the PHP Chinese website!

Hot AI Tools

Undresser.AI Undress
AI-powered app for creating realistic nude photos

AI Clothes Remover
Online AI tool for removing clothes from photos.

Undress AI Tool
Undress images for free

Clothoff.io
AI clothes remover

AI Hentai Generator
Generate AI Hentai for free.

Hot Article

Hot Tools

Notepad++7.3.1
Easy-to-use and free code editor

SublimeText3 Chinese version
Chinese version, very easy to use

Zend Studio 13.0.1
Powerful PHP integrated development environment

Dreamweaver CS6
Visual web development tools

SublimeText3 Mac version
God-level code editing software (SublimeText3)

Hot Topics
 1381
1381
 52
52
 MySQL: Simple Concepts for Easy Learning
Apr 10, 2025 am 09:29 AM
MySQL is an open source relational database management system. 1) Create database and tables: Use the CREATEDATABASE and CREATETABLE commands. 2) Basic operations: INSERT, UPDATE, DELETE and SELECT. 3) Advanced operations: JOIN, subquery and transaction processing. 4) Debugging skills: Check syntax, data type and permissions. 5) Optimization suggestions: Use indexes, avoid SELECT* and use transactions.
 How to open phpmyadmin
Apr 10, 2025 pm 10:51 PM
You can open phpMyAdmin through the following steps: 1. Log in to the website control panel; 2. Find and click the phpMyAdmin icon; 3. Enter MySQL credentials; 4. Click "Login".
 MySQL: An Introduction to the World's Most Popular Database
Apr 12, 2025 am 12:18 AM
MySQL is an open source relational database management system, mainly used to store and retrieve data quickly and reliably. Its working principle includes client requests, query resolution, execution of queries and return results. Examples of usage include creating tables, inserting and querying data, and advanced features such as JOIN operations. Common errors involve SQL syntax, data types, and permissions, and optimization suggestions include the use of indexes, optimized queries, and partitioning of tables.
 Why Use MySQL? Benefits and Advantages
Apr 12, 2025 am 12:17 AM
MySQL is chosen for its performance, reliability, ease of use, and community support. 1.MySQL provides efficient data storage and retrieval functions, supporting multiple data types and advanced query operations. 2. Adopt client-server architecture and multiple storage engines to support transaction and query optimization. 3. Easy to use, supports a variety of operating systems and programming languages. 4. Have strong community support and provide rich resources and solutions.
 How to use single threaded redis
Apr 10, 2025 pm 07:12 PM
Redis uses a single threaded architecture to provide high performance, simplicity, and consistency. It utilizes I/O multiplexing, event loops, non-blocking I/O, and shared memory to improve concurrency, but with limitations of concurrency limitations, single point of failure, and unsuitable for write-intensive workloads.
 MySQL and SQL: Essential Skills for Developers
Apr 10, 2025 am 09:30 AM
MySQL and SQL are essential skills for developers. 1.MySQL is an open source relational database management system, and SQL is the standard language used to manage and operate databases. 2.MySQL supports multiple storage engines through efficient data storage and retrieval functions, and SQL completes complex data operations through simple statements. 3. Examples of usage include basic queries and advanced queries, such as filtering and sorting by condition. 4. Common errors include syntax errors and performance issues, which can be optimized by checking SQL statements and using EXPLAIN commands. 5. Performance optimization techniques include using indexes, avoiding full table scanning, optimizing JOIN operations and improving code readability.
 MySQL's Place: Databases and Programming
Apr 13, 2025 am 12:18 AM
MySQL's position in databases and programming is very important. It is an open source relational database management system that is widely used in various application scenarios. 1) MySQL provides efficient data storage, organization and retrieval functions, supporting Web, mobile and enterprise-level systems. 2) It uses a client-server architecture, supports multiple storage engines and index optimization. 3) Basic usages include creating tables and inserting data, and advanced usages involve multi-table JOINs and complex queries. 4) Frequently asked questions such as SQL syntax errors and performance issues can be debugged through the EXPLAIN command and slow query log. 5) Performance optimization methods include rational use of indexes, optimized query and use of caches. Best practices include using transactions and PreparedStatemen
 How to recover data after SQL deletes rows
Apr 09, 2025 pm 12:21 PM
Recovering deleted rows directly from the database is usually impossible unless there is a backup or transaction rollback mechanism. Key point: Transaction rollback: Execute ROLLBACK before the transaction is committed to recover data. Backup: Regular backup of the database can be used to quickly restore data. Database snapshot: You can create a read-only copy of the database and restore the data after the data is deleted accidentally. Use DELETE statement with caution: Check the conditions carefully to avoid accidentally deleting data. Use the WHERE clause: explicitly specify the data to be deleted. Use the test environment: Test before performing a DELETE operation.


