
 Backend Development
Python Tutorial
Introducing the usage of Python-nmap network scanning and sniffing toolkit
Backend Development
Python Tutorial
Introducing the usage of Python-nmap network scanning and sniffing toolkit
Introducing the usage of Python-nmap network scanning and sniffing toolkit
nmap concept
NMap, also known as Network Mapper, was originally a network scanning and sniffing toolkit under Linux.
nmap is a network connection scanning software, used to scan open network connections of computers on the Internet. Determine which services are running on which connections and infer which operating system the computer is running (this is also known as fingerprinting). It is one of the must-use software for network administrators and is used to assess network system security.
Like most tools used for network security, nmap is also a tool favored by many hackers and hackers (also known as script kiddies). System administrators can use nmap to detect unauthorized use of servers in the work environment, but hackers will use nmap to collect the network settings of target computers to plan attacks.
Nmap is often confused with Nessus, a system vulnerability assessment software. Nmap uses stealth methods to avoid the surveillance of intrusion detection systems and try not to affect the daily operations of the target system.
Nmap was used by Trinity to hack into the energy management system of power plants in The Matrix, together with the 32-bit cyclic redundancy check vulnerability of SSH1.
nmap function
There are three basic functions. One is to detect whether a group of hosts is online; the second is to scan the host port and sniff the provided network services; and it can also Infer the operating system used by the host. Nmap can be used to scan LANs with as few as two nodes, up to networks with more than 500 nodes. Nmap also allows users to customize scanning techniques. Usually, a simple ping operation using the ICMP protocol can meet general needs; it can also deeply detect the UDP or TCP port, down to the operating system used by the host; it can also record all detection results into logs in various formats for further analysis. Analysis operations.
Perform a ping scan and print out the hosts that responded to the scan without further testing (such as port scanning or operating system detection):
nmap -sP 192.168.1.0/24
Only list each host on the specified network Host, do not send any packets to the target host:
nmap -sL 192.168.1.0/24
To detect the open ports of the target host, you can specify a comma-separated port list (such as -PS22, 23, 25, 80):
nmap -PS 192.168.1.234
Use UDP ping to detect the host:
nmap -PU 192.168.1.0/24
The most frequently used scan option: SYN scan, also known as semi-open scan, it does not open a full TCP connection and executes very quickly:
nmap -sS 192.168.1.0/24
nmap installation
This article takes linux Ubuntu16.04 as an example, and finally mainly uses python to operate
1. Install nmap first
sudo apt-get install nmap
2. Then install python-nmap
sudo pip install python-nmap
After installation, import nmap into python and test to verify whether it is successful
com@pythontab:~# python
Python 2.7.12 (default, Dec  3 2016, 10:42:27)
[GCC 4.4.7 20120313 (Red Hat 4.4.7-17)] on linux2
Type "help", "copyright", "credits" or "license" for more information.
>>> import nmap
Python operation nmap
1. Simple Small case
Create a PortScanner instance, and then scan ports 20-443 of the IP 114.114.114.114.
import nmap
nm = nmap.PortScanner()
ret = nm.scan('114.114.114.114','20')
print ret
The return format is as follows:
{
    'nmap': {
        'scanstats': {'uphosts': '1', 'timestr': 'Tue Oct 25 11:30:47 2016', 'downhosts': '0', 'totalhosts': '1', 'elapsed': '1.11'},
        'scaninfo': {'tcp': {'services': '20', 'method': 'connect'}},
        'command_line': 'nmap -oX - -p 20 -sV 115.239.210.26'
     },
    'scan': {
        '115.239.210.26': {
            'status': {'state': 'up', 'reason': 'syn-ack'},
            'hostnames': [{'type': '', 'name': ''}],
            'vendor': {},
            'addresses': {'ipv4': '115.239.210.26'},
            'tcp': {20: {'product': '', 'state': 'filtered', 'version': '', 'name': 'ftp-data', 'conf': '3', 'extrainfo': '', 'reason': 'no-response', 'cpe': ''}
            }
        }
    }
}
2. Built-in method:
You can also print out simple information
import nmap
nm = nmap.PortScanner()
print nm.scaninfo()
# {u'tcp': {'services': u'20-443', 'method': u'syn'}}
print nm.command_line()
# u'nmap -oX - -p 20-443 -sV 114.114.114.114'View How many hosts are there
print nm.all_hosts()
[u'114.114.114.114']
View the detailed information of the host
nm['114.114.114.114']
View all protocols included in the host
nm['114.114.114.114'].all_protocols()
Check which ports of the host provide the tcp protocol
nm['114.114.114.114']['tcp']
nm['114.114.114.114']['tcp'].keys()
Check whether the port provides the tcp protocol
nm['114.114.114.114'].has_tcp(21)
You can also set the parameters for nmap execution like this
nm.scan(hosts='192.168.1.0/24', arguments='-n -sP -PE -PA21,23,80,3389')
The above is the detailed content of Introducing the usage of Python-nmap network scanning and sniffing toolkit. For more information, please follow other related articles on the PHP Chinese website!

Hot AI Tools

Undresser.AI Undress
AI-powered app for creating realistic nude photos

AI Clothes Remover
Online AI tool for removing clothes from photos.

Undress AI Tool
Undress images for free

Clothoff.io
AI clothes remover

AI Hentai Generator
Generate AI Hentai for free.

Hot Article
Hot Tools

Notepad++7.3.1
Easy-to-use and free code editor

SublimeText3 Chinese version
Chinese version, very easy to use

Zend Studio 13.0.1
Powerful PHP integrated development environment

Dreamweaver CS6
Visual web development tools

SublimeText3 Mac version
God-level code editing software (SublimeText3)
Hot Topics
 1378
1378
 52
52

 How to scan from HP printer into a pdf
Feb 19, 2024 am 10:06 AM
How to scan from HP printer into a pdf
Feb 19, 2024 am 10:06 AM
After using HP printers to scan documents, many users want to scan them directly into a PDF file, but they don't know how to do it successfully. They just need to use a scanner program on their computer. How to scan an HP printer into a PDF: 1. First open the scanner program on your computer. 2. Then select "Save PDF" in the page settings. 3. Then press "Scan" in the lower right corner to start scanning the first file. 4. After completion, click the "+" icon in the lower left corner to add a new scan page. 5. You will see a new scan box next to the original file. 7. When finished, select "Save" to save these PDF files.
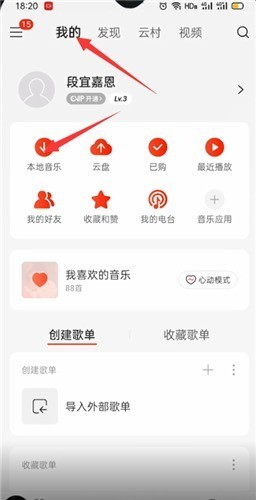 How does NetEase Cloud Music scan local music_NetEase Cloud Music scans local music tutorial
Mar 25, 2024 pm 10:21 PM
How does NetEase Cloud Music scan local music_NetEase Cloud Music scans local music tutorial
Mar 25, 2024 pm 10:21 PM
1. Open NetEase Cloud Music, click My, then click Local Music. 2. Click the three dots in the upper right corner. 3. Click Scan local music. 4. Click Scan Settings below. 5. Swipe left to filter audio files shorter than 60 seconds. 6. Go back and click Full Scan to scan all local music.
 How to use Windows Defender to scan folders in Win10.
Jul 10, 2023 pm 11:17 PM
How to use Windows Defender to scan folders in Win10.
Jul 10, 2023 pm 11:17 PM
Windows 10 has a free antivirus program called Windows Defender, which provides real-time protection and can scan your computer. This also allows you to perform customized scans, whereby you can specify specific folders or drives to scan for malware. Because you only need to scan this folder, the scan time will be much faster than scanning the entire machine. As shown below, we offer two ways to customize the scan for your specific folders. How to use Windows Defender to scan folders for malware in Win10. To scan an individual folder and its subfolders, the easiest way is to right-click the folder and select Scan with Windows Defender
 How to scan Quark QR code
Feb 27, 2024 pm 04:10 PM
How to scan Quark QR code
Feb 27, 2024 pm 04:10 PM
In Quark software, a variety of functions bring convenience and fun to users, among which the scanning function is particularly popular. Through the scanning function, users can easily scan the QR code, whether it is to quickly log in to the website, add friends, or download applications, all can be done with one click. So, how to use the scanning function of Quark QR code? Players who still don’t know how to use it must not miss it. Come and follow the article brought by the editor of this website to learn more about it. How to scan the Quark QR code and answer: [Quark]-[Three horizontal icons]-[Take photo and scan]. Specific steps: 1. First open the Quark software. After entering the homepage, we click the [three horizontal icons] in the lower right corner; 2. Then slide up on the My Page to the bottom of the page to find [Photo Scan]
 C# Development Notes: Security Vulnerability Scanning and Repair
Nov 23, 2023 am 08:26 AM
C# Development Notes: Security Vulnerability Scanning and Repair
Nov 23, 2023 am 08:26 AM
In C# development, with the continuous development of network technology, security issues have become more and more serious. To ensure the security of applications, developers need to pay attention to scanning and repairing security vulnerabilities. This article will introduce precautions from the following aspects. 1. Pay attention to data transmission security In applications, data transmission security is very important. Especially when using the network to transmit data, secure protocols and encryption algorithms should be used wherever possible. In order to ensure data integrity and confidentiality, it is recommended to use Secure Socket Layer (SSL) or Transport Layer Security (TLS), etc.
 How to deal with blurred scanned documents
Jan 05, 2021 pm 03:09 PM
How to deal with blurred scanned documents
Jan 05, 2021 pm 03:09 PM
Processing method: 1. Open the scanned image to be processed in the PS software; 2. Click "Filter" - "Sharpening" - "Smart Sharpening" on the top toolbar; 3. In the pop-up window, select according to your needs Sharpen the radius and click "OK"; 4. Click "File" - "Save As" and save it as a file.
 How to use QR code scanning in PHP?
Aug 19, 2023 pm 07:49 PM
How to use QR code scanning in PHP?
Aug 19, 2023 pm 07:49 PM
How to use QR code scanning in PHP? QR code scanning has become very common in modern life. Whether it is Alipay, WeChat Pay or various other applications, you can quickly pay or transfer information by scanning the QR code. In PHP, we can also easily implement the QR code scanning function. This article will introduce how to use PHP for QR code scanning and provide corresponding code examples. First, we need a PHP QR code generation library. Here we choose to use the "PHPQRCode" library.
 Scan printed and handwritten notes in the Notes app for iPhone
Nov 29, 2023 pm 11:19 PM
Scan printed and handwritten notes in the Notes app for iPhone
Nov 29, 2023 pm 11:19 PM
In 2022, Apple added a new feature to the Notes app on iPhone and iPad that allows you to quickly scan printed or handwritten text and save it in a digital text format. Read on to learn how it works. On earlier versions of iOS and iPadOS, scanning text into Apple's Notes app required tapping the note's text field and then tapping the "Live Text" option in the pop-up menu. However, Apple is making it easier to digitize real-world notes in 2022. The following steps show you how to do this on a device running iOS 15.4 or iPadOS 15.4 and above. On your iPhone or iPad, open "
