This article mainly introduces the bridge mode of Java design pattern, and analyzes the concept, function, Java implementation method and related precautions of the bridge mode in detail in the form of examples. Friends in need can refer to this article
The example describes the bridge mode of Java design pattern. Share it with everyone for your reference, as follows:
Concept:
Bridge Pattern: Separate the abstract part from its implementation part so that they are both Can vary independently.
The bridge mode converts inheritance relationships into association relationships, thereby reducing the coupling between classes and reducing the amount of code writing.
Under what circumstances will bridge mode be used?
To put it simply, when we abstract the characteristics of an object, the characteristic attributes of the object are very abstract, and we have to abstract the attributes again.
Otherwise, the number of specific subclasses will increase geometrically and will be difficult to expand. There is no way to maintain existing code.
For example, when we abstract the two objects of mobile phones, several of its attributes, such as operating system, CPU, screen, operator network, etc. are very complex. We cannot simply define these attributes directly, they must be abstracted again. A specific mobile phone object is a combination of these attributes, but it is not a simple combination. The attributes need to realize their own functions as attributes. Under such a design, code maintenance and expansion will be easier.
Note: When talking about this model, I cannot guarantee that the examples I say and write are correct. After all, I am new to it, and all examples are based on personal understanding.
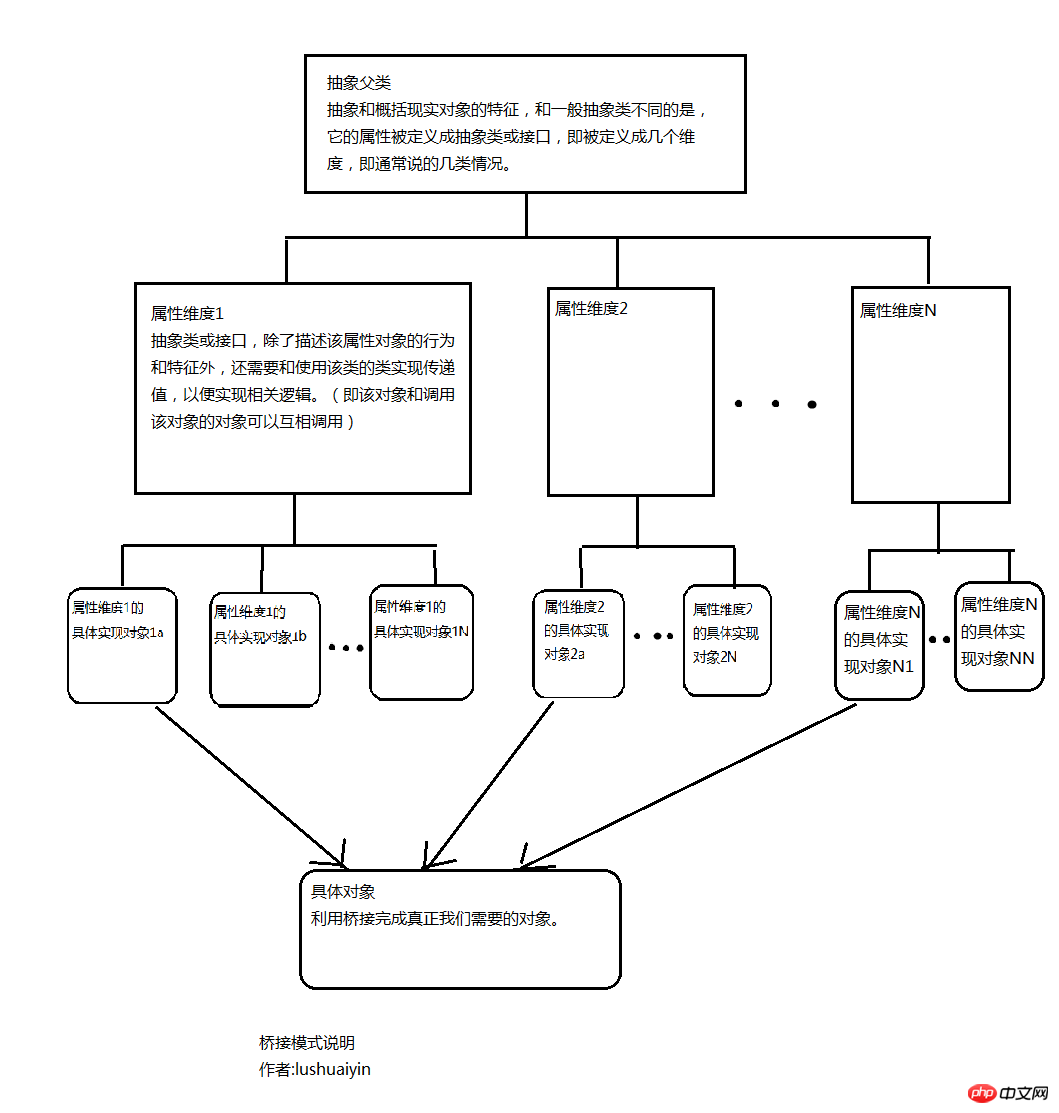
I think the bridge mode description diagram:

The following is an example:
1. First define the abstract class, abstract and description object Characteristics.
Divide dimensions on the properties of the object for future bridging and expansion.
package test.design.bridge;
public abstract class CellPhone {
  private String cellPhoneName;
  public CellPhoneSystem cellPhoneSystem;
  public CellPhoneCPU cellPhoneCPU;
  public void works(){
    System.out.println("---------------------");
    System.out.println("This cellphone is:"+this.getCellPhoneName()+",welcome to use. ");
    System.out.println("This cellphone detail infomation:");
    System.out.println("系统类型:"+this.getCellPhoneSystem().getSystemName());
    System.out.println("cpu型号:"+this.getCellPhoneCPU().getCpuName());
    System.out.println("---------------------");
  }
  public String getCellPhoneName() {
    return cellPhoneName;
  }
  public void setCellPhoneName(String cellPhoneName) {
    this.cellPhoneName = cellPhoneName;
  }
  public CellPhoneSystem getCellPhoneSystem() {
    return cellPhoneSystem;
  }
  public void setCellPhoneSystem(CellPhoneSystem cellPhoneSystem) {
    this.cellPhoneSystem = cellPhoneSystem;
  }
  public CellPhoneCPU getCellPhoneCPU() {
    return cellPhoneCPU;
  }
  public void setCellPhoneCPU(CellPhoneCPU cellPhoneCPU) {
    this.cellPhoneCPU = cellPhoneCPU;
  }
}2. Abstraction of attribute dimensions. (You can use interface definition, the key depends on your specific function)
package test.design.bridge;
/**
 * 属性cpu被抽象成一个维度,为了以后扩展
 * @author lushuaiyin
 *
 */
public abstract class CellPhoneCPU {
  public CellPhone cellPhone;
  public String cpuName;
  public void cpuWorks(){
    System.out.println("I am cpu. My pattern is:"+this.getCpuName());
    System.out.println("I am working for this cellphone:"+this.getCellPhone().getCellPhoneName());
  }
  public CellPhone getCellPhone() {
    return cellPhone;
  }
  public void setCellPhone(CellPhone cellPhone) {
    this.cellPhone = cellPhone;
    this.getCellPhone().setCellPhoneCPU(this);// 装配(桥接,或者可以认为对象类与其属性类的传递)
  }
  public String getCpuName() {
    return cpuName;
  }
  public void setCpuName(String cpuName) {
    this.cpuName = cpuName;
  }
}package test.design.bridge;
/**
* 属性操作系统被抽象成一个维度,为了以后扩展
* @author lushuaiyin
*
*/
public abstract class CellPhoneSystem {
public CellPhone cellPhone;
public String SystemName;
public void systemWorks(){
System.out.println("I am "+this.getSystemName()+" system.");
System.out.println("I am working for this cellphone:"+this.getCellPhone().getCellPhoneName());
}
public CellPhone getCellPhone() {
return cellPhone;
}
public void setCellPhone(CellPhone cellPhone) {
this.cellPhone = cellPhone;
this.getCellPhone().setCellPhoneSystem(this);// 装配(桥接,或者可以认为对象类与其属性类的传递)
}
public String getSystemName() {
return SystemName;
}
public void setSystemName(String systemName) {
SystemName = systemName;
}
}3. Specific dimension attribute object.
Here we define 2 specific objects each on the operating system attributes and cpu attributes,
package test.design.bridge;
public class AndroidSystem extends CellPhoneSystem{
}package test.design.bridge;
public class IOSSystem extends CellPhoneSystem{
}package test.design.bridge;
/**
* 双核cpu
* @author Administrator
*
*/
public class TwoCore extends CellPhoneCPU{
}package test.design.bridge;
/**
* 四核cpu
* @author Administrator
*
*/
public class FourCore extends CellPhoneCPU{
}4. Test the code.
It talks about how to expand the dimension when it is necessary to expand it.
Define a mobile phone object
##
package test.design.bridge;
public class Phone1 extends CellPhone{
  //具体对象的属性与逻辑
}package test.design.bridge;
public class TestMain {
/**
* @param args
*/
public static void main(String[] args) {
//任何一种具体的对象都是复杂多种属性的集合,在此可以看出桥接模式在构建对象时的灵活性
//产生一个具体对象1
CellPhone p1=new Phone1();
p1.setCellPhoneName(" IPhone 6 ");
CellPhoneSystem system1=new IOSSystem();//操作系统属性维度
system1.setSystemName("ios7");
system1.setCellPhone(p1);//装配
system1.systemWorks();//工作
/*装配说的简单点就是传值。因为我们把一个对象的属性按维度分开来了,
那么桥接的时候就必须相互传递对象。即对象类可以调用子属相类对象,
子属性类对象也可以调用该对象类.
关于这样的传值方式有多种,你可以在构造函数中传递,也可以在
调用具体逻辑方法时传递。这里我直接用set方法传递,只是为了更清楚.
如果某个属性维度是必须出现的,那就可以在抽象类的构造函数中传入*/
CellPhoneCPU cpu1=new TwoCore();//cpu属性维度
cpu1.setCpuName("A6");
cpu1.setCellPhone(p1);
cpu1.cpuWorks();
p1.works();//最终整体对象功能
/*
桥接模式就是为了应对属性的扩展,在此说的属性必须是在维度确定的情况下。
比如,这里我们在定义手机对象时,确定两个属性维度:操作系统和cpu型号。
以后再这两个属性中,需要扩展时,就可以使用该模式。比如,一种新的cpu
型号出现了,那么我不用重新设计现在的代码,只要增添一个cpu类即可。
如果出现了新的维度属性,比如手机对象必须考虑屏幕大小。那桥接模式
在此就需要从根本上修改代码来了。
*/
System.out.println("-----------分割---------------------------");
//在cpu维度上扩展。比如出现新型cpu:8核三星Exynos 5 Octa芯片".
//三星手机推出了GALAXY Note Ⅲ就是使用这种新型cpu. 写一个新类EightCore扩展cpu维度.
//同时定义这个手机对象GALAXY Note Ⅲ为PhoneGalaxyNote3
CellPhone note3=new PhoneGalaxyNote3();
note3.setCellPhoneName("GALAXY Note Ⅲ");
CellPhoneSystem system2=new AndroidSystem();
system2.setSystemName("android4");
system2.setCellPhone(note3);//装配
system2.systemWorks();//工作
CellPhoneCPU cpu2=new EightCore();//最新8核cpu
cpu2.setCpuName("三星Exynos 5 Octa芯片");
cpu2.setCellPhone(note3);
cpu2.cpuWorks();
note3.works();//三星GALAXY Note Ⅲ新体验
}
}package test.design.bridge;
public class EightCore extends CellPhoneCPU {
}package test.design.bridge;
public class PhoneGalaxyNote3 extends CellPhone{
//具体对象的属性与逻辑
}I am ios7 system. I am working for this cellphone: IPhone 6 I am cpu. My pattern is:A6 I am working for this cellphone: IPhone 6 --------------------- This cellphone is: IPhone 6 ,welcome to use. This cellphone detail infomation: 系统类型:ios7 cpu型号:A6 --------------------- -----------分割--------------------------- I am android4 system. I am working for this cellphone:GALAXY Note Ⅲ I am cpu. My pattern is:三星Exynos 5 Octa芯片 I am working for this cellphone:GALAXY Note Ⅲ --------------------- This cellphone is:GALAXY Note Ⅲ,welcome to use. This cellphone detail infomation: 系统类型:android4 cpu型号:三星Exynos 5 Octa芯片 ---------------------
The above is the detailed content of Detailed explanation of bridge mode in Java design patterns. For more information, please follow other related articles on the PHP Chinese website!


