Detailed explanation of learning common instructions of Vue.js
Vue.js directives start with v-. They are used for HTML elements. The directives provide some special features. When the directive is bound to an element, the directive will add some special features to the bound target element. Special behavior, we can think of directives as special HTML features.
Vue.js provides some built-in instructions. Now let’s introduce the commonly used built-in instructions.
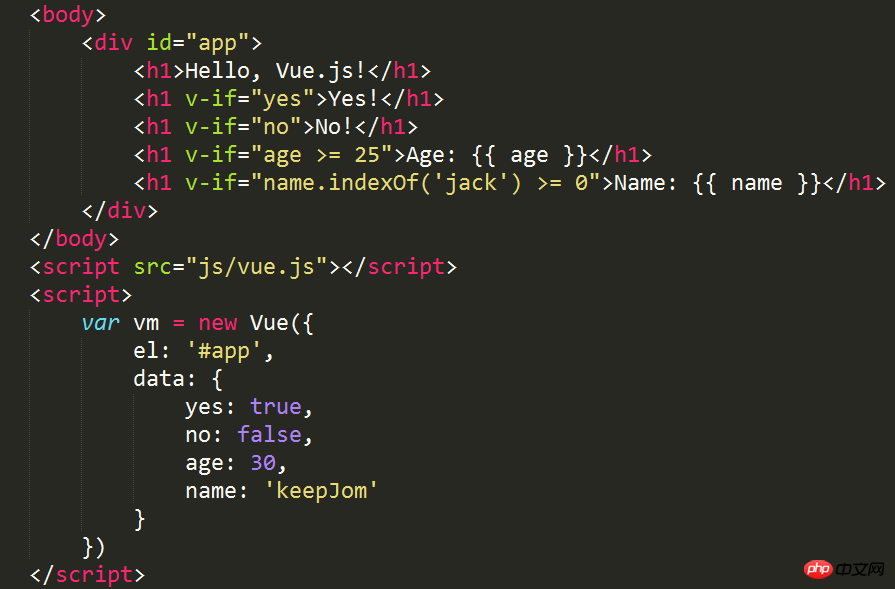
## v-if is a conditional rendering instruction, which adds or deletes elements based on the true or false expression. Its basic syntax: v-if = "expression", expression is a bool value An expression, which can be either a bool attribute or an operator that returns bool, such as the following code:
##

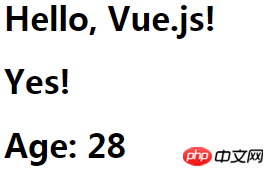
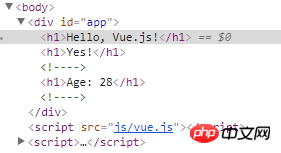
##You can see the rendering through the console The HTML code contains only these three
elements, as shown below:

#You can also modify the value of the data attribute on the console, for example, change the value of yes to false, that is, vm.yes = false, then the value in the page Yes will be deleted. As an instance of vue, vm can directly access the attributes in data because each vue instance will proxy the data attribute in its option object.
Remember: When using the v-if directive, only elements whose expression is true will be rendered. This is the same as the following A difference with the v-show command that will be introduced. 
## v-show command
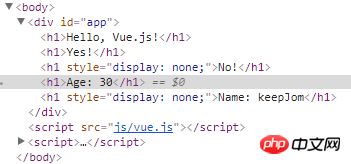
## The v-show instruction is also a conditional rendering instruction. I just mentioned that there is a difference between the v-if instruction and the v-show instruction. This difference is that the elements of the v-show instruction will is rendered, but elements whose expression is false will have the css attribute display:none set to hide them. As shown below:
v-else command

Whether the elements of the v-else directive are rendered into HTML mainly depends on the vue.js version. If it is version 2.x, then it does not matter whether it is preceded by the v-if directive Or the v-show instruction. When the previous instruction is true, the elements of the v-else instruction will not be rendered into HTML. If it is version 1.x, it depends on whether the previous one is the v-if instruction or the v-show instruction; ## When it is preceded by a v-if instruction and the instruction is true, the v-else instruction will not be Rendered into HTML; When the previous one is the v-show command, and the command is true, the v-else command will still When rendered into HTML, the css attribute display:none will be set to hide it; v-for directive ## to code:
##<!DOCTYPE html><html>
<head>
<meta charset="UTF-8">
<title></title>
<link rel="stylesheet" href="styles/demo.css" />
</head>
<body>
<p id="app">
<table>
<thead>
<tr>
<th>Name</th>
<th>Age</th>
<th>Sex</th>
</tr>
</thead>
<tbody>
<tr v-for="person in people">
<td>{{ person.name }}</td>
<td>{{ person.age }}</td>
<td>{{ person.sex }}</td>
</tr>
</tbody>
</table>
</p>
</body>
<script src="js/vue.js"></script>
<script>
var vm = new Vue({
el: '#app',
data: {
people: [{
name: 'Jack',
age: 30,
sex: 'Male'
}, {
name: 'Bill',
age: 26,
sex: 'Male'
}, {
name: 'Tracy',
age: 22,
sex: 'Female'
}, {
name: 'Chris',
age: 36,
sex: 'Male'
}]
}
}) </script></html>
 View Code
v-bind command
The v-bind command can be followed by a parameter, separated by a colon. This parameter is generally an attribute of the HTML element, for example: v-bind:class
Such as the following code:##
<!DOCTYPE html><html>
<head>
<meta charset="UTF-8">
<title></title>
<link rel="stylesheet" href="styles/demo.css" />
</head>
<body>
<p id="app">
<ul class="pagination">
<li v-for="n in pageCount">
<a href="javascripit:void(0)" v-bind:class="activeNumber === n + 1 ? 'active' : ''">{{ n + 1 }}</a>
</li>
</ul>
</p>
</body>
<script src="js/vue.js"></script>
<script>
var vm = new Vue({
el: '#app',
data: {
activeNumber: 1,
pageCount: 10
}
}) </script></html> View Code
Use the v-bind directive to act on the class of the element to set the css style for the current page.
What should be noted here is that when traversing pageCount, different versions of vue and js will cause the start of the traversal to be different;
When the version is 1 .x, the traversal starts from 0 and ends at pageCount-1;
When the version is 2.x, the traversal starts from 1 and ends at pageCount.
Used to monitor DOM events. Its usage is similar to v-bind. For example, to monitor click events: v-on:click="doSomething"
## There are two forms of calling methods: < 1>Bind a method, that is, point the event to a reference to the method
如下代码:Greet按钮就是使用第一种方法,即将事件绑定到greet()方法,而Hi按钮直接调用say()方法 

<!DOCTYPE html><html>
<head>
<meta charset="UTF-8">
<title></title>
</head>
<body>
<p id="app">
<p><input type="text" v-model="message"></p>
<p>
<!--click事件直接绑定一个方法-->
<button v-on:click="greet">Greet</button>
</p>
<p>
<!--click事件使用内联语句-->
<button v-on:click="say('Hi')">Hi</button>
</p>
</p>
</body>
<script src="js/vue.js"></script>
<script>
var vm = new Vue({
el: '#app',
data: {
message: 'Hello, Vue.js!'
}, // 在 `methods` 对象中定义方法 methods: {
greet: function() { // // 方法内 `this` 指向 vm alert(this.message)
},
say: function(msg) {
alert(msg)
}
}
}) </script></html>
View Code
v-bind与v-on的缩写方式
v-bind可以缩写为一个冒号,v-on可以缩写为一个@符号,如下:

The above is the detailed content of Detailed explanation of learning common instructions of Vue.js. For more information, please follow other related articles on the PHP Chinese website!

Hot AI Tools

Undresser.AI Undress
AI-powered app for creating realistic nude photos

AI Clothes Remover
Online AI tool for removing clothes from photos.

Undress AI Tool
Undress images for free

Clothoff.io
AI clothes remover

AI Hentai Generator
Generate AI Hentai for free.

Hot Article

Hot Tools

Notepad++7.3.1
Easy-to-use and free code editor

SublimeText3 Chinese version
Chinese version, very easy to use

Zend Studio 13.0.1
Powerful PHP integrated development environment

Dreamweaver CS6
Visual web development tools

SublimeText3 Mac version
God-level code editing software (SublimeText3)

Hot Topics
 Detailed explanation of obtaining administrator rights in Win11
Mar 08, 2024 pm 03:06 PM
Windows operating system is one of the most popular operating systems in the world, and its new version Win11 has attracted much attention. In the Win11 system, obtaining administrator rights is an important operation. Administrator rights allow users to perform more operations and settings on the system. This article will introduce in detail how to obtain administrator permissions in Win11 system and how to effectively manage permissions. In the Win11 system, administrator rights are divided into two types: local administrator and domain administrator. A local administrator has full administrative rights to the local computer
 Detailed explanation of division operation in Oracle SQL
Mar 10, 2024 am 09:51 AM
Detailed explanation of division operation in OracleSQL In OracleSQL, division operation is a common and important mathematical operation, used to calculate the result of dividing two numbers. Division is often used in database queries, so understanding the division operation and its usage in OracleSQL is one of the essential skills for database developers. This article will discuss the relevant knowledge of division operations in OracleSQL in detail and provide specific code examples for readers' reference. 1. Division operation in OracleSQL
 Detailed explanation of the role and usage of PHP modulo operator
Mar 19, 2024 pm 04:33 PM
The modulo operator (%) in PHP is used to obtain the remainder of the division of two numbers. In this article, we will discuss the role and usage of the modulo operator in detail, and provide specific code examples to help readers better understand. 1. The role of the modulo operator In mathematics, when we divide an integer by another integer, we get a quotient and a remainder. For example, when we divide 10 by 3, the quotient is 3 and the remainder is 1. The modulo operator is used to obtain this remainder. 2. Usage of the modulo operator In PHP, use the % symbol to represent the modulus
 Detailed analysis of C language learning route
Feb 18, 2024 am 10:38 AM
As a programming language widely used in the field of software development, C language is the first choice for many beginner programmers. Learning C language can not only help us establish the basic knowledge of programming, but also improve our problem-solving and thinking abilities. This article will introduce in detail a C language learning roadmap to help beginners better plan their learning process. 1. Learn basic grammar Before starting to learn C language, we first need to understand the basic grammar rules of C language. This includes variables and data types, operators, control statements (such as if statements,
 Detailed explanation of the linux system call system() function
Feb 22, 2024 pm 08:21 PM
Detailed explanation of Linux system call system() function System call is a very important part of the Linux operating system. It provides a way to interact with the system kernel. Among them, the system() function is one of the commonly used system call functions. This article will introduce the use of the system() function in detail and provide corresponding code examples. Basic Concepts of System Calls System calls are a way for user programs to interact with the operating system kernel. User programs request the operating system by calling system call functions
 Simple JavaScript Tutorial: How to Get HTTP Status Code
Jan 05, 2024 pm 06:08 PM
JavaScript tutorial: How to get HTTP status code, specific code examples are required. Preface: In web development, data interaction with the server is often involved. When communicating with the server, we often need to obtain the returned HTTP status code to determine whether the operation is successful, and perform corresponding processing based on different status codes. This article will teach you how to use JavaScript to obtain HTTP status codes and provide some practical code examples. Using XMLHttpRequest
 Detailed explanation of Linux curl command
Feb 21, 2024 pm 10:33 PM
Detailed explanation of Linux's curl command Summary: curl is a powerful command line tool used for data communication with the server. This article will introduce the basic usage of the curl command and provide actual code examples to help readers better understand and apply the command. 1. What is curl? curl is a command line tool used to send and receive various network requests. It supports multiple protocols, such as HTTP, FTP, TELNET, etc., and provides rich functions, such as file upload, file download, data transmission, proxy
 Learn more about Promise.resolve()
Feb 18, 2024 pm 07:13 PM
Detailed explanation of Promise.resolve() requires specific code examples. Promise is a mechanism in JavaScript for handling asynchronous operations. In actual development, it is often necessary to handle some asynchronous tasks that need to be executed in sequence, and the Promise.resolve() method is used to return a Promise object that has been fulfilled. Promise.resolve() is a static method of the Promise class, which accepts a


