 Backend Development
 Python Tutorial
 Example of how Python3 uses SMTP protocol to send E-mail emails
Example of how Python3 uses SMTP protocol to send E-mail emails
SMTP (Simple Mail Transfer Protocol) is a simple mail transfer protocol. It is a set of rules for transmitting mail from a source address to a destination address. It controls the transfer method of letters. The following article mainly introduces how Python3 uses the SMTP protocol to send E-mail emails. Friends in need can refer to it.
Preface
This article mainly introduces you to the relevant content about Python3 using SMTP protocol to send emails. It also introduces how to use python program to Before specifying an email address to send an email, we need to introduce some knowledge about email.
Email has a longer history than the Web. Until now, Email is also a very widely used service on the Internet.
Almost all programming languages support sending and receiving email, but, wait, before we start writing code, it is necessary to understand how email works on the Internet.
Assume that our own email address is me@163.com and the other party’s email address is friend@sina.com. Now we use software such as Outlook or Foxmail to write the email and fill in the other party’s email address. Email address, click "Send", and the email will be sent. These email software are called MUA: Mail User Agent - Mail User Agent.
Emails sent from MUA do not reach the other party's computer directly, but are sent to MTA: Mail Transfer Agent - Mail transfer agent, which is those Email service providers, such as NetEase, Sina, etc. Since our own email is 163.com, the email is first delivered to the MTA provided by NetEase, and then sent by NetEase's MTA to the other service provider, which is Sina's MTA. This process may also pass through other MTAs, but we don't care about the specific route, we only care about the speed.
After the email reaches Sina's MTA, since the other party uses the mailbox of @sina.com, Sina's MTA will deliver the email to the final destination of the email: MDA: Mail Delivery Agent——Mail Delivery Agent . After the email reaches MDA, it lies quietly on a server of Sina and is stored in a file or special database. We call this place where emails are stored for a long time an email box. To get the mail, the other party must use MUA to get the mail from the MDA to his or her computer.
So, the journey of an email is:
Sender-> MUA -> MTA -> MTA -> Several MTAs - > MDA <- MUA <- Recipient
With the above basic concepts, you need to write a program to send and receive emails, which is essentially:
1. Write MUA to send emails to MTA.
2. Write MUA to receive emails from MDA.
When sending emails, the protocol used by the MUA and MTA is SMTP: Simple Mail Transfer Protocol. The subsequent MTA also uses the SMTP protocol to another MTA.
When receiving emails, MUA and MDA use two protocols: POP: Post Office Protocol, the current version is 3, commonly known as POP3; IMAP: Internet Message Access Protocol, the current version is 4, the advantage is that not only can Mail, you can also directly operate the mail stored on the MDA, such as moving it from the inbox to the trash, etc.
When the email client software sends emails, it will ask you to configure the SMTP server first, that is, which MTA you want to send to. Assuming you are using 163's email address, you cannot send directly to Sina's MTA because it only serves Sina users. Therefore, you have to fill in the SMTP server address provided by 163: smtp.163.com, in order to prove that you are 163 For users, the SMTP server also requires you to fill in your email address and email password, so that the MUA can normally send emails to the MTA through the SMTP protocol.
Similarly, when receiving emails from MDA, the MDA server also requires verification of your email password to ensure that no one will pretend to be you to receive your emails. Therefore, email clients such as Outlook will ask you to fill in POP3 Or IMAP server address, email address and password, so that MUA can successfully obtain emails from MDA through POP or IMAP protocol.
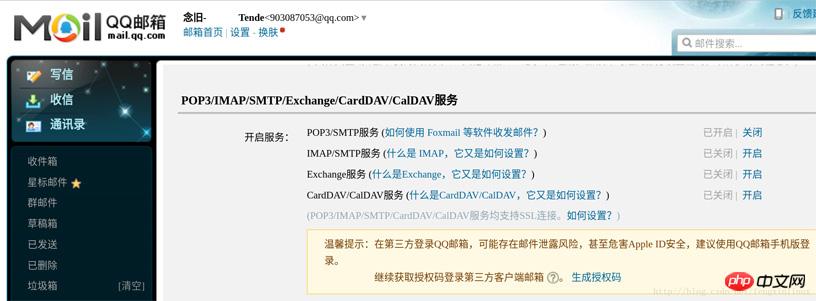
Finally, special note: Currently, most email service providers need to manually turn on the SMTP sending and POP receiving functions, otherwise they are only allowed to log in on the web page:
For example, QQ mailbox

Next, we start our topic, how to send emails through python.
-------------------------------------------------- ------------------------------------
Send simply Text email
SMTP is a protocol for sending emails. Python has built-in support for SMTP and can send plain text emails, HTML emails, and emails with attachments.
Python supports SMTP with two modules, smtplib and email. Email is responsible for constructing emails, and smtplib is responsible for sending emails.
First, let’s construct the simplest plain text email:
from email.mime.text import MIMEText
msg = MIMEText('hello, this is axin...', 'plain', 'utf-8')
Note:When constructing the MIMEText object, the first parameter is the email body, and the second parameter is the subtype of MIME. Passing in 'plain' means plain text. The final MIME is 'text/plain', and finally UTF-8 encoding must be used to ensure multi-language compatibility.
We just have the body content, we also need to add header information to the email we want to send. The header information contains information such as the sender and recipient, as well as the subject of the email.
msg = MIMEText('hello, this is axin...', 'plain', 'utf-8') #邮件正文 msg['From'] = _format_addr('阿鑫 <%s>' % from_addr) #邮件头部,发送者信息 msg['To'] = _format_addr('aa <%s>' % to_addr) #接收者信息 msg['Subject'] = Header('test', 'utf-8').encode() #邮件主题
After constructing the information we want to send, we only need to call the corresponding python function and send it through SMTP:
server = smtplib.SMTP(smtp_server, 25) #SMTP协议默认端口是25
server.set_debuglevel(1) #打印出和SMTP服务器交互的所有信息
server.login(from_addr, password) #登录SMTP服务器
server.sendmail(from_addr, [to_addr], msg.as_string()) #发送邮件
server.quit()
We use set_debuglevel(1) to print out all the information interacting with the SMTP server. The SMTP protocol is simply text commands and responses. The login() method is used to log in to the SMTP server. The sendmail() method is to send an email. Since it can be sent to multiple people at one time, a list is passed in. The email body is a str, as_string() Change the MIMEText object into str.
The complete code example is as follows:
from email import encoders from email.header import Header from email.mime.text import MIMEText from email.utils import parseaddr, formataddr import smtplib def _format_addr(s): #格式化一个邮件地址 name, addr = parseaddr(s) return formataddr((Header(name, 'utf-8').encode(), addr)) from_addr = 'fengxinlinux@sina.com' #发送者邮箱地址 password = '******' #发送者邮箱密码,不告诉你密码=。= to_addr = '903087053@qq.com' #接收者邮箱地址 smtp_server = 'smtp.sina.com' #发送者所在的邮箱供应商的MTA地址 #from_addr = input('From: ') #password = input('Password: ') #to_addr = input('To: ') #smtp_server = input('SMTP server: ') msg = MIMEText('hello, this is axin...', 'plain', 'utf-8') #邮件正文 msg['From'] = _format_addr('阿鑫 <%s>' % from_addr) #邮件头部,发送者信息 msg['To'] = _format_addr('axin <%s>' % to_addr) #接收者信息 msg['Subject'] = Header('test', 'utf-8').encode() #邮件主题 server = smtplib.SMTP(smtp_server, 25) # SMTP协议默认端口是25 server.set_debuglevel(1) #打印出和SMTP服务器交互的所有信息 server.login(from_addr, password) #登录SMTP服务器 server.sendmail(from_addr, [to_addr], msg.as_string()) #发送邮件 server.quit() 1
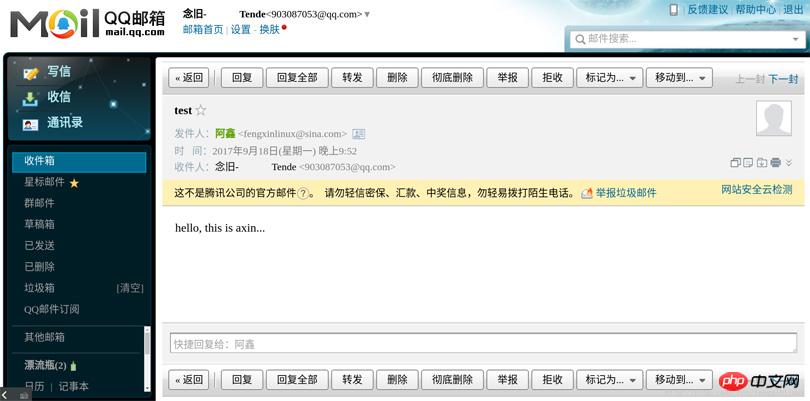
Run the program, we will find that a new email was received in the mailbox I tested mail.

#We will find that the other information is the same, but the recipient’s information is not the axin filled in our program.
Because many email service providers will automatically replace the recipient's name with the user's registered name when displaying the email, but the display of other recipients' names will not be affected.
When I was testing, sometimes the emails I sent were judged as spam by the email service provider and were directly placed in the trash. . . As for what will be considered spam, I have no idea. .
Send emails with attachments
#We have introduced how to send text emails above. With the above knowledge, send emails with attachments Email is actually very simple.
An email with attachments can be seen as an email containing several parts: text and each attachment itself. Therefore, you can construct a MIMEMultipart object to represent the email itself, and then add a MIMEText to it as the email body, and then continue. Just add the MIMEBase object representing the attachment:
# 邮件对象: msg= MIMEMultipart() msg['From'] = _format_addr('阿鑫 <%s>' % from_addr) #邮件头部,发送者信息 msg['To'] = _format_addr('axin <%s>' % to_addr) #接收者信息 msg['Subject'] = Header('test', 'utf-8').encode() #邮件主题 # 邮件正文是MIMEText: msg.attach(MIMEText('hello, this is axin...', 'plain', 'utf-8')) # 添加附件就是加上一个MIMEBase,从本地读取一个图片: with open('/home/fengxin/图片/11.jpg','rb') as fhandle: mime = MIMEBase('image','jpeg',filename='11.jpg') mime.add_header('Content-Disposition', 'attachment', filename='11.jpg') mime.add_header('Content-ID', '<0>') mime.add_header('X-Attachment-Id', '0') # 把附件的内容读进来: mime.set_payload(fhandle.read()) # 用Base64编码: encoders.encode_base64(mime) # 添加到MIMEMultipart: msg.attach(mime)
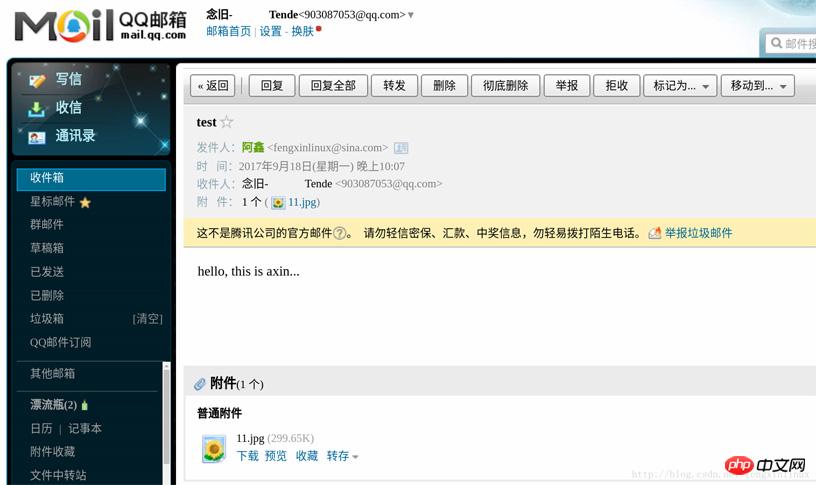
Then, follow the normal sending process to send the msg (note that the type has changed to MIMEMultipart), and you can receive it. Emails with attachments.
The complete code example is as follows:
from email import encoders from email.header import Header from email.mime.text import MIMEText from email.utils import parseaddr, formataddr from email.mime.multipart import MIMEMultipart from email.mime.base import MIMEBase import smtplib def _format_addr(s): #格式化一个邮件地址 name, addr = parseaddr(s) return formataddr((Header(name, 'utf-8').encode(), addr)) from_addr = '你的邮箱地址' #发送者邮箱地址 password = '你的邮箱密码' #发送者邮箱密码 to_addr = '903087053@qq.com' #接收者邮箱地址 smtp_server = 'smtp.sina.com' #发送者所在的邮箱供应商的MTA地址 #from_addr = input('From: ') #password = input('Password: ') #to_addr = input('To: ') #smtp_server = input('SMTP server: ') msg= MIMEMultipart() msg['From'] = _format_addr('阿鑫 <%s>' % from_addr) #邮件头部,发送者信息 msg['To'] = _format_addr('axin <%s>' % to_addr) #接收者信息 msg['Subject'] = Header('test', 'utf-8').encode() #邮件主题 msg.attach(MIMEText('hello, this is axin...', 'plain', 'utf-8')) with open('/home/fengxin/图片/11.jpg','rb') as fhandle: mime = MIMEBase('image','jpeg',filename='11.jpg') mime.add_header('Content-Disposition', 'attachment', filename='11.jpg') mime.add_header('Content-ID', '<0>') mime.add_header('X-Attachment-Id', '0') # 把附件的内容读进来: mime.set_payload(fhandle.read()) # 用Base64编码: encoders.encode_base64(mime) # 添加到MIMEMultipart: msg.attach(mime) server = smtplib.SMTP(smtp_server, 25) # SMTP协议默认端口是25 server.set_debuglevel(1) #打印出和SMTP服务器交互的所有信息 server.login(from_addr, password) #登录SMTP服务器 server.sendmail(from_addr, [to_addr], msg.as_string()) #发送邮件 server.quit() 1
After running. The test mailbox received the email correctly, as shown in the figure:

##Summary
The above is the detailed content of Example of how Python3 uses SMTP protocol to send E-mail emails. For more information, please follow other related articles on the PHP Chinese website!

Hot AI Tools

Undresser.AI Undress
AI-powered app for creating realistic nude photos

AI Clothes Remover
Online AI tool for removing clothes from photos.

Undress AI Tool
Undress images for free

Clothoff.io
AI clothes remover

AI Hentai Generator
Generate AI Hentai for free.

Hot Article

Hot Tools

Notepad++7.3.1
Easy-to-use and free code editor

SublimeText3 Chinese version
Chinese version, very easy to use

Zend Studio 13.0.1
Powerful PHP integrated development environment

Dreamweaver CS6
Visual web development tools

SublimeText3 Mac version
God-level code editing software (SublimeText3)

Hot Topics
 1378
1378
 52
52
 Which protocol does vivo fast charging belong to?
Sep 06, 2022 pm 02:43 PM
There are two main protocols for vivo fast charging: 1. "QC 2.0" fast charging protocol. "QC2.0" is "Quick Charge 2.0" technology. It is version 2.0 of fast charging technology released by Qualcomm. It can output 5V, 9V, and 12V. , 20V four voltage groups; 2. PD fast charging protocol is a fast charging specification formulated by the "USB-IF" organization. It is one of the current mainstream fast charging protocols and can make the current default maximum power "5V/2A" The "type-c" interface is increased to 100W.
 What is the maximum watt of PD3.0 fast charging protocol?
Nov 08, 2022 pm 04:04 PM
The PD3.0 fast charging protocol supports up to “100W”. In November 2015, USB PD fast charging ushered in a major version update, entering the USB PD3.0 fast charging era; the PD3.0 protocol supports 5V3A, 9V3A, 12V3A, 15V3A, 20V5A output, and the maximum power can reach 100W. Not only can It can be used to charge mobile phones, and can also be used to power laptops or monitors.
 What are the 5 industrial communication protocols?
Sep 28, 2022 am 11:52 AM
5 types of industrial communication protocols: 1. Modbus protocol, which is a universal language used in electronic controllers; 2. RS-232 protocol, which is a serial physical interface standard; 3. RS-485 protocol, which is based on RS232 Developed on the basis of; 4. HART protocol is a communication protocol used between on-site intelligent instruments and control room equipment; 5. MPI protocol is a cross-language communication protocol used to write parallel computers.
 SOAP Protocol Guide in PHP
May 20, 2023 pm 07:10 PM
With the continuous development of Internet technology, more and more enterprise-level applications need to provide interfaces to other applications to realize the interaction of data and business. In this case, we need a reliable protocol to transmit data and ensure data integrity and security. SOAP (Simple Object Access Protocol) is an XML-based protocol that can be used to implement communication between applications in a Web environment. As a popular web programming language, PHP
 How to disable smtp email function in php
Mar 22, 2023 pm 03:22 PM
PHP is a powerful programming language that is widely used in the field of Web development. The SMTP email function is also an important part of PHP development. However, in some cases, you may want to disable SMTP mail functionality, and this article will explain how to do this.
 What is the qc4+ fast charging protocol?
Aug 18, 2022 pm 03:49 PM
The QC4+ fast charging protocol is a combination of the USB PD PPS protocol and the QC3.0/2.0 fast charging protocol. It is a multi-functional, multi-protocol fast charging technology. The QC4+ charging protocol is compatible with USB PD3.0 (PPS) and is downwardly compatible with USB PD2.0, QC3.0, QC2.0, BC1.2 and other protocols. The first prerequisite for supporting USB PD and QC4+ is the support of USB-C interfaces at both ends and the power negotiation message based on the CC (configuration channel) in the USB-C interface.
 What technology does the x.25 protocol use?
Jul 18, 2022 pm 04:05 PM
The "x.25" protocol uses packet switching technology; the "x.25" protocol is a computer-oriented data communication network, consisting of basic equipment such as transmission lines, packet switches, remote concentrators and packet terminals, and adopts a layered architecture , negotiation, control and information transmission of information exchange are carried out between the peer layers of the interface through the communication protocol between the peer layers.
 Windows will retire TLS 1.0 and TLS 1.1 in the near future
Aug 12, 2023 am 11:37 AM
Microsoft plans to disable Transport Layer Security (TLS) protocol versions 1.0 and 1.1 in Windows. The company announced the news on its technology community website on March 1, 2023. These two protocols date back to 1999 (TLS1.0) and 2006 (TLS1.1) and have since been surpassed by newer versions TLS1.2 and TLS1.3. Microsoft noted that security issues were discovered in older protocol versions, and "Internet standards and regulators have deprecated or disallowed TLS versions 1.0 and 1.1 in response. Over the years, usage of TLS 1.0 and 1.1 has declined significantly. , Microsoft believes the time has come to disable both protocols. Mic


