MyBatis is an excellent persistence layer framework that supports customized SQL, stored procedures and advanced mapping. MyBatis avoids almost all JDBC code and manual setting of parameters and retrieval of result sets. MyBatis can use simple XML or annotations to configure and map native information, mapping interfaces and Java POJOs (Plain Old Java Objects, ordinary Java objects) into records in the database.
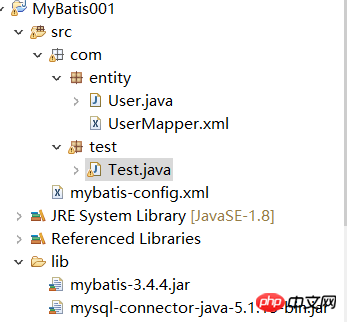
Step 1: Create a project first, just an ordinary Java project, take a look at the project structure first

Step 2: Import the relevant jar package (can be downloaded from the official website, open source):
mybatis-3.4.4.jar MyBatis jar package
mysql-connector-java-5.1.13-bin.jar Mysql jar package
Step 3: Write a configuration file. It is an XML file mybatis-config.xml, and the location is placed under src
<?xml version="1.0" encoding="UTF-8" ?><!DOCTYPE configuration PUBLIC "-//mybatis.org//DTD Config 3.0//EN" "http://mybatis.org/dtd/mybatis-3-config.dtd"><configuration>
  <environments default="development">
    <environment id="development">
      <transactionManager type="JDBC"/>
      <dataSource type="POOLED">
        <property name="driver" value="com.mysql.jdbc.Driver"/>
        <property name="url" value="jdbc:mysql://localhost:3306/mobile"/>
        <property name="username" value="zhou"/>
        <property name="password" value="123456"/>
      </dataSource>
    </environment>
  </environments>
  <mappers>
    <mapper resource="com/entity/UserMapper.xml"/>
</mappers></configuration>Description of the attributes of the xml file in MyBatis:
<!-- 配置文件的根元素 -->  <configuration>
    <!-- 属性:定义配置外在化 -->
    <properties></properties>
    <!-- 设置:定义mybatis的一些全局性设置 -->
    <settings>
       <!-- 具体的参数名和参数值 -->
       <setting name="" value=""/>
    </settings>
    <!-- 类型名称:为一些类定义别名 -->
    <typeAliases></typeAliases>
    <!-- 类型处理器:定义Java类型与数据库中的数据类型之间的转换关系 -->
    <typeHandlers></typeHandlers>
    <!-- 对象工厂 -->
    <objectFactory type=""></objectFactory>
    <!-- 插件:mybatis的插件,插件可以修改mybatis的内部运行规则 -->
    <plugins>
       <plugin interceptor=""></plugin>
    </plugins>
    <!-- 环境:配置mybatis的环境 -->
    <environments default="">
       <!-- 环境变量:可以配置多个环境变量,比如使用多数据源时,就需要配置多个环境变量 -->
       <environment id="">
          <!-- 事务管理器 -->
          <transactionManager type=""></transactionManager>
          <!-- 数据源 -->
          <dataSource type=""></dataSource>
       </environment>
    </environments>
    <!-- 数据库厂商标识 -->
    <databaseIdProvider type=""></databaseIdProvider>
    <!-- 映射器:指定映射文件或者映射类 -->
<mappers></mappers> </configuration>Step 4: Create the entity class. Needless to say, normal creation is ok
Step 5: Create the mapper mapping xml file of the entity class. The location is at the same level as the entity class. It is some operations on the entity class. I think it is just a matter of configuring the sql statement. Then go to the method to adjust the attribute description of
<?xml version="1.0" encoding="UTF-8" ?><!DOCTYPE mapper PUBLIC "-//mybatis.org//DTD Mapper 3.0//EN" "http://mybatis.org/dtd/mybatis-3-mapper.dtd"><!-- namespace可以不加xml后缀 --><mapper namespace="com.entity.UserMapper"><!-- 单个对象查询 -->
  <select id="selectUser" parameterType="int"  resultType="com.entity.User">
    select * from user where id = #{id}  </select>
  <!--查询列表  -->
  <resultMap id="userList" type="com.entity.User">
  <result property="id" column="id" />
  <result property="username" column="username"/>
  <result property="password" column="password"/></resultMap>
  <select id="selectAll"  resultMap="userList">
    select * from user  </select>
  <!--插入数据  -->
   <insert id="insert"  >
    insert into User (username,password) values(#{username},#{password})  </insert>
  <!--更新数据  --><update id="update">
  update User set username = #{username},password = #{password} where id = #{id}</update><!--删除数据  --><delete id="delete">
delete from User where id = #{id}</delete></mapper>: first Let’s look at the first few and later encounters, Baidu can

#Step 6: Write a test class to test whether what you built is useful
package com.test;import java.io.IOException;import java.io.InputStream;import java.util.List;import org.apache.ibatis.io.Resources;import org.apache.ibatis.session.SqlSession;import org.apache.ibatis.session.SqlSessionFactory;import org.apache.ibatis.session.SqlSessionFactoryBuilder;import com.entity.User;/**
 *
 * @author 坚持到你GL
 * */public class Test {
     private static SqlSession session=null;
     public static SqlSession mySession() {        //你的MyBatis的配置文件地址
        String resource = "mybatis-config.xml";
        InputStream inputStream=null;
        try {            //IO解析xml文件
            inputStream = Resources.getResourceAsStream(resource);
        } catch (IOException e) {            // TODO Auto-generated catch block
        e.printStackTrace();
        }        //创建一个SqlSessionFactoryBuilder对象,获得SqlSessionFactory 的实例
        SqlSessionFactory sqlSessionFactory = new SqlSessionFactoryBuilder().build(inputStream);        //开启SqlSession
         session=sqlSessionFactory.openSession();
         return session;
    }    private static void select(){        //selectUser是实体类映射文件的中设置的id
        User user=mySession().selectOne("selectUser",2);
        System.out.println(user);
    }    private static void selectAll() {
        List<User> list=mySession().selectList("selectAll");
        for (User user : list) {
            System.out.println(user);
        }
    }    private static void insert() {
        User insertuser=new User("zhou","123456");
        mySession().insert("insert",insertuser);
        session.commit();
    }    private static void update() {
        User updateuser =new User(9,"admin","admin");
        mySession().update("update", updateuser);
        session.commit();
    }    private static void delect() {
        mySession().delete("delete", 10);
        session.commit();
    }    public static void main(String[] args) {

    selectAll();
    }
}For simple development of microservices for small projects, using MyBatis is a very good choice
The above is the detailed content of Simple usage of MyBatis. For more information, please follow other related articles on the PHP Chinese website!
 mybatis first level cache and second level cache
 What is the difference between ibatis and mybatis
 How to configure database connection in mybatis
 What is the working principle and process of mybatis
 What are the differences between hibernate and mybatis
 OuYi exchange usdt price
 How to get the address bar address
 The role of subnet mask
 How to connect asp to access database


