

Learn react-router-dom through a user management example
We learn react-router-dom through a user management example
This example includes 9 small components
App.js introduces components
Home.js home page component
User.js user management component
- UserList.js User list component
- UserAdd.js User add component
- UserDetail.js User details component
Profile.js Personal center component
Login.js User login component
Protected.js handles login Component (we simulate login)
We first create an App component as a component introduced in our project
import React, {Component} from 'react';//Router 容器,它是用来包裹路由规则的//Route 是路由规则//BrowserRouter基于h5的。兼容性不好//引入react-router-demoimport {HashRouter as Router, Route,Link,NavLink,Switch} from 'react-router-dom';//引入我们需要的组件import Home from "./Home";
import User from "./User";
import Profile from "./Profile";
import Login from "./Login";
import Protected from './Protected'//定义一个App组件export default class App extends Component {
render() { //定义一个我们选中的状态
let activeStyle={color:'red'} return ( <Router>
<p className="container">
<nav className='nav navbar-default'>
<p className="container-fluid">
<a className="navbar-brand">用户管理</a>
</p>
<ul className="nav">
<li className='navbar-nav'><NavLink exact activeStyle={activeStyle} to="/">首页</NavLink></li>
<li className='navbar-nav'><NavLink activeStyle={activeStyle} to="/user">用户管理</NavLink></li>
<li className='navbar-nav'><NavLink activeStyle={activeStyle} to="/profile">个人中心</NavLink></li>
</ul>
</nav>
<p>
{/*Switch是匹配*/}
{/*exact 我们匹配/斜杠时候,就匹配第一个*/} <Switch>
<Route exact path="/" component={Home}/>
<Route path="/user" component={User}/>
<Protected path="/profile" component={Profile}/>
<Route path="/login" component={Login}/>
</Switch>
</p>
</p>
</Router> )
}
}The App component allows us Introduced components, in this component, we need to pay attention to the outermost Router
This is the routing container, our routing rule Route needs to be wrapped in the date
Route contains two attributes, path and component
path points to the routing path, and component points to the component to be jumped
Our route navigation is usually Link and NavLink
These two functions have the same function, both are route jumps, but NavLink has an attribute used to display the jump selected style, the activeStyle attribute, which is written to display the highlighted style, and receives an object {}
## in Our route navigation has a to attribute
the to attribute is the path to jump to in our route
The following is the User.js component, which mainly includes two routes, NavLink and Route. It has the same meaning as above, switching the two components NavLink and Route
import React, {Component} from 'react'import {Link,Route,NavLink} from 'react-router-dom'import UsersList from './UsersList'import UsersAdd from './UsersAdd'import UserDetail from "./UserDetail";
export default class User extends Component {
render() {
let activeStyle={color:'red'} return ( <p className='row'>
<p className="col-sm-3">
<nav>
<ul className="nav nav-stacked">
<li><NavLink activeStyle={activeStyle} to="/user/list">用户列表</NavLink></li>
<li><NavLink activeStyle={activeStyle} to="/user/add">添加用户</NavLink></li>
</ul>
</nav>
</p>
<p className="col-sm-9">
<Route path="/user/list" component={UsersList}></Route>
<Route path="/user/add" component={UsersAdd}></Route>
<Route path="/user/detail/:id" component={UserDetail}></Route>
</p>
</p> )
}
}- UserAdd.js User Add Component
import React, {Component} from 'react'export default class UsersAdd extends Component {
    handleSubmit=()=>{
        let username=this.refs.username.value;
        let password=this.refs.password.value;
        let user={username,password,id:Date.now()};
        let users=JSON.parse(localStorage.getItem('USERS')||"[]");
        users.push(user);
        localStorage.setItem('USERS',JSON.stringify(users));        this.props.history.push('/user/list')
    }
    render() {        /*
        * history 用来跳转页面
        * location.pathname 用来存放当前路径
        * match代表匹配的结果
        *
        * */
        return (            <form onSubmit={this.handleSubmit}>
                <p className="form-group">
                    <label htmlFor="username" className="control-label">
                        用户名                    </label>
                    <input type="text" className="form-control" ref="username" placeholder="用户名"/>
                </p>
                <p className="form-group">
                    <label htmlFor="username" className="control-label">
                        密码                    </label>
                    <input type="password" className="form-control" ref="password" placeholder="密码"/>
                </p>
                <p className="form-group">

                    <input type="submit" className="btn btn-danger" />
                </p>
            </form>        )
    }
}We cache the data added by the user on the page to facilitate the rendering of our user list page
<span style="font-size: 14pt;">localStorage.setItem('USERS',JSON.stringify(users));</span><br/><span style="font-size: 14pt;">缓存完成后跳转到列表详情页面userList</span><br/><span style="font-size: 14pt;">this.props.history.push('/user/list')</span>
- UserList.js User List Component
import React, {Component} from 'react'import {Link} from 'react-router-dom'export default class UsersList extends Component {
    constructor(){
        super();
        this.state={users:[]}
    }
    componentWillMount(){
        let users = JSON.parse(localStorage.getItem('USERS') || "[]");
        this.setState({users});
    }
    render(){
    return (
    <ul className="list-group">
               {
                       this.state.users.map((user,index)=>(
                       <li key={index} className="list-group-item">
                           <span>用户名:</span>
                           <Link to={`/user/detail/${user.id}`}>{user.username}</Link>
                          <span className="btn btn-danger" onClick={()=>{
                              let users=this.state.users.filter(item=>item.id!=user.id)                              this.setState({users});
                          }}>删除</span>
                       </li>                   ))
               }           </ul>        )
    }
}componentWillMount() is the component cycle function after the component is mounted
In this hook In the function, we go to the USERS data stored in userAdd, and then render it to the page
{user. username}
Here we jump to the personal information details and bring everyone’s user ID
Then our user details page UserDetail.js component
import React, {Component} from 'react'export default class UserDetail extends Component {
    render() {        // let user=this.props.location.state.user
        let users = JSON.parse(localStorage.getItem('USERS')||"[]");
        let id = this.props.match.params.id;
        let user = users.find(item=>item.id == id);
        return (
        <table className="table table-bordered">
                <thead>
                <tr>
                    <th>ID</th>
                    <th>用户名</th>
                    <th>密码</th>
                </tr>
                </thead>
                <tbody>
                    <tr>
                    <td>{user.id}</td>
                    <td>{user.username}</td>
                    <td>{user.password}</td>
                    </tr>
                </tbody>
            </table>        )
    }
}let id = this.props.match.params.id;
let user = users.find(item=>item.id == id);
Get the id brought by the route through match
Then determine the item with the same ID in users
and then render it to the page
. Then we determine the login. If there is no login, then Log in. You can view user management only after logging in.
import React from 'react';
import {Route, Redirect} from 'react-router-dom';//函数组件//把属性对象中的Component属性取出来赋给comp,把其它属性取出来赋给other对象//再把other对象的全部属性取出来赋给Route// component=组件// render函数 当路由匹配的时候,渲染的是render方法的返回值export default function ({component: _comp, ...rest}) { return <Route {...rest} render={
props => localStorage.getItem('login') ? <_comp/> :
<Redirect to={{pathname: '/login', state: {from: props.location.pathname}}}/>
}/> return null;
}import React, {Component} from 'react';
export default class Login extends Component {
handleClick = ()=>{
localStorage.setItem('login','true');
console.log(this.props);
this.props.history.push(this.props.location.state.from);
}
render() {
return (
<p>
<button
onClick={this.handleClick}
className="btn btn-primary">登录
</button>
</p>
)
}
}The above is the detailed content of Learn react-router-dom through a user management example. For more information, please follow other related articles on the PHP Chinese website!

Hot AI Tools

Undresser.AI Undress
AI-powered app for creating realistic nude photos

AI Clothes Remover
Online AI tool for removing clothes from photos.

Undress AI Tool
Undress images for free

Clothoff.io
AI clothes remover

Video Face Swap
Swap faces in any video effortlessly with our completely free AI face swap tool!

Hot Article
Hot Tools

Notepad++7.3.1
Easy-to-use and free code editor

SublimeText3 Chinese version
Chinese version, very easy to use

Zend Studio 13.0.1
Powerful PHP integrated development environment

Dreamweaver CS6
Visual web development tools

SublimeText3 Mac version
God-level code editing software (SublimeText3)
Hot Topics
 1386
1386
 52
52

 How to use Xiaohongshu account to find users? Can I find my mobile phone number?
Mar 22, 2024 am 08:40 AM
How to use Xiaohongshu account to find users? Can I find my mobile phone number?
Mar 22, 2024 am 08:40 AM
With the rapid development of social media, Xiaohongshu has become one of the most popular social platforms. Users can create a Xiaohongshu account to show their personal identity and communicate and interact with other users. If you need to find a user’s Xiaohongshu number, you can follow these simple steps. 1. How to use Xiaohongshu account to find users? 1. Open the Xiaohongshu APP, click the "Discover" button in the lower right corner, and then select the "Notes" option. 2. In the note list, find the note posted by the user you want to find. Click to enter the note details page. 3. On the note details page, click the "Follow" button below the user's avatar to enter the user's personal homepage. 4. In the upper right corner of the user's personal homepage, click the three-dot button and select "Personal Information"
 Log in to Ubuntu as superuser
Mar 20, 2024 am 10:55 AM
Log in to Ubuntu as superuser
Mar 20, 2024 am 10:55 AM
In Ubuntu systems, the root user is usually disabled. To activate the root user, you can use the passwd command to set a password and then use the su- command to log in as root. The root user is a user with unrestricted system administrative rights. He has permissions to access and modify files, user management, software installation and removal, and system configuration changes. There are obvious differences between the root user and ordinary users. The root user has the highest authority and broader control rights in the system. The root user can execute important system commands and edit system files, which ordinary users cannot do. In this guide, I'll explore the Ubuntu root user, how to log in as root, and how it differs from a normal user. Notice
 Tutorial: How to delete a normal user account in Ubuntu system?
Jan 02, 2024 pm 12:34 PM
Tutorial: How to delete a normal user account in Ubuntu system?
Jan 02, 2024 pm 12:34 PM
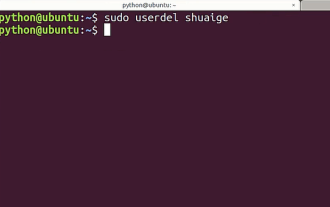
Many users have been added to the Ubuntu system. I want to delete the users that are no longer in use. How to delete them? Let’s take a look at the detailed tutorial below. 1. Open the terminal command line and use the userdel command to delete the specified user. Be sure to add the sudo permission command, as shown in the figure below. 2. When deleting, be sure to be in the administrator directory. Ordinary users do not have this permission. , as shown in the figure below 3. After the delete command is executed, how to judge whether it has been truly deleted? Next we use the cat command to open the passwd file, as shown in the figure below 4. We see that the deleted user information is no longer in the passwd file, which proves that the user has been deleted, as shown in the figure below 5. Then we enter the home file
 What is sudo and why is it important?
Feb 21, 2024 pm 07:01 PM
What is sudo and why is it important?
Feb 21, 2024 pm 07:01 PM
sudo (superuser execution) is a key command in Linux and Unix systems that allows ordinary users to run specific commands with root privileges. The function of sudo is mainly reflected in the following aspects: Providing permission control: sudo achieves strict control over system resources and sensitive operations by authorizing users to temporarily obtain superuser permissions. Ordinary users can only obtain temporary privileges through sudo when needed, and do not need to log in as superuser all the time. Improved security: By using sudo, you can avoid using the root account during routine operations. Using the root account for all operations may lead to unexpected system damage, as any mistaken or careless operation will have full permissions. and
 Analysis of user password storage mechanism in Linux system
Mar 20, 2024 pm 04:27 PM
Analysis of user password storage mechanism in Linux system
Mar 20, 2024 pm 04:27 PM
Analysis of user password storage mechanism in Linux system In Linux system, the storage of user password is one of the very important security mechanisms. This article will analyze the storage mechanism of user passwords in Linux systems, including the encrypted storage of passwords, the password verification process, and how to securely manage user passwords. At the same time, specific code examples will be used to demonstrate the actual operation process of password storage. 1. Encrypted storage of passwords In Linux systems, user passwords are not stored in the system in plain text, but are encrypted and stored. L
 Oracle Database: Can one user have multiple tablespaces?
Mar 03, 2024 am 09:24 AM
Oracle Database: Can one user have multiple tablespaces?
Mar 03, 2024 am 09:24 AM
Oracle database is a commonly used relational database management system, and many users will encounter problems with the use of table spaces. In Oracle database, a user can have multiple table spaces, which can better manage data storage and organization. This article will explore how a user can have multiple table spaces in an Oracle database and provide specific code examples. In Oracle database, table space is a logical structure used to store objects such as tables, indexes, and views. Every database has at least one tablespace,
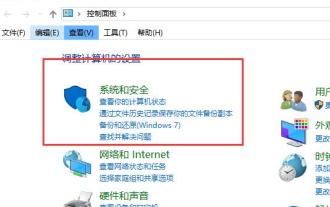 What to do if the right-click menu management cannot be opened in Windows 10
Jan 04, 2024 pm 07:07 PM
What to do if the right-click menu management cannot be opened in Windows 10
Jan 04, 2024 pm 07:07 PM
When we use the win10 system, when we use the mouse to right-click the desktop or the right-click menu, we find that the menu cannot be opened and we cannot use the computer normally. At this time, we need to restore the system to solve the problem. Win10 right-click menu management cannot be opened: 1. First open our control panel, and then click. 2. Then click under Security and Maintenance. 3. Click on the right to restore the system. 4. If it still cannot be used, check whether there is something wrong with the mouse itself. 5. If you are sure there is no problem with the mouse, press + and enter. 6. After the execution is completed, restart the computer.
 One-line command to find all real users in Linux
Feb 18, 2024 pm 05:50 PM
One-line command to find all real users in Linux
Feb 18, 2024 pm 05:50 PM
Hello everyone, I am Xianyu. Friends who have been exposed to Linux all know that there are three types of users in Linux (or Unix-like): Super user (UID 0): the root user, who has the highest permissions. System user (UID 1~999): System built-in user, used to run system services and daemon processes. Ordinary user (UID 1000~60000): Created to allow users to use Linux system resources. The account created by the user is generally an ordinary account. So now the question is, how to quickly find out the real users (root users and ordinary users) in Linux? Before we officially start, we first introduce a tool-getent. getent
