 Backend Development
 C#.Net Tutorial
 Detailed explanation of the ABP introductory tutorial of the ASP.NET template development framework ABP series
Detailed explanation of the ABP introductory tutorial of the ASP.NET template development framework ABP series
ABP is a starting point for new modern web applications using best practices and using the most popular tools. Can be used as a base framework or project template for general-purpose applications. Next, this article will give you a detailed introduction to the ABP introductory tutorial. Friends who are interested should take a look.
ABP is the abbreviation of "ASP.NET Boilerplate Project (ASP.NET Sample Project)".
ASP.NET Boilerplate is a new starting point for developing modern WEB applications using best practices and popular technologies. It aims to become a universal WEB application framework and project template.
ABP’s official website: http://www.aspnetboilerplate.com
ABP’s open source project on Github: https://github.com/aspnetboilerplate
The origin of ABP
"DRY - avoid duplication of code" is the most important thing a good developer has when developing software One of the thoughts. We all have similar needs when developing enterprise WEB applications, such as: login pages, user/role management, permission verification, data validity verification, multi-language/localization, etc. A high-quality large-scale software will use some best practices, such as layered architecture, domain-driven design, dependency injection, etc. We may also use tools such as ORM, Database Migrations, and Logging.
Creating an enterprise application from scratch is a tedious task because many common basic tasks need to be repeated. Many companies are developing their own application frameworks to reuse in different projects, and then develop some new features based on the framework. But not every company has such strength. If we could share more, maybe we could avoid having to write similar code repeatedly for every company or every project. The reason why the author named the project "ASP.NET Boilerplate" is that he hopes it can become a new starting point for developing general enterprise WEB applications and directly use ABP as a project template.
What is ABP?
ABP is a starting point for new modern web applications using best practices and using the most popular tools. Can be used as a base framework or project template for general-purpose applications. Its features include:
Server side:
Based on the latest .NET technology (currently ASP.NET MVC 5, Web API 2 , C# 5.0, will be upgraded after ASP.NET 5 is officially released)
Implement domain-driven design (entities, warehousing, domain services, domain events, application services, data transfer objects, work Units, etc.)
Implementing a layered architecture (domain layer, application layer, presentation layer and infrastructure layer) provides an infrastructure to develop reusable and configurable modules to integrate some The most popular open source frameworks/libraries, maybe some of them you are using.
Provides an infrastructure that allows us to easily use dependency injection (using Castle Windsor as a dependency injection container)
Provides Repository warehousing The mode supports different ORMs (Entity Framework, NHibernate, MangoDb and in-memory database have been implemented)
Supports and implements database migration (EF's Code first) modular development (each module has independent EF DbContext, database can be specified separately)
Includes a simple and flexible multi-language/localization system
Includes an EventBus Implement unified exception handling of global domain events on the server side (the application layer almost does not need to write its own exception handling code)
Data validity verification (Asp.NET MVC can only do Action Method parameter verification, ABP implements parameter validity verification of the Application layer method)
Automatically create the Web Api layer through Application Services (no need to write the ApiController layer)
Provide base classes and helper classes to allow us to easily implement some common tasks
Use the "convention over configuration principle"
Client:
Bootstrap, Less, AngularJs, jQuery, Modernizr and other JS libraries: jQuery.validate, jQuery.form, jQuery.blockUI , json2, etc.
Provides project templates for single-page applications (AngularJs, Durandaljs) and multi-page applications (Bootstrap+Jquery).
Automatically create a Javascript proxy layer to make it easier to use Web Api to encapsulate some Javascript functions, and to make it easier to use ajax, message boxes, notification components, busy status mask layers, etc.
In addition to the ABP framework project, a module named "Zero" has also been developed to implement the following functions:
Authentication and authorization management (implemented through ASP.NET Identity)
User & role management system settings access management (system level, tenant level, user level, scope automatic management )
Audit log (automatically records the caller and parameters of each interface)
What is ABP not?
ABP provides an application development model for best practices. It has basic classes, interfaces and tools that make it easy to build maintainable large-scale applications.
However:
It is not one of the RAD tools, which are designed to create applications without coding. Instead, ABP provides a coding best practice.
It is not a code generation tool. While it has some features to build dynamic code at runtime, it cannot generate code.
It is not an integrated framework. Instead, it uses popular tools/libraries for specific tasks (e.g. EF for ORM, Log4Net for logging, Castle Windsor as a dependency injection container, AngularJs for SPA frameworks).
Judging from my experience of using ABP for several months, although ABP is not RAD, using it to develop projects is definitely much faster than the traditional three-tier architecture.
Although ABP is not a code generation tool, because of it, the code of our project is more concise and standardized, which is conducive to the use of code generation tools.
I use the code generator developed by VS2013's Scaffolder+T4, which can automatically generate all front-end and back-end codes and databases based on the UML class diagram of domain objects. A simple CURD module requires almost no coding and has complex businesses. The logical module mainly supplements the domain layer code. In this way, you can spend more time on the design of the domain model and reduce the time on writing code.
The following uses the original author's "Simple Task System" example to demonstrate how to use ABP to develop a project
Create an empty web application from a template
ABP provides a startup template for new projects (although you can create the project manually and obtain the ABP package from nuget, the template method is easier).
Go to www.aspnetboilerplate.com/Templates to create your application from templates.
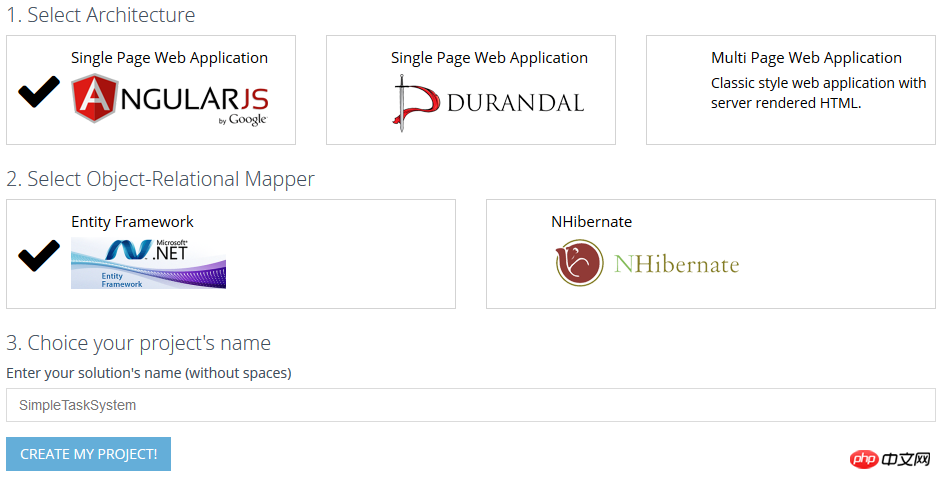
You can choose SPA (AngularJs or DurandalJs) or choose MPA (classic multi-page application) project. You can choose Entity Framework or NHibernate as the ORM framework.
Here we choose AngularJs and Entity Framework, fill in the project name "SimpleTaskSystem", click the "CREATE MY PROJECT" button to download a zip package, decompress it to get the VS2013 solution, the .NET version used is 4.5.1.
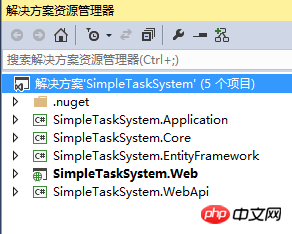
Abp components and other third-party components are referenced in each project and need to be downloaded from Nuget.
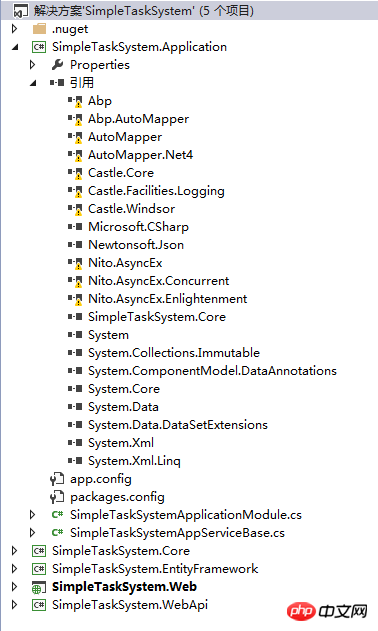
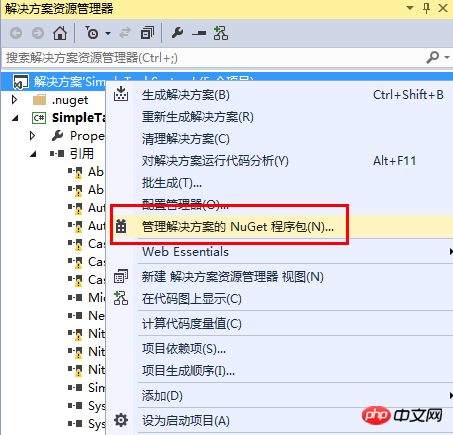
The yellow exclamation mark icon indicates that this component does not exist in the local folder and needs to be restored from Nuget. The operation is as follows:

To make the project run, you must create a database. This template assumes you are using SQL2008 or newer. Of course, it can also be easily replaced with other relational databases.
Open the Web.Config file to view and configure the link string:
<add name="Default" connectionString="Server=localhost; Database=SimpleTaskSystemDb; Trusted_Connection=True;" />
(When EF's Code first data migration is used later, it will automatically Create a database named SimpleTaskSystemDb in the SQL Server database)
That’s it, the project is ready to run! Open VS2013 and press F5:
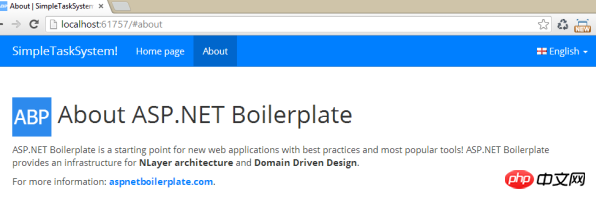
The following will implement this simple task system program step by step
Create entities
Write the entity class in the Core project, because the entity is part of the domain layer.
A simple application scenario: create some tasks (tasks) and assign them to people. We need two entities, Task and Person.
Task entity has several attributes: description (Description), creation time (CreationTime), task status (State), and optional navigation attribute (AssignedPerson) to reference Person.
public class Task : Entity<long>
{
 [ForeignKey("AssignedPersonId")]
 public virtual Person AssignedPerson { get; set; }

 public virtual int? AssignedPersonId { get; set; }

 public virtual string Description { get; set; }

 public virtual DateTime CreationTime { get; set; }

 public virtual TaskState State { get; set; }

 public Task()
 {
  CreationTime = DateTime.Now;
  State = TaskState.Active;
 }
}The Person entity is simpler and only defines a Name attribute:
public class Person : Entity
{
 public virtual string Name { get; set; }
}In the ABP framework, there An Entity base class, which has an Id property. Because the Task class inherits from Entity
Create DbContext
To use EntityFramework, you need to define the DbContext class first. The ABP template has already created the DbContext file. We only need to add Task and Person Class added to IDbSet, please see the code:
public class SimpleTaskSystemDbContext : AbpDbContext
{
 public virtual IDbSet<Task> Tasks { get; set; }

 public virtual IDbSet<Person> People { get; set; }

 public SimpleTaskSystemDbContext()
  : base("Default")
 {

 }

 public SimpleTaskSystemDbContext(string nameOrConnectionString)
  : base(nameOrConnectionString)
 {

 }
}通过Database Migrations创建数据库表
我们使用EntityFramework的Code First模式创建数据库架构。ABP模板生成的项目已经默认开启了数据迁移功能,我们修改SimpleTaskSystem.EntityFramework项目下Migrations文件夹下的Configuration.cs文件:
internal sealed class Configuration : DbMigrationsConfiguration<SimpleTaskSystem.EntityFramework.SimpleTaskSystemDbContext>
{
 public Configuration()
 {
  AutomaticMigrationsEnabled = false;
 }

 protected override void Seed(SimpleTaskSystem.EntityFramework.SimpleTaskSystemDbContext context)
 {
  context.People.AddOrUpdate(
   p => p.Name,
   new Person {Name = "Isaac Asimov"},
   new Person {Name = "Thomas More"},
   new Person {Name = "George Orwell"},
   new Person {Name = "Douglas Adams"}
   );
 }
}在VS2013底部的“程序包管理器控制台”窗口中,选择默认项目并执行命令“Add-Migration InitialCreate”

会在Migrations文件夹下生成一个xxxx-InitialCreate.cs文件,内容如下:
public partial class InitialCreate : DbMigration
{
 public override void Up()
 {
  CreateTable(
   "dbo.StsPeople",
   c => new
    {
     Id = c.Int(nullable: false, identity: true),
     Name = c.String(),
    })
   .PrimaryKey(t => t.Id);

  CreateTable(
   "dbo.StsTasks",
   c => new
    {
     Id = c.Long(nullable: false, identity: true),
     AssignedPersonId = c.Int(),
     Description = c.String(),
     CreationTime = c.DateTime(nullable: false),
     State = c.Byte(nullable: false),
    })
   .PrimaryKey(t => t.Id)
   .ForeignKey("dbo.StsPeople", t => t.AssignedPersonId)
   .Index(t => t.AssignedPersonId);
 }

 public override void Down()
 {
  DropForeignKey("dbo.StsTasks", "AssignedPersonId", "dbo.StsPeople");
  DropIndex("dbo.StsTasks", new[] { "AssignedPersonId" });
  DropTable("dbo.StsTasks");
  DropTable("dbo.StsPeople");
 }
}然后继续在“程序包管理器控制台”执行“Update-Database”,会自动在数据库创建相应的数据表:
PM> Update-Database
数据库显示如下:
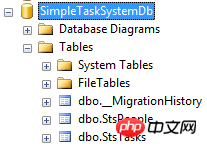
(以后修改了实体,可以再次执行Add-Migration和Update-Database,就能很轻松的让数据库结构与实体类的同步)
定义仓储接口
通过仓储模式,可以更好把业务代码与数据库操作代码更好的分离,可以针对不同的数据库有不同的实现类,而业务代码不需要修改。
定义仓储接口的代码写到Core项目中,因为仓储接口是领域层的一部分。
我们先定义Task的仓储接口:
public interface ITaskRepository : IRepository<Task, long>
{它继承自ABP框架中的IRepository泛型接口。
在IRepository中已经定义了常用的增删改查方法:
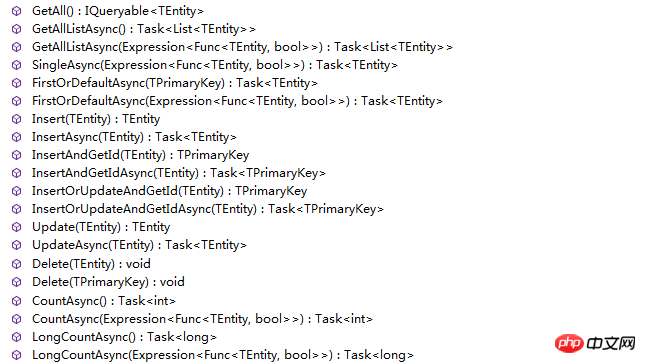
所以ITaskRepository默认就有了上面那些方法。可以再加上它独有的方法GetAllWithPeople(...)。
不需要为Person类创建一个仓储类,因为默认的方法已经够用了。ABP提供了一种注入通用仓储的方式,将在后面“创建应用服务”一节的TaskAppService类中看到。
实现仓储类
我们将在EntityFramework项目中实现上面定义的ITaskRepository仓储接口。
通过模板建立的项目已经定义了一个仓储基类:SimpleTaskSystemRepositoryBase(这是一种比较好的实践,因为以后可以在这个基类中添加通用的方法)。
public class TaskRepository : SimpleTaskSystemRepositoryBase<Task, long>, ITaskRepository
{
  public List<Task> GetAllWithPeople(int? assignedPersonId, TaskState? state)
  {
    //在仓储方法中,不用处理数据库连接、DbContext和数据事务,ABP框架会自动处理。

    var query = GetAll(); //GetAll() 返回一个 IQueryable<T>接口类型

    //添加一些Where条件

    if (assignedPersonId.HasValue)
    {
      query = query.Where(task => task.AssignedPerson.Id == assignedPersonId.Value);
    }

    if (state.HasValue)
    {
      query = query.Where(task => task.State == state);
    }

    return query
      .OrderByDescending(task => task.CreationTime)
      .Include(task => task.AssignedPerson)
      .ToList();
  }
}TaskRepository继承自SimpleTaskSystemRepositoryBase并且实现了上面定义的ITaskRepository接口。
创建应用服务(Application Services)
在Application项目中定义应用服务。首先定义Task的应用服务层的接口:
public interface ITaskAppService : IApplicationService
{
  GetTasksOutput GetTasks(GetTasksInput input);
  void UpdateTask(UpdateTaskInput input);
  void CreateTask(CreateTaskInput input);
}ITaskAppService继承自IApplicationService,ABP自动为这个类提供一些功能特性(比如依赖注入和参数有效性验证)。
然后,我们写TaskAppService类来实现ITaskAppService接口:
public class TaskAppService : ApplicationService, ITaskAppService
{
  private readonly ITaskRepository _taskRepository;
  private readonly IRepository<Person> _personRepository;

  /// <summary>
  /// 构造函数自动注入我们所需要的类或接口
  /// </summary>
  public TaskAppService(ITaskRepository taskRepository, IRepository<Person> personRepository)
  {
    _taskRepository = taskRepository;
    _personRepository = personRepository;
  }

  public GetTasksOutput GetTasks(GetTasksInput input)
  {
    //调用Task仓储的特定方法GetAllWithPeople
    var tasks = _taskRepository.GetAllWithPeople(input.AssignedPersonId, input.State);

    //用AutoMapper自动将List<Task>转换成List<TaskDto>
    return new GetTasksOutput
        {
          Tasks = Mapper.Map<List<TaskDto>>(tasks)
        };
  }

  public void UpdateTask(UpdateTaskInput input)
  {
    //可以直接Logger,它在ApplicationService基类中定义的
    Logger.Info("Updating a task for input: " + input);

    //通过仓储基类的通用方法Get,获取指定Id的Task实体对象
    var task = _taskRepository.Get(input.TaskId);

    //修改task实体的属性值
    if (input.State.HasValue)
    {
      task.State = input.State.Value;
    }

    if (input.AssignedPersonId.HasValue)
    {
      task.AssignedPerson = _personRepository.Load(input.AssignedPersonId.Value);
    }

    //我们都不需要调用Update方法
    //因为应用服务层的方法默认开启了工作单元模式(Unit of Work)
    //ABP框架会工作单元完成时自动保存对实体的所有更改,除非有异常抛出。有异常时会自动回滚,因为工作单元默认开启数据库事务。
  }

  public void CreateTask(CreateTaskInput input)
  {
    Logger.Info("Creating a task for input: " + input);

    //通过输入参数,创建一个新的Task实体
    var task = new Task { Description = input.Description };

    if (input.AssignedPersonId.HasValue)
    {
      task.AssignedPersonId = input.AssignedPersonId.Value;
    }

    //调用仓储基类的Insert方法把实体保存到数据库中
    _taskRepository.Insert(task);
  }
}TaskAppService使用仓储进行数据库操作,它通往构造函数注入仓储对象的引用。
数据验证
如果应用服务(Application Service)方法的参数对象实现了IInputDto或IValidate接口,ABP会自动进行参数有效性验证。
CreateTask方法有一个CreateTaskInput参数,定义如下:
public class CreateTaskInput : IInputDto
{
  public int? AssignedPersonId { get; set; }

  [Required]
  public string Description { get; set; }
}Description属性通过注解指定它是必填项。也可以使用其他 Data Annotation 特性。
如果你想使用自定义验证,你可以实现ICustomValidate 接口:
public class UpdateTaskInput : IInputDto, ICustomValidate
{
  [Range(1, long.MaxValue)]
  public long TaskId { get; set; }

  public int? AssignedPersonId { get; set; }

  public TaskState? State { get; set; }

  public void AddValidationErrors(List<ValidationResult> results)
  {
    if (AssignedPersonId == null && State == null)
    {
      results.Add(new ValidationResult("AssignedPersonId和State不能同时为空!", new[] { "AssignedPersonId", "State" }));
    }
  }
}你可以在AddValidationErrors方法中写自定义验证的代码。
创建Web Api服务
ABP可以非常轻松地把Application Service的public方法发布成Web Api接口,可以供客户端通过ajax调用。
DynamicApiControllerBuilder
  .ForAll<IApplicationService>(Assembly.GetAssembly(typeof (SimpleTaskSystemApplicationModule)), "tasksystem")
  .Build();
SimpleTaskSystemApplicationModule这个程序集中所有继承了IApplicationService接口的类,都会自动创建相应的ApiController,其中的公开方法,就会转换成WebApi接口方法。
可以通过http://xxx/api/services/tasksystem/Task/GetTasks这样的路由地址进行调用。
通过上面的案例,大致介绍了领域层、基础设施层、应用服务层的用法。
现在,可以在ASP.NET MVC的Controller的Action方法中直接调用Application Service的方法了。
If you use SPA single-page programming, you can directly call the corresponding Application Service method through ajax on the client (by creating a dynamic Web Api).
Summarize
The above is the detailed content of Detailed explanation of the ABP introductory tutorial of the ASP.NET template development framework ABP series. For more information, please follow other related articles on the PHP Chinese website!

Hot AI Tools

Undresser.AI Undress
AI-powered app for creating realistic nude photos

AI Clothes Remover
Online AI tool for removing clothes from photos.

Undress AI Tool
Undress images for free

Clothoff.io
AI clothes remover

Video Face Swap
Swap faces in any video effortlessly with our completely free AI face swap tool!

Hot Article

Hot Tools

Notepad++7.3.1
Easy-to-use and free code editor

SublimeText3 Chinese version
Chinese version, very easy to use

Zend Studio 13.0.1
Powerful PHP integrated development environment

Dreamweaver CS6
Visual web development tools

SublimeText3 Mac version
God-level code editing software (SublimeText3)

Hot Topics
 1386
1386
 52
52
 Xiaomi 15 series full codenames revealed: Dada, Haotian, Xuanyuan
Aug 22, 2024 pm 06:47 PM
The Xiaomi Mi 15 series is expected to be officially released in October, and its full series codenames have been exposed in the foreign media MiCode code base. Among them, the flagship Xiaomi Mi 15 Ultra is codenamed "Xuanyuan" (meaning "Xuanyuan"). This name comes from the Yellow Emperor in Chinese mythology, which symbolizes nobility. Xiaomi 15 is codenamed "Dada", while Xiaomi 15Pro is named "Haotian" (meaning "Haotian"). The internal code name of Xiaomi Mi 15S Pro is "dijun", which alludes to Emperor Jun, the creator god of "The Classic of Mountains and Seas". Xiaomi 15Ultra series covers
 The best time to buy Huawei Mate 60 series, new AI elimination + image upgrade, and enjoy autumn promotions
Aug 29, 2024 pm 03:33 PM
Since the Huawei Mate60 series went on sale last year, I personally have been using the Mate60Pro as my main phone. In nearly a year, Huawei Mate60Pro has undergone multiple OTA upgrades, and the overall experience has been significantly improved, giving people a feeling of being constantly new. For example, recently, the Huawei Mate60 series has once again received a major upgrade in imaging capabilities. The first is the new AI elimination function, which can intelligently eliminate passers-by and debris and automatically fill in the blank areas; secondly, the color accuracy and telephoto clarity of the main camera have been significantly upgraded. Considering that it is the back-to-school season, Huawei Mate60 series has also launched an autumn promotion: you can enjoy a discount of up to 800 yuan when purchasing the phone, and the starting price is as low as 4,999 yuan. Commonly used and often new products with great value
 How to evaluate the cost-effectiveness of commercial support for Java frameworks
Jun 05, 2024 pm 05:25 PM
Evaluating the cost/performance of commercial support for a Java framework involves the following steps: Determine the required level of assurance and service level agreement (SLA) guarantees. The experience and expertise of the research support team. Consider additional services such as upgrades, troubleshooting, and performance optimization. Weigh business support costs against risk mitigation and increased efficiency.
 How does the learning curve of PHP frameworks compare to other language frameworks?
Jun 06, 2024 pm 12:41 PM
The learning curve of a PHP framework depends on language proficiency, framework complexity, documentation quality, and community support. The learning curve of PHP frameworks is higher when compared to Python frameworks and lower when compared to Ruby frameworks. Compared to Java frameworks, PHP frameworks have a moderate learning curve but a shorter time to get started.
 How do the lightweight options of PHP frameworks affect application performance?
Jun 06, 2024 am 10:53 AM
The lightweight PHP framework improves application performance through small size and low resource consumption. Its features include: small size, fast startup, low memory usage, improved response speed and throughput, and reduced resource consumption. Practical case: SlimFramework creates REST API, only 500KB, high responsiveness and high throughput
 Golang framework documentation best practices
Jun 04, 2024 pm 05:00 PM
Writing clear and comprehensive documentation is crucial for the Golang framework. Best practices include following an established documentation style, such as Google's Go Coding Style Guide. Use a clear organizational structure, including headings, subheadings, and lists, and provide navigation. Provides comprehensive and accurate information, including getting started guides, API references, and concepts. Use code examples to illustrate concepts and usage. Keep documentation updated, track changes and document new features. Provide support and community resources such as GitHub issues and forums. Create practical examples, such as API documentation.
 How to choose the best golang framework for different application scenarios
Jun 05, 2024 pm 04:05 PM
Choose the best Go framework based on application scenarios: consider application type, language features, performance requirements, and ecosystem. Common Go frameworks: Gin (Web application), Echo (Web service), Fiber (high throughput), gorm (ORM), fasthttp (speed). Practical case: building REST API (Fiber) and interacting with the database (gorm). Choose a framework: choose fasthttp for key performance, Gin/Echo for flexible web applications, and gorm for database interaction.
 Detailed practical explanation of golang framework development: Questions and Answers
Jun 06, 2024 am 10:57 AM
In Go framework development, common challenges and their solutions are: Error handling: Use the errors package for management, and use middleware to centrally handle errors. Authentication and authorization: Integrate third-party libraries and create custom middleware to check credentials. Concurrency processing: Use goroutines, mutexes, and channels to control resource access. Unit testing: Use gotest packages, mocks, and stubs for isolation, and code coverage tools to ensure sufficiency. Deployment and monitoring: Use Docker containers to package deployments, set up data backups, and track performance and errors with logging and monitoring tools.


