Implementation method of installable exe program in Java
This article mainly introduces the relevant information on how to implement installable exe program examples in Java. Through this article, I hope it can help everyone to realize such a function. Friends who need it can refer to it
Detailed explanation of java implementation of installable exe program examples
The general idea of implementing installable exe files by writing Java code:
1. Create a java project in eclipse , then write Java code, and export the written Java project into a .jar format jar package;
2. By installing exe4j software, make the exported .jar format file into an .exe format executable file, (note: the .exe file at this time can only be executed, but cannot be installed);
3. By installing the Inno setup software, convert the executable .exe format file, .jar format files and other required files into an installable .exe format file;
4. Be very careful: the paths selected in the exe4j and Inno setup software are all relative paths, so in the exported jar package , exe4j, Inno setup and other software execution processes, it is strongly recommended to keep operating and outputting files in a folder;
The general steps to implement installable exe format files through java code are as follows:
1. Create a java project, write the java code, and export the jar package:
1. Create a java project, write the java code, needless to say;
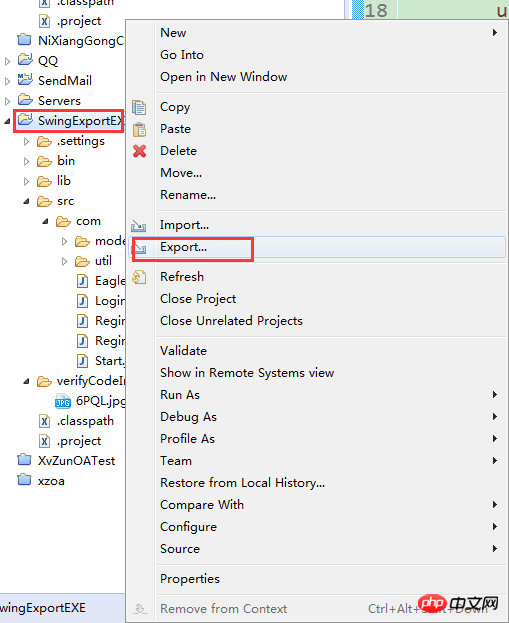
2. Export the jar Package:
Step one:
Step two:
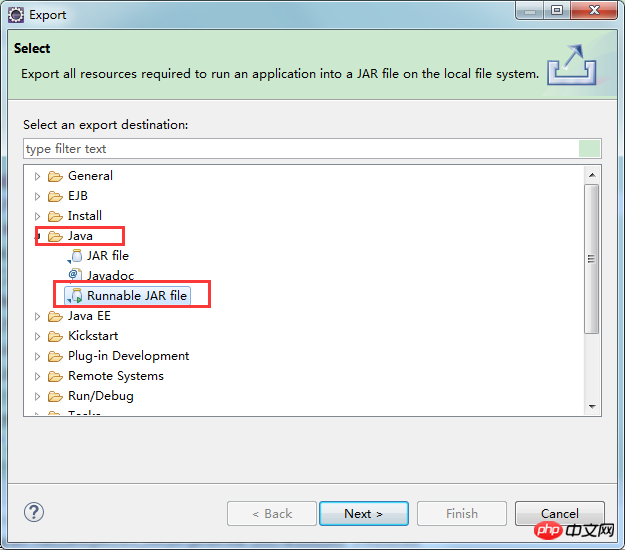
Step three:
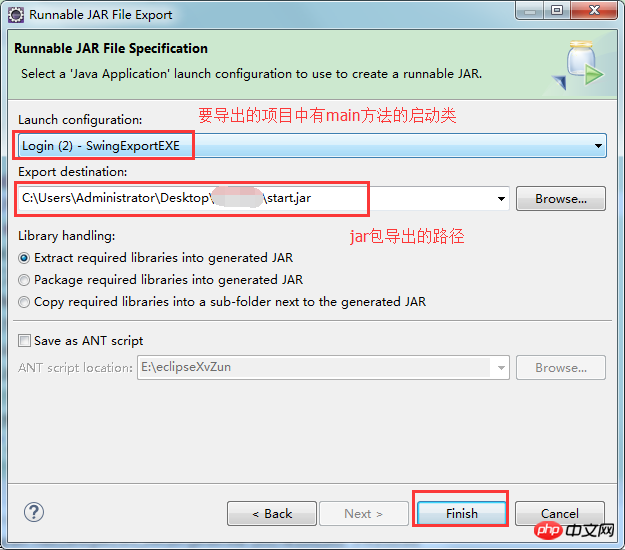
2. Make the jar package into an executable exe format file by installing the exe4j software (note: the exe format file at this time can only be executed, but cannot be installed):
1. Download the exe4j software, and then install it as normal:
2. Step 1:
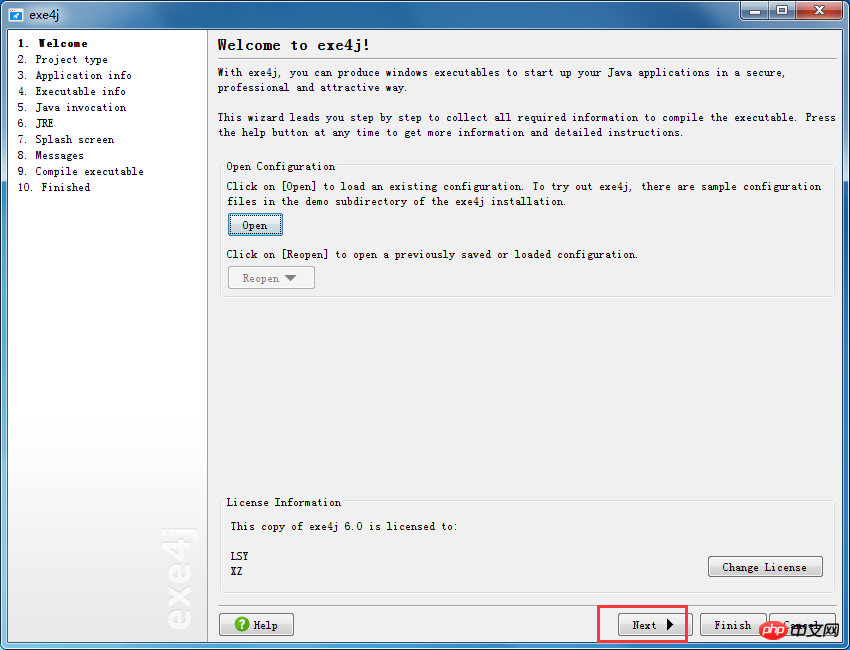
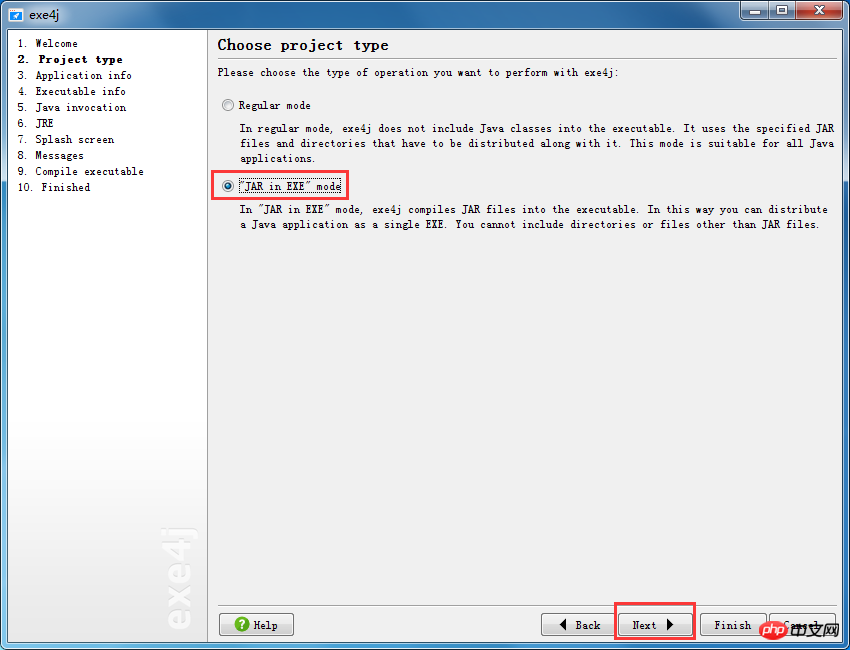
3. Step 2 :
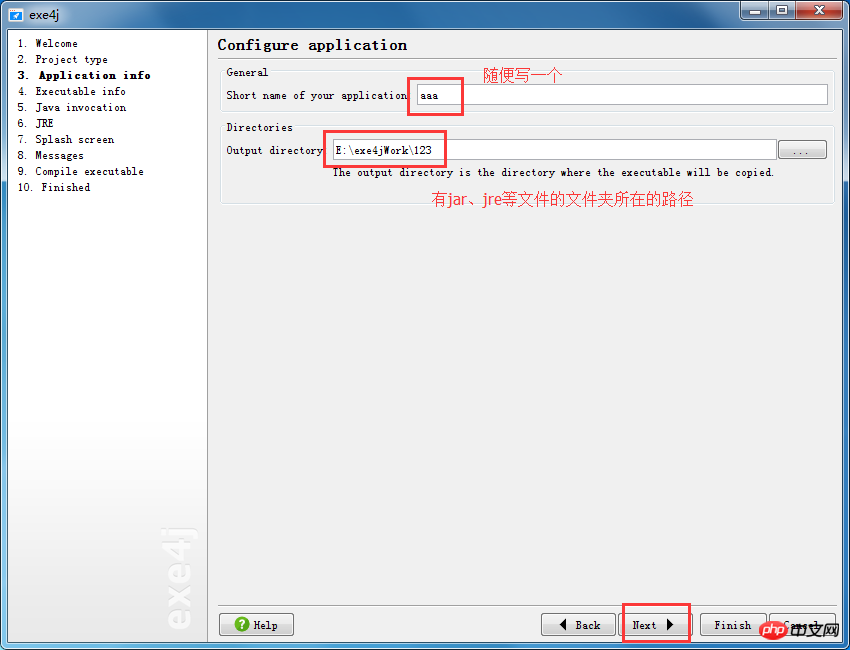
4. Step 3: When selecting the path, be sure to select the path where the folder containing jar packages, jre and other files is located. This is also the output .exe format. It is strongly recommended to write the path of the file like this;
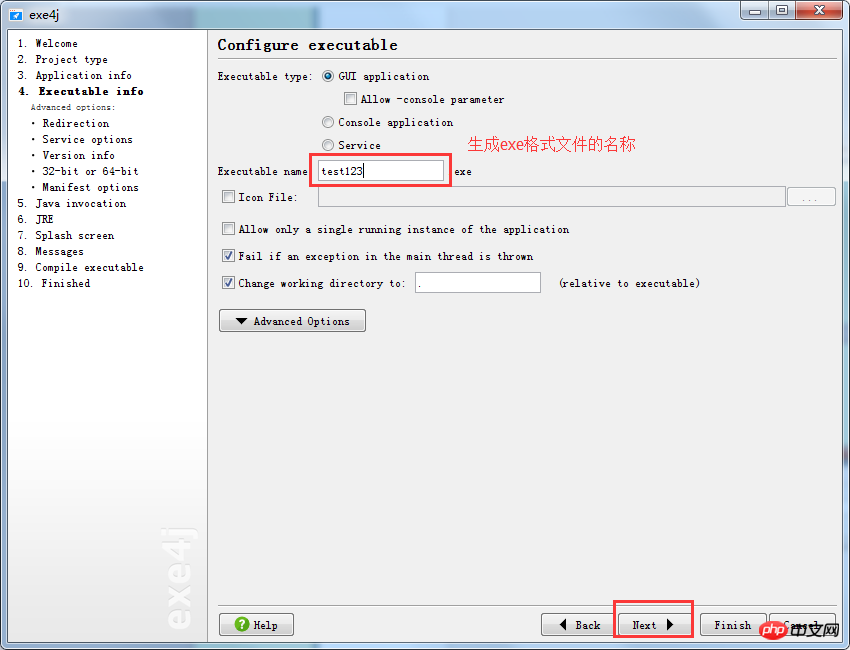
5. Step 4: The content filled in in this position is the file name output by the .exe format file;
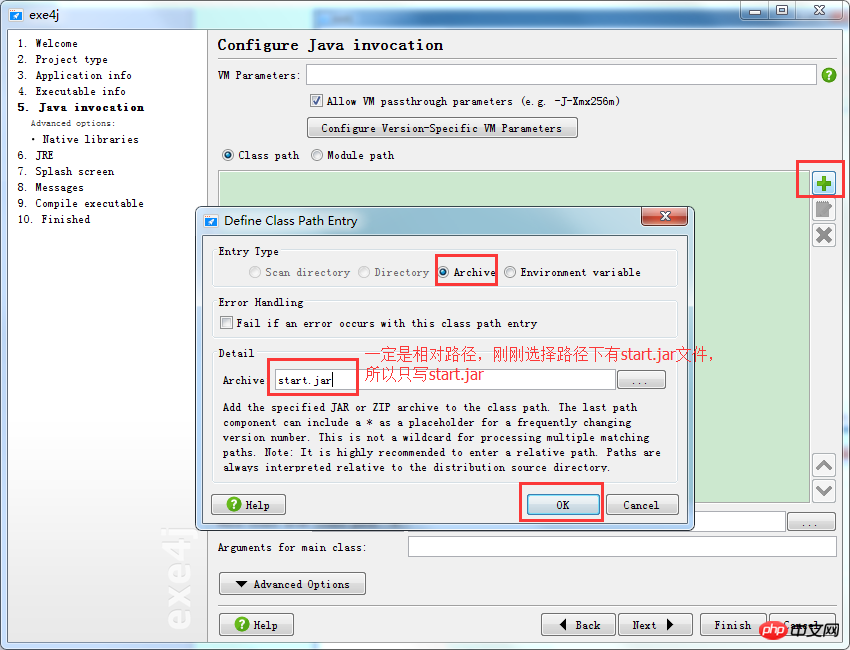
6. Step 5: Add the jar package exported by the project. Pay special attention to: The jar package path at this time must be a relative path , because the above selection outputs the .exe format. The path of the file is the path of the folder where the jar package is located, that is, the exe4j software workspace is the path where the jar package is located. The relative path is relative to the workspace, because the jar package is in the root directory of the workspace, so Just write the file name + format of the jar package;
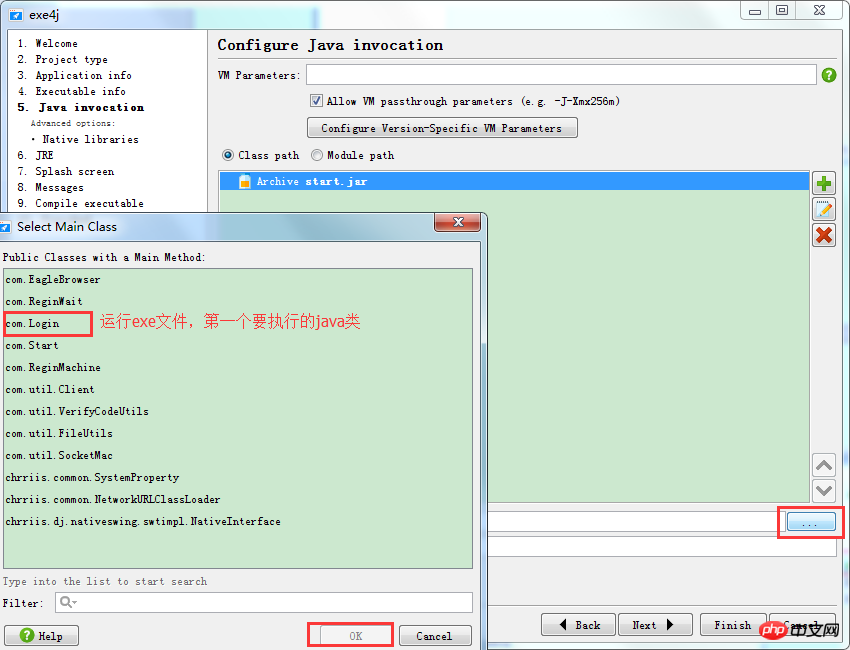
7. Step 6: Select the first java class to be executed first when executing the project. Similar to setting the access homepage when accessing a project in a BS project;
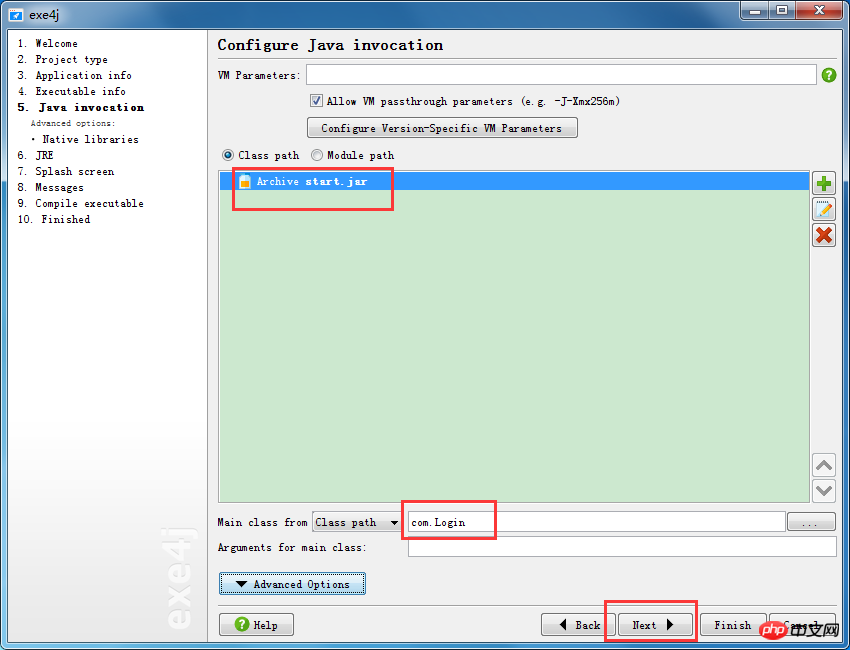
8. Step 7: After the project's jar package and the first category of project access are set , just go to the next step;
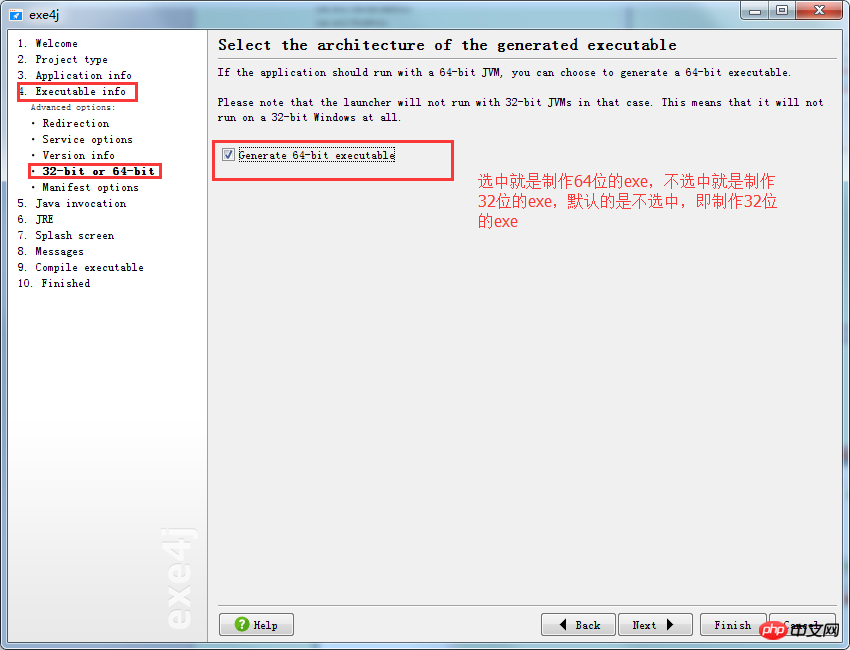
9. Step 8: The .exe format file produced by exe4j is a 32-bit operating system file by default. If you want to make a 64-bit operating system file, The files of the operating system can be selected and set according to the figure below;
10. Step 9: Set the version range of jre when the program is running;
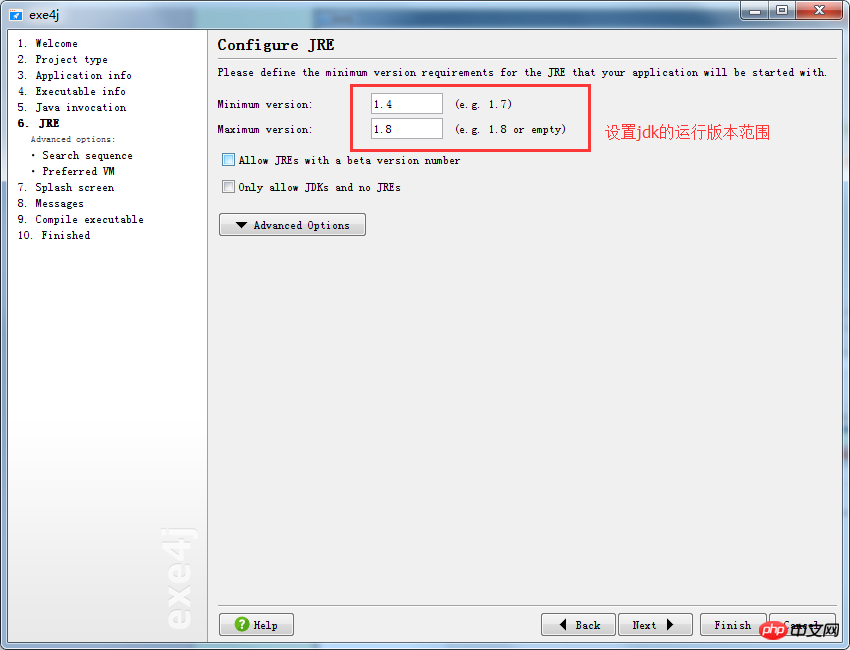
11. Step 10: Because you are creating a java project, the project will eventually be run on the jvm. If you want the user to install jdk by themselves, it is very inconvenient to configure the environment variables, so you can make During the process, jre is encapsulated. You can set the jre version of the running environment by yourself, allowing users to use the program more conveniently. The following figure shows the steps to set the Jre running environment for the program: Be very careful: jre must be placed in and Jar package in the same directory, so you can write relative directories, otherwise files will easily appear;
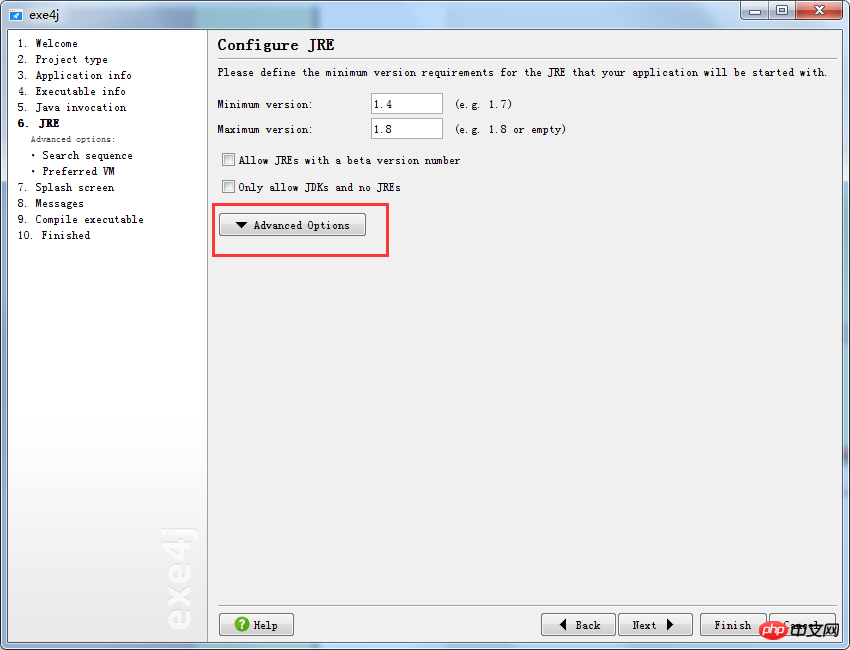
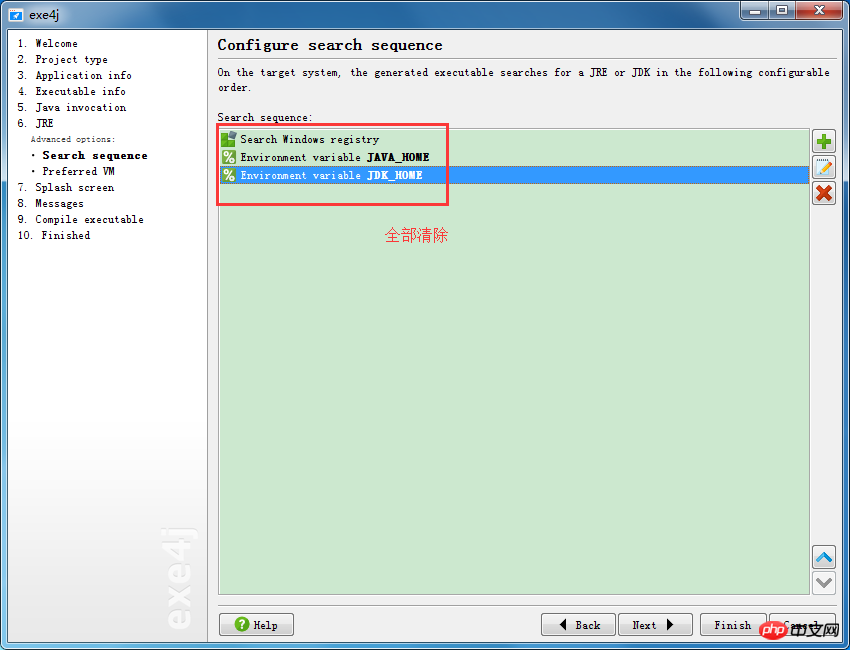
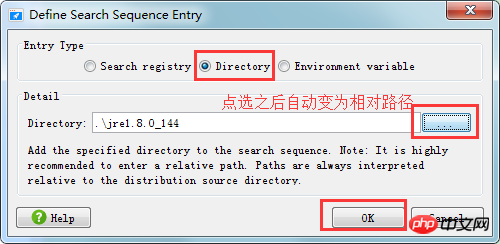
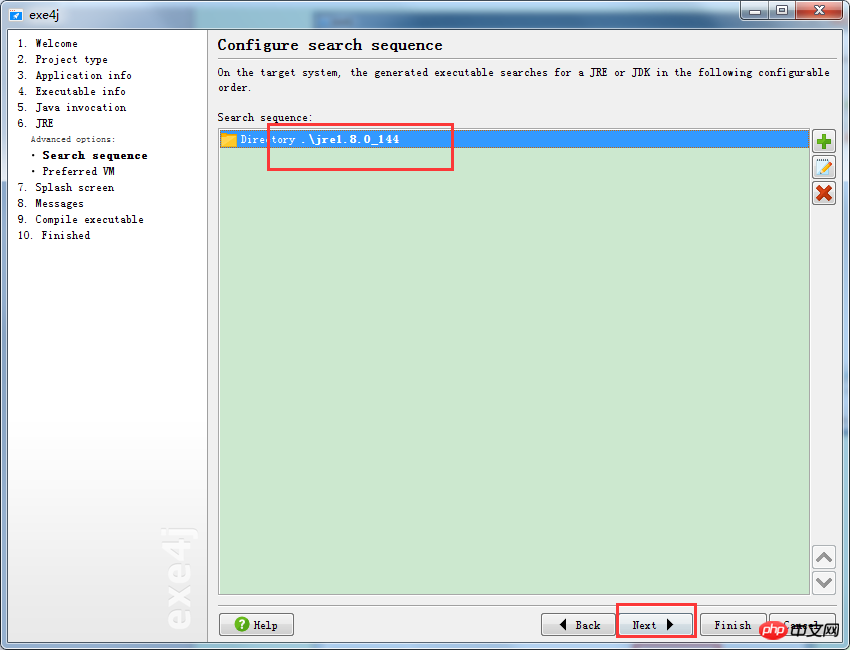
12. Step 11: From now on, just default to next:
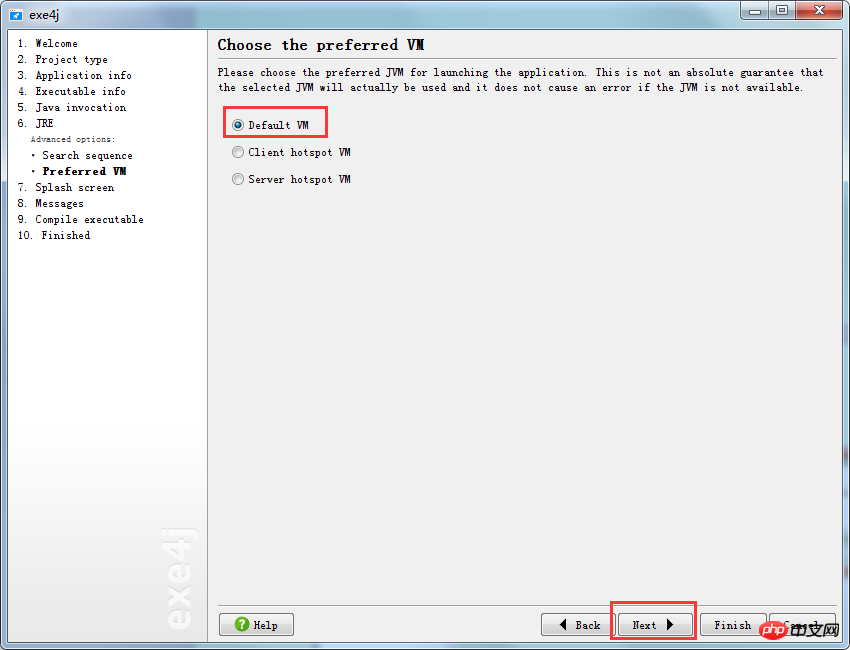
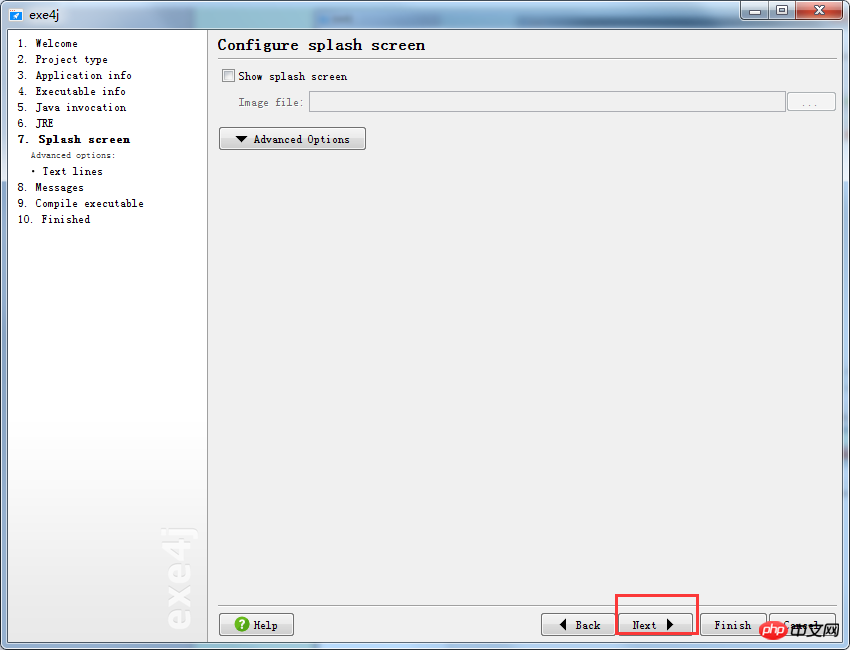
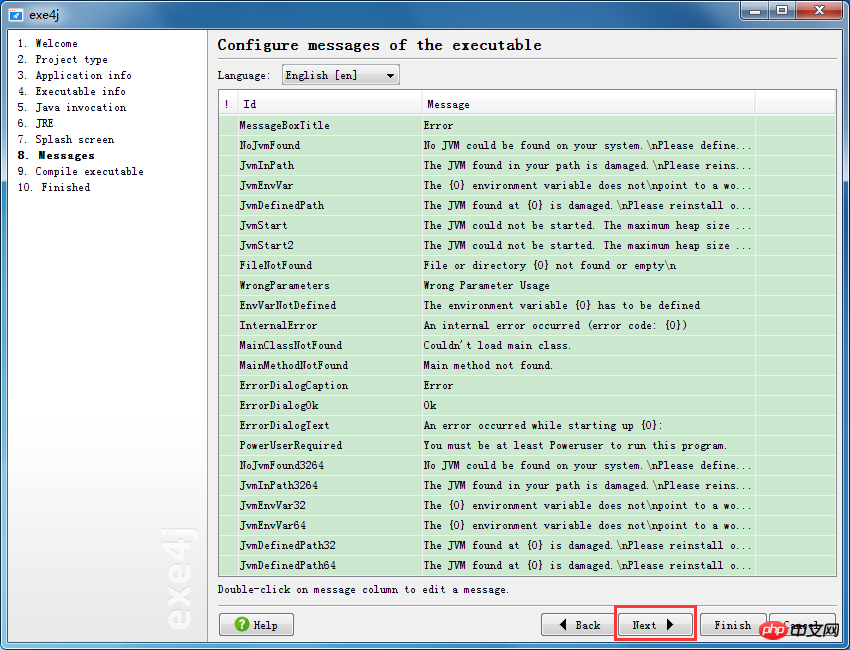
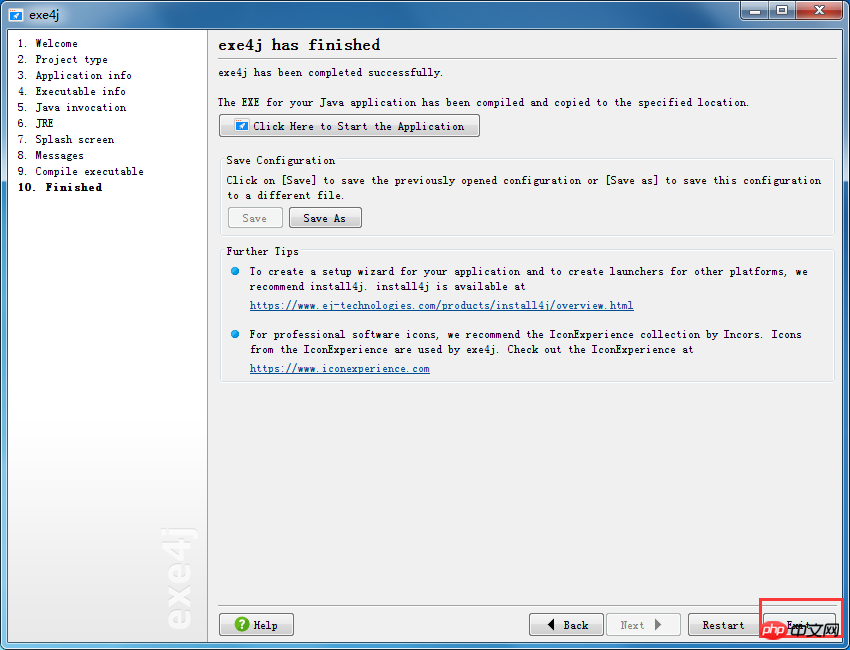
3. By installing the Inno setup software, convert the executable .exe file , jar files, and jre files are encapsulated into an installable .exe file:
1. Install the Inno setup software and start the software:
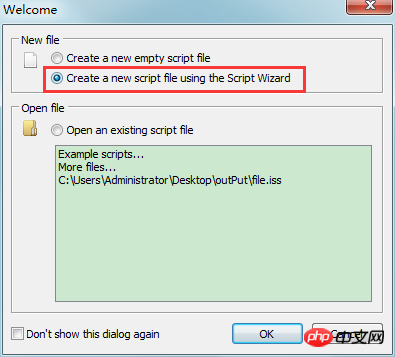
2 , just click next by default:
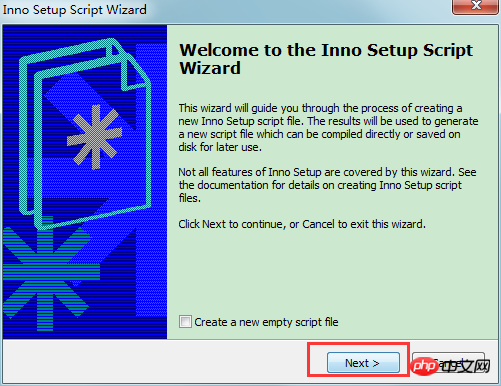
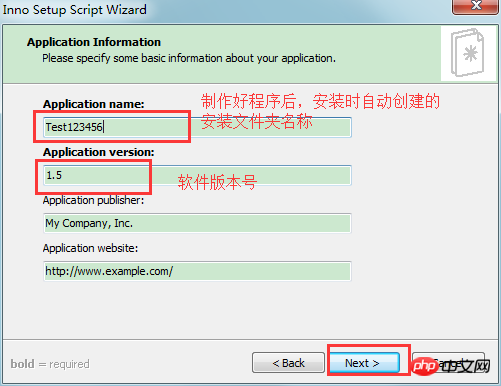
3. Set the installation folder created by default when installing the program and the version number of the program and other information:
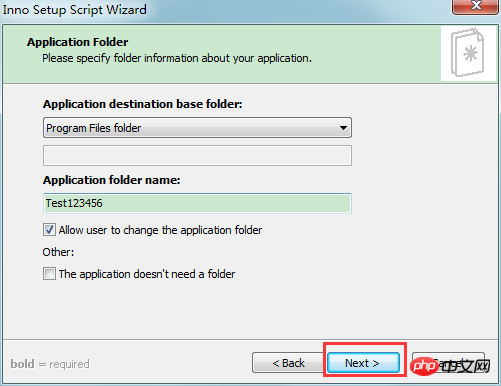
4. The default is next:
5. Select the directory of the executable .exe format file:
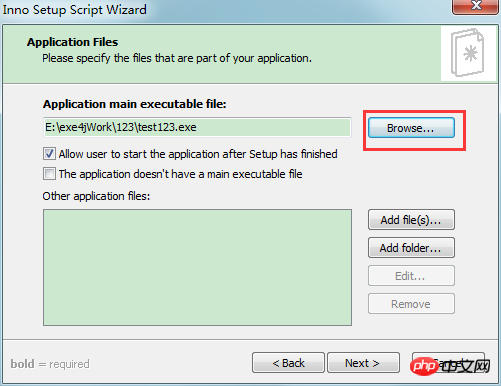
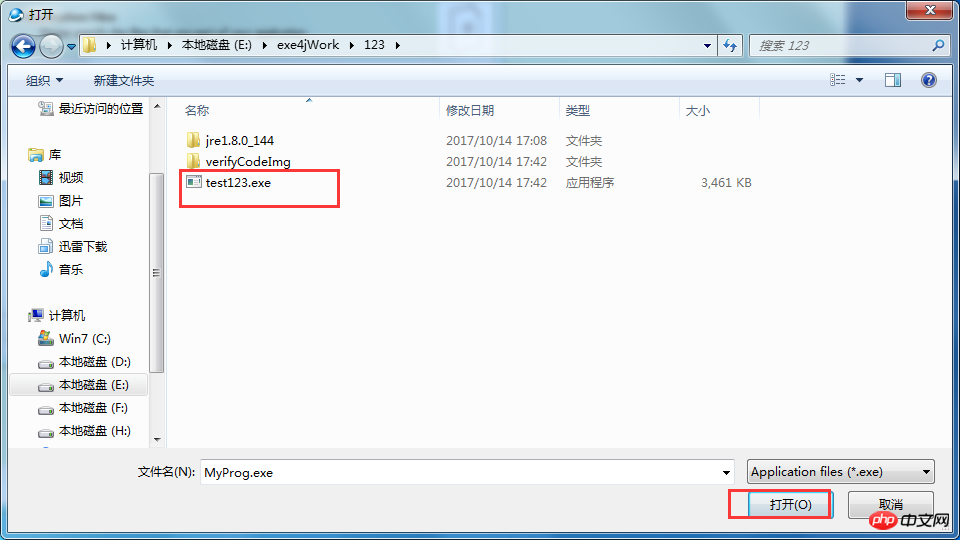
6. Add the folder where the executable .exe file, jar package, and jre file are located, and add all the files in the folder. This can be set as a relative path:
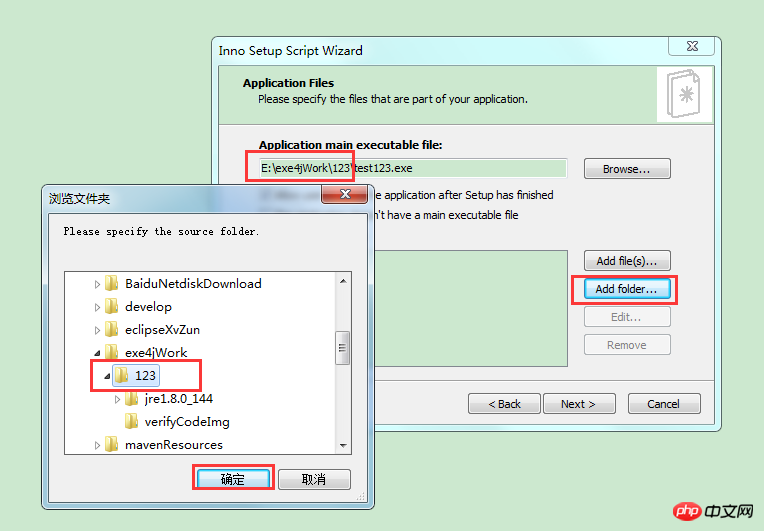
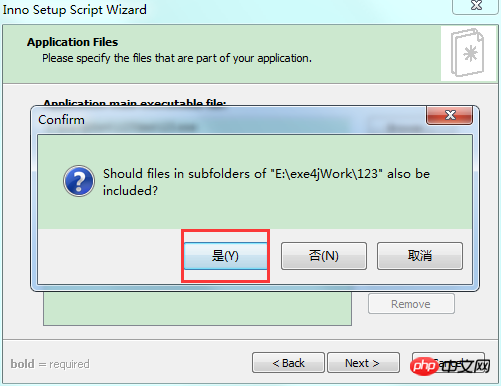
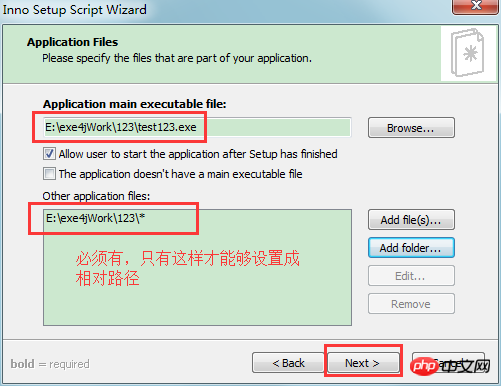
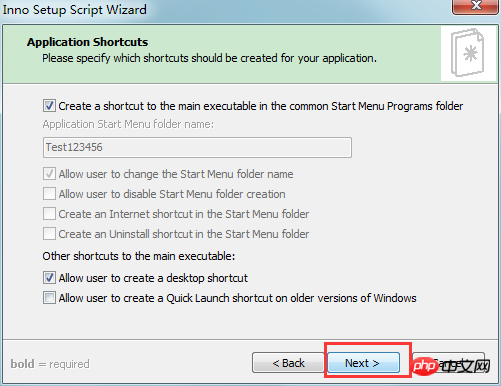
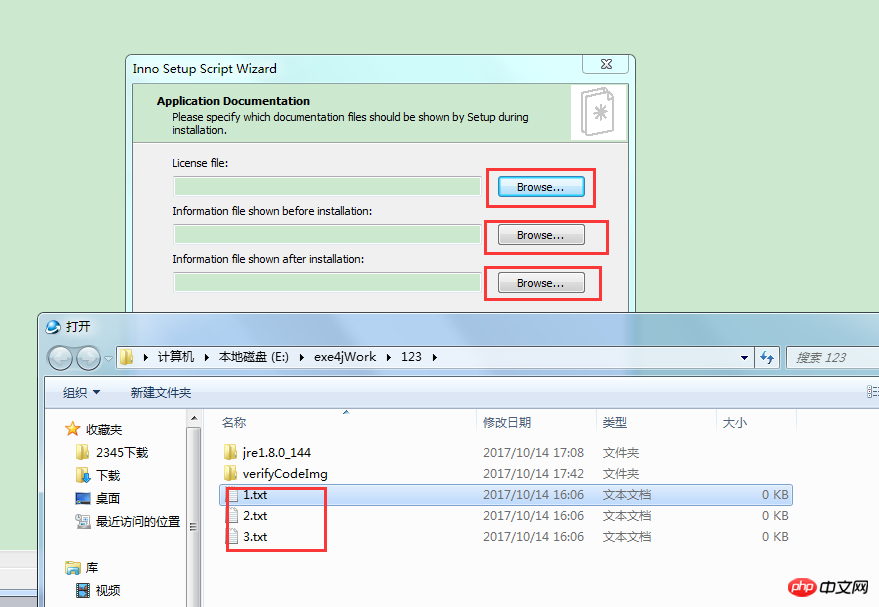
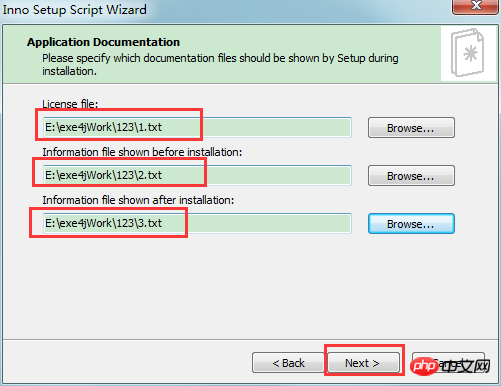
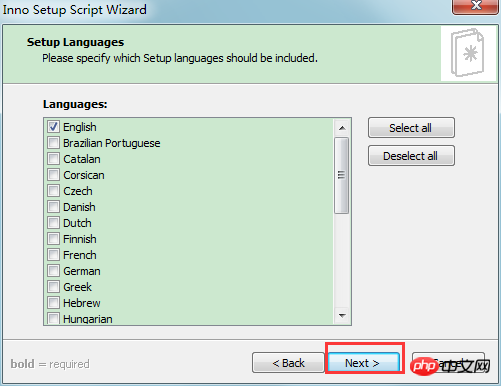
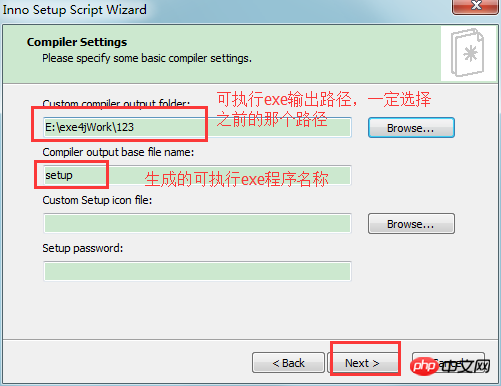
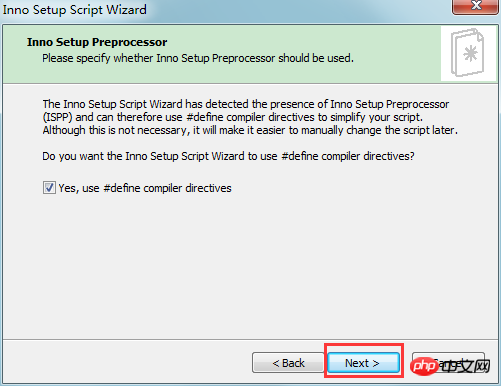
The output location of the installable .exe format file must also be the folder where the jar package, jre file, and executable .exe file is located;
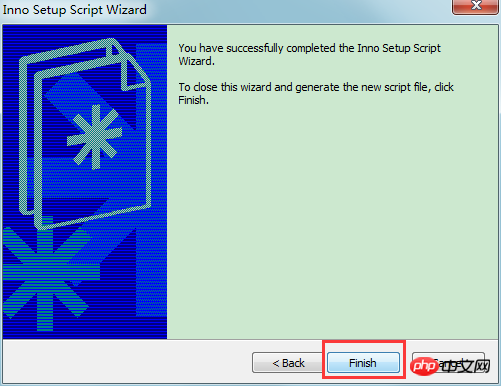
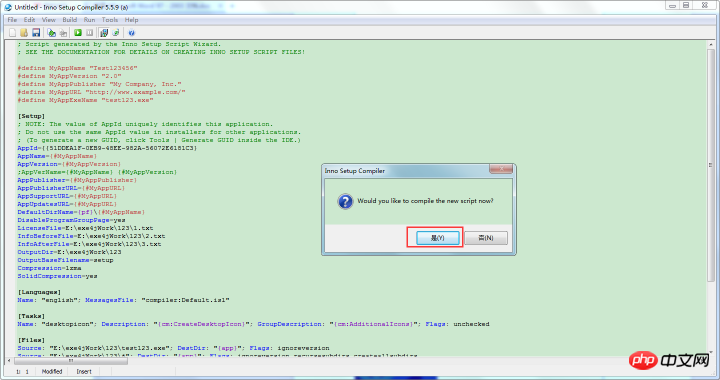
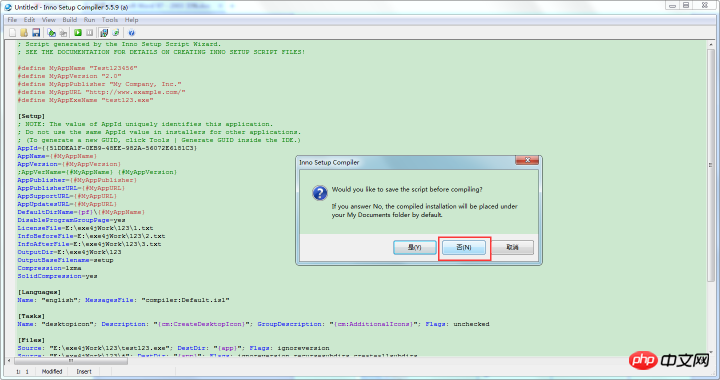
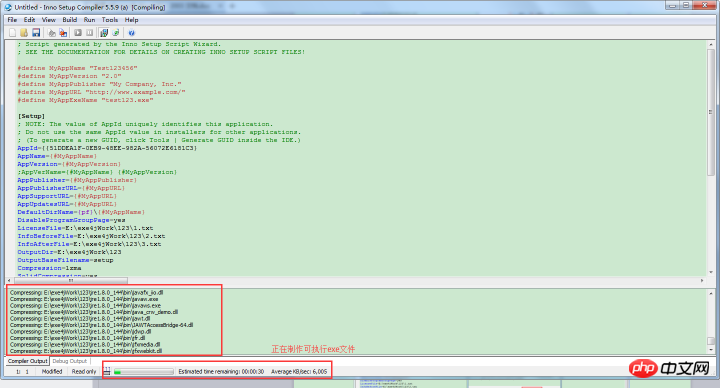 ##12. After the production is completed, you can now look at the .exe format file that can be installed:
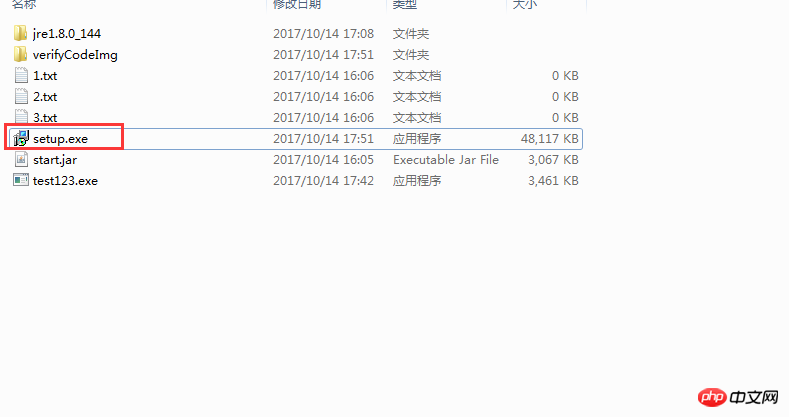 13. Finally, jar The folder where the package, jre file, executable .exe file, installable .exe file, etc. are located is compressed into a package, and the package can be sent to the user. Users only need to decompress the file, click on the installable .exe file, and install it. After the installation is completed, the decompressed file can be deleted;
The above is the detailed content of Implementation method of installable exe program in Java. For more information, please follow other related articles on the PHP Chinese website!

Hot AI Tools

Undresser.AI Undress
AI-powered app for creating realistic nude photos

AI Clothes Remover
Online AI tool for removing clothes from photos.

Undress AI Tool
Undress images for free

Clothoff.io
AI clothes remover

Video Face Swap
Swap faces in any video effortlessly with our completely free AI face swap tool!

Hot Article

Hot Tools

Notepad++7.3.1
Easy-to-use and free code editor

SublimeText3 Chinese version
Chinese version, very easy to use

Zend Studio 13.0.1
Powerful PHP integrated development environment

Dreamweaver CS6
Visual web development tools

SublimeText3 Mac version
God-level code editing software (SublimeText3)

Hot Topics
 1392
1392
 52
52
 36
36
 110
110
 Perfect Number in Java
Aug 30, 2024 pm 04:28 PM
Guide to Perfect Number in Java. Here we discuss the Definition, How to check Perfect number in Java?, examples with code implementation.
 Weka in Java
Aug 30, 2024 pm 04:28 PM
Guide to Weka in Java. Here we discuss the Introduction, how to use weka java, the type of platform, and advantages with examples.
 Smith Number in Java
Aug 30, 2024 pm 04:28 PM
Guide to Smith Number in Java. Here we discuss the Definition, How to check smith number in Java? example with code implementation.
 Java Spring Interview Questions
Aug 30, 2024 pm 04:29 PM
In this article, we have kept the most asked Java Spring Interview Questions with their detailed answers. So that you can crack the interview.
 Break or return from Java 8 stream forEach?
Feb 07, 2025 pm 12:09 PM
Java 8 introduces the Stream API, providing a powerful and expressive way to process data collections. However, a common question when using Stream is: How to break or return from a forEach operation? Traditional loops allow for early interruption or return, but Stream's forEach method does not directly support this method. This article will explain the reasons and explore alternative methods for implementing premature termination in Stream processing systems. Further reading: Java Stream API improvements Understand Stream forEach The forEach method is a terminal operation that performs one operation on each element in the Stream. Its design intention is
 TimeStamp to Date in Java
Aug 30, 2024 pm 04:28 PM
Guide to TimeStamp to Date in Java. Here we also discuss the introduction and how to convert timestamp to date in java along with examples.
 Java Program to Find the Volume of Capsule
Feb 07, 2025 am 11:37 AM
Capsules are three-dimensional geometric figures, composed of a cylinder and a hemisphere at both ends. The volume of the capsule can be calculated by adding the volume of the cylinder and the volume of the hemisphere at both ends. This tutorial will discuss how to calculate the volume of a given capsule in Java using different methods. Capsule volume formula The formula for capsule volume is as follows: Capsule volume = Cylindrical volume Volume Two hemisphere volume in, r: The radius of the hemisphere. h: The height of the cylinder (excluding the hemisphere). Example 1 enter Radius = 5 units Height = 10 units Output Volume = 1570.8 cubic units explain Calculate volume using formula: Volume = π × r2 × h (4
 Create the Future: Java Programming for Absolute Beginners
Oct 13, 2024 pm 01:32 PM
Java is a popular programming language that can be learned by both beginners and experienced developers. This tutorial starts with basic concepts and progresses through advanced topics. After installing the Java Development Kit, you can practice programming by creating a simple "Hello, World!" program. After you understand the code, use the command prompt to compile and run the program, and "Hello, World!" will be output on the console. Learning Java starts your programming journey, and as your mastery deepens, you can create more complex applications.


