

Introduction to React visual development tool shadow-widget
This article introduces the best practices of "React + Shadow Widget" applied to general GUI development, focusing only on the optimal development methods in typical scenarios. It is divided into two parts. The second part describes the orthogonal framework analysis mode and common debugging methods.
To view the previous article, please click here, and the Shadow Widget open source project is here.

1. Controller View and View
In a typical Flux framework, the relationship between Store and View is as follows:
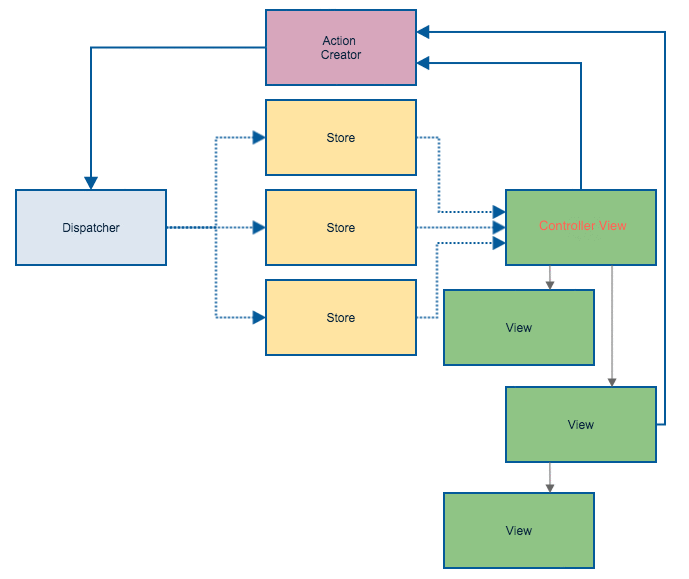
This picture is taken from the article "What is Flux?" by fluxor.com. The data in the Store is passed to a Component. This Component drives multi-layer Component sub-nodes through props attributes to display the interface. In this data transfer relationship, multiple Components are Views, but the View that obtains data from the Store is special and is called "Controller View" (see the figure above). Corresponding Controller View and View to the MVVM framework of Shadow Widget, Controller View is VM (ViewModel), and the child Component driven by VM is V (View).
However, real-life programming is not as simple as the picture above. The child nodes of the Controller View, that is, the View nodes, are sometimes very complex. If the external part only relies on the data passed from the superior props to drive rendering, it will be very awkward. Developers often involuntarily abandon the "pure" programming model, break through limitations, and let the View read data from global variables. That is, they separate some data from the Store in disguise and use global variables to express it, or simply let the View read data directly from the Store. Store reads data instead of only using the data passed by Controller View.
Shadow Widget simplifies the problem. Since Store is mainly used to store data, then restore its data characteristics. As data, it doesn’t matter where it is defined. Just use the properties of Component to store data. There is no insurmountable obstacle to incorporating Store into Component, of course, provided that we have designed the "dual source properties" and "W tree" mechanisms. Then, the Controller View and its multiple subordinate Views are collectively regarded as a FB (Functionarity Block), and javascript is used to define the behavior of each node under the same Functionality Block Namespace. Writing the projection definitions of related nodes together eliminates the node gap to a large extent, because you can define a variable to transmit data at any time.
2. Orthogonal frame analysis mode
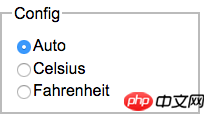
Continuing from the example in the previous article, assume that we add the "global configuration" function based on the original function and provide 3 options: "Automatic Choose Celsius or Fahrenheit format", "Fixed to Celsius", "Fixed to Fahrenheit". Among them, the first option Auto (automatic format selection) infers country information based on browser characteristics, and then intelligently selects Celsius or Fahrenheit.
Add the following interface design:
Correspondingly, add a Functionarity Block, and the JS coding is as follows:
(function() { // functionarity block

var configComp = null;

idSetter['config'] = function(value,oldValue) {
  // ...
};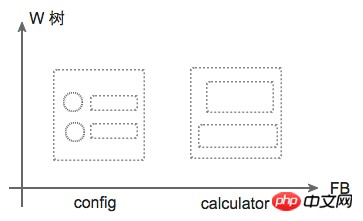
})();The entry node of this FB is configComp. Then to refine the design, we should move the configComp definition to the global variable definition area, because this node is used in both FB function blocks.
For the convenience of description, we call these two FBs config and calculator respectively. Take the FB distribution as the horizontal axis and the W tree as the vertical axis. The nodes in the W tree are connected in series layer by layer. Draw The distribution of these two FBs is as follows:
When we design the GUI as a whole, we should think in the MVVM way. Combined with this example, that is, planning two "function blocks" config and calculator, determining the entry node of each function block, and its upper and lower series connection relationship. When dealing with the linkage relationships between various functional blocks, you should switch to the Flux one-way data flow thinking method.
To summarize, the entire HTML page is a DOM tree, which is vertical. The process of dividing several functional blocks in this tree is a design process based on MVVM; while processing each functional block The horizontal connection between them is dominated by the FRP idea. This way of thinking vertically and horizontally is called "orthogonal framework" analysis mode.
Explain that Flux is an implementation of the FRP (Functional Reactiv Programming) development idea. For React development, the Flux mentioned above is basically equivalent to FRP.
As for how the functions between FBs interact, if the processing logic is simple, you may wish to write the code directly in the relevant FB code block. If the logic is complex, you may wish to take the shared parent node of the relevant FB as the entry node and create a new one. FB function block. The main function of taking the shared parent node is that the parent node can cover the life cycle of all nodes under it from creation to unmount. It will be more convenient to program in its idSetter function.
3. 挂载数据来驱动调测
在可视设计器中开发界面的过程,可能存在破坏式重构,比如你在某个 FB 的入口节点指定 data 属性值,然后它的子节点根据 data 取值自动生成子节点,如果你给定的 data 初始值格式不对,其下子节点会无法生成。所给初值不对可能因为设计变化了,你的 data 格式还没来得及调整。
为了最大幅度减少上述破坏式重构带来错误,在设计界面时,我们建议用作驱动源头的数据初值应取 “空” 值,比如赋给 null 或 [] 之类的值。
界面设计过程中,若想查看不同数据初值会驱动什么样的界面形态,不妨启用 W.$dataSrc 定义,比如前面例子界面缺省显示 Celsius 温度格式,因为 '.body.calculator.field' 节点的 scale 属性初值是 'c',现在我们想检查 scale='f' 界面是否正确。按如下方式使用两行代码即可:
if (!window.W) { window.W = new Array(); W.$modules = [];}
W.$modules.push( function(require,module,exports) {

var W = require('shadow-widget');

var dataSrc = W.$dataSrc = {};
dataSrc['.body.calculator.field'] = { 'scale': 'f' };

});其中,var dataSrc = W.$dataSrc = {} 表示启用 W.$dataSrc,缺省是不启用的。另一句 dataSrc['.body.calculator.field'] = { 'scale': 'f' },用来预定义哪个节点要附加哪些属性的初值。
上面代码可以写入独立的 js 文件,多个此类 js 文件可构造不同的调测场景,然后用 <script> 标签按需把某一个 js 文件导入到被测页面。
4. 结合 shadow-bootstrap 的可视化设计
shadow-bootstrap 新近推出 v1.1 版本,Bootstrap 设计方式在 Shadow Widget 体系得到完整支持了。
Bootstrap 提供了优秀的前端控件库,在 shadow-widget 上用 bootstrap 堪称完美,毕竟上百个 class 类谁都记不住,大家做开发时,要不停的查手册。用 shadow-widget 的可视化设计器,只需从右侧样板页拖一个样板扔进来,就创建你想要的构件了,然后选择相应节点,把相关属性配置一下,你的界面很快就做好。
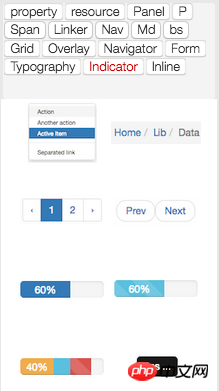
上图是其中一个样板页,该拖入哪个样板,看一眼就能区分,不再受那么多 class 类名困扰了。
5. 注意事项
刚开始使用 Shadow Widget 时,大家可能不适应它的可视化设计,容易忘掉几项设计约束,简单举几个例子:
在根节点(即
".body"节点)下只能摆放面板与绝对定位的构件(如 ScenePage 等),即首层节点要么是 Panel 类构件,要么是指定position='absolute'的非行内构件。绝对定位的构件,应挂到根节点,不宜在其它地方出现。(注:此项为建议,不强制)
面板之下不能直接放行内构件,要在面板下放置 P 类构件后,才能放 Span 类构件。
一个构件要么启用
"html."属性,要么使用它的若干子节点,两者只能二选一,若定义子节点了,以"html."表示文本将被忽略。
总之,与界面设计打交道,设计总是具体的,你要面对各类封装好的构件,不少构件有特殊要求,《Shadow Widget 用户手册》有全面介绍,有必要通读该手册。
6. 关于团队分工
Shadow Widget 最佳实践还建议团队成员要按技能分工,至少有两个工种,其一是能运用他人已封装好的 WTC 类或库化 UI,进行 GUI 开发;其二是为他人封装 WTC 类或库化 UI。前者对技能要求不高,后者则要求深入掌握 React 与 Shadow Widget 知识。
对于微型团队,也应按上述分工的思路规划您的产品开发,因为这两种分工的目标不同,前者着眼短期目标,尽快把产品做出来,把界面弄漂亮些,后者着眼中长期目标,用封装库提高开发复用率。即使是单人团队,同样需要分工,无非在时间上错开,一段时间承担一种角色,另一段时间换一个角色。
Shadow Widget 当前的 WTC 类与界面库还不够丰富,但它的架子已搭好,起点不低。它的定制扩展能力出色,已通过一些上规模代码的产品检验,如 shadow-bootstrap, pinp-blogs 等,具备一定成熟度。我们有理由相信,这个产品会随着扩展库逐渐增多,前景越来越光明。
![]()
The above is the detailed content of Introduction to React visual development tool shadow-widget. For more information, please follow other related articles on the PHP Chinese website!

Hot AI Tools

Undresser.AI Undress
AI-powered app for creating realistic nude photos

AI Clothes Remover
Online AI tool for removing clothes from photos.

Undress AI Tool
Undress images for free

Clothoff.io
AI clothes remover

Video Face Swap
Swap faces in any video effortlessly with our completely free AI face swap tool!

Hot Article
Hot Tools

Notepad++7.3.1
Easy-to-use and free code editor

SublimeText3 Chinese version
Chinese version, very easy to use

Zend Studio 13.0.1
Powerful PHP integrated development environment

Dreamweaver CS6
Visual web development tools

SublimeText3 Mac version
God-level code editing software (SublimeText3)
Hot Topics
 1387
1387
 52
52

 Guide to React front-end and back-end separation: How to achieve decoupling and independent deployment of front-end and back-end
Sep 28, 2023 am 10:48 AM
Guide to React front-end and back-end separation: How to achieve decoupling and independent deployment of front-end and back-end
Sep 28, 2023 am 10:48 AM
React front-end and back-end separation guide: How to achieve front-end and back-end decoupling and independent deployment, specific code examples are required In today's web development environment, front-end and back-end separation has become a trend. By separating front-end and back-end code, development work can be made more flexible, efficient, and facilitate team collaboration. This article will introduce how to use React to achieve front-end and back-end separation, thereby achieving the goals of decoupling and independent deployment. First, we need to understand what front-end and back-end separation is. In the traditional web development model, the front-end and back-end are coupled
 How to build simple and easy-to-use web applications with React and Flask
Sep 27, 2023 am 11:09 AM
How to build simple and easy-to-use web applications with React and Flask
Sep 27, 2023 am 11:09 AM
How to use React and Flask to build simple and easy-to-use web applications Introduction: With the development of the Internet, the needs of web applications are becoming more and more diverse and complex. In order to meet user requirements for ease of use and performance, it is becoming increasingly important to use modern technology stacks to build network applications. React and Flask are two very popular frameworks for front-end and back-end development, and they work well together to build simple and easy-to-use web applications. This article will detail how to leverage React and Flask
 How to build a reliable messaging app with React and RabbitMQ
Sep 28, 2023 pm 08:24 PM
How to build a reliable messaging app with React and RabbitMQ
Sep 28, 2023 pm 08:24 PM
How to build a reliable messaging application with React and RabbitMQ Introduction: Modern applications need to support reliable messaging to achieve features such as real-time updates and data synchronization. React is a popular JavaScript library for building user interfaces, while RabbitMQ is a reliable messaging middleware. This article will introduce how to combine React and RabbitMQ to build a reliable messaging application, and provide specific code examples. RabbitMQ overview:
 React Router User Guide: How to implement front-end routing control
Sep 29, 2023 pm 05:45 PM
React Router User Guide: How to implement front-end routing control
Sep 29, 2023 pm 05:45 PM
ReactRouter User Guide: How to Implement Front-End Routing Control With the popularity of single-page applications, front-end routing has become an important part that cannot be ignored. As the most popular routing library in the React ecosystem, ReactRouter provides rich functions and easy-to-use APIs, making the implementation of front-end routing very simple and flexible. This article will introduce how to use ReactRouter and provide some specific code examples. To install ReactRouter first, we need
 How to build real-time data processing applications using React and Apache Kafka
Sep 27, 2023 pm 02:25 PM
How to build real-time data processing applications using React and Apache Kafka
Sep 27, 2023 pm 02:25 PM
How to use React and Apache Kafka to build real-time data processing applications Introduction: With the rise of big data and real-time data processing, building real-time data processing applications has become the pursuit of many developers. The combination of React, a popular front-end framework, and Apache Kafka, a high-performance distributed messaging system, can help us build real-time data processing applications. This article will introduce how to use React and Apache Kafka to build real-time data processing applications, and
 What are the Go language development tools?
Dec 11, 2023 pm 03:56 PM
What are the Go language development tools?
Dec 11, 2023 pm 03:56 PM
go language development tools: 1. GoLand; 2. Visual Studio Code; 3. Sublime Text; 4. Vim; 5. LiteIDE; 6. GoClipse; 7. Delve; 8. GoDoc; 9. GoCodify; 10. GoSublime; 11. Go Playground; 12. GoDocBrowser; 13. Go-Ethereum; 14. LiteIDE X.
 PHP, Vue and React: How to choose the most suitable front-end framework?
Mar 15, 2024 pm 05:48 PM
PHP, Vue and React: How to choose the most suitable front-end framework?
Mar 15, 2024 pm 05:48 PM
PHP, Vue and React: How to choose the most suitable front-end framework? With the continuous development of Internet technology, front-end frameworks play a vital role in Web development. PHP, Vue and React are three representative front-end frameworks, each with its own unique characteristics and advantages. When choosing which front-end framework to use, developers need to make an informed decision based on project needs, team skills, and personal preferences. This article will compare the characteristics and uses of the three front-end frameworks PHP, Vue and React.
 Integration of Java framework and front-end React framework
Jun 01, 2024 pm 03:16 PM
Integration of Java framework and front-end React framework
Jun 01, 2024 pm 03:16 PM
Integration of Java framework and React framework: Steps: Set up the back-end Java framework. Create project structure. Configure build tools. Create React applications. Write REST API endpoints. Configure the communication mechanism. Practical case (SpringBoot+React): Java code: Define RESTfulAPI controller. React code: Get and display the data returned by the API.
