
 Web Front-end
JS Tutorial
JS component Bootstrap Table multi-row drag effect implementation code_javascript skills
Web Front-end
JS Tutorial
JS component Bootstrap Table multi-row drag effect implementation code_javascript skills
JS component Bootstrap Table multi-row drag effect implementation code_javascript skills

Foreword: I just wrote an article the day before yesterday JS component Bootstrap Table table row dragging effect. Today I received a new need. I need to be able to drag multiple selected items at the same time based on the previous table row dragging. OK. After spending half a day researching it, the effect came out, but it felt unsatisfactory. Share it first, and then think of better ways to optimize it later.
1. Effect display
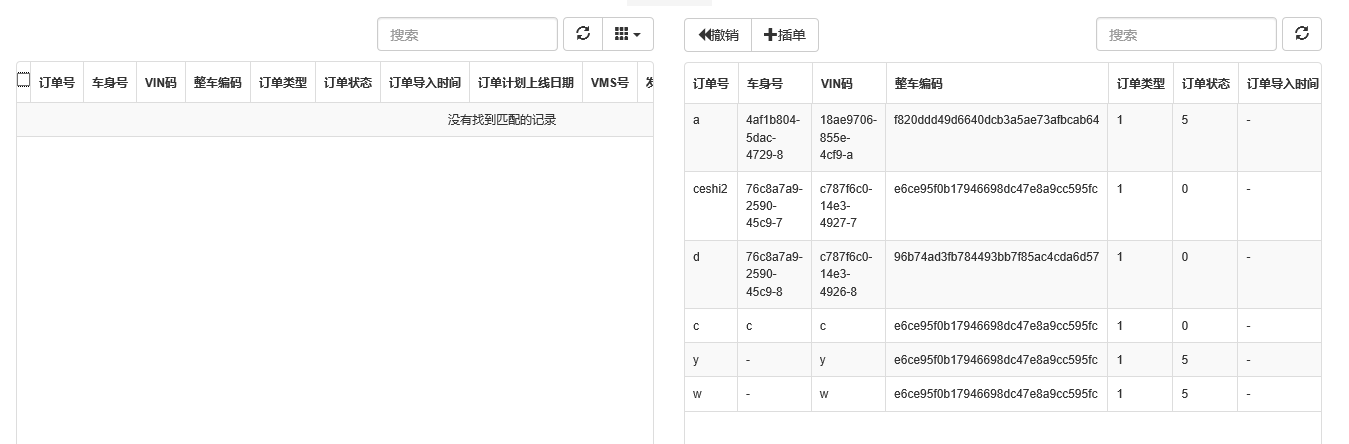
1. Before dragging

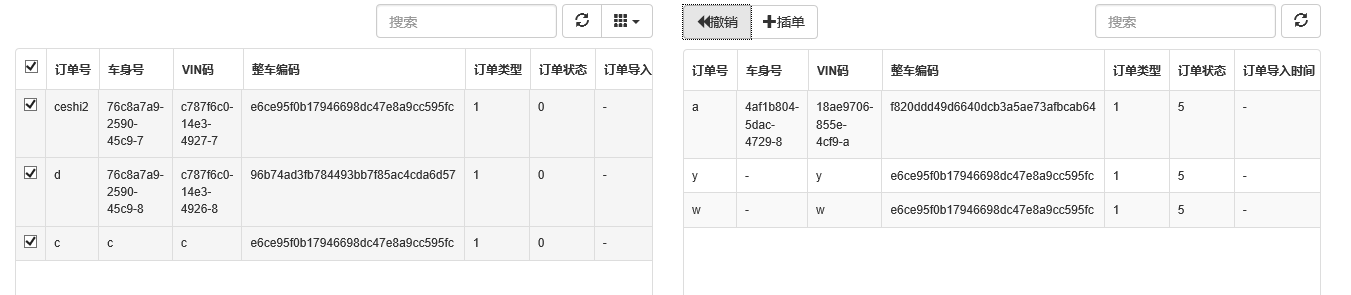
2. Dragging

3. After dragging
4. Undo and return to the state before dragging
2. Demand analysis
From the previous article, we know that if you want to implement drag and drop, you must have a draggable label, or container. For example, the tr in the previous article is a drag and drop container. If you want to implement drag and drop of selected rows, then The blogger's first reaction is to put the selected row into a container, such as a div, and then register the div to be draggable. However, the actual situation is that tr is a label in the table. If tr is used Wrapping it in div will inevitably disrupt the styles in the table, and the interface will be really messed up. Obviously, this road will not work. Then I found out through Google Chrome's element review that the parent element of the table tr generated using Bootstrap table was actually tbody, so I was wondering if I could register the drag and drop of tbody. Practice has proven that this method is feasible. So let's get started.
3. Code examples
The code of cshtm will not be repeated, it is the same as the previous article. Let's focus on the js code.
var i_statuindex = 0;
var arrdata = [];
var m_oTable = null;
$(function () {
//1.初始化表格
m_oTable = new TableInit();
m_oTable.Init();
//2.初始化按钮事件
var oButtonInit = new ButtonInit();
oButtonInit.Init();
//3.日期控件的初始化
$(".datetimepicker").datetimepicker({
format: 'yyyy-mm-dd hh:ii',
autoclose: true,
todayBtn: true,
});
});
//表格相关事件和方法
var TableInit = function () {
var oTableInit = new Object();
oTableInit.Init = function () {
$('#tb_order_left').bootstrapTable({
url: '/api/OrderApi/get',
method: 'get',
striped: true,
cache: false,
striped: true,
pagination: true,
height: 600,
uniqueId:"TO_ORDER_ID",
queryParams: oTableInit.queryParams,
queryParamsType: "limit",
sidePagination: "server",
pageSize: 10,
pageList: [10, 25, 50, 100],
search: true,
strictSearch: true,
showColumns: true,
showRefresh: true,
minimumCountColumns: 2,
clickToSelect: true,
columns: [{
checkbox: true
},
{
field: 'ORDER_NO',
title: '订单号'
},
{
field: 'BODY_NO',
title: '车身号'
}, {
field: 'VIN',
title: 'VIN码'
}, {
field: 'TM_MODEL_MATERIAL_ID',
title: '整车编码'
},
{
field: 'ORDER_TYPE',
title: '订单类型'
},
{
field: 'ORDER_STATUS',
title: '订单状态'
},
{
field: 'CREATE_DATE',
title: '订单导入时间'
},
{
field: 'PLAN_DATE',
title: '订单计划上线日期'
},
{
field: 'VMS_NO',
title: 'VMS号'
},
{
field: 'ENGIN_CODE',
title: '发动机号'
},
{
field: 'TRANS_CODE',
title: '变速箱号'
},
{
field: 'OFFLINE_DATE_ACT',
title: '实际下线日期'
},
{
field: 'HOLD_RES',
title: 'hold理由'
},
{
field: 'SPC_FLAG',
title: '特殊标记'
},
],
onLoadSuccess: function (data) {
oTableInit.InitDrag();
if (data.total > 0) {
var iheight = $('#div_tableleft').find(".fixed-table-container").height();
$('#div_tableleft').find(".fixed-table-container").height(iheight + 36);
}
},
onCheckAll: function (rows) {
$("#tb_order_left tbody tr").addClass("selected");
},
onUncheckAll: function (rows) {
$("#tb_order_left tbody tr").removeClass("selected");
}
});
$('#tb_order_right').bootstrapTable({
url: '/api/OrderApi/get',
method: 'get',
toolbar: '#toolbar_right',
striped: true,
cache: false,
striped: true,
pagination: true,
height: 600,
queryParams: oTableInit.queryParamsRight,
queryParamsType: "limit",
//ajaxOptions: { departmentname: "", statu: "" },
sidePagination: "server",
pageSize: 10,
pageList: [10, 25, 50, 100],
search: true,
strictSearch: true,
showRefresh: true,
minimumCountColumns: 2,
columns: [
{
field: 'ORDER_NO',
title: '订单号'
},
{
field: 'BODY_NO',
title: '车身号'
}, {
field: 'VIN',
title: 'VIN码'
}, {
field: 'TM_MODEL_MATERIAL_ID',
title: '整车编码'
},
{
field: 'ORDER_TYPE',
title: '订单类型'
},
{
field: 'ORDER_STATUS',
title: '订单状态'
},
{
field: 'CREATE_DATE',
title: '订单导入时间'
},
{
field: 'PLAN_DATE',
title: '订单计划上线日期'
},
{
field: 'VMS_NO',
title: 'VMS号'
},
{
field: 'ENGIN_CODE',
title: '发动机号'
},
{
field: 'TRANS_CODE',
title: '变速箱号'
},
{
field: 'OFFLINE_DATE_ACT',
title: '实际下线日期'
},
{
field: 'HOLD_RES',
title: 'hold理由'
},
{
field: 'SPC_FLAG',
title: '特殊标记'
},
],
onLoadSuccess: function (data) {
oTableInit.InitDrop();
}
});
};
oTableInit.InitDrag = function () {
$('#tb_order_left tbody').draggable({
  helper: "clone",
  start: function (event, ui) {
  var old_left_data = JSON.stringify($('#tb_order_left').bootstrapTable("getData"));
  var old_right_data = JSON.stringify($('#tb_order_right').bootstrapTable("getData"));
  var odata = { index: ++i_statuindex, left_data: old_left_data, right_data: old_right_data };
  arrdata.push(odata);
  },
  stop: function (event, ui) {
  }
 });
};
oTableInit.InitDrop = function () {
$("#div_tableright div[class=fixed-table-container]").droppable({
drop: function (event, ui) {
var arrtr = $(ui.helper[0]).find("tr[class=selected]");
if (arrtr.length <= 0) {
alert("请先选中要插单的行");
return;
}
var oTop = ui.helper[0].offsetTop;
var iRowHeadHeight = 40;
var iRowHeight = 37;
var rowIndex = 0;
if (oTop <= iRowHeadHeight + iRowHeight / 2) {
rowIndex = 0;
}
else {
rowIndex = Math.ceil((oTop - iRowHeadHeight) / iRowHeight);
}
for (var i = 0; i < arrtr.length; i++) {
var arrtd = $(arrtr[i]).find("td");
var uniqueid = $(arrtr[i]).attr("data-uniqueid");
var rowdata = {
ORDER_NO: $(arrtd[1]).text(),
BODY_NO: $(arrtd[2]).text(),
VIN: $(arrtd[3]).text(),
TM_MODEL_MATERIAL_ID: $(arrtd[4]).text(),
ORDER_TYPE: $(arrtd[5]).text(),
ORDER_STATUS: $(arrtd[6]).text(),
CREATE_DATE: $(arrtd[7]).text() == "-" ? null : $(arrtd[7]).text(),
PLAN_DATE: $(arrtd[8]).text() == "-" ? null : $(arrtd[8]).text(),
VMS_NO: $(arrtd[9]).text(),
ENGIN_CODE: $(arrtd[10]).text(),
TRANS_CODE: $(arrtd[11]).text(),
OFFLINE_DATE_ACT: $(arrtd[12]).text() == "-" ? null : $(arrtd[12]).text(),
HOLD_RES: $(arrtd[13]).text(),
SPC_FLAG: $(arrtd[14]).text(),
TO_ORDER_ID: uniqueid
};
$("#tb_order_right").bootstrapTable("insertRow", { index: rowIndex++, row: rowdata });
$('#tb_order_left').bootstrapTable("removeByUniqueId", uniqueid);
}
oTableInit.InitDrag();
}
});
};
oTableInit.queryParams = function (params) { //配置参数
var temp = { //这里的键的名字和控制器的变量名必须一直,这边改动,控制器也需要改成一样的
limit: params.limit, //页面大小
offset: params.offset, //页码
strBodyno: $("#txt_search_bodynumber").val(),
strVin: $("#txt_search_vinnumber").val(),
strOrderno: $("#txt_search_ordernumber").val(),
strEngincode: $("#txt_search_engin_code").val(),
strOrderstatus: 0,
strTranscode: $("#txt_search_trans_code").val(),
strVms: $("#txt_search_vms").val(),
strCarcode: $("#txt_search_carcode").val(),
strImportStartdate: $("#txt_search_import_startdate").val(),
strImportEnddate: $("#txt_search_import_enddate").val(),
strSendStartdate: $("#txt_search_send_startdate").val(),
strSendEnddate: $("#txt_search_send_enddate").val(),
};
return temp;
};
oTableInit.queryParamsRight = function (params) { //配置参数
var temp = { //这里的键的名字和控制器的变量名必须一直,这边改动,控制器也需要改成一样的
limit: params.limit, //页面大小
offset: params.offset, //页码
strBodyno: "",
strVin: "",
strOrderno: "",
strEngincode: "",
strOrderstatus: 5,
strTranscode: "",
strVms: "",
strCarcode: "",
strImportStartdate: "",
strImportEnddate: "",
strSendStartdate: "",
strSendEnddate: "",
};
return temp;
};
return oTableInit;
};
//页面按钮初始化事件
var ButtonInit = function () {
var oInit = new Object();
var postdata = {};
oInit.Init = function () {
//查询点击事件
$("#btn_query").click(function () {
$("#tb_order_left").bootstrapTable('refresh');
});
//重置点击事件
$("#btn_reset").click(function () {
$(".container-fluid").find(".form-control").val("");
$("#tb_order_left").bootstrapTable('refresh');
});
//插单操作点击事件
$("#btn_insertorder").click(function () {
});
//撤销操作点击事件
$("#btn_cancel").click(function () {
if (i_statuindex <= 0) {
return;
}
for (var i = 0; i < arrdata.length; i++) {
if (arrdata[i].index != i_statuindex) {
continue;
}
var arr_left_data = eval(arrdata[i].left_data);
var arr_right_data = eval(arrdata[i].right_data);
$('#tb_order_left').bootstrapTable('removeAll');
$('#tb_order_right').bootstrapTable('removeAll');
$('#tb_order_left').bootstrapTable('append', arr_left_data);
for (var x = 0; x < arr_right_data.length; x++) {
$("#tb_order_right").bootstrapTable("insertRow", { index: x, row: arr_right_data[x] });
}
//$('#tb_order_right').bootstrapTable('append', arr_right_data);//append之后不能drop
break;
}
i_statuindex--;
//重新注册可拖拽
m_oTable.InitDrag();
//m_oTable.InitDrop();
});
};
return oInit;
};
Let’s focus on some of the code
1. You can drag and drop on the left side of registration
$('#tb_order_left tbody').draggable({
helper: "clone",
start: function (event, ui) {
var old_left_data = JSON.stringify($('#tb_order_left').bootstrapTable("getData"));
var old_right_data = JSON.stringify($('#tb_order_right').bootstrapTable("getData"));
var odata = { index: ++i_statuindex, left_data: old_left_data, right_data: old_right_data };
arrdata.push(odata);
},
stop: function (event, ui) {
}
});
The code here is very simple and mainly does two things:
(1) Register the draggability of tbody, and the same applies to the draggable event of JQuery UI.
(2) Before starting dragging, save the data in both tables for restoration operations.
2. Register and drop on the right
$("#div_tableright div[class=fixed-table-container]").droppable({
drop: function (event, ui) {
var arrtr = $(ui.helper[0]).find("tr[class=selected]");
if (arrtr.length <= 0) {
alert("请先选中要插单的行");
return;
}
var oTop = ui.helper[0].offsetTop;
var iRowHeadHeight = 40;
var iRowHeight = 37;
var rowIndex = 0;
if (oTop <= iRowHeadHeight + iRowHeight / 2) {
rowIndex = 0;
}
else {
rowIndex = Math.ceil((oTop - iRowHeadHeight) / iRowHeight);
}
for (var i = 0; i < arrtr.length; i++) {
var arrtd = $(arrtr[i]).find("td");
var uniqueid = $(arrtr[i]).attr("data-uniqueid");
var rowdata = {
ORDER_NO: $(arrtd[1]).text(),
BODY_NO: $(arrtd[2]).text(),
VIN: $(arrtd[3]).text(),
TM_MODEL_MATERIAL_ID: $(arrtd[4]).text(),
ORDER_TYPE: $(arrtd[5]).text(),
ORDER_STATUS: $(arrtd[6]).text(),
CREATE_DATE: $(arrtd[7]).text() == "-" ? null : $(arrtd[7]).text(),
PLAN_DATE: $(arrtd[8]).text() == "-" ? null : $(arrtd[8]).text(),
VMS_NO: $(arrtd[9]).text(),
ENGIN_CODE: $(arrtd[10]).text(),
TRANS_CODE: $(arrtd[11]).text(),
OFFLINE_DATE_ACT: $(arrtd[12]).text() == "-" ? null : $(arrtd[12]).text(),
HOLD_RES: $(arrtd[13]).text(),
SPC_FLAG: $(arrtd[14]).text(),
TO_ORDER_ID: uniqueid
};
$("#tb_order_right").bootstrapTable("insertRow", { index: rowIndex++, row: rowdata });
$('#tb_order_left').bootstrapTable("removeByUniqueId", uniqueid);
}
oTableInit.InitDrag();
}
});
The code here is slightly different from before
(1) Register the droppable of the #div_tableright div[class=fixed-table-container] tag. This tag is automatically generated after the Bootstrap Table table is initialized. Why not directly register the droppable of the table #tb_order_right because of the role of this tag? If the domain is too small, the dragged tbody will not be able to capture the drop event. The #div_tableright div[class=fixed-table-container] div tag outside the registration form can solve the problem.
(2) Use var arrtr = $(ui.helper[0]).find("tr[class=selected]"); to find the selected row in the tbody dragged over, and then extract the data and insert it into the table on the right in turn. The table on the left deletes rows of data one by one.
(3) What is a bit troublesome here is to find the position of the drop. We know that if you want to put the selected line on the left to the specified position on the right, then you have to get the position of the current mouse drop. Here, through ui.helper[0 ].offsetTop property to obtain the Y-axis position of the mouse, and calculate the position to be inserted.
3. Undo operation
 $("#btn_cancel").click(function () {
  if (i_statuindex <= 0) {
  return;
  }
  for (var i = 0; i < arrdata.length; i++) {
  if (arrdata[i].index != i_statuindex) {
   continue;
  }
  var arr_left_data = eval(arrdata[i].left_data);
  var arr_right_data = eval(arrdata[i].right_data);

  $('#tb_order_left').bootstrapTable('removeAll');
  $('#tb_order_right').bootstrapTable('removeAll');
  $('#tb_order_left').bootstrapTable('append', arr_left_data);
  for (var x = 0; x < arr_right_data.length; x++) {
   $("#tb_order_right").bootstrapTable("insertRow", { index: x, row: arr_right_data[x] });
  }

  //$('#tb_order_right').bootstrapTable('append', arr_right_data);//append之后不能drop
  break;
  }
  i_statuindex--;

  //重写注册可拖拽
  m_oTable.InitDrag();
  //m_oTable.InitDrop();
 });
The undo operation is basically the same as before.
4. Summary
The effect is complete, but the only drawback is that every time it is dragged, the entire tbody is dragged, not the selected rows. However, multiple selected rows cannot be wrapped in a container. No suitable solution has been found yet. Let’s do this for now, and then optimize it later when we come up with a good solution.
5. Optimization Plan
1. How to register drap
oTableInit.InitDrag = function () {
 $('#tb_order_left tbody').draggable({
  helper: "clone",
  start: function (event, ui) {
  var old_left_data = JSON.stringify($('#tb_order_left').bootstrapTable("getData"));
  var old_right_data = JSON.stringify($('#tb_order_right').bootstrapTable("getData"));
  var odata = { index: ++i_statuindex, left_data: old_left_data, right_data: old_right_data };
  arrdata.push(odata);
  $(ui.helper[0]).find("tr[class!=selected]").remove();
  },
  stop: function (event, ui) {
  }
 });
 };
Added this sentence $(ui.helper[0]).find("tr[class!=selected]").remove(); so that unselected rows cannot be seen when dragging.
2. Accurately locate the position specified in the table on the right:
oTableInit.InitDrop = function () {
$("#div_tableright div[class=fixed-table-container]").droppable({
drop: function (event, ui) {
var arrtr = $(ui.helper[0]).find("tr[class=selected]");
if (arrtr.length <= 0) {
toastr.warning('请先选中要插单的行');
return;
}
var oTop = ui.helper[0].offsetTop;
//因为表格每行的高度可能不一致,所以这里取插入行位置的办法是:取右边表格的行高依次累加,计算行索引。
var rowIndex = 0;
var bIsBottom = true;
var iRowHeadHeight = 40;
var addHeight = iRowHeadHeight;
var trs = $("#tb_order_right tbody tr");
for (var i = 0; i < trs.length; i++) {
addHeight += $(trs[i]).height();
if (addHeight > oTop) {
rowIndex = i;
bIsBottom = false;//这里参数用来定义拖动到右边表格最下面的情况,这时没有进入到此条件判断里面。
break;
}
}
if (bIsBottom) {
rowIndex = trs.length;
}
for (var i = 0; i < arrtr.length; i++) {
var arrtd = $(arrtr[i]).find("td");
var uniqueid = $(arrtr[i]).attr("data-uniqueid");
var rowdata = {
ORDER_NO: $(arrtd[1]).text(),
BODY_NO: $(arrtd[2]).text(),
VIN: $(arrtd[3]).text(),
TM_MODEL_MATERIAL_ID: $(arrtd[4]).text(),
ORDER_TYPE: $(arrtd[5]).text(),
ORDER_STATUS_NAME: $(arrtd[6]).text(),
CREATE_DATE: $(arrtd[7]).text() == "-" ? null : $(arrtd[7]).text(),
PLAN_DATE: $(arrtd[8]).text() == "-" ? null : $(arrtd[8]).text(),
VMS_NO: $(arrtd[9]).text(),
ENGIN_CODE: $(arrtd[10]).text(),
TRANS_CODE: $(arrtd[11]).text(),
OFFLINE_DATE_ACT: $(arrtd[12]).text() == "-" ? null : $(arrtd[12]).text(),
HOLD_RES: $(arrtd[13]).text(),
SPC_FLAG: $(arrtd[14]).text(),
TO_ORDER_ID: uniqueid,
ORDER_STATUS:0
};
$("#tb_order_right").bootstrapTable("insertRow", { index: rowIndex++, row: rowdata });
$('#tb_order_left').bootstrapTable("removeByUniqueId", uniqueid);
}
oTableInit.InitDrag();
}
});
};
Because the row height of each row is uncertain and is dynamically supported by the data in the row, the drop position is also dynamically calculated here.
At this point, this small function has basically come to an end, and the basic effects and points to be optimized are also completed.
Source code download: Bootstrap Table multi-row drag effect
The above is the entire content of this article. I hope this article will be helpful to everyone in learning javascript programming.

Hot AI Tools

Undresser.AI Undress
AI-powered app for creating realistic nude photos

AI Clothes Remover
Online AI tool for removing clothes from photos.

Undress AI Tool
Undress images for free

Clothoff.io
AI clothes remover

Video Face Swap
Swap faces in any video effortlessly with our completely free AI face swap tool!

Hot Article
Hot Tools

Notepad++7.3.1
Easy-to-use and free code editor

SublimeText3 Chinese version
Chinese version, very easy to use

Zend Studio 13.0.1
Powerful PHP integrated development environment

Dreamweaver CS6
Visual web development tools

SublimeText3 Mac version
God-level code editing software (SublimeText3)
Hot Topics
 1388
1388
 52
52

 How to get the bootstrap search bar
Apr 07, 2025 pm 03:33 PM
How to get the bootstrap search bar
Apr 07, 2025 pm 03:33 PM
How to use Bootstrap to get the value of the search bar: Determines the ID or name of the search bar. Use JavaScript to get DOM elements. Gets the value of the element. Perform the required actions.
 How to use bootstrap in vue
Apr 07, 2025 pm 11:33 PM
How to use bootstrap in vue
Apr 07, 2025 pm 11:33 PM
Using Bootstrap in Vue.js is divided into five steps: Install Bootstrap. Import Bootstrap in main.js. Use the Bootstrap component directly in the template. Optional: Custom style. Optional: Use plug-ins.
 How to do vertical centering of bootstrap
Apr 07, 2025 pm 03:21 PM
How to do vertical centering of bootstrap
Apr 07, 2025 pm 03:21 PM
Use Bootstrap to implement vertical centering: flexbox method: Use the d-flex, justify-content-center, and align-items-center classes to place elements in the flexbox container. align-items-center class method: For browsers that do not support flexbox, use the align-items-center class, provided that the parent element has a defined height.
 How to write split lines on bootstrap
Apr 07, 2025 pm 03:12 PM
How to write split lines on bootstrap
Apr 07, 2025 pm 03:12 PM
There are two ways to create a Bootstrap split line: using the tag, which creates a horizontal split line. Use the CSS border property to create custom style split lines.
 How to use bootstrap button
Apr 07, 2025 pm 03:09 PM
How to use bootstrap button
Apr 07, 2025 pm 03:09 PM
How to use the Bootstrap button? Introduce Bootstrap CSS to create button elements and add Bootstrap button class to add button text
 How to resize bootstrap
Apr 07, 2025 pm 03:18 PM
How to resize bootstrap
Apr 07, 2025 pm 03:18 PM
To adjust the size of elements in Bootstrap, you can use the dimension class, which includes: adjusting width: .col-, .w-, .mw-adjust height: .h-, .min-h-, .max-h-
 How to set up the framework for bootstrap
Apr 07, 2025 pm 03:27 PM
How to set up the framework for bootstrap
Apr 07, 2025 pm 03:27 PM
To set up the Bootstrap framework, you need to follow these steps: 1. Reference the Bootstrap file via CDN; 2. Download and host the file on your own server; 3. Include the Bootstrap file in HTML; 4. Compile Sass/Less as needed; 5. Import a custom file (optional). Once setup is complete, you can use Bootstrap's grid systems, components, and styles to create responsive websites and applications.
 How to insert pictures on bootstrap
Apr 07, 2025 pm 03:30 PM
How to insert pictures on bootstrap
Apr 07, 2025 pm 03:30 PM
There are several ways to insert images in Bootstrap: insert images directly, using the HTML img tag. With the Bootstrap image component, you can provide responsive images and more styles. Set the image size, use the img-fluid class to make the image adaptable. Set the border, using the img-bordered class. Set the rounded corners and use the img-rounded class. Set the shadow, use the shadow class. Resize and position the image, using CSS style. Using the background image, use the background-image CSS property.
