

Simple example of JavaScript slideshow

In our daily development work, we often encounter slide switches. Then we all know that common slide switches are nothing more than carousels and gradients. No matter which kind of slide switches, timer is used. This is achieved by gradually changing certain attributes of pictures or picture groups. Today I will introduce to you a simple example of JavaScript to implement a slideshow!
Abandon other effects, the simplest carousel only has one statement:
parent.appendChild(parent.firstChild), continuously add an element of the list to the last one, appendChild will add the node Removed from its original position, so it can create a switching effect.
One point, IE treats text nodes differently from other browsers. You need to pay attention when getting child nodes. In addition, in different versions of FF, the children attribute also needs to be paid attention to.
The following demo does not set #view's overflow:hidden.
demo_1:
The code is as follows:
<!DOCTYPE html PUBLIC "-//W3C//DTD XHTML 1.0 Transitional//EN"
"http://www.w3.org/TR/xhtml1/DTD/xhtml1-transitional.dtd">
<html>
<head>
<meta http-equiv="Content-Type" content="text/html; charset=utf-8"/>
<title></title>
<style type="text/css">
*{ margin: 0; padding: 0;}
ul{ list-style: none;}
#view{ position: relative; width: 320px; height: 120px; margin-left:320px; border: 10px solid #bc8f8f; }
#view:after{ content: '.'; display: block; clear: both; height: 0; visibility:hidden;}
#img_list{ position: absolute; width: 960px;}
#img_list li{ float: left; width: 320px; height: 120px; }
#a{ background: #87ceeb;}
#b{ background: #ff69b4;}
#c{ background: #98fb98;}
</style>
</head>
<body>
<p id="view">
<ul id="img_list">
<li id="a"></li>
<li id="b"></li>
<li id="c"></li>
</ul>
</p>
<script type="text/javascript">
var img_list = document.getElementById('img_list');
setInterval(function(){
img_list.appendChild(img_list.firstChild);
},500)
</script>
</body>
</html>
(The above demo actually does not need to be floated, just for the sake of subsequent demonstration)
Another way is to move the entire list in a certain direction without changing the node order (continuously changing the left attribute of the list),
demo_2:
The code is as follows:
<html>
<head>
<meta http-equiv="Content-Type" content="text/html; charset=utf-8"/>
<title></title>
<style type="text/css">
*{ margin: 0; padding: 0;}
ul{ list-style: none;}
#view{ position: relative; width: 320px; height: 120px; margin-left:320px; border: 10px solid #bc8f8f; }
#view:after{ content: '.'; display: block; clear: both; height: 0; visibility:hidden;}
#img_list{ position: absolute; width: 960px;}
#img_list li{ float: left; width: 320px; height: 120px; }
#a{ background: #87ceeb;}
#b{ background: #ff69b4;}
#c{ background: #98fb98;}
</style>
</head>
<body>
<p id="view">
<ul id="img_list">
<li id="a"></li>
<li id="b"></li>
<li id="c"></li>
</ul>
</p>
<script type="text/javascript">
var img_list = document.getElementById('img_list');
img_list.style.left = 0;
setInterval(function(){
img_list.style.left = parseInt(img_list.style.left) == -640 ? 0: (parseInt(img_list.style.left) - 320 + 'px');
},500)
</script>
</body>
</html>The demo above is abrupt and feels bad, so you can add a smooth movement effect.
The so-called smooth movement effect is actually to decompose each big step of the second demo above into several small parts, and divide a movement of 320px into 50 times to execute;
demo_3:
The code is as follows:
<!DOCTYPE html PUBLIC "-//W3C//DTD XHTML 1.0 Transitional//EN"
"http://www.w3.org/TR/xhtml1/DTD/xhtml1-transitional.dtd">
<html>
<head>
<meta http-equiv="Content-Type" content="text/html; charset=utf-8"/>
<title></title>
<style type="text/css">
*{ margin: 0; padding: 0;}
ul{ list-style: none;}
#view{ position: relative; width: 320px; height: 120px; margin-left:320px; border: 10px solid #bc8f8f; }
#view:after{ content: '.'; display: block; clear: both; height: 0; visibility:hidden;}
#img_list{ position: absolute; width: 960px;}
#img_list li{ float: left; width: 320px; height: 120px; }
#a{ background: #87ceeb;}
#b{ background: #ff69b4;}
#c{ background: #98fb98;}
</style>
</head>
<body>
<p id="view">
<ul id="img_list">
<li id="a"></li>
<li id="b"></li>
<li id="c"></li>
</ul>
</p>
<script type="text/javascript">
var img_list = document.getElementById('img_list');
img_list.style.left = 0;
setInterval(function(){
for(var i = 0 ; i < 100 ; i++){
(function(pos){
setTimeout(function(){
img_list.style.left = parseInt(img_list.style.left) == -640 ? 0: -pos/100 * 640+'px';
},(pos + 1)*10)
})(i)
}
},1500)
</script>
</body>
</html>For the case of demo_1, we can continuously reduce the width of firstChild to achieve an effect similar to demo_3.
demo_4
The code is as follows:
<!DOCTYPE html PUBLIC "-//W3C//DTD XHTML 1.0 Transitional//EN"
"http://www.w3.org/TR/xhtml1/DTD/xhtml1-transitional.dtd">
<html>
<head>
<meta http-equiv="Content-Type" content="text/html; charset=utf-8"/>
<title></title>
<style type="text/css">
*{ margin: 0; padding: 0;}
ul{ list-style: none;}
#view{ position: relative; width: 320px; height: 120px; margin-left:320px; border: 10px solid #bc8f8f; }
#view:after{ content: '.'; display: block; clear: both; height: 0; visibility:hidden;}
#img_list{ position: absolute; width: 960px;}
#img_list li{ float: left; width: 320px; height: 120px; }
#a{ background: #87ceeb;}
#b{ background: #ff69b4;}
#c{ background: #98fb98;}
</style>
</head>
<body>
<p id="view">
<ul id="img_list">
<li id="a"></li>
<li id="b"></li>
<li id="c"></li>
</ul>
</p>
<script type="text/javascript">
var img_list = document.getElementById('img_list');
setInterval(function(){
var current = img_list.children[0];
for(var i = 0 ; i < 100 ; i++){
(function(pos){
setTimeout(function(){
current.style.width = 320 - (pos/100)*320 + 'px';
},(pos + 1)*10)
})(i)
}
setTimeout(function(){
img_list.appendChild(current);
current.style.width = '320px';
},1010);
},1500)
</script>
</body>
</html>The methods and principles above are similar. In addition, you can also set a transparent gradient to make the transparency of a picture from 1 to 0. Therefore, switching effects can also be produced with minimal code changes.
demo_5:
The code is as follows:
<!DOCTYPE html PUBLIC "-//W3C//DTD XHTML 1.0 Transitional//EN"
"http://www.w3.org/TR/xhtml1/DTD/xhtml1-transitional.dtd">
<html>
<head>
<meta http-equiv="Content-Type" content="text/html; charset=utf-8"/>
<title></title>
<style type="text/css">
*{ margin: 0; padding: 0;}
ul{ list-style: none;}
#view{ position: relative; width: 320px; height: 120px; margin-left:320px; border: 10px solid #bc8f8f; }
#view:after{ content: '.'; display: block; clear: both; height: 0; visibility:hidden;}
#img_list{ position: absolute; width: 960px;}
#img_list li{position: absolute; top:0; left: 0; width: 320px; height: 120px; }
#a{ background: #87ceeb;}
#b{ background: #ff69b4;}
#c{ background: #98fb98;}
</style>
</head>
<body>
<p id="view">
<ul id="img_list">
<li id="a"></li>
<li id="b"></li>
<li id="c"></li>
</ul>
</p>
<script type="text/javascript">
var img_list = document.getElementById('img_list');
setInterval(function(){
var current = img_list.children[0];
for(var i = 0 ; i < 100 ; i++){
(function(pos){
setTimeout(function(){
current.style.opacity = 1 - (pos/100)*1;
},(pos + 1)*10)
})(i)
}
setTimeout(function(){
img_list.appendChild(current);
current.style.opacity = 1;
},1010);
},1500)
</script>
</body>
</html>As for other gorgeous effects, it can be processed through some other combinations.
One processing method is to divide the picture into n areas, set the background to the picture that needs to be displayed, and then display the corresponding background in different areas. In this way, a 100*100 picture can be divided into 100 small squares of 10*10, and then these squares are processed to get more effects. In theory, it can be divided into 10,000 1*1 dots, but the browser will explode...
demo_6:
The code is as follows:
<!DOCTYPE html PUBLIC "-//W3C//DTD XHTML 1.0 Transitional//EN"
"http://www.w3.org/TR/xhtml1/DTD/xhtml1-transitional.dtd">
<html>
<head>
<meta http-equiv="Content-Type" content="text/html; charset=utf-8"/>
<title></title>
<style type="text/css">
*{ margin: 0; padding: 0; border: 0;}
body{ padding: 50px;}
.sep{ float: left; margin:1px 1px 0 0;}
</style>
</head>
<body>
<img id="img" src="../动画/apple.jpg" alt="" />
<p id="wrap" style="position: relative; "></p>
<script type="text/javascript">
var img = document.getElementById('img');
var wrap = document.getElementById('wrap');
img.onload = function(){
console.dir(img);
var h = img.naturalHeight;
var w = img.naturalWidth;
newPanel(w,h);
}
function newPanel(w,h){
var cols = 10;
var rows = 10;
var colWidth = Math.floor(w/cols);
var rowHeight = Math.floor(w/rows);
for(var row = 0; row < rows; row++){
for(var col =0; col < cols; col++){
var p = document.createElement('p');
p.style.width = colWidth + 'px';
p.style.height= rowHeight + 'px';
p.className= 'sep';
p.style.backgroundImage = 'url(' + img.src + ')';
p.style.backgroundPosition = -colWidth*col +'px ' + -rowHeight*row +'px' ;
wrap.appendChild(p);
}
}
}
setTimeout(function(){
setInterval(function(){
wrap.lastChild && wrap.removeChild(wrap.lastChild);
},50)
},1000)
</script>
</body>
</html>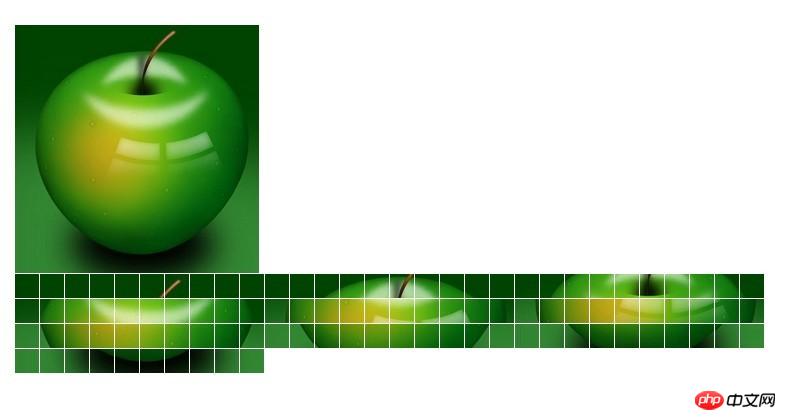

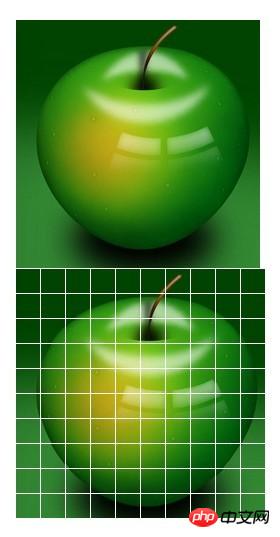
It’s just a demonstration, the specific width and arrangement need to be organized by yourself. Or eliminate, or mask, corresponding to different arrangements and combinations, other methods are also easier to implement.
Finally, everyone knows that CSS3 can also achieve some slide effects,
demo_7:
The code is as follows:
<!DOCTYPE HTML PUBLIC "-//W3C//DTD HTML 4.01 Transitional//EN"
"http://www.w3.org/TR/html4/loose.dtd">
<html>
<head>
<meta http-equiv="Content-Type" content="text/html; charset=utf-8"/>
<title></title>
<style type="text/css">
*{
margin: 0;
padding: 0;
}
#test{
position: relative;
width: 300px;
height: 200px;
overflow: hidden;
border: 1px solid #d4d4d4;
}
#test ul{
position: absolute;
top:0;
left: 0;
height:200px;
}
#test ul li{
float: left;
width: 300px;
height:200px;
}
@-webkit-keyframes myAnimation{
0%{
top:0;
}
40%{
top:-200px;
}
70%{
top:-400px;
}
100%{
top:-600px;
}
}
#test ul{
-webkit-animation-name:myAnimation;
-webkit-animation-duration:4s;
-webkit-animation-timing-function:linear;
-webkit-animation-iteration-count:infinite;
}
</style>
</head>
<body>
<p id="test">
<ul>
<li><img width="300" height="200" src="../image/a.jpg" alt="" /></li>
<li><img width="300" height="200" src="../image/a.jpg" alt="" /></li>
<li><img width="300" height="200" src="../image/a.jpg" alt="" /></li>
<li><img width="300" height="200" src="../image/a.jpg" alt="" /></li>
</ul>
</p>
</body>
</html>
Summary:
This article uses many examples to explain the operation of JavaScript to implement slides. I believe that my friends will pass the study of this article. , I have a certain understanding of the implementation of slides!
Related recommendations:
php+javascript slideshow generation code
Javascript implements the slideshow effect source code for image switching
JS implements the Taobao slideshow effect
The above is the detailed content of Simple example of JavaScript slideshow. For more information, please follow other related articles on the PHP Chinese website!

Hot AI Tools

Undresser.AI Undress
AI-powered app for creating realistic nude photos

AI Clothes Remover
Online AI tool for removing clothes from photos.

Undress AI Tool
Undress images for free

Clothoff.io
AI clothes remover

Video Face Swap
Swap faces in any video effortlessly with our completely free AI face swap tool!

Hot Article
Hot Tools

Notepad++7.3.1
Easy-to-use and free code editor

SublimeText3 Chinese version
Chinese version, very easy to use

Zend Studio 13.0.1
Powerful PHP integrated development environment

Dreamweaver CS6
Visual web development tools

SublimeText3 Mac version
God-level code editing software (SublimeText3)
Hot Topics
 1389
1389
 52
52

 How to implement an online speech recognition system using WebSocket and JavaScript
Dec 17, 2023 pm 02:54 PM
How to implement an online speech recognition system using WebSocket and JavaScript
Dec 17, 2023 pm 02:54 PM
How to use WebSocket and JavaScript to implement an online speech recognition system Introduction: With the continuous development of technology, speech recognition technology has become an important part of the field of artificial intelligence. The online speech recognition system based on WebSocket and JavaScript has the characteristics of low latency, real-time and cross-platform, and has become a widely used solution. This article will introduce how to use WebSocket and JavaScript to implement an online speech recognition system.
 Introduction to the method of inserting heptagons into PPT slides
Mar 26, 2024 pm 07:46 PM
Introduction to the method of inserting heptagons into PPT slides
Mar 26, 2024 pm 07:46 PM
1. Open the PPT slide document, and in the [Outline, Slide] column on the left side of the PPT, click to select the slide where you want to insert the basic [shape]. 2. After selecting, select the [Insert] menu in the function menu bar above the PPT and click. 3. After clicking the [Insert] menu, the [Insert] submenu bar pops up below the function menu bar. Select the [Shape] menu in the [Insert] submenu bar. 4. Click the [Shape] menu to pop up the preset shape type selection page. 5. In the shape type selection page, select the [Heptagon] shape and click. 6. After clicking, move the mouse to the slide editing interface, press the mouse to draw, and release the mouse after the drawing is completed. Complete the insertion of the [heptagon] shape.
 Recommended: Excellent JS open source face detection and recognition project
Apr 03, 2024 am 11:55 AM
Recommended: Excellent JS open source face detection and recognition project
Apr 03, 2024 am 11:55 AM
Face detection and recognition technology is already a relatively mature and widely used technology. Currently, the most widely used Internet application language is JS. Implementing face detection and recognition on the Web front-end has advantages and disadvantages compared to back-end face recognition. Advantages include reducing network interaction and real-time recognition, which greatly shortens user waiting time and improves user experience; disadvantages include: being limited by model size, the accuracy is also limited. How to use js to implement face detection on the web? In order to implement face recognition on the Web, you need to be familiar with related programming languages and technologies, such as JavaScript, HTML, CSS, WebRTC, etc. At the same time, you also need to master relevant computer vision and artificial intelligence technologies. It is worth noting that due to the design of the Web side
 WebSocket and JavaScript: key technologies for implementing real-time monitoring systems
Dec 17, 2023 pm 05:30 PM
WebSocket and JavaScript: key technologies for implementing real-time monitoring systems
Dec 17, 2023 pm 05:30 PM
WebSocket and JavaScript: Key technologies for realizing real-time monitoring systems Introduction: With the rapid development of Internet technology, real-time monitoring systems have been widely used in various fields. One of the key technologies to achieve real-time monitoring is the combination of WebSocket and JavaScript. This article will introduce the application of WebSocket and JavaScript in real-time monitoring systems, give code examples, and explain their implementation principles in detail. 1. WebSocket technology
 Essential tools for stock analysis: Learn the steps to draw candle charts with PHP and JS
Dec 17, 2023 pm 06:55 PM
Essential tools for stock analysis: Learn the steps to draw candle charts with PHP and JS
Dec 17, 2023 pm 06:55 PM
Essential tools for stock analysis: Learn the steps to draw candle charts in PHP and JS. Specific code examples are required. With the rapid development of the Internet and technology, stock trading has become one of the important ways for many investors. Stock analysis is an important part of investor decision-making, and candle charts are widely used in technical analysis. Learning how to draw candle charts using PHP and JS will provide investors with more intuitive information to help them make better decisions. A candlestick chart is a technical chart that displays stock prices in the form of candlesticks. It shows the stock price
 How to use JavaScript and WebSocket to implement a real-time online ordering system
Dec 17, 2023 pm 12:09 PM
How to use JavaScript and WebSocket to implement a real-time online ordering system
Dec 17, 2023 pm 12:09 PM
Introduction to how to use JavaScript and WebSocket to implement a real-time online ordering system: With the popularity of the Internet and the advancement of technology, more and more restaurants have begun to provide online ordering services. In order to implement a real-time online ordering system, we can use JavaScript and WebSocket technology. WebSocket is a full-duplex communication protocol based on the TCP protocol, which can realize real-time two-way communication between the client and the server. In the real-time online ordering system, when the user selects dishes and places an order
 Steps to unify the theme color of PPT slides
Mar 26, 2024 pm 08:51 PM
Steps to unify the theme color of PPT slides
Mar 26, 2024 pm 08:51 PM
1. The color scheme is naturally related to design, so we click on the design toolbar and on the right side, you can see the color options. Point the mouse up, and you can see that the current theme color is: Default design template 1. 2. Click on this option, and the first one is the current color design. To change that, we're going to go down below the panel: New Theme Colors. 3. Click in, and in the column of colors that appear, you can see that there are three accent text colors, all of which are light and almost impossible to display on a light background. Among them is the text color in this example. 4. Click the drop-down arrow on the right side of the color to display the color selection panel. In order not to destroy the overall color matching, choose a dark color in the primary color system to replace the primary color. Replace the other two colors in the same way. 5. Compare the changed color with the original color. On the left is
 JavaScript and WebSocket: Building an efficient real-time weather forecasting system
Dec 17, 2023 pm 05:13 PM
JavaScript and WebSocket: Building an efficient real-time weather forecasting system
Dec 17, 2023 pm 05:13 PM
JavaScript and WebSocket: Building an efficient real-time weather forecast system Introduction: Today, the accuracy of weather forecasts is of great significance to daily life and decision-making. As technology develops, we can provide more accurate and reliable weather forecasts by obtaining weather data in real time. In this article, we will learn how to use JavaScript and WebSocket technology to build an efficient real-time weather forecast system. This article will demonstrate the implementation process through specific code examples. We
