PHP+XML 制作简单的留言本 图文教程_php实例
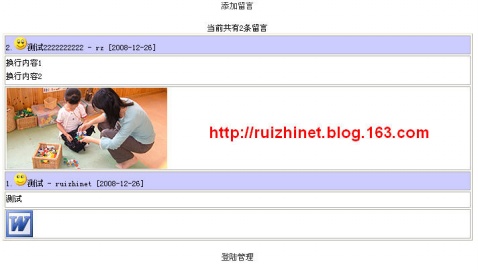
1. 留言显示页面
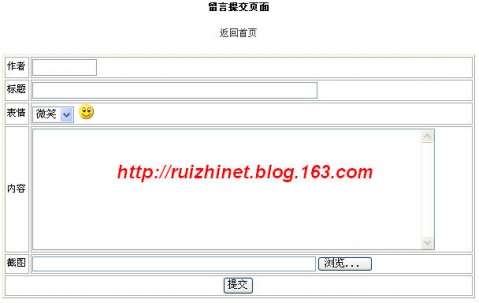
2. 发布留言,并允许上传图片
3. 输入密码登录后可以删除留言。
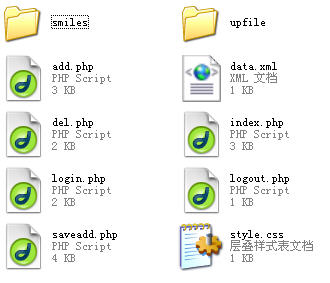
1. 文件目录

upfile是保存上传图片的目录。
2. 主要界面
(1)首页,显示留言页面

(2)发表留言页面

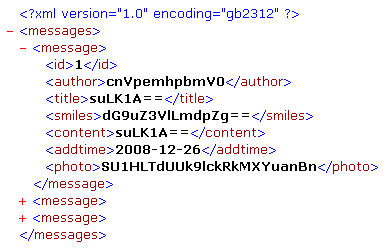
3. XML文档格式,名称为data.xml

各字段的含义不多说,各元素的值看起来有点怪,是因为我使用了base64_encode对字符串进行了编码。
4 主要页面代码
(1)add.php
此页只是纯粹的HTML代码
(2)savadd.php
用于保存留言信息
if(!$_POST["author"] || !$_POST["content"])
{
echo "\n";
echo "你没有填写留言姓名或内容,2秒钟返回首页";
exit();
}else{
$imgflag=0; //用于判断是否需要上传图片
function random($length) //此函数用于生成一个随机的图片文件名(不含扩展名),以防止与现有图片重复
{
$hash = 'IMG-';
$chars = 'ABCDEFGHIJKLMNOPQRSTUVWXYZ0123456789abcdefghijklmnopqrstuvwxyz';
$max = strlen($chars) - 1;
for($i = 0; $i {
$hash .= $chars[mt_rand(0, $max)];
}
return $hash;
}
function fileext($filename) //此函数用于获取上传文件的扩展名
{
return substr(strrchr($filename, '.'), 1);
}
if($_FILES["upfile"]["name"]!=""){
$uploaddir="upfile/"; //图片保存路径
$type=array("jpg","gif","bmp","jpeg","png"); //允许上传的文件类型
if(!in_array(strtolower(fileext($_FILES['upfile']['name'])),$type)) //如果上传的文件的扩展名不符合要求
{
echo "\n";
$text=implode(",",$type);
echo "您只能上传以下类型文件: ",$text,"
";
exit();
}
else
{
$filename=explode(".",$_FILES['upfile']['name']);
do
{
$filename[0]=random(10);
$randname=implode(".",$filename); //得到的最终随机生成的文件名(连同扩展名)
$uploadfile=$uploaddir.$randname;
} while(file_exists($uploadfile));
if (move_uploaded_file($_FILES['upfile']['tmp_name'],$uploadfile)){ //保存上传的图片到upfile文件夹
echo "上传图片成功";
$imgflag=1;
}
else{
echo "上传图片失败!";
$imgflag=0;
}
}
}
//获取其他表单域
$author=base64_encode($_POST["author"]);
$content=base64_encode(ereg_replace("\r\n","
",$_POST["content"]));
$smiles=base64_encode($_POST["smiles"]);
if($_POST["title"]){
$title=base64_encode($_POST["title"]);
}else{
$title=base64_encode("无标题");
}
$addtime=date("Y-m-d");
if($imgflag==1){ //如果有上传图片
$photo=base64_encode($randname);
}else{ //否则将photo元素的值设置为NONE
$photo="NONE";
}
$dom=new DOMDocument('1.0','gb2312'); //指定XML的格式
$dom->load("data.xml"); //加载
$root=$dom->getElementsByTagName("messages"); //获取根节点
$root=$root->item(0);
$last_id=$root->lastChild->firstChild->nodeValue; //获取最后一个message的第一个子节点(即id节点)的值
$id=$last_id+1; //新增消息的id
settype($id,"string"); //将其转换为字符型
$message=$root->appendChild(new DOMElement('message')); //添加message节点
$el_id=$message->appendChild(new DOMElement('id')); //添加message节点的各个子节点
$el_id->appendChild($dom->createTextNode($id));
$el_author=$message->appendChild(new DOMElement('author'));
$el_author->appendChild($dom->createTextNode($author));
$el_title=$message->appendChild(new DOMElement('title'));
$el_title->appendChild($dom->createTextNode($title));
$el_smiles=$message->appendChild(new DOMElement('smiles'));
$el_smiles->appendChild($dom->createTextNode($smiles));
$el_content=$message->appendChild(new DOMElement('content'));
$el_content->appendChild($dom->createTextNode($content));
$el_addtime=$message->appendChild(new DOMElement('addtime'));
$el_addtime->appendChild($dom->createTextNode($addtime));
$el_photo=$message->appendChild(new DOMElement('photo'));
$el_photo->appendChild($dom->createTextNode($photo));
$dom->save("data.xml"); //保存XML
echo "\n";
echo "谢谢您的留言,2秒钟返回首页";
}
?>
(3)index.php
本页面用于显示留言信息
$dom=new DOMDocument('1.0','gb2312');
$dom->load("data.xml"); //加载
$root=$dom->getElementsByTagName("messages");
$root=$root->item(0);
$message=$root->getElementsByTagName("message"); //获取所有message节点
$message_count=$message->length; //计算有多少条留言
echo "当前共有".$message_count."条留言";
if($message_count==0){
echo "暂时没有留言\n";
}else{
?>
| "; echo $id.".  ".base64_decode($title)." - ".base64_decode($author)." [".$addtime."] "; ".base64_decode($title)." - ".base64_decode($author)." [".$addtime."] "; if(isset($_SESSION["password"]) && $_SESSION["password"]!="") //如果输入了密码显示删除链接 { echo "[删除]"; } echo " |
| ".base64_decode($content)." |
 |
if(isset($_SESSION["password"]) && $_SESSION["password"]!=""){
?>
}else{
?>
}
?>
(4) 删除留言
if(isset($_SESSION["password"]) && $_SESSION["password"]!="")
{
$dom=new DOMDocument;
$dom->load("data.xml");
$root=$dom->getElementsByTagName("messages");
$root=$root->item(0);
foreach($root->childNodes as $msg)
{
if($msg->firstChild->nodeValue==$_GET["id"]) //如果message节点的id子节点的值跟要删除的id相等
{
$photo=$msg->lastChild->nodeValue;
if($photo!="NONE"){ //如果留言包含图片,还应该将图片删除
$photo_path="upfile/".base64_decode($photo);
$flag=unlink($photo_path);
if($flag){
echo "删除图片成功
";
}
}
$root->removeChild($msg);
break;
}
}
$dom->save("data.xml");
?>
删除留言成功,2秒钟返回首页
}else{
?>
您还未登陆,2秒钟返回登陆页面
}
?>

Hot AI Tools

Undresser.AI Undress
AI-powered app for creating realistic nude photos

AI Clothes Remover
Online AI tool for removing clothes from photos.

Undress AI Tool
Undress images for free

Clothoff.io
AI clothes remover

AI Hentai Generator
Generate AI Hentai for free.

Hot Article

Hot Tools

Notepad++7.3.1
Easy-to-use and free code editor

SublimeText3 Chinese version
Chinese version, very easy to use

Zend Studio 13.0.1
Powerful PHP integrated development environment

Dreamweaver CS6
Visual web development tools

SublimeText3 Mac version
God-level code editing software (SublimeText3)

Hot Topics
 11 Best PHP URL Shortener Scripts (Free and Premium)
Mar 03, 2025 am 10:49 AM
Long URLs, often cluttered with keywords and tracking parameters, can deter visitors. A URL shortening script offers a solution, creating concise links ideal for social media and other platforms. These scripts are valuable for individual websites a
 Working with Flash Session Data in Laravel
Mar 12, 2025 pm 05:08 PM
Laravel simplifies handling temporary session data using its intuitive flash methods. This is perfect for displaying brief messages, alerts, or notifications within your application. Data persists only for the subsequent request by default: $request-
 Build a React App With a Laravel Back End: Part 2, React
Mar 04, 2025 am 09:33 AM
This is the second and final part of the series on building a React application with a Laravel back-end. In the first part of the series, we created a RESTful API using Laravel for a basic product-listing application. In this tutorial, we will be dev
 Simplified HTTP Response Mocking in Laravel Tests
Mar 12, 2025 pm 05:09 PM
Laravel provides concise HTTP response simulation syntax, simplifying HTTP interaction testing. This approach significantly reduces code redundancy while making your test simulation more intuitive. The basic implementation provides a variety of response type shortcuts: use Illuminate\Support\Facades\Http; Http::fake([ 'google.com' => 'Hello World', 'github.com' => ['foo' => 'bar'], 'forge.laravel.com' =>
 cURL in PHP: How to Use the PHP cURL Extension in REST APIs
Mar 14, 2025 am 11:42 AM
The PHP Client URL (cURL) extension is a powerful tool for developers, enabling seamless interaction with remote servers and REST APIs. By leveraging libcurl, a well-respected multi-protocol file transfer library, PHP cURL facilitates efficient execution of various network protocols, including HTTP, HTTPS, and FTP. This extension offers granular control over HTTP requests, supports multiple concurrent operations, and provides built-in security features.
 12 Best PHP Chat Scripts on CodeCanyon
Mar 13, 2025 pm 12:08 PM
Do you want to provide real-time, instant solutions to your customers' most pressing problems? Live chat lets you have real-time conversations with customers and resolve their problems instantly. It allows you to provide faster service to your custom
 Announcement of 2025 PHP Situation Survey
Mar 03, 2025 pm 04:20 PM
The 2025 PHP Landscape Survey investigates current PHP development trends. It explores framework usage, deployment methods, and challenges, aiming to provide insights for developers and businesses. The survey anticipates growth in modern PHP versio
 Notifications in Laravel
Mar 04, 2025 am 09:22 AM
In this article, we're going to explore the notification system in the Laravel web framework. The notification system in Laravel allows you to send notifications to users over different channels. Today, we'll discuss how you can send notifications ov


