Webpack learning tutorial front-end performance optimization summary
Webpack is the most popular module loader and packaging tool recently. It can use various resources, such as JS (including JSX), coffee, styles (including less/sass), images, etc. as modules. deal with. This article mainly summarizes and introduces relevant information about front-end performance optimization of webpack learning tutorial. Friends in need can refer to it.
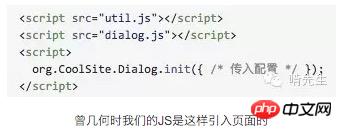
We introduced JS resources as shown above. I believe we rarely encounter them now. In recent years, the field of Web front-end development has evolved towards standardized development. This is reflected in the following two points:
1. MVC R&D architecture. There are many benefits (the logic is clear, the program focuses on the separation of data and performance, and it is highly readable, which is helpful for avoiding and troubleshooting problems...)
2. There are endless construction tools. Many benefits (improving team collaboration, engineering operation and maintenance, and avoiding manual processing of trivial and repetitive work)
Modular development
Integrate the front-end Implementation of performance optimization theory, code compression, merging, cache control, extraction of public code, etc.
Others include, for example, you can use ES 6 or CoffeeScript to write source code, and then build browser support ES5
So, the front end is so fun, if there are still projects that do not separate the front and back ends, it is really too conservative.
Mainstream build tools
There are many build tools on the market, including Grunt, Gulp, browserify, etc. These and WebPack are all packaging tools. But WebPack also has the following characteristics:
Compared with Grunt, WebPack not only has a rich set of plug-ins, but also has a loading (Loader) system. It supports multiple standardized loading methods, including ES6, CommonJS, AMD, etc., which Grunt and Gulp do not have.
From the perspective of code obfuscation, WebPack is more extreme
The code is fragmented into processing units (rather than files), making file fragmentation more flexible.
P.S. This is just a simple comparison, no matter which one is better or worse. In fact, tools can meet the needs. The key is how to use them. Behind the use of tools is the understanding of front-end performance optimization.
Introduction
Recently I am using webpack to optimize the first screen loading performance. After using several plug-ins, our speed before and after going online has doubled. Let me simply share it here. First, I will post a comparison picture of the first screen rendering before and after optimization.

You can see that the total download time is reduced from 3800ms to 1600ms.
When we use webpack, we usually choose multiple entry files in order to separate our own source code from the third-party library code. This is the previous code.
entry: {
 entry: './src/main.js',
 vendor: ['vue', 'vue-router', 'vuex', 'element-ui','echarts']
},
output: {
 path: config.build.assetsRoot,
 filename: utils.assetsPath('js/[name].[chunkhash].js'),
 chunkFilename: utils.assetsPath('js/[id].[chunkhash].js')
}entry: {
entry: './src/main.js',
vendor: ['vue', 'vue-router', 'vuex', 'element-ui']
},
// 这里的output为base中的output,不是生产的output
output: {
path: config.build.assetsRoot,
filename: '[name].js',
libraryTarget: "umd",
publicPath: process.env.NODE_ENV === 'production' ?
config.build.assetsPublicPath : config.dev.assetsPublicPath
},
externals: {
echarts: 'echarts',
_: 'lodash'
},

var BundleAnalyzerPlugin = require('webpack-bundle-analyzer').BundleAnalyzerPlugin;
new BundleAnalyzerPlugin({
  // 可以是`server`,`static`或`disabled`。
  // 在`server`模式下,分析器将启动HTTP服务器来显示软件包报告。
  // 在“静态”模式下,会生成带有报告的单个HTML文件。
  // 在`disabled`模式下,你可以使用这个插件来将`generateStatsFile`设置为`true`来生成Webpack Stats JSON文件。
  analyzerMode: 'server',
  // 将在“服务器”模式下使用的主机启动HTTP服务器。
  analyzerHost: '127.0.0.1',
  // 将在“服务器”模式下使用的端口启动HTTP服务器。
  analyzerPort: 8888,
  // 路径捆绑,将在`static`模式下生成的报告文件。
  // 相对于捆绑输出目录。
  reportFilename: 'report.html',
  // 模块大小默认显示在报告中。
  // 应该是`stat`,`parsed`或者`gzip`中的一个。
  // 有关更多信息,请参见“定义”一节。
  defaultSizes: 'parsed',
  // 在默认浏览器中自动打开报告
  openAnalyzer: true,
  // 如果为true,则Webpack Stats JSON文件将在bundle输出目录中生成
  generateStatsFile: false,
  // 如果`generateStatsFile`为`true`,将会生成Webpack Stats JSON文件的名字。
  // 相对于捆绑输出目录。
  statsFilename: 'stats.json',
  // stats.toJson()方法的选项。
  // 例如,您可以使用`source:false`选项排除统计文件中模块的来源。
  // 在这里查看更多选项:https: //github.com/webpack/webpack/blob/webpack-1/lib/Stats.js#L21
  statsOptions: null,
  logLevel: 'info' //日志级别。可以是'信息','警告','错误'或'沉默'。
 })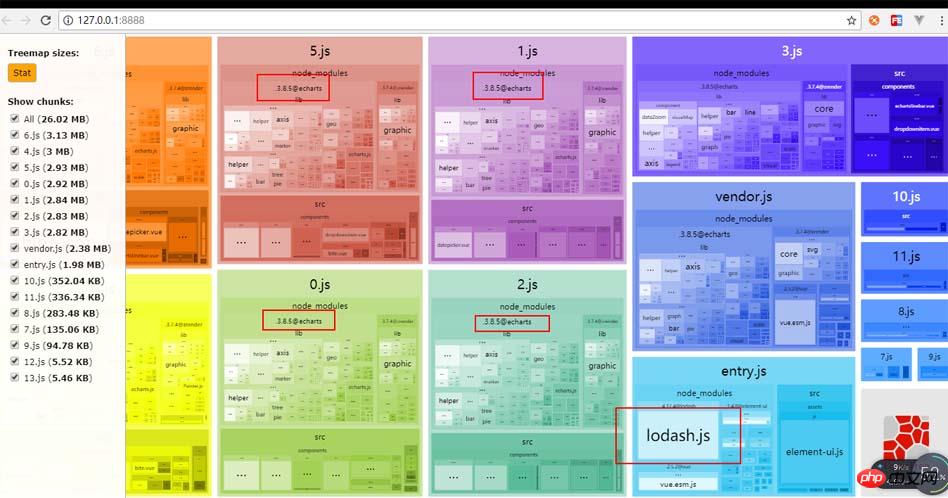
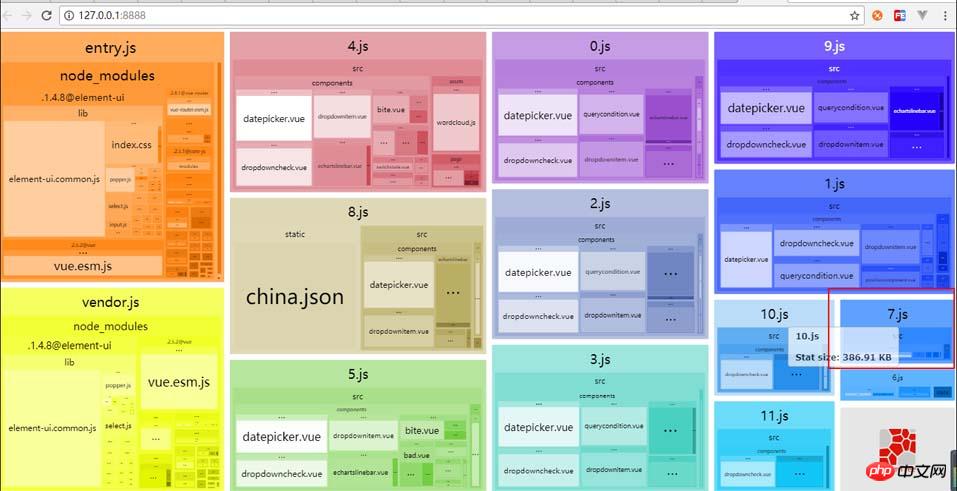
import lodash from "_";
import echarts from "echarts";

trunkhash:根据每个文件生成不同的hash值,当文件变化时hash会改变且只会改变相应的文件
然后我们肯定是要用到CommonsChunkPlugin,这个插件是用来抽取公共代码的,基本上99%的配置都是长这样子或者类似这样子用两个不同的commonschunkPlugin,但这从某方面来说并没有实现真正意义上的持久化缓存,这个一会我会通过webpack打包原理来详细解释其中的原因。。。。。。
new webpack.optimize.CommonsChunkPlugin({
 names: ['vendor','manifest']
})在没用这个插件之前,我们的main.js和vendor.js会是这样子。。。
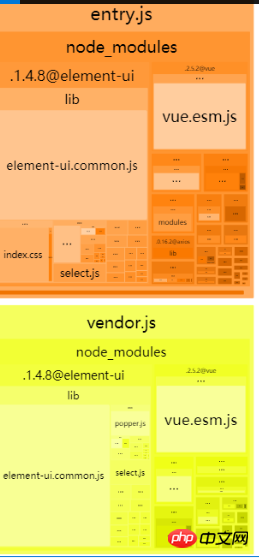
大家会看到我们这两个文件会有公共的部分,比如vue和element-ui,所以我们要抽取公共代码到vendor中,所以我们可以先这样配置
new webpack.optimize.CommonsChunkPlugin({
 name: 'vendor',
}),但这样的话虽然可以提取公共代码,但我们会把runtime(webpack运行时的代码,一会在打包原理中会再次提到)也放到vendor中,这里面会维护一个trunk的文件列表,类似于这样,就是说我们改任意的代码,这个table里面的hash会变,所以vendor的hash也会变
,所以这没有实现真正的持久化缓存。这个hash table是按需缓存的打包出来的trunk包,一般都是通过require.ensure(就是vue-router中配置的page对应页面,按需加载)

所以我们就把name改为names,就是上面那个配置。因为使用这个插件,我们会把公共代码抽到第一个name中,把runtime放到最后一个name中,也就是我们所谓的“manifest”文件。
并且这个文件会比较小,通常都是2kb左右,所以build后会生成一个script标签,但这样的话就多了一个http请求,所以我们可以用另外一个插件(InlineManifestWebpackPlugin)将manifest.js内联进去。就会长这样子
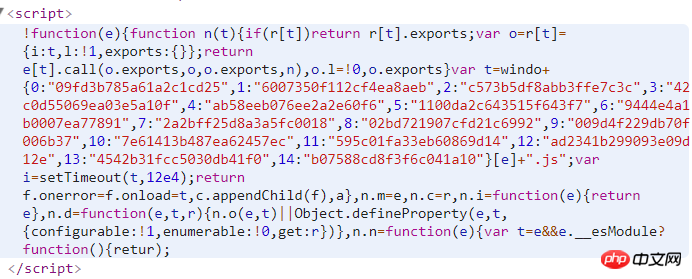
再回到我们的CommonsChunkPlugin,现在我们随便改任何已存在的文件,vendor.js的hash都不会变,是的,貌似这就实现了持久化缓存。但是当我们新增一个模块,并且在入口文件中import一下,我们的vendor就会跟main一起变。很奇怪对吧,我们明明已经做了自己的源码跟第三方库分离,为什么vendor还会变(到现在应该没有任何一篇博客对此进行详细的说明)。下面我就详细的给大家解释下我的看法,如果大家发现有不对的地方还请指正。
再解释为什么之前,我们先简单了解下webpack的打包规则。
webpack一个entry对应一个bundle,这个bundle包括入口文件和其依赖的模块。其他按需加载的则打包成其他的bundle。还有一个比较重要的文件时manifest,它是最先加载的,负责打包其他的bundle并按需加载和执行。
manifest是一个自执行函数,熟悉angular的同学看第一行应该很了解,因为anguar1.3版本的源码中启动就是angular.bootstrap,对,这里也是一样。里面的modules变量就是对应模块函数,它是webpack处理的基本单位,就是说对应打包前的一个文件
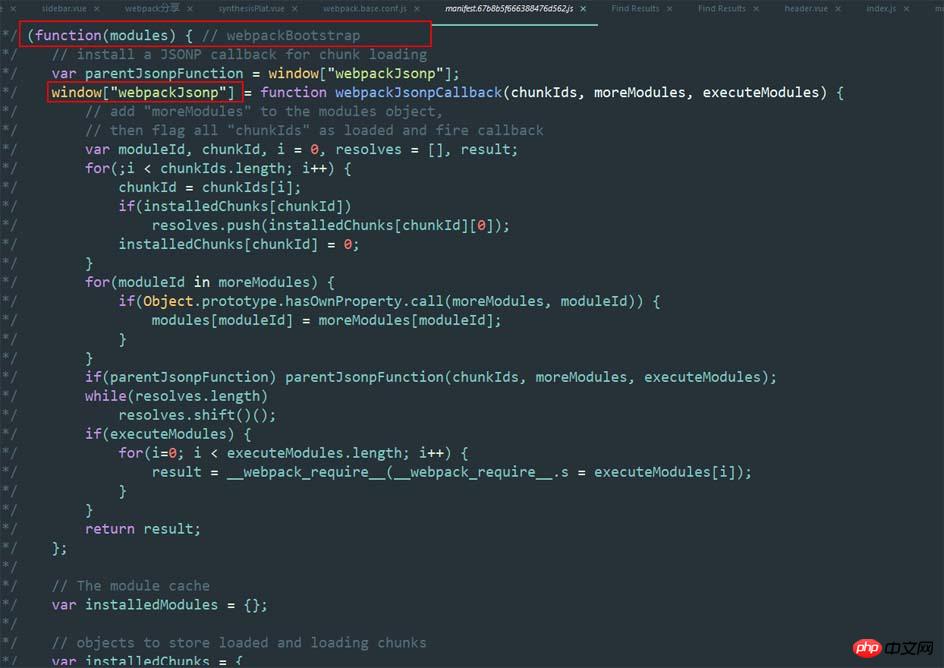
这是js源文件,

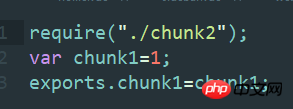
这是打包后的文件,
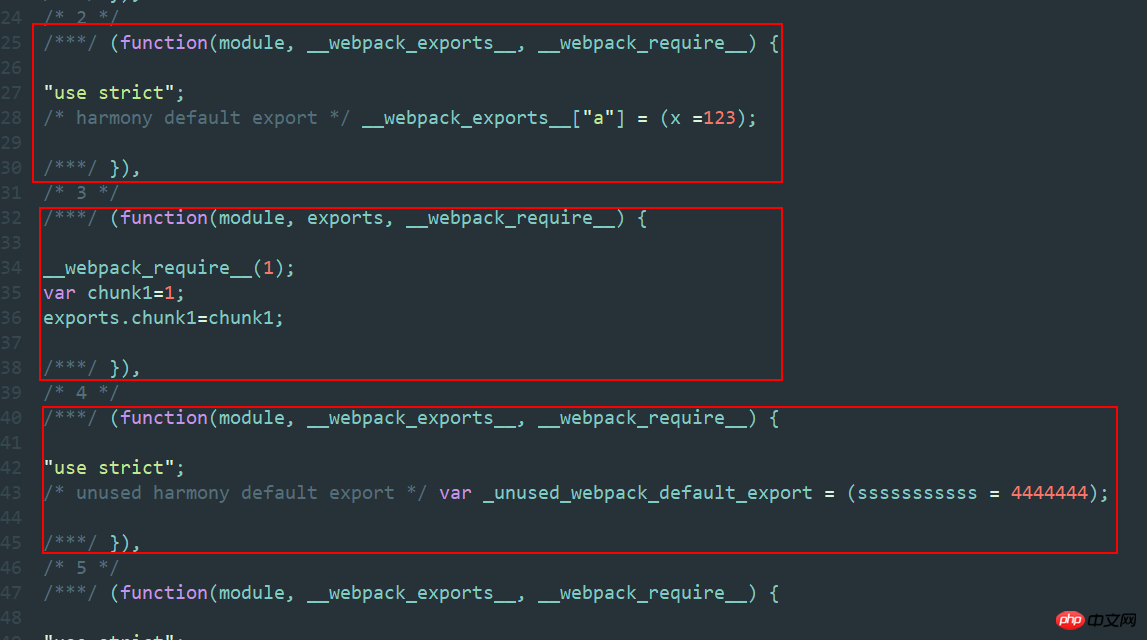
所有的模块函数索引都是连续的(每个js文件生成一个trunkid!!!!!),像这种 /* 4 */ 对应的就是js文件,他通过打包就变成了一个个trunkid,仔细看会看到咱们打包前js文件里的export和require依赖都会统一转换成webpack模块。咱们说的webpackJsonp就是除manifest之外打包其他的文件的函数体。
简单说下main吧,这个图的trunkid是连续的,为了在一张图上显示,我截掉了trunk3-7.
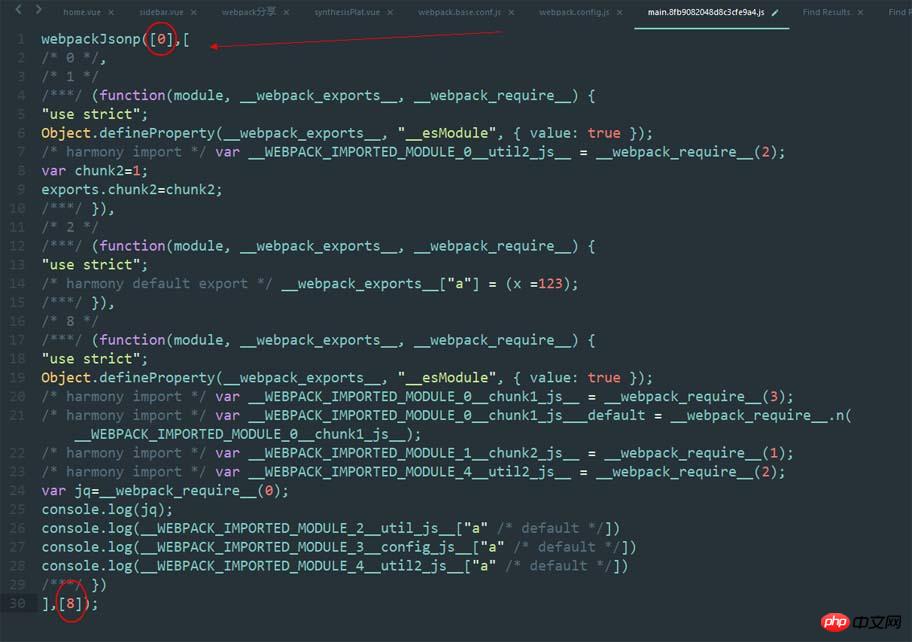
There are three parameters here. The first one is the trunkid of my current file. It is a unique identifier, which refers to the trunkid of main. The second one is the module function of all the files packaged. The third one is my The trunkid module function to be executed immediately.
ok, that’s enough to introduce these.
Then let’s go back and see why our so-called commonschunkPlugin changed. As I said just now, there are as many trunkids as there are js.
So when we add a new js and introduce it to the main entrance, webpack packages it again, and my main file will have one more module function. As I just said, the trunkid increases sequentially and will not be repeated. Therefore, the corresponding vendor's ID will be +1. It is such a subtle change that causes the hash to change.
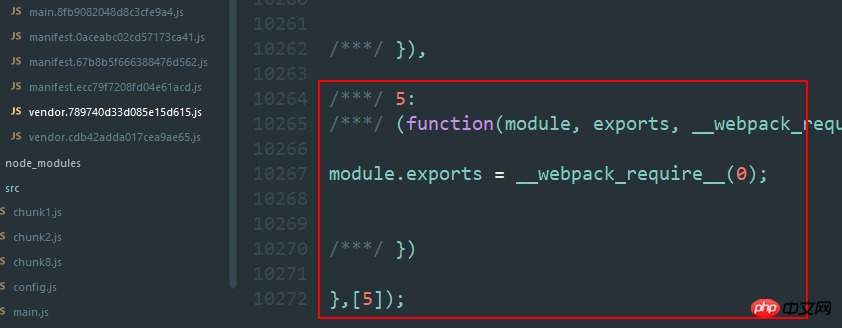

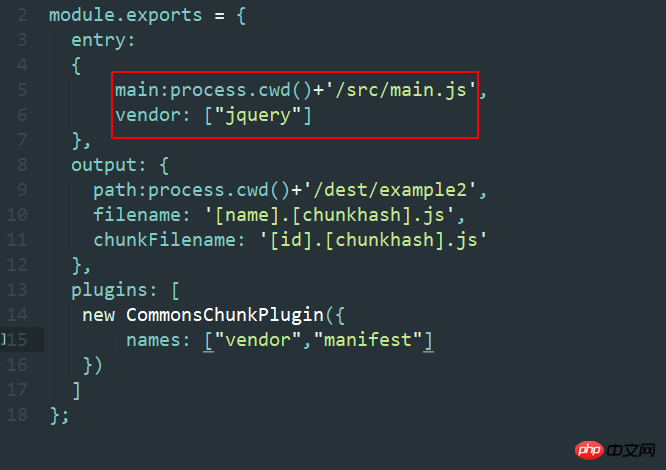
Look carefully, both vendors have 10272 lines. The only difference is I want to self-execute this vendor library. I quoted jquery here, so this file only has jquery. Self-execution must have module functions, trunkid+1, so the hash will change. Let's recall it carefully. In fact, this also illustrates the significance of this plug-in. I just want to extract the public library. OK, this plug-in does it, but because of the webpack packaging mechanism, different files generate different turnkids, so this is a fly in the ointment. Recall that we generally do not modify main.js casually, so from another perspective, this is the implementation of persistent caching. But what if I just want to keep the vendor’s hash unchanged?
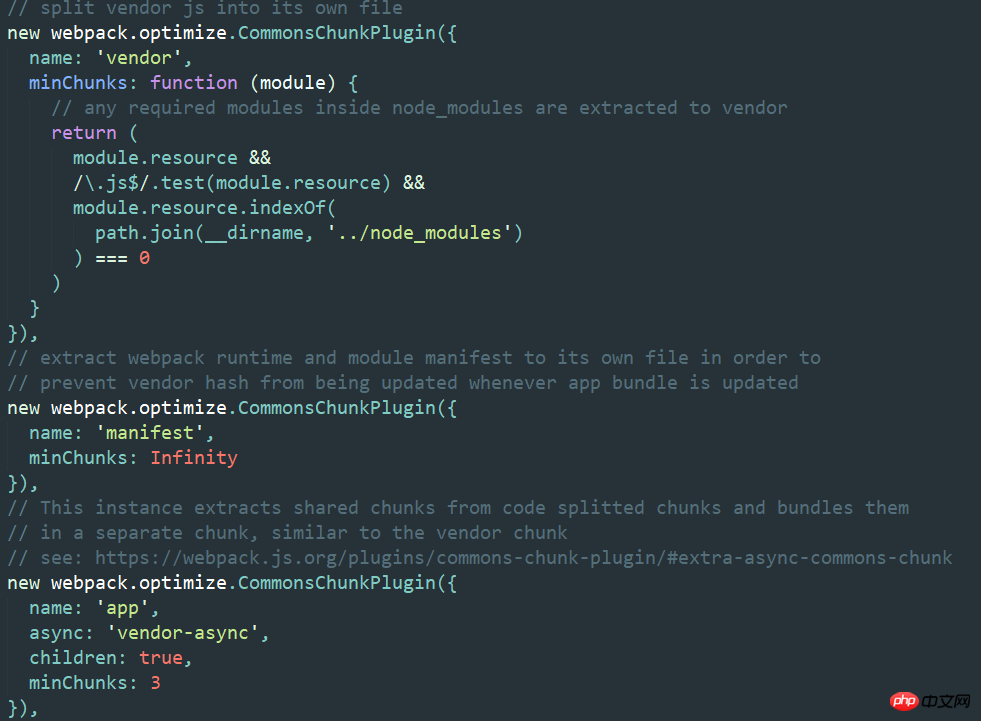
This code can be implemented. Yes, if you know vue-cli well, this is the official demo of vue-cli. As for why it is possible, I will discuss this later. Explain to everyone (I really can’t write anymore...).
Finally, I would like to introduce to you a super useful thing, which is CDN. Our current demand is to let pictures go to CDN and js to go online. However, the official explanation is to make CDN changes by modifying the config file. If this is done, all my output will go through CDN, and all ajax requests will be cross-domain. That’s it.

My solution at the beginning was to replace the source files one by one, which would be slower. More importantly, the cdn image also has a hash value. When I When you replace the image in the future, you have to change the corresponding hash again. Is there any way to allow him to automatically obtain the hash?
Yes, we need to configure the cdn separately in the url-loader so that js can access the online path and static resources use the cdn. The two do not affect each other.
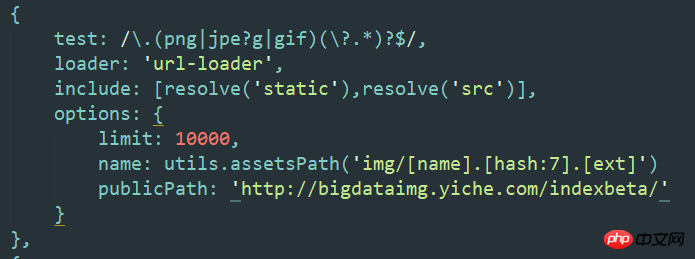
A brief reminder, url-loader cannot detect the background in js, so any address we reference in js must first import this image, url -loader will parse and package it.
The above content is a summary of the front-end performance optimization of the webpack learning tutorial. I hope it can help everyone.
Related recommendations:
Webpack server-side code packaging
Detailed introduction to examples of webpack processing CSS
Detailed explanation of webpack’s configuration file
The above is the detailed content of Webpack learning tutorial front-end performance optimization summary. For more information, please follow other related articles on the PHP Chinese website!

Hot AI Tools

Undresser.AI Undress
AI-powered app for creating realistic nude photos

AI Clothes Remover
Online AI tool for removing clothes from photos.

Undress AI Tool
Undress images for free

Clothoff.io
AI clothes remover

Video Face Swap
Swap faces in any video effortlessly with our completely free AI face swap tool!

Hot Article

Hot Tools

Notepad++7.3.1
Easy-to-use and free code editor

SublimeText3 Chinese version
Chinese version, very easy to use

Zend Studio 13.0.1
Powerful PHP integrated development environment

Dreamweaver CS6
Visual web development tools

SublimeText3 Mac version
God-level code editing software (SublimeText3)

Hot Topics
 1386
1386
 52
52
 VUE3 Getting Started Tutorial: Packaging and Building with Webpack
Jun 15, 2023 pm 06:17 PM
Vue is an excellent JavaScript framework that can help us quickly build interactive and efficient web applications. Vue3 is the latest version of Vue, which introduces many new features and functionality. Webpack is currently one of the most popular JavaScript module packagers and build tools, which can help us manage various resources in our projects. This article will introduce how to use Webpack to package and build Vue3 applications. 1. Install Webpack
 How to use Nginx web server caddy
May 30, 2023 pm 12:19 PM
Introduction to Caddy Caddy is a powerful and highly scalable web server that currently has 38K+ stars on Github. Caddy is written in Go language and can be used for static resource hosting and reverse proxy. Caddy has the following main features: Compared with the complex configuration of Nginx, its original Caddyfile configuration is very simple; it can dynamically modify the configuration through the AdminAPI it provides; it supports automated HTTPS configuration by default, and can automatically apply for HTTPS certificates and configure it; it can be expanded to data Tens of thousands of sites; can be executed anywhere with no additional dependencies; written in Go language, memory safety is more guaranteed. First of all, we install it directly in CentO
 Real-time protection against face-blocking barrages on the web (based on machine learning)
Jun 10, 2023 pm 01:03 PM
Face-blocking barrage means that a large number of barrages float by without blocking the person in the video, making it look like they are floating from behind the person. Machine learning has been popular for several years, but many people don’t know that these capabilities can also be run in browsers. This article introduces the practical optimization process in video barrages. At the end of the article, it lists some applicable scenarios for this solution, hoping to open it up. Some ideas. mediapipeDemo (https://google.github.io/mediapipe/) demonstrates the mainstream implementation principle of face-blocking barrage on-demand up upload. The server background calculation extracts the portrait area in the video screen, and converts it into svg storage while the client plays the video. Download svg from the server and combine it with barrage, portrait
 Using Jetty7 for Web server processing in Java API development
Jun 18, 2023 am 10:42 AM
Using Jetty7 for Web Server Processing in JavaAPI Development With the development of the Internet, the Web server has become the core part of application development and is also the focus of many enterprises. In order to meet the growing business needs, many developers choose to use Jetty for web server development, and its flexibility and scalability are widely recognized. This article will introduce how to use Jetty7 in JavaAPI development for We
 How to implement form validation for web applications using Golang
Jun 24, 2023 am 09:08 AM
Form validation is a very important link in web application development. It can check the validity of the data before submitting the form data to avoid security vulnerabilities and data errors in the application. Form validation for web applications can be easily implemented using Golang. This article will introduce how to use Golang to implement form validation for web applications. 1. Basic elements of form validation Before introducing how to implement form validation, we need to know what the basic elements of form validation are. Form elements: form elements are
 How to configure nginx to ensure that the frps server and web share port 80
Jun 03, 2023 am 08:19 AM
First of all, you will have a doubt, what is frp? Simply put, frp is an intranet penetration tool. After configuring the client, you can access the intranet through the server. Now my server has used nginx as the website, and there is only one port 80. So what should I do if the FRP server also wants to use port 80? After querying, this can be achieved by using nginx's reverse proxy. To add: frps is the server, frpc is the client. Step 1: Modify the nginx.conf configuration file in the server and add the following parameters to http{} in nginx.conf, server{listen80
 What are web standards?
Oct 18, 2023 pm 05:24 PM
Web standards are a set of specifications and guidelines developed by W3C and other related organizations. It includes standardization of HTML, CSS, JavaScript, DOM, Web accessibility and performance optimization. By following these standards, the compatibility of pages can be improved. , accessibility, maintainability and performance. The goal of web standards is to enable web content to be displayed and interacted consistently on different platforms, browsers and devices, providing better user experience and development efficiency.
 How to enable administrative access from the cockpit web UI
Mar 20, 2024 pm 06:56 PM
Cockpit is a web-based graphical interface for Linux servers. It is mainly intended to make managing Linux servers easier for new/expert users. In this article, we will discuss Cockpit access modes and how to switch administrative access to Cockpit from CockpitWebUI. Content Topics: Cockpit Entry Modes Finding the Current Cockpit Access Mode Enable Administrative Access for Cockpit from CockpitWebUI Disabling Administrative Access for Cockpit from CockpitWebUI Conclusion Cockpit Entry Modes The cockpit has two access modes: Restricted Access: This is the default for the cockpit access mode. In this access mode you cannot access the web user from the cockpit


