
 Web Front-end
JS Tutorial
Detailed explanation of vue's on-demand loading component webpack require.ensure
Web Front-end
JS Tutorial
Detailed explanation of vue's on-demand loading component webpack require.ensure
Detailed explanation of vue's on-demand loading component webpack require.ensure

vue-cli是由vue官方发布的快速构建vue单页面的脚手架。使用 vue-cli构建的项目,在 默认情况下 ,执行 npm run build 会将所有的js代码打包为一个整体,本文主要介绍了vue按需加载组件webpack require.ensure的方法,具有一定的参考价值,感兴趣的小伙伴们可以参考一下,希望能帮助到大家。
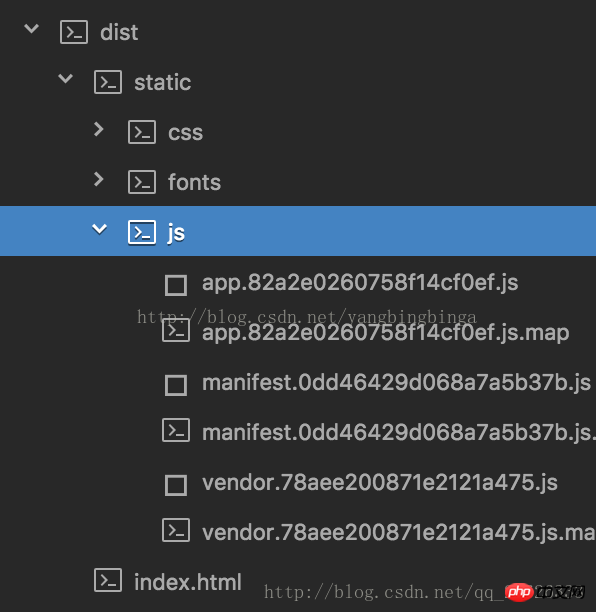
打包位置是 dist/static/js/app.[contenthash].js
类似下面的路由代码
router/index.js 路由相关信息,该路由文件引入了多个 .vue组件
import Hello from '@/components/Hello'
import Province from '@/components/Province'
import Segment from '@/components/Segment'
import User from '@/components/User'
import Loading from '@/components/Loading'
执行 npm run build 会打包为一个整体 app.[contenthash].js ,这个文件是非常大,可能几兆或者几十兆,加载会很慢
所以我们需要分模块打包,把我们想要组合在一起的组件打包到一个 chunk块中去,分模块打包需要下面这样使用 webpack的 require.ensure,并且在最后加入一个 chunk名,相同 chunk名字的模块将会打包到一起。
webpack中利用require.ensure()实现按需加载
1、require.ensure()
webpack 在编译时,会静态地解析代码中的 require.ensure(),同时将模块添加到一个分开的 chunk 当中。这个新的 chunk 会被 webpack 通过 jsonp 来按需加载。
语法如下:
require.ensure(dependencies: String[], callback: function(require), chunkName: String)
依赖 dependencies
这是一个字符串数组,通过这个参数,在所有的回调函数的代码被执行前,我们可以将所有需要用到的模块进行声明。
回调 callback
当所有的依赖都加载完成后,webpack会执行这个回调函数。require 对象的一个实现会作为一个参数传递给这个回调函数。因此,我们可以进一步 require() 依赖和其它模块提供下一步的执行。
chunk名称 chunkName
chunkName 是提供给这个特定的 require.ensure() 的 chunk 的名称。通过提供 require.ensure() 不同执行点相同的名称,我们可以保证所有的依赖都会一起放进相同的 文件束(bundle)。
让我们来看以下的项目
\\ file structure
  |
  js --|
  |  |-- entry.js
  |  |-- a.js
  |  |-- b.js
  webpack.config.js
  |
  dist
\\ entry.js
require('a');
require.ensure([], function(require){
  require('b');
});\\ a.js console.log('***** I AM a *****');
\\ b.js
console.log('***** I AM b *****');
\\ webpack.config.js
var path = require('path');
module.exports = function(env) {
  return {
    entry: './js/entry.js',
    output: {
      filename: 'bundle.js',
      path: path.resolve(__dirname, 'dist')
    }
  }
}通过执行这个项目的 webpack 构建,我们发现 webpack 创建了2个新的文件束, bundle.js 和 0.bundle.js。
entry.js 和 a.js 被打包进 bundle.js.
b.js 被打包进 0.bundle.js.
2、require.ensure() 的坑点
(1)、空数组作为参数
require.ensure([], function(require){
  require('./a.js');
});以上代码保证了拆分点被创建,而且 a.js 被 webpack 分开打包。
(2)、依赖作为参数
require.ensure(['./a.js'], function(require) {
  require('./b.js');
});上面代码, a.js 和 b.js 都被打包到一起,而且从主文件束中拆分出来。但只有 b.js 的内容被执行。a.js 的内容仅仅是可被使用,但并没有被输出。
想去执行 a.js,我们需要异步地引用它,如 require(‘./a.js'),让它的 JavaScritp 被执行。
(3)、单独打包成自己写的名字配置
需要配置chunkFilename,和publicPath。publicPath是按需加载单独打包出来的chunk是以publicPath会基准来存放的,chunkFilename:[name].js这样才会最终生成正确的路径和名字
module.exports={
  entry:'./js/entry.js',
  output:{
    path:path.resolve(__dirname,"./dist"),
    filename:'js/a.bundle.js',
    publicPath:"./",
    chunkFilename:'js/[name].js'
}所以router/index.js 修改为懒加载组件:
const Province = r => require.ensure([], () => r(require('@/components/Province.vue')), 'chunkname1')
const Segment = r => require.ensure([], () => r(require('@/components/Segment.vue')), 'chunkname2')
const Loading = r => require.ensure([], () => r(require('@/components/Loading.vue')), 'chunkname3')
const User = r => require.ensure([], () => r(require('@/components/User.vue')), 'chunkname3')
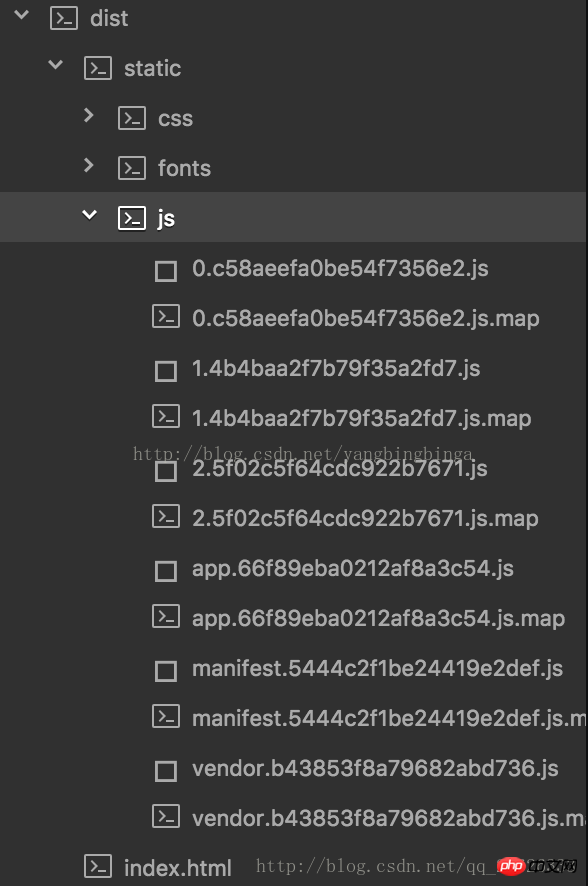
根据 chunkame的不同, 上面的四个组件, 将会被分成3个块打包,最终打包之后与组件相关的js文件会分为3个 (除了app.js,manifest.js, vendor.js)
分模块打包之后在 dist目录下是这样的, 这样就把一个大的 js文件分为一个个小的js文件了,按需去下载,其他的使用方法和import的效果一样
相关推荐:
HTML5 本地存储和内容按需加载的思路和方法_html5教程技巧
The above is the detailed content of Detailed explanation of vue's on-demand loading component webpack require.ensure. For more information, please follow other related articles on the PHP Chinese website!

Hot AI Tools

Undresser.AI Undress
AI-powered app for creating realistic nude photos

AI Clothes Remover
Online AI tool for removing clothes from photos.

Undress AI Tool
Undress images for free

Clothoff.io
AI clothes remover

AI Hentai Generator
Generate AI Hentai for free.

Hot Article
Hot Tools

Notepad++7.3.1
Easy-to-use and free code editor

SublimeText3 Chinese version
Chinese version, very easy to use

Zend Studio 13.0.1
Powerful PHP integrated development environment

Dreamweaver CS6
Visual web development tools

SublimeText3 Mac version
God-level code editing software (SublimeText3)
Hot Topics


 VUE3 Getting Started Tutorial: Packaging and Building with Webpack
Jun 15, 2023 pm 06:17 PM
VUE3 Getting Started Tutorial: Packaging and Building with Webpack
Jun 15, 2023 pm 06:17 PM
Vue is an excellent JavaScript framework that can help us quickly build interactive and efficient web applications. Vue3 is the latest version of Vue, which introduces many new features and functionality. Webpack is currently one of the most popular JavaScript module packagers and build tools, which can help us manage various resources in our projects. This article will introduce how to use Webpack to package and build Vue3 applications. 1. Install Webpack
 How to use Nginx web server caddy
May 30, 2023 pm 12:19 PM
How to use Nginx web server caddy
May 30, 2023 pm 12:19 PM
Introduction to Caddy Caddy is a powerful and highly scalable web server that currently has 38K+ stars on Github. Caddy is written in Go language and can be used for static resource hosting and reverse proxy. Caddy has the following main features: Compared with the complex configuration of Nginx, its original Caddyfile configuration is very simple; it can dynamically modify the configuration through the AdminAPI it provides; it supports automated HTTPS configuration by default, and can automatically apply for HTTPS certificates and configure it; it can be expanded to data Tens of thousands of sites; can be executed anywhere with no additional dependencies; written in Go language, memory safety is more guaranteed. First of all, we install it directly in CentO
 Real-time protection against face-blocking barrages on the web (based on machine learning)
Jun 10, 2023 pm 01:03 PM
Real-time protection against face-blocking barrages on the web (based on machine learning)
Jun 10, 2023 pm 01:03 PM
Face-blocking barrage means that a large number of barrages float by without blocking the person in the video, making it look like they are floating from behind the person. Machine learning has been popular for several years, but many people don’t know that these capabilities can also be run in browsers. This article introduces the practical optimization process in video barrages. At the end of the article, it lists some applicable scenarios for this solution, hoping to open it up. Some ideas. mediapipeDemo (https://google.github.io/mediapipe/) demonstrates the mainstream implementation principle of face-blocking barrage on-demand up upload. The server background calculation extracts the portrait area in the video screen, and converts it into svg storage while the client plays the video. Download svg from the server and combine it with barrage, portrait
 How to configure nginx to ensure that the frps server and web share port 80
Jun 03, 2023 am 08:19 AM
How to configure nginx to ensure that the frps server and web share port 80
Jun 03, 2023 am 08:19 AM
First of all, you will have a doubt, what is frp? Simply put, frp is an intranet penetration tool. After configuring the client, you can access the intranet through the server. Now my server has used nginx as the website, and there is only one port 80. So what should I do if the FRP server also wants to use port 80? After querying, this can be achieved by using nginx's reverse proxy. To add: frps is the server, frpc is the client. Step 1: Modify the nginx.conf configuration file in the server and add the following parameters to http{} in nginx.conf, server{listen80
 How to implement form validation for web applications using Golang
Jun 24, 2023 am 09:08 AM
How to implement form validation for web applications using Golang
Jun 24, 2023 am 09:08 AM
Form validation is a very important link in web application development. It can check the validity of the data before submitting the form data to avoid security vulnerabilities and data errors in the application. Form validation for web applications can be easily implemented using Golang. This article will introduce how to use Golang to implement form validation for web applications. 1. Basic elements of form validation Before introducing how to implement form validation, we need to know what the basic elements of form validation are. Form elements: form elements are
 Using Jetty7 for Web server processing in Java API development
Jun 18, 2023 am 10:42 AM
Using Jetty7 for Web server processing in Java API development
Jun 18, 2023 am 10:42 AM
Using Jetty7 for Web Server Processing in JavaAPI Development With the development of the Internet, the Web server has become the core part of application development and is also the focus of many enterprises. In order to meet the growing business needs, many developers choose to use Jetty for web server development, and its flexibility and scalability are widely recognized. This article will introduce how to use Jetty7 in JavaAPI development for We
 Is PHP front-end or back-end in web development?
Mar 24, 2024 pm 02:18 PM
Is PHP front-end or back-end in web development?
Mar 24, 2024 pm 02:18 PM
PHP belongs to the backend in web development. PHP is a server-side scripting language, mainly used to process server-side logic and generate dynamic web content. Compared with front-end technology, PHP is more used for back-end operations such as interacting with databases, processing user requests, and generating page content. Next, specific code examples will be used to illustrate the application of PHP in back-end development. First, let's look at a simple PHP code example for connecting to a database and querying data:
 How to enable administrative access from the cockpit web UI
Mar 20, 2024 pm 06:56 PM
How to enable administrative access from the cockpit web UI
Mar 20, 2024 pm 06:56 PM
Cockpit is a web-based graphical interface for Linux servers. It is mainly intended to make managing Linux servers easier for new/expert users. In this article, we will discuss Cockpit access modes and how to switch administrative access to Cockpit from CockpitWebUI. Content Topics: Cockpit Entry Modes Finding the Current Cockpit Access Mode Enable Administrative Access for Cockpit from CockpitWebUI Disabling Administrative Access for Cockpit from CockpitWebUI Conclusion Cockpit Entry Modes The cockpit has two access modes: Restricted Access: This is the default for the cockpit access mode. In this access mode you cannot access the web user from the cockpit
