This article mainly introduces to you the relevant information about the vlan configuration of Linux virtual network equipment. The article introduces it in great detail through sample code. It has certain reference learning value for everyone's study or work. I hope it can help everyone.
Introduction
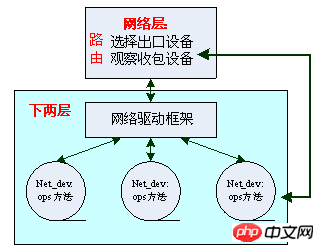
VLAN is an additional feature of the network stack and is located in the lower two layers. First, let’s learn the implementation of the lower two layers of the network stack in Linux, and then look at how to add the VLAN function to it. The lower two layers involve specific hardware devices. The increasingly perfect Linux kernel has achieved good code isolation, and the same is true for network device drivers, as shown in the following figure:

It should be noted here that the network device net_dev under Linux does not necessarily correspond to the actual hardware device. As long as a struct net_device{} structure (netdevice.h) is registered in the kernel, then the network device will exist. This structure is very large and contains the protocol address of the device (IP address for IP) so that it can be recognized by the network layer and participate in the routing system, the most famous of which is the loopback device. Different devices (including hardware and non-hardware) have different ops operation methods, which are implemented by the driver itself. Some general, device-independent operating procedures (such as device locking, etc.) are extracted by Linux and are called driver frameworks.
VLAN configuration of Linux virtual network device
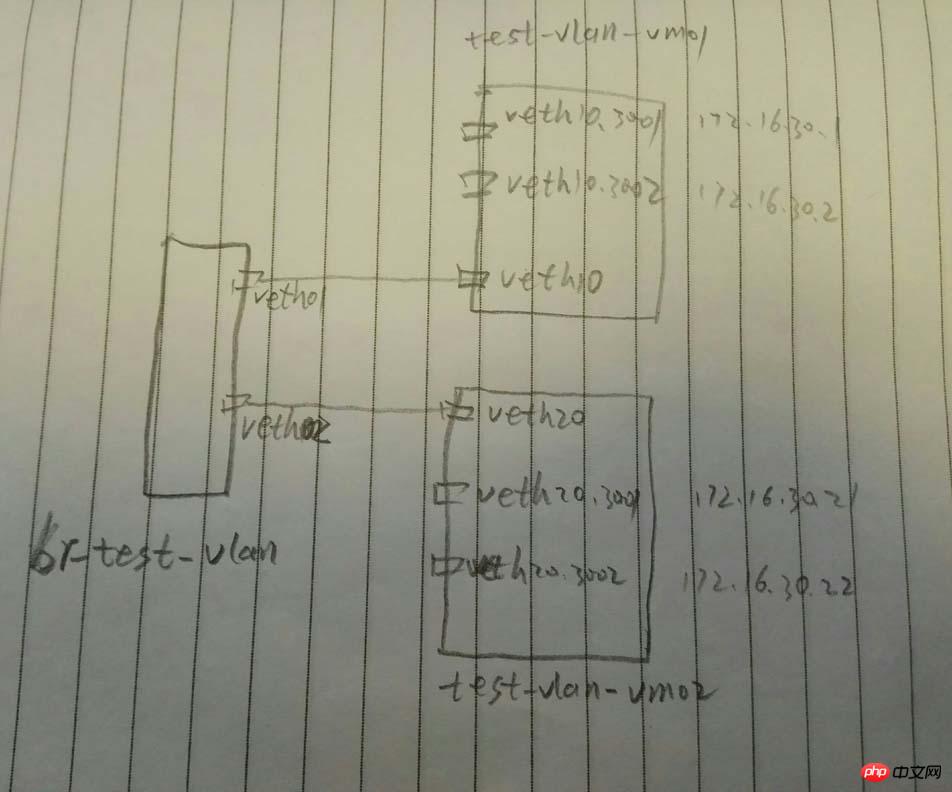
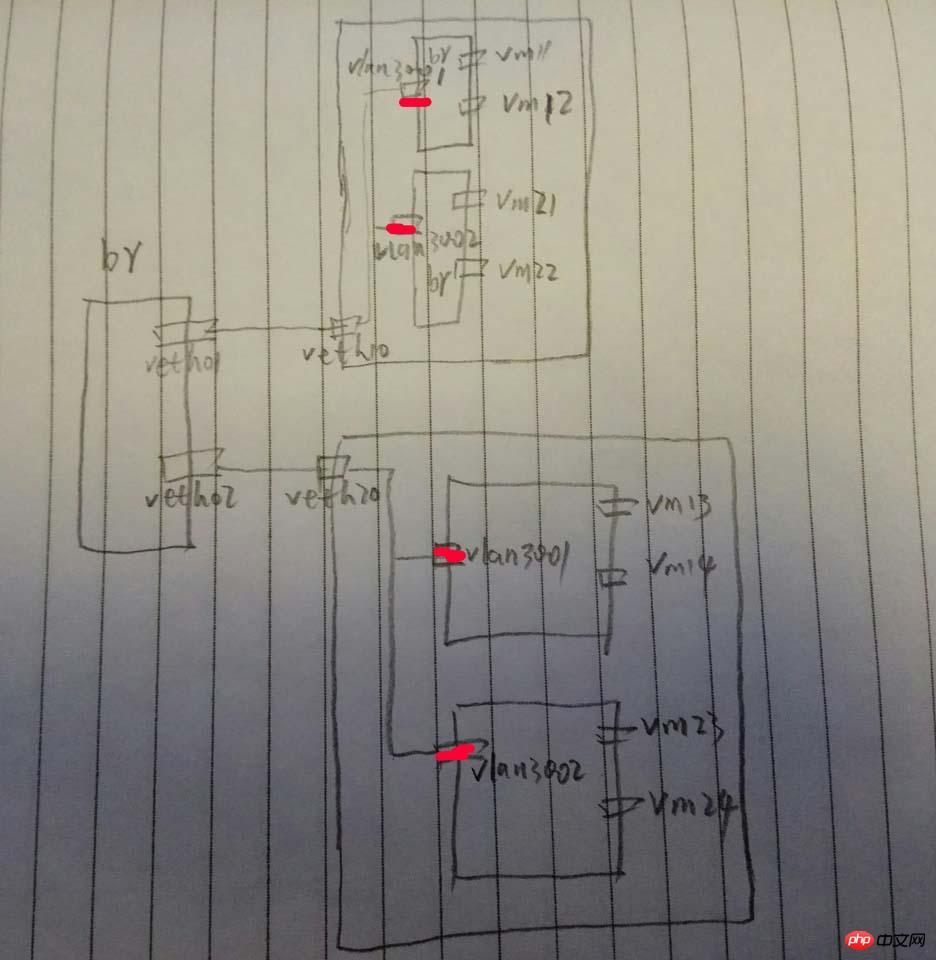
We connect two network namespaces through a bridge and two device pairs, and create two vlans in each namespace

Use vconfig to configure vlan:
#创建网桥
brctl addbr br-test-vlan
#创建veth对儿
ip link add veth01 type veth peer name veth10
ip link add veth02 type veth peer name veth20
#将veth对儿的一段添加到网桥
brctl addif br-test-vlan veth01
brctl addif br-test-vlan veth02
#启动设备
ip link set dev br-test-vlan up
ip link set dev veth01 up
ip link set dev veth02 up
ip link set dev veth10 up
ip link set dev veth20 up
#创建网络名字空间
ip netns add test-vlan-vm01
ip netns add test-vlan-vm02
#将设备对儿的另一端添加到另个名字空间(其实在一个名字空间也能玩,只是两个名字空间更加形象)
ip link set veth10 netns test-vlan-vm01
ip link set veth20 netns test-vlan-vm02
#分别进入两个名字空间创建vlan和配置ip
#配置名字空间test-vlan-vm01
ip netns exec test-vlan-vm01 bash
#配置vlan 3001 和 vlan 3002
vconfig add veth10 3001
vconfig add veth10 3002
#启动两个vlan的设备
ip link set veth10.3001 up
ip link set veth10.3002 up
#分别在两个vlan上配置ip (这里简单起见,使用了同一个网段了IP,缺点是,需要了解一点儿路由的知识)
ip a add 172.16.30.1/24 dev veth10.3001
ip a add 172.16.30.2/24 dev veth10.3002
#添加路由
route add 172.16.30.21 dev veth10.3001
route add 172.16.30.22 dev veth10.3002
#配置名字空间test-vlan-vm02
ip netns exec test-vlan-vm02 bash
#配置vlan 3001 和 vlan 3002
vconfig add veth20 3001
vconfig add veth20 3002
#启动两个vlan的设备
ip link set veth20.3001 up
ip link set veth20.3002 up
#分别在两个vlan上配置ip (这里简单起见,使用了同一个网段了IP,缺点是,需要了解一点儿路由的知识)
ip a add 172.16.30.21/24 dev veth20.3001
ip a add 172.16.30.22/24 dev veth20.3002
#添加路由
route add 172.16.30.1 dev veth20.3001
route add 172.16.30.2 dev veth20.3002
Check the vlan configuration:
# cat /proc/net/vlan/config
VLAN Dev name | VLAN ID
Name-Type: VLAN_NAME_TYPE_RAW_PLUS_VID_NO_PAD
veth10.3001 | 3001 | veth10
veth10.3002 | 3002 | veth10
Now, we can ping the other in the two namespaces respectively Although both IPs in the namespace can be pinged successfully, the source IPs used are different and the vlans used are also different. We can use any one of veth01/veth10/veth02/veth20/br-test-vlan Capture the packet and you will see the vlan information:
# tcpdump -i veth10 -nn -e
tcpdump: verbose output suppressed, use -v or -vv for full protocol decode
listening on veth10, link-type EN10MB (Ethernet), capture size 262144 bytes
15:38:18.381010 82:f7:0e:2d:3f:62 > 9e:58:72:fa:11:15, ethertype 802.1Q (0x8100), length 102: vlan <span style="color: #ff0000;">3001</span>, p 0, ethertype IPv4, <strong><span style="color: #ff0000;">172.16.30.1 > 172.16.30.21</span></strong>: ICMP echo request, id 19466, seq 1, length 64
15:38:18.381183 9e:58:72:fa:11:15 > 82:f7:0e:2d:3f:62, ethertype 802.1Q (0x8100), length 102: vlan <span style="color: #ff0000;"><strong>3001</strong></span>, p 0, ethertype IPv4, 172.16.30.21 > 172.16.30.1: ICMP echo reply, id 19466, seq 1, length 64
15:38:19.396796 82:f7:0e:2d:3f:62 > 9e:58:72:fa:11:15, ethertype 802.1Q (0x8100), length 102: vlan 3001, p 0, ethertype IPv4, 172.16.30.1 > 172.16.30.21: ICMP echo request, id 19466, seq 2, length 64
15:38:19.396859 9e:58:72:fa:11:15 > 82:f7:0e:2d:3f:62, ethertype 802.1Q (0x8100), length 102: vlan 3001, p 0, ethertype IPv4, 172.16.30.21 > 172.16.30.1: ICMP echo reply, id 19466, seq 2, length 64
15:38:23.162052 82:f7:0e:2d:3f:62 > 9e:58:72:fa:11:15, ethertype 802.1Q (0x8100), length 102: vlan 3002, p 0, ethertype IPv4, 172.16.30.2 > <strong><span style="color: #ff0000;">172.16.30.22</span></strong>: ICMP echo request, id 19473, seq 1, length 64
15:38:23.162107 9e:58:72:fa:11:15 > 82:f7:0e:2d:3f:62, ethertype 802.1Q (0x8100), length 102: vlan 3002, p 0, ethertype IPv4, <strong><span style="color: #ff0000;">172.16.30.22 > 172.16.30.2</span></strong>: ICMP echo reply, id 19473, seq 1, length 64
If you try to ping 172.16.30.22 from veth10.3001, it will not work because it is a different vlan:
# ping -I veth10.3001 172.16.30.22
PING 172.16.30.22 (172.16.30.22) from 172.16.30.1 veth10.3001: 56(84) bytes of data.
^C
--- 172.16.30.22 ping statistics ---
9 packets transmitted, 0 received, 100% packet loss, time 8231ms
does not apply to vconfig Solution:
ip link add link veth10 name veth10.3001 type vlan id 3001
Another: vlan is generally named after the device name.vlanid, but it is not mandatory. It is okay to name it vlan3003 as follows
# ip link add link veth10 name vlan3003 type vlan id 3003
Note: It is better to have the same vlan on a master device The sub-device can only have at most one
# ip link add link veth10 name vlan3001 type vlan id 3001
 RTNETLINK answers: File exists
. Therefore, normally speaking, it is usually like this:

Related recommendations:
The above is the detailed content of Detailed explanation of linux vlan configuration. For more information, please follow other related articles on the PHP Chinese website!


