
 Backend Development
PHP Tutorial
Example analysis of PHPMailer sending emails in PHP_php example
Backend Development
PHP Tutorial
Example analysis of PHPMailer sending emails in PHP_php example
Example analysis of PHPMailer sending emails in PHP_php example

This article uses QQ mailbox as an example to explain the usage methods and techniques of PHPMaIiler. The following uses QQ mailbox as an example to introduce PHPMaIiler according to these four aspects. Use, follow the editor to learnPHPMaIilerSend Email
Introduction to PHPMailer Step 1: Enable QQ mailbox to send mail Step 2: Enable PHP to use QQ mailbox to send mail Step 3: Write Send email code ThinkPHP uses PHPMailer to send emails
Introduction to PHPMailer
Can run on any platform; supports SMTP authentication; specifies multiple recipients when sending emails , Cc address, Bcc address and reply address; Note: Adding Cc and Bcc is only supported by SMTP mode under the win platform; supports multiple email encodings including: 8bit, base64, binary and quoted-printable; customizable email header information , which is similar to sending header information through the header function in PHP. It supports making the email body into HTMl content, then you can insert pictures into the email body; tested and compatible SMTP servers include: Sendmail, qmail, Postfix, Imail, Exchange, etc.
Step 1: Enable QQ mailbox to send mail
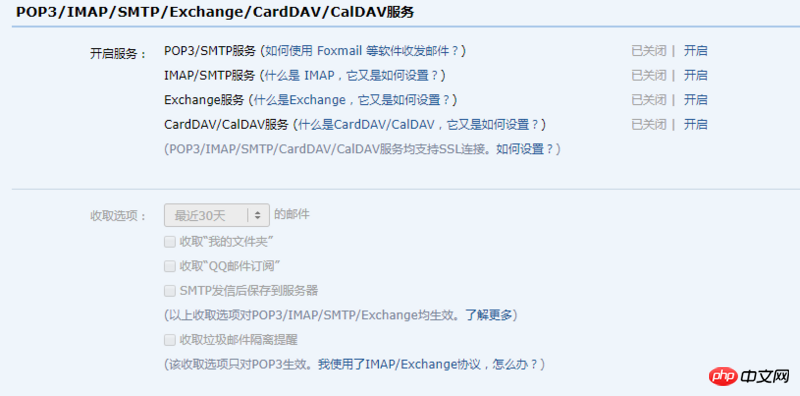
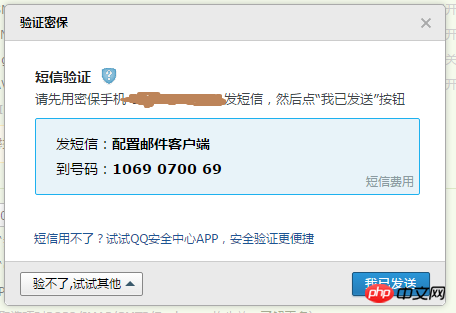
Our mailbox can originally send mail, but we need to realize sending it on our website Email, then we need to set up our QQ mailbox, because our website now exists as a third-party client, so we need to use an SMTP server to send it. It is recommended to turn on the first two items here. Got it!
Enter QQ mailbox->Click settings->Click account
Step 2: Enable PHP to use QQ mailbox to send mail
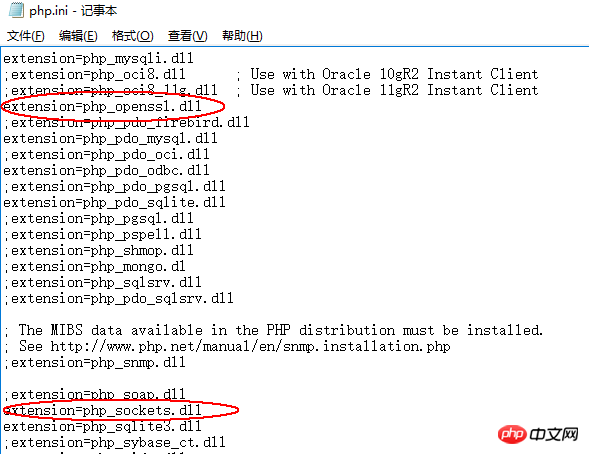
PHPMailer requires PHP's socket extension support, and PHPMailer links to the qq domain name mailbox It requires SSL encryption and PHP openssl extension support. You can use phpinfo to check whether the extension is enabled.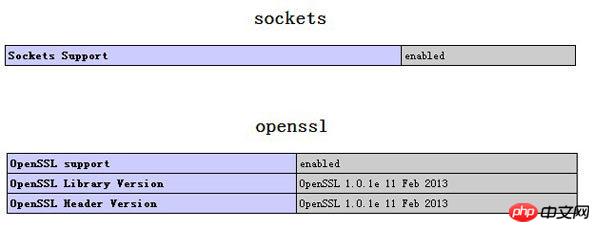
Step 3: Write the code to send the email
index.html code is as follows:<!doctype html> <html lang="en"> <head> <meta charset="UTF-8"> <title>Document</title> </head> <body> <form action="./index.php" method="post" > 邮箱:<input type="text" id="mail" name="mail"/> 标题:<input type="text" id="title" name="title"/> 内容<input type="text" id="content" name="content"/> <input type="submit" value="发送"/> </form> </body> </html>
/**
 *发送邮件方法
 *@param $to:接收者 $title:标题 $content:邮件内容
 *@return bool true:发送成功 false:发送失败
 */
function sendMail($to,$title,$content){
 require_once("phpmailer/class.phpmailer.php");
 require_once("phpmailer/class.smtp.php");
 //实例化PHPMailer核心类
 $mail = new PHPMailer();
 //使用smtp鉴权方式发送邮件
 $mail->isSMTP();
 //smtp需要鉴权 这个必须是true
 $mail->SMTPAuth=true;
 //链接qq域名邮箱的服务器地址
 $mail->Host = 'smtp.qq.com';
 //设置使用ssl加密方式登录鉴权
 $mail->SMTPSecure = 'ssl';
 //设置ssl连接smtp服务器的远程服务器端口号,以前的默认是25,但是现在新的好像已经不可用了 可选465或587
 $mail->Port = 465;
 //设置发件人的主机域 可有可无 默认为localhost 内容任意,建议使用你的域名
 $mail->Hostname = 'http://www.lsgogroup.com';
 //设置发送的邮件的编码 可选GB2312 我喜欢utf-8 据说utf8在某些客户端收信下会乱码
 $mail->CharSet = 'UTF-8';
 //设置发件人姓名(昵称) 任意内容,显示在收件人邮件的发件人邮箱地址前的发件人姓名
 $mail->FromName = '发件人姓名(昵称)';
 //smtp登录的账号 这里填入字符串格式的qq号即可
 $mail->Username ='12345678@qq.com';
 //smtp登录的密码 使用生成的授权码(就刚才保存的最新的授权码)
 $mail->Password = '最新的授权码';
 //设置发件人邮箱地址 这里填入上述提到的“发件人邮箱”
 $mail->From = '12345678@qq.com';
 //邮件正文是否为html编码 注意此处是一个方法 不再是属性 true或false
 $mail->isHTML(true);
 //设置收件人邮箱地址 该方法有两个参数 第一个参数为收件人邮箱地址 第二参数为给该地址设置的昵称 不同的邮箱系统会自动进行处理变动 这里第二个参数的意义不大
 $mail->addAddress($to,'尊敬的客户');
 //添加多个收件人 则多次调用方法即可
 // $mail->addAddress('xxx@163.com','尊敬的客户');
 //添加该邮件的主题
 $mail->Subject = $title;
 //添加邮件正文 上方将isHTML设置成了true,则可以是完整的html字符串
 $mail->Body = $content;
 $status = $mail->send();
 //判断与提示信息
 if($status) {
  return true;
 }else{
  return false;
 }
}
##index.
<?php
require_once("./functions.php");
$to=$_POST['mail'];
$title=$_POST['title'];
$content=$_POST['content'];
$flag = sendMail($to,$title,$content);
if($flag){
echo "发送邮件成功!";
}else{
echo "发送邮件失败!";
}
?>
If you are using QQ corporate mailbox, then the server address linking the qq domain name mailbox and the password for smtp login are different. :
//链接qq域名邮箱的服务器地址
$mail->Host = 'smtp.exmail.qq.com';
//smtp登录的密码 (QQ企业邮箱的登录密码)
$mail->Password = '登录密码';
ThinkPHP uses PHPMailer to send emails
PHPMailer Unzip to ThinkPHPLibraryVendor
Create new function.php in the Common folder
/**
 * 邮件发送函数
 * @param $to:接收者 $title:标题 $content:邮件内容
 * @return bool true:发送成功 false:发送失败
 */
function sendMail($to, $title, $content) {
 Vendor('PHPMailer.PHPMailerAutoload');
 Vendor('PHPMailer.class.smtp');
 $mail = new PHPMailer(); //实例化
 $mail->IsSMTP(); // 启用SMTP
 $mail->Host=C('MAIL_HOST'); //smtp服务器的名称
 $mail->SMTPSecure = C('MAIL_SECURE');
 $mail->Port = C('MAIL_PORT');
 $mail->SMTPAuth = C('MAIL_SMTPAUTH'); //启用smtp认证
 $mail->Username = C('MAIL_USERNAME'); //你的邮箱名
 $mail->Password = C('MAIL_PASSWORD') ; //邮箱密码
 $mail->From = C('MAIL_FROM'); //发件人地址(也就是你的邮箱地址)
 $mail->FromName = C('MAIL_FROMNAME'); //发件人姓名
 $mail->AddAddress($to,"尊敬的客户");
 $mail->WordWrap = 50; //设置每行字符长度
 $mail->IsHTML(C('MAIL_ISHTML')); // 是否HTML格式邮件
 $mail->CharSet=C('MAIL_CHARSET'); //设置邮件编码
 $mail->Subject =$title; //邮件主题
 $mail->Body = $content; //邮件内容
 $mail->AltBody = "您好"; //邮件正文不支持HTML的备用显示
 return($mail->Send());
}
Add
configuration File// 配置邮件发送服务器 'MAIL_HOST' =>'smtp.qq.com',//smtp服务器的名称 'MAIL_SMTPAUTH' =>true, //启用smtp认证 'MAIL_USERNAME' =>'12345678@qq.com',//你的邮箱名 'MAIL_FROM' =>'12345678@qq.com',//发件人地址 'MAIL_FROMNAME'=>'12345678@qq.com',//发件人姓名 'MAIL_PASSWORD' =>'xxxxxx,//邮箱密码 'MAIL_CHARSET' =>'utf-8',//设置邮件编码 'MAIL_ISHTML' =>TRUE, // 是否HTML格式邮件 'MAIL_PORT' =>'465',//设置ssl连接smtp服务器的远程服务器端口号 'MAIL_SECURE' =>'ssl',//设置使用ssl加密方式登录鉴权
Finally, use
PHPMailer to send the email<!doctype html> <html lang="en"> <head> <meta charset="UTF-8"> <title>Document</title> </head> <body> <form action="/index.php/Admin/test/add" method="post" enctype="multipart/form-data"> 邮箱:<input type="text" id="mail" name="mail"/> 标题:<input type="text" id="title" name="title"/> 内容<input type="text" id="content" name="content"/> <input type="submit" value="发送"/> </form> </body> </html>
public function add(){
  if(sendMail($_POST['mail'],$_POST['title'],$_POST['content']))
   echo "发送成功";
  else
   echo "发送失败";
}The above is all the content of sending emails by PHPMailer in PHP. I hope it can be helpful to everyone! !
Related recommendations:
Analysis of how to send emails using PHPMailer in PHP
PHPMailer method to send email with attachments in php_PHP tutorialPHPMailer method to send email with attachments in phpThe above is the detailed content of Example analysis of PHPMailer sending emails in PHP_php example. For more information, please follow other related articles on the PHP Chinese website!

Hot AI Tools

Undresser.AI Undress
AI-powered app for creating realistic nude photos

AI Clothes Remover
Online AI tool for removing clothes from photos.

Undress AI Tool
Undress images for free

Clothoff.io
AI clothes remover

AI Hentai Generator
Generate AI Hentai for free.

Hot Article
Hot Tools

Notepad++7.3.1
Easy-to-use and free code editor

SublimeText3 Chinese version
Chinese version, very easy to use

Zend Studio 13.0.1
Powerful PHP integrated development environment

Dreamweaver CS6
Visual web development tools

SublimeText3 Mac version
God-level code editing software (SublimeText3)
Hot Topics


 CakePHP Project Configuration
Sep 10, 2024 pm 05:25 PM
CakePHP Project Configuration
Sep 10, 2024 pm 05:25 PM
In this chapter, we will understand the Environment Variables, General Configuration, Database Configuration and Email Configuration in CakePHP.
 PHP 8.4 Installation and Upgrade guide for Ubuntu and Debian
Dec 24, 2024 pm 04:42 PM
PHP 8.4 Installation and Upgrade guide for Ubuntu and Debian
Dec 24, 2024 pm 04:42 PM
PHP 8.4 brings several new features, security improvements, and performance improvements with healthy amounts of feature deprecations and removals. This guide explains how to install PHP 8.4 or upgrade to PHP 8.4 on Ubuntu, Debian, or their derivati
 CakePHP Date and Time
Sep 10, 2024 pm 05:27 PM
CakePHP Date and Time
Sep 10, 2024 pm 05:27 PM
To work with date and time in cakephp4, we are going to make use of the available FrozenTime class.
 CakePHP File upload
Sep 10, 2024 pm 05:27 PM
CakePHP File upload
Sep 10, 2024 pm 05:27 PM
To work on file upload we are going to use the form helper. Here, is an example for file upload.
 CakePHP Routing
Sep 10, 2024 pm 05:25 PM
CakePHP Routing
Sep 10, 2024 pm 05:25 PM
In this chapter, we are going to learn the following topics related to routing ?
 Discuss CakePHP
Sep 10, 2024 pm 05:28 PM
Discuss CakePHP
Sep 10, 2024 pm 05:28 PM
CakePHP is an open-source framework for PHP. It is intended to make developing, deploying and maintaining applications much easier. CakePHP is based on a MVC-like architecture that is both powerful and easy to grasp. Models, Views, and Controllers gu
 CakePHP Working with Database
Sep 10, 2024 pm 05:25 PM
CakePHP Working with Database
Sep 10, 2024 pm 05:25 PM
Working with database in CakePHP is very easy. We will understand the CRUD (Create, Read, Update, Delete) operations in this chapter.
 CakePHP Creating Validators
Sep 10, 2024 pm 05:26 PM
CakePHP Creating Validators
Sep 10, 2024 pm 05:26 PM
Validator can be created by adding the following two lines in the controller.
