

In-depth understanding of Vue global API

Does everyone know the API? This article mainly introduces an in-depth understanding of the global API of Vue official documentation. The editor thinks it is quite good, so I will share it with you now and give it as a reference. Let’s follow the editor to take a look, I hope it can help everyone.
Vue.extend
The configuration item data must be function, otherwise the configuration is invalid. The merging rules of data (you can see "Vue Official Documentation - Global Configuration") source code is as follows:
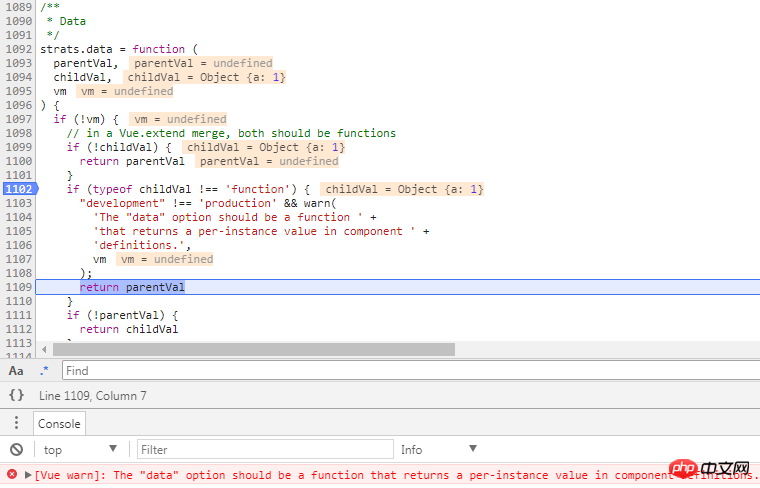
Pass in non-function type data (the data in the picture above Configured as {a:1}), when merging options, if data is not of function type, the development version will issue a warning and then directly return parentVal, which means that the data option passed in by extend is ignored.
We know that when instantiating Vue, data can be an object. Aren't the merging rules here universal? Note that there is an if(!vm) judgment above. vm has a value when instantiated, so it is different from Vue.extend. In fact, the following comments also explain it (in a Vue.extend merge, both should be function) , which is why the official documentation says data is a special case.
In addition, the "subclass" mentioned in the official document is because Vue.extend returns a function that "inherits" Vue. The source code structure is as follows:
Vue.extend = function (extendOptions) {
  //***
  var Super = this;
  var SuperId = Super.cid;
  //***
  var Sub = function VueComponent(options) {
    this._init(options);
  };
  Sub.prototype = Object.create(Super.prototype);
  Sub.prototype.constructor = Sub;
  //***
  return Sub
};Vue.nextTick
Since you use vue, of course you have to think in a data-driven way. The so-called data-driven means not to directly operate dom, dom All operations can be completed using various instructions of vue. The instructions "bind" the data to the dom. Operating data can not only update the dom, but also be more convenient.
If the browser supports Promise, or uses the Promise library (but the one exposed to the outside must be called Promise, because the judgment in the source code is typeof Promise !== 'undefined'), nextTick returns Promise object.
Vue.nextTick().then(() => {
  // do sth
})The callback for Vue to execute nextTick uses the call method cb.call(ctx); ctx is the current Vue instance, so you can directly use this call in the callback The configuration of the instance.
nextTick can be simply understood as placing the callback at the end for execution. If Promise and MutationObserver are not currently supported in the source code, the setTimeout method will be used to execute the callback. Isn't this the common way we delay the execution of code.
 if (typeof Promise !== 'undefined' && isNative(Promise)) {
 } else if (typeof MutationObserver !== 'undefined' && (
     isNative(MutationObserver) ||
     // PhantomJS and iOS 7.x
     MutationObserver.toString() === '[object MutationObserverConstructor]'
   )) {
 } else {
   // fallback to setTimeout
   /* istanbul ignore next */
   timerFunc = function () {
     setTimeout(nextTickHandler, 0);
   };
} Let’s take an example to see it in practice:
<p id="app">
<p ref="dom">{{a}}</p>
</p>
new Vue({
el: '#app',
data: {
a: 1
},
mounted: function name(params) {
console.log('start');
this.$nextTick(function () {
console.log('beforeChange', this.$refs.dom.textContent)
})
this.a = 2;
console.log('change');
this.$nextTick(function () {
console.log('afterChange', this.$refs.dom.textContent)
})
console.log('end');
}
})
// 控制台依次打印
// start
// change
// end
// beforeChange 1
// afterChange 2You may have some I wonder, since they are executed last, why does beforeChange output 1 instead of 2? This is because the dom update triggered behind this.a=2 also uses nextTick. The actual execution order of the above code is: beforeChange> update dom>afterChange.
Vue.set
Vue.set( target, key, value ), the target cannot be a Vue instance, or the root data object of a Vue instance, because it is done in the source code The following judgment is made:
var ob = (target).__ob__;
if (target._isVue || (ob && ob.vmCount)) {
"development" !== 'production' && warn(
  'Avoid adding reactive properties to a Vue instance or its root $data ' +
  'at runtime - declare it upfront in the data option.'
);
return val
}target._isVue prevents adding attributes to the Vue instance, ob && ob.vmCount prevents adding attributes to the root data object of the Vue instance .
Vue.delete
If Vue can detect the delete operation, then this API will not appear. If you must use delete to delete the $data attribute, use Vue.delete, otherwise the dom update will not be triggered.
Same as Vue.set, the target of Vue.delete(target, key) cannot be a Vue example or the root data object of a Vue example. The blocking method in the source code is the same as Vue.set.
In version 2.2.0+, if the target is an array, the key is the array subscript. Because Vue.delete actually uses splice to delete an array, although delete can be used to delete an array, the position is still there and cannot be considered a true deletion.
var a = [1, 2, 3];
delete a[0];
console.log(a); // [undefined, 2, 3]
Vue.use
Vue.use The source code is relatively simple and can be posted in full.
Vue.use = function (plugin) {
  var installedPlugins = (this._installedPlugins || (this._installedPlugins = []));
  if (installedPlugins.indexOf(plugin) > -1) {
    return this
  }
  // additional parameters
  var args = toArray(arguments, 1);
  args.unshift(this);
  if (typeof plugin.install === 'function') {
    plugin.install.apply(plugin, args);
  } else if (typeof plugin === 'function') {
    plugin.apply(null, args);
  }
  installedPlugins.push(plugin);
  return this
};The installed plug-ins are placed in installedPlugins. Before installing the plug-in, use installedPlugins.indexOf(plugin) to determine whether the plug-in has been installed, thereby preventing multiple registrations of the same plug-in. Second-rate.
The plug-in type is object, and the install attribute must be specified to install the plug-in (typeof plugin.install === 'function'). In addition, plug-in execution uses plugin.install.apply(plugin, args);, Therefore this accesses other properties of object. The args here are the parameters other than plugin passed in by Vue (args.unshift(this);) and Vue.use (toArray(arguments, 1), 1 means intercepting starting from arguments[1]).
Vue.use({
  a: 1,
  install: function (Vue) {
    console.log(this.a) // 1
    console.log(arguments) // [function Vue(options),"a", "b", "c"]
  }
}, 'a', 'b', 'c')The plug-in type is function, and the installation calls plugin.apply(null, args);, so in strict mode the plug-in runtime context this is null, not Strict mode is Window.
'use strict'
Vue.use(function plugin() {
  console.log(this) // null
  console.log(arguments) // [function Vue(options),"a", "b", "c"]
}, 'a', 'b', 'c')Vue.compile
和众多 JS 模板引擎的原理一样,预先会把模板转化成一个 render 函数,Vue.compile 就是来完成这个工作的,目标是将模板(template 或 el)转化成 render 函数。
Vue.compile 返回了{render:Function,staticRenderFns:Array},render 可直接应用于 Vue 的配置项 render,而 staticRenderFns 是怎么来的,而且按照官网的例子,Vue 还有个隐藏的配置项 staticRenderFns,先来个例子看看。
var compiled = Vue.compile(
'<p>' +
'<header><h1>no data binding</h1></header>' +
'<section>{{prop}}</section>' +
'</p>'
)
console.log(compiled.render.toString())
console.log(compiled.staticRenderFns.toString())
// render
function anonymous() {
with(this) {
return _c('p', [_m(0), _c('section', [_v(_s(prop))])])
}
}
// staticRenderFns
function anonymous() {
with(this) {
return _c('header', [_c('h1', [_v("no data binding")])])
}
}原来没有和数据绑定的 dom 会放到 staticRenderFns 中,然后在 render 中以_m(0)来调用。但是并不尽然,比如上述模板去掉
,staticRenderFns 长度为 0,header 直接放到了 render 函数中。
function anonymous() {
  with(this) {
    return _c('p', [_c('header', [_v("no data binding")]), _c('section', [_v(_s(prop))])])
  }
}Vue.compile 对应的源码比较复杂,上述渲染
 // For a node to qualify as a static root, it should have children that
 // are not just static text. Otherwise the cost of hoisting out will
 // outweigh the benefits and it's better off to just always render it fresh.
 if (node.static && node.children.length && !(
     node.children.length === 1 &&
     node.children[0].type === 3
   )) {
   node.staticRoot = true;
   return
 } else {
   node.staticRoot = false;
}另外官网说明了此方法只在独立构建时有效,什么是独立构建?这个官网做了详细的介绍,不再赘述。对应官网地址:对不同构建版本的解释。
仔细观察编译后的 render 方法,和我们自己写的 render 方法有很大区别。但是仍然可以直接配置到 render 配置选项上。那么里面的那些 _c()、_m() 、_v()、_s() 能调用?随便看一个 Vue 的实例的 __proto__ 就会发现:
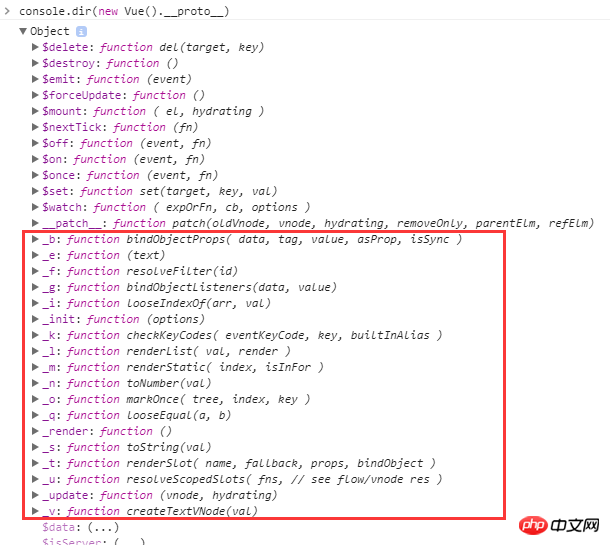
// internal render helpers.
// these are exposed on the instance prototype to reduce generated render
// code size.
Vue.prototype._o = markOnce;
Vue.prototype._n = toNumber;
Vue.prototype._s = toString;
Vue.prototype._l = renderList;
Vue.prototype._t = renderSlot;
Vue.prototype._q = looseEqual;
Vue.prototype._i = looseIndexOf;
Vue.prototype._m = renderStatic;
Vue.prototype._f = resolveFilter;
Vue.prototype._k = checkKeyCodes;
Vue.prototype._b = bindObjectProps;
Vue.prototype._v = createTextVNode;
Vue.prototype._e = createEmptyVNode;
Vue.prototype._u = resolveScopedSlots;
Vue.prototype._g = bindObjectListeners;
正如注释所说,这些方法是为了减少生成的 render 函数的体积。
全局 API 还剩 directive、filter、component、mixin,这几个比较类似,而且都对应着配置项,会在「选项」中再详细介绍。
相关推荐:
The above is the detailed content of In-depth understanding of Vue global API. For more information, please follow other related articles on the PHP Chinese website!

Hot AI Tools

Undresser.AI Undress
AI-powered app for creating realistic nude photos

AI Clothes Remover
Online AI tool for removing clothes from photos.

Undress AI Tool
Undress images for free

Clothoff.io
AI clothes remover

Video Face Swap
Swap faces in any video effortlessly with our completely free AI face swap tool!

Hot Article
Hot Tools

Notepad++7.3.1
Easy-to-use and free code editor

SublimeText3 Chinese version
Chinese version, very easy to use

Zend Studio 13.0.1
Powerful PHP integrated development environment

Dreamweaver CS6
Visual web development tools

SublimeText3 Mac version
God-level code editing software (SublimeText3)
Hot Topics
 1390
1390
 52
52

 Insufficient memory or disk space to repagin or print this document Word error
Feb 19, 2024 pm 07:15 PM
Insufficient memory or disk space to repagin or print this document Word error
Feb 19, 2024 pm 07:15 PM
This article will introduce how to solve the problem of insufficient memory or disk space to repage or print the document in Microsoft Word. This error usually occurs when users try to print a Word document. If you encounter a similar error, please refer to the suggestions provided in this article to resolve it. Insufficient memory or disk space to repage or print this document Word error How to resolve the Microsoft Word printing error "There is not enough memory or disk space to repage or print the document." Update Microsoft Office Close memory-hogging applications Change your default printer Start Word in safe mode Rename the NorMal.dotm file Save the Word file as another
 How to add redline to Word document
Mar 01, 2024 am 09:40 AM
How to add redline to Word document
Mar 01, 2024 am 09:40 AM
It is 395 words, which is 495. This article will show you how to add red lines in Word documents. Redlining a document refers to making modifications to the document so that users can clearly see the changes. This feature is very important when multiple people are editing a document together. What redline means Marking a document Redlining means using red lines or callouts to indicate changes, edits, or revisions to a document. The term was inspired by the practice of using a red pen to mark printed documents. Redline comments are widely used in different scenarios, such as clearly showing recommended changes to authors, editors, and reviewers when editing a document. Propose changes and modifications in legal agreements or contracts Provide constructive criticism and suggestions on papers, presentations, etc. How to give W
 Can't open hyperlink in word document
Feb 18, 2024 pm 06:10 PM
Can't open hyperlink in word document
Feb 18, 2024 pm 06:10 PM
In recent years, with the continuous development of network technology, our lives are inseparable from various digital tools and the Internet. When processing documents, especially in writing, we often use word documents. However, sometimes we may encounter a difficult problem, that is, the hyperlink in the word document cannot be opened. This issue will be discussed below. First of all, we need to make it clear that hyperlinks refer to links added in word documents to other documents, web pages, directories, bookmarks, etc. When we click on these links, I
 Learn the os.Stdout.Write function in the Go language documentation to implement standard output
Nov 03, 2023 pm 03:48 PM
Learn the os.Stdout.Write function in the Go language documentation to implement standard output
Nov 03, 2023 pm 03:48 PM
Learn the os.Stdout.Write function in the Go language documentation to implement standard output. In the Go language, standard output is implemented through os.Stdout. os.Stdout is a variable of type *os.File, which represents the standard output device. In order to output content to standard output, you can use the os.Stdout.Write function. This article will introduce how to use the os.Stdout.Write function to implement standard output and provide specific code examples. os.
 Word document is blank when opening on Windows 11/10
Mar 11, 2024 am 09:34 AM
Word document is blank when opening on Windows 11/10
Mar 11, 2024 am 09:34 AM
When you encounter a blank page issue when opening a Word document on a Windows 11/10 computer, you may need to perform repairs to resolve the situation. There are various sources of this problem, one of the most common being a corrupted document itself. Furthermore, corruption of Office files may also lead to similar situations. Therefore, the fixes provided in this article may be helpful to you. You can try to use some tools to repair the damaged Word document, or try to convert the document to another format and reopen it. In addition, checking whether the Office software in the system needs to be updated is also a way to solve this problem. By following these simple steps, you may be able to fix Word document blank when opening Word document on Win
 Interpretation of Java documentation: Detailed introduction to the substring() method of the StringBuilder class
Nov 03, 2023 pm 04:31 PM
Interpretation of Java documentation: Detailed introduction to the substring() method of the StringBuilder class
Nov 03, 2023 pm 04:31 PM
Interpretation of Java documentation: Detailed introduction to the substring() method of the StringBuilder class Introduction: In Java programming, string processing is one of the most common operations. Java provides a series of classes and methods for string processing, among which the StringBuilder class is a commonly used choice for frequent string operations. In the StringBuilder class, the substring() method is a very useful method for intercepting substrings of strings. This article will
 How to implement the basic usage of Workerman documents
Nov 08, 2023 am 11:46 AM
How to implement the basic usage of Workerman documents
Nov 08, 2023 am 11:46 AM
Introduction to how to implement the basic usage of Workerman documents: Workerman is a high-performance PHP development framework that can help developers easily build high-concurrency network applications. This article will introduce the basic usage of Workerman, including installation and configuration, creating services and listening ports, handling client requests, etc. And give corresponding code examples. 1. Install and configure Workerman. Enter the following command on the command line to install Workerman: c
 Detailed explanation of Word document operation: merge two pages into one
Mar 26, 2024 am 08:18 AM
Detailed explanation of Word document operation: merge two pages into one
Mar 26, 2024 am 08:18 AM
Word documents are one of the most frequently used applications in our daily work and study. When working with documents, you may sometimes encounter a situation where you need to merge two pages into one. This article will introduce in detail how to merge two pages into one page in a Word document to help readers handle document layout more efficiently. In Word documents, the operation of merging two pages into one is usually used to save paper and printing costs, or to make the document more compact and neat. The following are the specific steps to merge two pages into one: Step 1: Open the Word that needs to be operated
