Vue.js is a progressive framework for building user interfaces. It only focuses on the view layer and adopts a bottom-up incremental development design. The goal is to achieve responsive data binding and combined views through the simplest possible API. components. Vue is very easy to learn. This tutorial is based on Vue 2.1.8 version test. It is very popular in programming. This article mainly introduces the detailed usage of Vue.js. Friends who need it can refer to it. I hope it can help everyone.
First of all, let’s take a look at Vue:
Vue.js is a progressive framework for building user interfaces. Unlike other heavyweight frameworks, Vue fundamentally adopts a minimum-cost, incrementally adoptable design. Vue's core library focuses solely on the view layer and is easy to integrate with other third-party libraries or existing projects. On the other hand, when combined with single-file components and libraries supported by the Vue ecosystem, Vue is also perfectly capable of powering complex single-page applications. Therefore, Vue is actually very powerful.
1.Vue.js installation and template syntax
The use of Vue is very simple. You can directly download Vue.js or import Vue.min.js to use it.
1-1 Template Syntax
Vue.js uses HTML-based template syntax, allowing developers to declaratively bind the DOM to the data of the underlying Vue instance.
At its core, Vue.js is a system that allows you to declaratively render data into the DOM using concise template syntax.
Combined with the response system, when the application state changes, Vue can intelligently calculate the minimum cost of re-rendering the component and apply it to DOM operations.
1. html template
html template: DOM-based template, the templates are parsable and valid HTML
Interpolation:
Text: use "Mustache" syntax (braces) {{ value }}; Function: Replace the attribute value on the instance. When the value changes, the interpolated content will be automatically updated. You can also use v-text="value" instead.
<p>{{ value }}<p> 等价于 <p v-text="value"></p>Native HTML: The text output by double curly brackets will not parse the HTML tag. That is to say, when the data of the instance is an html tag, it cannot be parsed but output directly. If you want to parse at this time, you can use v-html="value" instead.
new Vue({
  data:{
    value: `<span>我是一个span标签</span>`
  }
});
<p>{{ value }}<p>  页面展示 => <span>我是一个span标签</span>
<p v-html="value"><p> 页面展示 => 我是一个span标签It should be noted that sometimes due to some network delays and other reasons, users will first see {{ xxx }} in the middle of the purchase period, and then have data. If we want to avoid this effect, we can use v-text="xxxx" instead.
Properties: Use v-bind for binding, which can respond to changes.
Use javascript expressions: you can write simple expressions. (Simple ternary operations are possible, but if statements cannot be written). There will be calculated attributes in the future.
{ 1+2 }
{ true? "yes":"no" }2. String template
template string
tempalte => The attribute of the option object
The template will replace the mount Elements. The content of the mounted element will be ignored. There is only one root node. Write the HTML structure in a pair of script tags and set type="x-template".
<body>
  <p id="box">

  </p>
</body>
<script src="vue.js"></script>
<script type="text/javascript">
  document.addEventListener('DOMContentLoaded',function () {
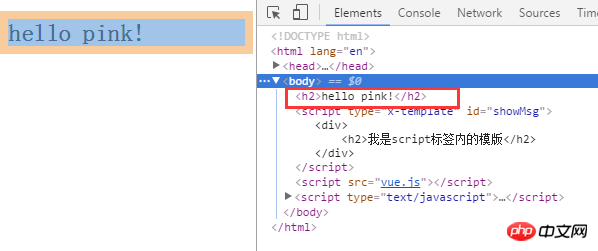
    var str = '<h2>hello pink!</h2>'
    var vm = new Vue({
      el: '#box',
      template: str
    });
  },false);
</script>
Indicates that the weight is relatively high, directly "replace" the mount point, replace the original html and display it.
//代码片段这个就是利用script标签对内定义模版,局限性:不能跨文件使用,一个页面中可以使用
<body>
  <p id="box">

  </p>
</body>
<script src="vue.js"></script>
<script type="x-template" id="str">
  <p>我是一个p标签</p>
</script>
<script type="text/javascript">
  document.addEventListener('DOMContentLoaded',function () {
    var vm = new Vue({
      el: '#box',
      template: '#str'
    });
  },false);
</script>Vue instance, each application creates a root instance (root instance) through the Vue constructor to start New Vue (option object). You need to pass in the options object, which contains hanging elements, data, templates, methods, etc.
el: Mount element selector --- String|HtmlElement
data: Proxy data --- Object|Function
methods: Definition method --- Object
Vue Proxy data data. Each Vue instance will proxy all properties in its data object. These proxied properties are responsive. The newly added attributes are not responsive and the view will not be updated after changes.
The Vue instance's own properties and methods expose its own properties and methods, starting with "$", such as: $el, $data. . .
var vm = new Vue({
    el: '#app',
    data: {
     message: 'hello,Datura!!!'
    },
    methods: {
      test (){
        alert(1);
      }
    },
    compontents:{
    //这里存放组件
    }
   });
 /* vm就是new出来的实例 */
 console.log(vm.$data);//也就是数据data,后面还有很多挂载在vm(new出来的)实例上的属性
//代码片段放在template标签里,并给一个id名
<body>
  <template id="tem">
    <p>我是template</p>
  </template>
  <p id="box">

  </p>
</body>
<script src="vue.js"></script>
<script type="text/javascript">
  document.addEventListener('DOMContentLoaded',function () {
    var vm = new Vue({
      el: '#box',
      template: '#tem'
    });
  },false);
</script>3. Template—render function
render function is very close to the editor
render => Option object properties
Data object properties
class: {}, => 绑定class,和v-bind:class一样的API
style: {}, => 绑定样式,和v-bind:style一样的API
attrs: {}, => 添加行间属性
domProps: {}, => DOM元素属性
on: {}, => 绑定事件
nativeOn: {}, => 监听原生事件
directives: {}, => 自定义指令
scopedSlots: {}, => slot作用域
slot: {}, => 定义slot名称 和组件有关系,插曹
key: "key", => 给元素添加唯一标识
ref: "ref", => 引用信息
2Vue.js的条件、循环语句
2-1条件语句
v-if :根据值的真假,切换元素会被销毁、重建; => 在dom中已消失
v-show :根据值的真假,切换元素的display属性;
v-else :条件都不符合时渲染;
v-else-if :多条件判断,为真则渲染;1. V-if
Conditional judgment uses the v-if instruction:
<p id="app">
  <p v-if="seen">现在你看到我了</p>
  <template v-if="ok">
   <p>哈哈哈,打字辛苦啊!!!</p>
  </template>
</p>
<script>
new Vue({
 el: '#app',
 data: {
  seen: true,
  ok: true
 }
})
</script>Here, the v-if instruction will determine whether to insert p based on the value of the expression seen (true or false) element.
2. v-else
You can use the v-else instruction to add an "else" block to v-if:
Randomly generate a number and determine whether it is greater than 0.5. Then output the corresponding information:
<p id="app">
  <p v-if="Math.random() > 0.5">
   Sorry
  </p>
  <p v-else>
   Not sorry
  </p>
</p>

<script>
new Vue({
 el: '#app'
})
</script>3. v-show
We can also use the v-show command to display elements based on conditions:
<p id="app">
  <h1 v-show="ok">Hello!</h1>
</p>
<script>
new Vue({
 el: '#app',
 data: {
  ok: true
 }
})
</script>4. v-else- if
v-else-if was added in 2.1.0. As the name suggests, it is used as the else-if block of v-if. Can be used multiple times in a chain:
Judge the value of the type variable:
<p id="app">
<p v-if="type === 'A'">
A
</p>
<p v-else-if="type === 'B'">
B
</p>
<p v-else-if="type === 'C'">
C
</p>
<p v-else>
Not A/B/C
</p>
</p>
<script>
new Vue({
el: '#app',
data: {
type: 'C'
}
})
</script>[Use and comparison of v-show and v-if]
① v-show : Switch the display attribute of the element based on the true or false value;
v-show elements will always be rendered and remain in the DOM.
v-show does not support template syntax.
② v-if is a true conditional rendering, because it will ensure that the conditional block properly destroys and rebuilds the event listeners and subcomponents within the conditional block during the switch.
③ v-if有更高的切换消耗而v-show有更高的初始渲染消耗。
如果需要频繁切换使用v-show更好,如果在运行时条件不大可能改变,使用v-if比较好
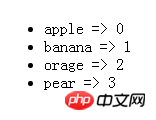
2-2 循环语句 v-for
① 语法:v-for="x in items"
x是索引;items是数组,这样进行遍历
② v-for循环是不断创建新的标签,标签里的内容,我们决定,一般都是放在数组里,然后遍历显示出来。也可以放对象 ,遍历对象。
③ 当 v-if 与 v-for 一起使用时,v-for 具有比 v-if 更高的优先级。
<body>
  <p id="app">
    <ul>
      <li v-for="(val,key) in fruitsArr">{{ val }} => {{ key }}</li> //循环出来的列表项
    </ul>
  </p>
</body>
<script src="../vue.js"></script>
<script type="text/javascript">
  document.addEventListener('DOMContentLoaded',function () {
    var vm = new Vue({
      el: '#app',
      data:{
        fruitsArr:['apple','banana','orage','pear']  //数据源
      }
    });
  },false);
</script>
总结
以上所述是小编给大家介绍的Vue.js用法详解,希望对大家有所帮助,如果大家有任何疑问请给我留言,小编会及时回复大家的。在此也非常感谢大家对脚本之家网站的支持!

学完本文之后相信大家对Vue.js有一个更深的了解,大家觉得不错的话就收藏起来吧。
相关推荐:
The above is the detailed content of Detailed explanation of the most complete usage of Vue.js. For more information, please follow other related articles on the PHP Chinese website!


