

An in-depth analysis of the principles of Vue's one-way data flow

This article mainly introduces the in-depth understanding of the principles of Vue's one-way data flow. It introduces the principle and use of Vue's one-way data flow in detail. It has certain reference value. Those who are interested can learn more. I hope it can help everyone.
What is one-way data flow
One-way data flow means that the status can only be modified from one direction. The following figure is a minimalist representation of one-way data flow:

A minimalist representation of one-way data flow
versus one-way data flow Corresponding to the two-way data flow (also called two-way binding). In a two-way data flow, a Model (can be understood as a collection of states) can modify its own state or the state of other Models, and user operations (such as inputting content in an input box) can also modify the state. This makes changing one state likely to trigger a series of state changes, making it difficult to predict what the final state will be. Makes the code difficult to debug. As shown in the figure below:
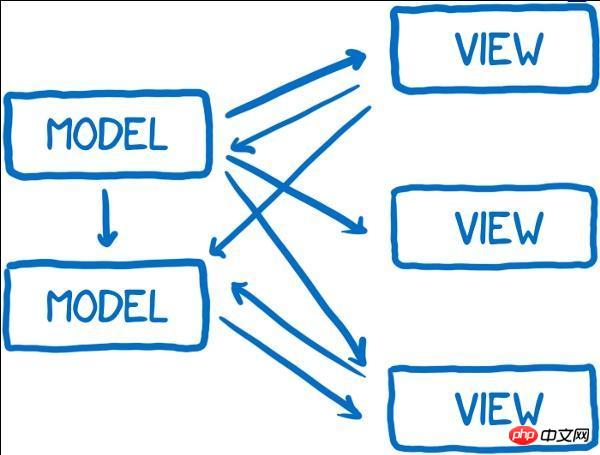
Compared with bidirectional data flow, in one-way data flow, when you need to modify the state, you have to completely restart the modification process. This limits how the state can be modified, making the state predictable and easy to debug.
Usage scenarios of one-way data flow
When multiple components share state, it becomes difficult to share the state and communicate between components (sibling components). We extract the shared state and use one-way data flow to make it easier.
Start with v-model
1. v-model is used on input elements
v-model is used It looks like two-way binding (actually...), but Vue is a single data flow, and v-model is just syntax sugar:
<input v-model="something" />
<input v-bind:value="something" v-on:input="something = $event.target.value" />
The first line The code is actually just syntactic sugar for the second line. Then the second line of code can be abbreviated like this:
<input :value="something" @input="something = $event.target.value" />
To understand this line of code, first you need to know that the input element itself has an oninput event, which is a new addition to HTML5 Similar to onchange, whenever the content of the input box changes, oninput will be triggered, and the latest value will be passed to something through $event.
We carefully observe the two lines of code of syntax sugar and original syntax, and we can draw a conclusion: When adding the v-model attribute to the input element, value will be used as the attribute of the element by default, and then 'input' Events serve as trigger events for real-time delivery of value
2. v-model is used on components
v-model can be used not only on inputs, but also on components. It can be used, take a look at the demo on the official website.
<currency-input v-model="price"></currency-input>
Vue.component('currency-input', {
template: '\
<span>\
$\
<input\
ref="input"\
v-bind:value="value"\
v-on:input="updateValue($event.target.value)"\
>\
</span>\
',
props: ['value'], // 为什么这里要用 value 属性,value在哪里定义的?
methods: {
// 不是直接更新值,而是使用此方法来对输入值进行格式化和位数限制
updateValue: function (value) {
var formattedValue = value
// 删除两侧的空格符
.trim()
// 保留 2 位小数
.slice(
0,
value.indexOf('.') === -1
? value.length
: value.indexOf('.') + 3
)
// 如果值尚不合规,则手动覆盖为合规的值
if (formattedValue !== value) {
this.$refs.input.value = formattedValue
}
// 通过 input 事件带出数值
// <!--为什么这里把 'input' 作为触发事件的事件名?`input` 在哪定义的?-->
this.$emit('input', Number(formattedValue))
}
}
})If you know the answers to these two questions, then congratulations on truly mastering v-model. If you don’t understand, you can take a look at this code:
<currency-input v-model="price"></currency-input>
所以在组件中使用时,它相当于下面的简写:
//上行代码是下行的语法糖
<currency-input :value="price" @input="price = arguments[0]"></currency-input>
So, when adding the v-model attribute to a component, the value will be used as the attribute of the component by default, and then the 'input' value will be used as the event when binding the event to the component. name. This is especially useful when writing components.
3. Disadvantages and solutions of v-model
When creating common components like check boxes or radio buttons, v-model is not easy to use. .
<input type="checkbox" v-model="something" />
v-model provides us with the value attribute and oninput event. However, what we need is not the value attribute, but the checked attribute. And when you click this single The oninput event will not be triggered when the box is selected, it will only trigger the onchange event.
Because v-model only uses input elements, this situation is easy to solve:
<input type="checkbox" :checked="value" @change="change(value, $event)"
When v-model uses components Last time:
<checkbox v-model="value"></checkbox>
Vue.component('checkbox', {
tempalte: '<input type="checkbox" @change="change" :checked="currentValue"/>'
props: ['value'],
data: function () {
return {
//这里为什么要定义一个局部变量,并用 prop 的值初始化它。
currentValue: this.value
};
},
methods: {
change: function ($event) {
this.currentValue = $event.target.checked;
this.$emit('input', this.currentValue);
}
})In Vue version 2.2, you can customize prop/event through the model option when defining a component.
4. Vue component data flow
From the analysis of v-model above, we can understand that two-way data binding is based on one-way binding. The change(input) event is added to input elements (input, textare, etc.) to dynamically modify the model and view, that is, by triggering ($emit) the event of the parent component to modify the mv to achieve the effect of mvvm. The data transfer between Vue components is one-way, that is, the data is always passed from the parent component to the child component. The child component can have its own data maintained internally, but it does not have the right to modify the data passed to it by the parent component. When developing When the author tries to do this, vue will report an error. This is done for better decoupling between components. During development, there may be multiple sub-components that depend on certain data of the parent component. If the sub-component can modify the data of the parent component, a change in the sub-component will cause all the sub-components to depend on this data. The child component has changed, so Vue does not recommend that the child component modifies the data of the parent component. Directly modifying props will throw a warning. The flow chart is as follows:

So, when you want to modify props in a child component, use the child component as a parent component, so there is
1 , define a local variable and initialize it with the value of prop.
2. Define a calculated property, process the prop value and return it.
Related recommendations:
Solutions to component data flow issues in vue.js
A PHP data flow application A small example
The above is the detailed content of An in-depth analysis of the principles of Vue's one-way data flow. For more information, please follow other related articles on the PHP Chinese website!

Hot AI Tools

Undresser.AI Undress
AI-powered app for creating realistic nude photos

AI Clothes Remover
Online AI tool for removing clothes from photos.

Undress AI Tool
Undress images for free

Clothoff.io
AI clothes remover

AI Hentai Generator
Generate AI Hentai for free.

Hot Article
Hot Tools

Notepad++7.3.1
Easy-to-use and free code editor

SublimeText3 Chinese version
Chinese version, very easy to use

Zend Studio 13.0.1
Powerful PHP integrated development environment

Dreamweaver CS6
Visual web development tools

SublimeText3 Mac version
God-level code editing software (SublimeText3)
Hot Topics
 1386
1386
 52
52

 Analysis of the function and principle of nohup
Mar 25, 2024 pm 03:24 PM
Analysis of the function and principle of nohup
Mar 25, 2024 pm 03:24 PM
Analysis of the role and principle of nohup In Unix and Unix-like operating systems, nohup is a commonly used command that is used to run commands in the background. Even if the user exits the current session or closes the terminal window, the command can still continue to be executed. In this article, we will analyze the function and principle of the nohup command in detail. 1. The role of nohup: Running commands in the background: Through the nohup command, we can let long-running commands continue to execute in the background without being affected by the user exiting the terminal session. This needs to be run
 In-depth discussion of the principles and practices of the Struts framework
Feb 18, 2024 pm 06:10 PM
In-depth discussion of the principles and practices of the Struts framework
Feb 18, 2024 pm 06:10 PM
Principle analysis and practical exploration of the Struts framework. As a commonly used MVC framework in JavaWeb development, the Struts framework has good design patterns and scalability and is widely used in enterprise-level application development. This article will analyze the principles of the Struts framework and explore it with actual code examples to help readers better understand and apply the framework. 1. Analysis of the principles of the Struts framework 1. MVC architecture The Struts framework is based on MVC (Model-View-Con
 In-depth understanding of the batch Insert implementation principle in MyBatis
Feb 21, 2024 pm 04:42 PM
In-depth understanding of the batch Insert implementation principle in MyBatis
Feb 21, 2024 pm 04:42 PM
MyBatis is a popular Java persistence layer framework that is widely used in various Java projects. Among them, batch insertion is a common operation that can effectively improve the performance of database operations. This article will deeply explore the implementation principle of batch Insert in MyBatis, and analyze it in detail with specific code examples. Batch Insert in MyBatis In MyBatis, batch Insert operations are usually implemented using dynamic SQL. By constructing a line S containing multiple inserted values
 An in-depth discussion of the functions and principles of Linux RPM tools
Feb 23, 2024 pm 03:00 PM
An in-depth discussion of the functions and principles of Linux RPM tools
Feb 23, 2024 pm 03:00 PM
The RPM (RedHatPackageManager) tool in Linux systems is a powerful tool for installing, upgrading, uninstalling and managing system software packages. It is a commonly used software package management tool in RedHatLinux systems and is also used by many other Linux distributions. The role of the RPM tool is very important. It allows system administrators and users to easily manage software packages on the system. Through RPM, users can easily install new software packages and upgrade existing software
 Detailed explanation of the principle of MyBatis paging plug-in
Feb 22, 2024 pm 03:42 PM
Detailed explanation of the principle of MyBatis paging plug-in
Feb 22, 2024 pm 03:42 PM
MyBatis is an excellent persistence layer framework. It supports database operations based on XML and annotations. It is simple and easy to use. It also provides a rich plug-in mechanism. Among them, the paging plug-in is one of the more frequently used plug-ins. This article will delve into the principles of the MyBatis paging plug-in and illustrate it with specific code examples. 1. Paging plug-in principle MyBatis itself does not provide native paging function, but you can use plug-ins to implement paging queries. The principle of paging plug-in is mainly to intercept MyBatis
 An in-depth analysis of the functions and working principles of the Linux chage command
Feb 24, 2024 pm 03:48 PM
An in-depth analysis of the functions and working principles of the Linux chage command
Feb 24, 2024 pm 03:48 PM
The chage command in the Linux system is a command used to modify the password expiration date of a user account. It can also be used to modify the longest and shortest usable date of the account. This command plays a very important role in managing user account security. It can effectively control the usage period of user passwords and enhance system security. How to use the chage command: The basic syntax of the chage command is: chage [option] user name. For example, to modify the password expiration date of user "testuser", you can use the following command
 The basic principles and methods of implementing inheritance methods in Golang
Jan 20, 2024 am 09:11 AM
The basic principles and methods of implementing inheritance methods in Golang
Jan 20, 2024 am 09:11 AM
The basic principles and implementation methods of Golang inheritance methods In Golang, inheritance is one of the important features of object-oriented programming. Through inheritance, we can use the properties and methods of the parent class to achieve code reuse and extensibility. This article will introduce the basic principles and implementation methods of Golang inheritance methods, and provide specific code examples. The basic principle of inheritance methods In Golang, inheritance is implemented by embedding structures. When a structure is embedded in another structure, the embedded structure has embedded
 Astar staking principle, income dismantling, airdrop projects and strategies & operation nanny-level strategy
Jun 25, 2024 pm 07:09 PM
Astar staking principle, income dismantling, airdrop projects and strategies & operation nanny-level strategy
Jun 25, 2024 pm 07:09 PM
Table of Contents Astar Dapp Staking Principle Staking Revenue Dismantling of Potential Airdrop Projects: AlgemNeurolancheHealthreeAstar Degens DAOVeryLongSwap Staking Strategy & Operation "AstarDapp Staking" has been upgraded to the V3 version at the beginning of this year, and many adjustments have been made to the staking revenue rules. At present, the first staking cycle has ended, and the "voting" sub-cycle of the second staking cycle has just begun. To obtain the "extra reward" benefits, you need to grasp this critical stage (expected to last until June 26, with less than 5 days remaining). I will break down the Astar staking income in detail,
