

A brief discussion on the direct style of react isomorphism

Before we talked about isomorphic server-side rendering, you can directly get out the HTML structure. Although we explained the solution to the problem of introducing static resources such as styles and pictures on the server side, we did not actually perform the relevant operations. This article will Explain how to make the style appear as straight as html. This article mainly introduces the style direct expression of react isomorphism. The editor thinks it is quite good. Now I will share it with you and give you a reference. Let’s follow the editor to take a look, I hope it can help everyone.
PS: Straight out, my understanding is to enter the url to initiate a get request to access the server, and directly get the complete response result, instead of asynchronously obtaining it through ajax.
The key elements of React isomorphism
The perfect Compponent property and life cycle and the render timing of the client are the keys to React isomorphism.
DOM consistency
Rendering the same Compponent on the front and back ends will output a consistent Dom structure.
Different life cycles
On the server side, the Component life cycle will only reach componentWillMount, while the client side is complete.
Client render timing
When isomorphic, the server combines the data to render the Component into a complete HTML string and returns the data status to the client. The client It will be judged whether it can be used directly or needs to be remounted.
The above are the basic conditions provided by React for isomorphic/server-side rendering. In actual project applications, other corner issues need to be considered. For example, there is no window object on the server side and different processing needs to be done. Below, we will share some isomorphic Tips and optimization results through specific practices on the mobile QQ home-school group
Add style files
Currently there is no style file in our project. So you need to write one first, let’s write a style file for the component App.
Installation dependencies
The following dependencies will be used later. Install them first. The function of each dependency will be explained in detail below.
Copy the code as follows:
npm install postcss-loader postcss-import postcss-cssnext postcss-nested postcss-functions css-loader style-loader isomorphic-style-loader -- save-dev
Create .pcss file
The suffix of the css file is .css, and the suffix of the less file is .less. Here I choose to use PostCSS with its plug-in to write the style. So I just defined a suffix .pcss myself.
// ./src/client/component/app/style.pcss

.root {
 color: red;
}Set a root class, and the style is to simply set the color to red. Then reference it in the App component.
// ./src/client/component/app/index.tsx

...
import * as styles from './style.pcss';
...
 public render() {
  return (
   <p className={styles.root}>hello world</p>
  );
 }
...At this time you will find something like this in the editor:

This problem occurs because ts does not know the type definition of this module, so We need to manually add custom module type definitions. Create a new @types folder in the project root directory, and create the index.d.ts file in this directory:
// ./@types/index.d.ts

declare module '*.pcss' {
 const content: any;
 export = content;
}After saving, you will not see the editor error, but the webpack packaging in the terminal will prompt an error , because we haven’t added the corresponding loader yet.
Configuring the parsing rules of .pcss files
JS has been componentized, and CSS modularization is also necessary. You no longer have to worry about avoiding duplicate class names. We export a new method in the base configuration to obtain postcss rules.
// ./src/webpack/base.ts

...
export const getPostCssRule = (styleLoader) => ({
 test: /\.pcss$/,
 use: [
  styleLoader,
  {
   loader: 'css-loader',
   options: {
    camelCase: true,
    importLoaders: 1,
    localIdentName: '[path][name]---[local]---[hash:base64:5]',
    modules: true,
   },
  },
  {
   loader: 'postcss-loader',
   options: {
    plugins: () => [
     require('postcss-import')({
      path: path.join(baseDir, './src/client/style'),
     }),
     require('postcss-cssnext'),
     require('postcss-nested'),
     require('postcss-functions')({
      functions: {
       x2(v, u) {
        return v * 2 + (u ? u : 'px');
       },
      },
     }),
    ],
   },
  },
 ],
});
...We can see from the above method that three loaders are needed to process .pcss files. From bottom to top in processing order are postcss-loader, css-loader, and a variable styleLoader. , as for what this variable is, we can see where this method is used:
// ./src/webpack/client.ts

...
(clientDevConfig.module as webpack.NewModule).rules.push(
 ...
 getPostCssRule({
  loader: 'style-loader',
 }),
 ...
);
...// ./src/webpack/server.ts
...
(clientDevConfig.module as webpack.NewModule).rules.push(
...
getPostCssRule({
loader: 'isomorphic-style-loader',
}),
...
);
...The client and server need to use different styleLoaders to process style files.
Introduction to PostCSS
PostCSS is a tool that uses js to convert css. This is the official introduction. The loader used with webpack is postcss-loader, but only a single postcss-loader is actually of little use. It needs to be matched with its plug-in to achieve powerful functions.
1. postcss-import
The reason I use this plug-in here is to avoid complex path writing when @importing in the style file. I set the path value, then It is very convenient for me to introduce the public variable style file (assuming it is called "variables.pcss") in the folder corresponding to the path into the style file at any other level. I only need to write import 'variables.pcss'; and that's it. Of course, if the corresponding file cannot be found, it will ignore the path and use the default relative path to find it.
2. postcss-cssnext
This plug-in can use the next generation of css syntax.
3. postcss-nested
This plug-in can nested writing styles.
4. postcss-functions
This plug-in can customize functions and call them in style files.
Having said that, let’s give an example of writing code~
We add a new style folder in the client directory to store some style resets, variable files and the like. . Then create two pcss files:
// ./src/client/style/variables.pcss

:root {
 --fontSizeValue: 16;
}// ./src/client/style/index.pcss
@import 'variables.pcss';
body {
margin: 0;
font-size: x2(var(--fontSizeValue));
}Introduce the index.pcss we just wrote
// ./src/client/index.tsx
...
import './style/index.pcss';
...
Introduction to CSS Modules
In short, it is css modularization, no need to worry about the overall situation Class name problem. Let’s look at the options of the above css-loader:
camelCase为true运行使用驼峰写法来写类名
importLoaders的值为N是因为在css-loader之前有N个loader已经处理过文件了,这里的N值是1,因为之前有一个postcss-loader,这个值一定要设置对,否则会影响@import语句,我的这个表述可能不是太正确,详细可参见 Clarify importLoaders documentation? 这个地方详细讲解了,我翻译一下大概意思是,这个属性的值N代表的是对于@import的文件要经过css-loader后面的N个loader的处理,英文不太好,大家可以自行理解。
localIdentName这个就是指生成的类名啦,具体看后续结果截图就一目了然了。
modules为true即启用模块化
isomorphic-style-loader
在客户端,使用style-loader,它会动态的往dom里插入style元素,而服务端由于缺少客户端的相关对象及API,所以需要isomorphic-style-loader,目前用到它只是为了避免报错哈哈,后续还有大作用,样式直出全靠它。
打包运行
注意:打包运行之前不要忘了给tsconfig.client.json和tsconfig.server.json引入我们的自定义模块定义文件index.d.ts,不然webpack编译就会报找不到pcss这种模块啦。
// ./src/webpack/tsconfig.client(server).json
...
"include": [
  ...
  "../../@types/**/*",
  ...
]
...
运行结果如下:

虽然style元素已经存在,但是这个是由style-loader生成的,并不是服务端直出的,看page source就知道了。

而且在刷新页面的时候能很明显的看到样式变化闪烁的效果。
直出样式
我们利用isomorphic-style-loader来实现服务端直出样式,原理的话根据官方介绍就是利用了react的context api来实现,在服务端渲染的过程中,利用注入的insertCss方法和高阶组件(hoc high-order component)来获取样式代码。
安装依赖
npm install prop-types --save-dev
改写App组件
根据其官方介绍,我们在不使用其整合完毕的isomorphic router的情况下,需要写一个Provider给App组件:
// ./src/client/component/app/provider.tsx

import * as React from 'react';

import * as PropTypes from 'prop-types';

class AppProvider extends React.PureComponent<any, any> {
 public static propTypes = {
  context: PropTypes.object,
 };

 public static defaultProps = {
  context: {
   insertCss: () => '',
  },
 };

 public static childContextTypes = {
  insertCss: PropTypes.func.isRequired,
 };

 public getChildContext() {
  return this.props.context;
 }

 public render() {
  return this.props.children || null;
 }
}

export default AppProvider;将原App组件里的具体内容迁移到AppContent组件里去:
// ./src/client/component/app/content.tsx

import * as React from 'react';

import * as styles from './style.pcss';

/* tslint:disable-next-line no-submodule-imports */
import withStyles from 'isomorphic-style-loader/lib/withStyles';

@withStyles(styles)
class AppContent extends React.PureComponent {
 public render() {
  return (
   <p className={styles.root}>hello world</p>
  );
 }
}

export default AppContent;新的App组件:
// ./src/client/component/app/index.tsx

import * as React from 'react';

import AppProvider from './provider';

import AppContent from './content';

class App extends React.PureComponent {
 public render() {
  return (
   <AppProvider>
    <AppContent />
   </AppProvider>
  );
 }
}

export default App;疑问一:AppProvider组件是做什么的?
答:Provider的意思是 供应者,提供者 。顾名思义,AppProvider为其后代组件提供了一些东西,这个东西就是context,它有一个insertCss方法。根据其定义,该方法拥有默认值,返回空字符串的函数,即默认没什么作用,但是可以通过props传入context来达到自定义的目的。通过设定childContextTypes和getChildContext,该组件后代凡是设定了contextTypes的组件都会拥有this.context对象,而这个对象正是getChildContext的返回值。
疑问二:AppContent为何要独立出去?
答:接上一疑问,AppProvider组件render其子组件,而要使得context这个api生效,其子组件必须是定义了contextTypes的,但是我们并没有看见AppContent有这个定义,这个是因为这个定义在高阶组件withStyles里面(参见其 源码 )。
疑问三:@withStyles是什么语法?
答:这个是装饰器,属于es7。使用该语法,需要配置tsconfig:
// ./tsconfig.json
// ./src/webpack/tsconfig.client(server).json

{
 ...
 "compilerOptions": {
  ...
  "experimentalDecorators": true,
  ...
 },
 ...
}改写服务端bundle文件
由于App组件的改写,服务端不能再复用该组件,但是AppProvider和AppContent目前还是可以复用的。
// ./src/server/bundle.tsx

import * as React from 'react';

/* tslint:disable-next-line no-submodule-imports */
import { renderToString } from 'react-dom/server';

import AppProvider from '../client/component/app/provider';

import AppContent from '../client/component/app/content';

export default {
 render() {
  const css = [];
  const context = { insertCss: (...styles) => styles.forEach((s) => css.push(s._getCss())) };
  const html = renderToString(
   <AppProvider context={context}>
    <AppContent />
   </AppProvider>,
  );
  const style = css.join('');
  return {
   html,
   style,
  };
 },
};这里我们传入了自定义的context对象,通过css这个变量来存储style信息。我们原先render函数直接返回renderToString的html字符串,而现在多了一个style,所以我们返回拥有html和style属性的对象。
疑问四:官方示例css是一个Set类型实例,这里怎么是一个数组类型实例?
答:Set是es6中新的数据结构,类似数组,但可以保证无重复值,只有tsconfig的编译选项中的target为es6时,且加入es2017的lib时才不会报错,由于我们的target是es5,所以是数组,且使用数组并没有太大问题。
处理服务端入口文件
由于bundle的render值变更,所以我们也要处理一下。
// ./src/server/index.tsx

...
router.get('/*', (ctx: Koa.Context, next) => { // 配置一个简单的get通配路由
 const renderResult = bundle ? bundle.render() : {}; // 获得渲染出的结果对象
 const { html = '', style = '' } = renderResult;
 ...
 ctx.body = `
  ...
  <head>
   ...
   ${style ? `<style>${style}</style>` : ''}
   ...
  </head>
  ...
 `;
 ...
});
...直出结果
样式直出后的page source:
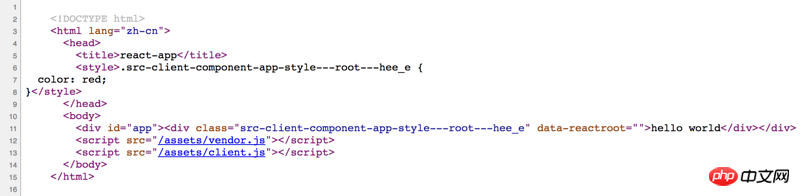
找回丢失的公共样式文件
从上面的直出结果来看,缺少./src/style/index.pcss这个样式代码,原因显而易见,它不属于任何一个组件,它是公共的,我们在客户端入口文件里引入了它。对于公共样式文件,服务端要直出这部分内容,可以这么做:
./src/server/bundle.tsx

...
import * as commonStyles from '../client/style/index.pcss';
...
const css = [commonStyles._getCss()];
...
我们利用isomorphic-style-loader提供的api可以得到这部分样式代码字符串。这样就可以得到完整的直出样式了。
相关推荐:
Node直出理论与实践总结_html/css_WEB-ITnose
The above is the detailed content of A brief discussion on the direct style of react isomorphism. For more information, please follow other related articles on the PHP Chinese website!

Hot AI Tools

Undresser.AI Undress
AI-powered app for creating realistic nude photos

AI Clothes Remover
Online AI tool for removing clothes from photos.

Undress AI Tool
Undress images for free

Clothoff.io
AI clothes remover

AI Hentai Generator
Generate AI Hentai for free.

Hot Article
Hot Tools

Notepad++7.3.1
Easy-to-use and free code editor

SublimeText3 Chinese version
Chinese version, very easy to use

Zend Studio 13.0.1
Powerful PHP integrated development environment

Dreamweaver CS6
Visual web development tools

SublimeText3 Mac version
God-level code editing software (SublimeText3)
Hot Topics


 How to build a real-time chat app with React and WebSocket
Sep 26, 2023 pm 07:46 PM
How to build a real-time chat app with React and WebSocket
Sep 26, 2023 pm 07:46 PM
How to build a real-time chat application using React and WebSocket Introduction: With the rapid development of the Internet, real-time communication has attracted more and more attention. Live chat apps have become an integral part of modern social and work life. This article will introduce how to build a simple real-time chat application using React and WebSocket, and provide specific code examples. 1. Technical preparation Before starting to build a real-time chat application, we need to prepare the following technologies and tools: React: one for building
 Guide to React front-end and back-end separation: How to achieve decoupling and independent deployment of front-end and back-end
Sep 28, 2023 am 10:48 AM
Guide to React front-end and back-end separation: How to achieve decoupling and independent deployment of front-end and back-end
Sep 28, 2023 am 10:48 AM
React front-end and back-end separation guide: How to achieve front-end and back-end decoupling and independent deployment, specific code examples are required In today's web development environment, front-end and back-end separation has become a trend. By separating front-end and back-end code, development work can be made more flexible, efficient, and facilitate team collaboration. This article will introduce how to use React to achieve front-end and back-end separation, thereby achieving the goals of decoupling and independent deployment. First, we need to understand what front-end and back-end separation is. In the traditional web development model, the front-end and back-end are coupled
 How to build simple and easy-to-use web applications with React and Flask
Sep 27, 2023 am 11:09 AM
How to build simple and easy-to-use web applications with React and Flask
Sep 27, 2023 am 11:09 AM
How to use React and Flask to build simple and easy-to-use web applications Introduction: With the development of the Internet, the needs of web applications are becoming more and more diverse and complex. In order to meet user requirements for ease of use and performance, it is becoming increasingly important to use modern technology stacks to build network applications. React and Flask are two very popular frameworks for front-end and back-end development, and they work well together to build simple and easy-to-use web applications. This article will detail how to leverage React and Flask
 macOS: How to change the color of desktop widgets
Oct 07, 2023 am 08:17 AM
macOS: How to change the color of desktop widgets
Oct 07, 2023 am 08:17 AM
In macOS Sonoma, widgets don't have to be hidden off-screen or forgotten in the Notification Center panel like they did in previous versions of Apple's macOS. Instead, they can be placed directly on your Mac’s desktop – they’re also interactive. When not in use, macOS desktop widgets fade into the background in a monochrome style, reducing distractions and allowing you to focus on the task at hand in the active application or window. However, when you click on the desktop, they return to full color. If you prefer a drab look and want to retain that aspect of uniformity on your desktop, there's a way to make it permanent. The following steps demonstrate how it is done. Open the System Settings app
 How to build a reliable messaging app with React and RabbitMQ
Sep 28, 2023 pm 08:24 PM
How to build a reliable messaging app with React and RabbitMQ
Sep 28, 2023 pm 08:24 PM
How to build a reliable messaging application with React and RabbitMQ Introduction: Modern applications need to support reliable messaging to achieve features such as real-time updates and data synchronization. React is a popular JavaScript library for building user interfaces, while RabbitMQ is a reliable messaging middleware. This article will introduce how to combine React and RabbitMQ to build a reliable messaging application, and provide specific code examples. RabbitMQ overview:
 How to build a fast data analysis application using React and Google BigQuery
Sep 26, 2023 pm 06:12 PM
How to build a fast data analysis application using React and Google BigQuery
Sep 26, 2023 pm 06:12 PM
How to use React and Google BigQuery to build fast data analysis applications Introduction: In today's era of information explosion, data analysis has become an indispensable link in various industries. Among them, building fast and efficient data analysis applications has become the goal pursued by many companies and individuals. This article will introduce how to use React and Google BigQuery to build a fast data analysis application, and provide detailed code examples. 1. Overview React is a tool for building
 React code debugging guide: How to quickly locate and solve front-end bugs
Sep 26, 2023 pm 02:25 PM
React code debugging guide: How to quickly locate and solve front-end bugs
Sep 26, 2023 pm 02:25 PM
React code debugging guide: How to quickly locate and resolve front-end bugs Introduction: When developing React applications, you often encounter a variety of bugs that may crash the application or cause incorrect behavior. Therefore, mastering debugging skills is an essential ability for every React developer. This article will introduce some practical techniques for locating and solving front-end bugs, and provide specific code examples to help readers quickly locate and solve bugs in React applications. 1. Selection of debugging tools: In Re
 React responsive design guide: How to achieve adaptive front-end layout effects
Sep 26, 2023 am 11:34 AM
React responsive design guide: How to achieve adaptive front-end layout effects
Sep 26, 2023 am 11:34 AM
React Responsive Design Guide: How to Achieve Adaptive Front-end Layout Effects With the popularity of mobile devices and the increasing user demand for multi-screen experiences, responsive design has become one of the important considerations in modern front-end development. React, as one of the most popular front-end frameworks at present, provides a wealth of tools and components to help developers achieve adaptive layout effects. This article will share some guidelines and tips on implementing responsive design using React, and provide specific code examples for reference. Fle using React
