

nginx configuration React static page tutorial

This article mainly introduces you to the relevant content about nginx configuring React static pages. The article gives you a detailed introduction to the installation of nginx and some basic operations, and then shares with you the simple version of the sample code for nginx configuration of React static pages. Not much to say below, let’s take a look at the detailed introduction.
Regarding the installation and startup of nginx and the solution to the occupation of port 80, you can also refer to this article: http://www.jb51.net/article/110291.htm
Step one: Install
1, http://nginx.org/en/download.html download
2, tar -xf nginx-1.2.0.tar.gz
.3. Enter the decompression directory chmod a+rwx *
4. ./configure --without-http_rewrite_module
5. make && make install
6, sudo /usr/local/nginx/sbin/nginx
7, browser access localhost
8 , I was surprised to find the welcome page
Step 2: Basic operation
Start
cd /usr/local/nginx/sbin
./nginx
Soft link
Start So troublesome, I want to start nginx directly!
ln -s /usr/local/nginx/sbin/nginx /usr/local/bin/nginx
View the startup configuration file
sudo nginx -t
Restart
sudo nginx -s reload
Close
ps -ef | grep nginx
kill -QUIT xxxx
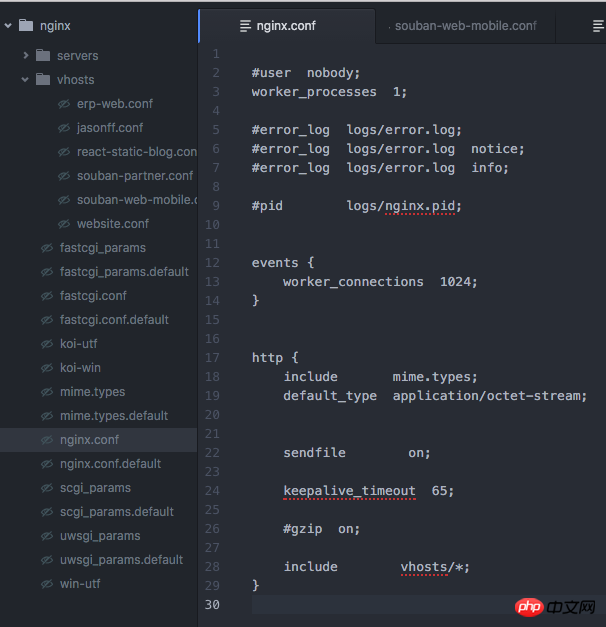
Step 3 Simple version of React static page nginx configuration
worker_processes 1;

events {
 worker_connections 1024;
}


http {
 include mime.types;
 default_type application/octet-stream;
 sendfile on;
 keepalive_timeout 65;
 server {
 listen 8080;
 server_name localhost;

 root /Users/jasonff/project/erp-web;

 location / {
  try_files $uri @fallback;
 }

 location @fallback {
  rewrite .* /index.html break;
 }

 error_page 500 502 503 504 /50x.html;
 location = /50x.html {
  root html;
 }
 }
 include servers/*;
}Some explanations:
Where is my configuration file?
If you want to know where your configuration file is, check View startup configuration file in the second step, and then write the required configuration in this file.
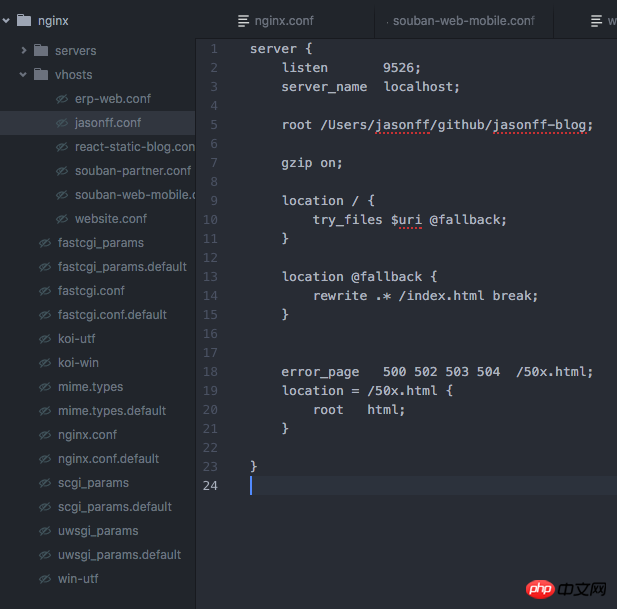
Step 4: Multiple site deployment
In the directory where the nginx.conf file is located, create a new folder vhost and create several new files, such as example1.conf , example2.conf...
server {
 listen 8030;
 server_name localhost;
 root /Users/jasonff/project/souban-website;
 location / {
 try_files $uri @fallback;
 }
 location @fallback {
 rewrite .* /index.html break;
 }
 error_page 500 502 503 504 /50x.html;
 location = /50x.html {
 root html;
 }
}Then reconfigure nginx.conf
worker_processes 1;
events {
 worker_connections 1024;
}

http {
 include mime.types;
 default_type application/octet-stream;
 sendfile on;
 keepalive_timeout 65;
 include vhosts/*;
 //加入include vhosts/*
}Appendix: Configuration introduction (dictionary query)
#运行用户
user nobody;
#启动进程,通常设置成和cpu的数量相等
worker_processes 1;

#全局错误日志及PID文件
#error_log logs/error.log;
#error_log logs/error.log notice;
#error_log logs/error.log info;

#pid logs/nginx.pid;

#工作模式及连接数上限
events {
 #epoll是多路复用IO(I/O Multiplexing)中的一种方式,
 #仅用于linux2.6以上内核,可以大大提高nginx的性能
 use epoll;

 #单个后台worker process进程的最大并发链接数
 worker_connections 1024;

 # 并发总数是 worker_processes 和 worker_connections 的乘积
 # 即 max_clients = worker_processes * worker_connections
 # 在设置了反向代理的情况下,max_clients = worker_processes * worker_connections / 4 为什么
 # 为什么上面反向代理要除以4,应该说是一个经验值
 # 根据以上条件,正常情况下的Nginx Server可以应付的最大连接数为:4 * 8000 = 32000
 # worker_connections 值的设置跟物理内存大小有关
 # 因为并发受IO约束,max_clients的值须小于系统可以打开的最大文件数
 # 而系统可以打开的最大文件数和内存大小成正比,一般1GB内存的机器上可以打开的文件数大约是10万左右
 # 我们来看看360M内存的VPS可以打开的文件句柄数是多少:
 # $ cat /proc/sys/fs/file-max
 # 输出 34336
 # 32000 < 34336,即并发连接总数小于系统可以打开的文件句柄总数,这样就在操作系统可以承受的范围之内
 # 所以,worker_connections 的值需根据 worker_processes 进程数目和系统可以打开的最大文件总数进行适当地进行设置
 # 使得并发总数小于操作系统可以打开的最大文件数目
 # 其实质也就是根据主机的物理CPU和内存进行配置
 # 当然,理论上的并发总数可能会和实际有所偏差,因为主机还有其他的工作进程需要消耗系统资源。
 # ulimit -SHn 65535

}


http {
 #设定mime类型,类型由mime.type文件定义
 include mime.types;
 default_type application/octet-stream;
 #设定日志格式
 log_format main '$remote_addr - $remote_user [$time_local] "$request" '
   '$status $body_bytes_sent "$http_referer" '
   '"$http_user_agent" "$http_x_forwarded_for"';

 access_log logs/access.log main;

 #sendfile 指令指定 nginx 是否调用 sendfile 函数(zero copy 方式)来输出文件,
 #对于普通应用,必须设为 on,
 #如果用来进行下载等应用磁盘IO重负载应用,可设置为 off,
 #以平衡磁盘与网络I/O处理速度,降低系统的uptime.
 sendfile on;
 #tcp_nopush on;

 #连接超时时间
 #keepalive_timeout 0;
 keepalive_timeout 65;
 tcp_nodelay on;

 #开启gzip压缩
 gzip on;
 gzip_disable "MSIE [1-6].";

 #设定请求缓冲
 client_header_buffer_size 128k;
 large_client_header_buffers 4 128k;


 #设定虚拟主机配置
 server {
 #侦听80端口
 listen 80;
 #定义使用 www.nginx.cn访问
 server_name www.nginx.cn;

 #定义服务器的默认网站根目录位置
 root html;

 #设定本虚拟主机的访问日志
 access_log logs/nginx.access.log main;

 #默认请求
 location / {

  #定义首页索引文件的名称
  index index.php index.html index.htm;

 }

 # 定义错误提示页面
 error_page 500 502 503 504 /50x.html;
 location = /50x.html {
 }

 #静态文件,nginx自己处理
 location ~ ^/(images|javascript|js|css|flash|media|static)/ {

  #过期30天,静态文件不怎么更新,过期可以设大一点,
  #如果频繁更新,则可以设置得小一点。
  expires 30d;
 }

 #PHP 脚本请求全部转发到 FastCGI处理. 使用FastCGI默认配置.
 location ~ .php$ {
  fastcgi_pass 127.0.0.1:9000;
  fastcgi_index index.php;
  fastcgi_param SCRIPT_FILENAME $document_root$fastcgi_script_name;
  include fastcgi_params;
 }

 #禁止访问 .htxxx 文件
  location ~ /.ht {
  deny all;
 }

 }
}Attach my picture
Related recommendations:
Detailed example of VSCode configuration React Native development environment
JS to implement static page search and highlighting
The above is the detailed content of nginx configuration React static page tutorial. For more information, please follow other related articles on the PHP Chinese website!

Hot AI Tools

Undresser.AI Undress
AI-powered app for creating realistic nude photos

AI Clothes Remover
Online AI tool for removing clothes from photos.

Undress AI Tool
Undress images for free

Clothoff.io
AI clothes remover

AI Hentai Generator
Generate AI Hentai for free.

Hot Article
Hot Tools

Notepad++7.3.1
Easy-to-use and free code editor

SublimeText3 Chinese version
Chinese version, very easy to use

Zend Studio 13.0.1
Powerful PHP integrated development environment

Dreamweaver CS6
Visual web development tools

SublimeText3 Mac version
God-level code editing software (SublimeText3)
Hot Topics
 1385
1385
 52
52

 How to check whether nginx is started
Apr 14, 2025 pm 01:03 PM
How to check whether nginx is started
Apr 14, 2025 pm 01:03 PM
How to confirm whether Nginx is started: 1. Use the command line: systemctl status nginx (Linux/Unix), netstat -ano | findstr 80 (Windows); 2. Check whether port 80 is open; 3. Check the Nginx startup message in the system log; 4. Use third-party tools, such as Nagios, Zabbix, and Icinga.
 The Benefits of React: Performance, Reusability, and More
Apr 15, 2025 am 12:05 AM
The Benefits of React: Performance, Reusability, and More
Apr 15, 2025 am 12:05 AM
React’s popularity includes its performance optimization, component reuse and a rich ecosystem. 1. Performance optimization achieves efficient updates through virtual DOM and diffing mechanisms. 2. Component Reuse Reduces duplicate code by reusable components. 3. Rich ecosystem and one-way data flow enhance the development experience.
 How to configure cloud server domain name in nginx
Apr 14, 2025 pm 12:18 PM
How to configure cloud server domain name in nginx
Apr 14, 2025 pm 12:18 PM
How to configure an Nginx domain name on a cloud server: Create an A record pointing to the public IP address of the cloud server. Add virtual host blocks in the Nginx configuration file, specifying the listening port, domain name, and website root directory. Restart Nginx to apply the changes. Access the domain name test configuration. Other notes: Install the SSL certificate to enable HTTPS, ensure that the firewall allows port 80 traffic, and wait for DNS resolution to take effect.
 How to check whether nginx is started?
Apr 14, 2025 pm 12:48 PM
How to check whether nginx is started?
Apr 14, 2025 pm 12:48 PM
In Linux, use the following command to check whether Nginx is started: systemctl status nginx judges based on the command output: If "Active: active (running)" is displayed, Nginx is started. If "Active: inactive (dead)" is displayed, Nginx is stopped.
 How to check nginx version
Apr 14, 2025 am 11:57 AM
How to check nginx version
Apr 14, 2025 am 11:57 AM
The methods that can query the Nginx version are: use the nginx -v command; view the version directive in the nginx.conf file; open the Nginx error page and view the page title.
 How to start nginx server
Apr 14, 2025 pm 12:27 PM
How to start nginx server
Apr 14, 2025 pm 12:27 PM
Starting an Nginx server requires different steps according to different operating systems: Linux/Unix system: Install the Nginx package (for example, using apt-get or yum). Use systemctl to start an Nginx service (for example, sudo systemctl start nginx). Windows system: Download and install Windows binary files. Start Nginx using the nginx.exe executable (for example, nginx.exe -c conf\nginx.conf). No matter which operating system you use, you can access the server IP
 How to start nginx in Linux
Apr 14, 2025 pm 12:51 PM
How to start nginx in Linux
Apr 14, 2025 pm 12:51 PM
Steps to start Nginx in Linux: Check whether Nginx is installed. Use systemctl start nginx to start the Nginx service. Use systemctl enable nginx to enable automatic startup of Nginx at system startup. Use systemctl status nginx to verify that the startup is successful. Visit http://localhost in a web browser to view the default welcome page.
 How to configure nginx in Windows
Apr 14, 2025 pm 12:57 PM
How to configure nginx in Windows
Apr 14, 2025 pm 12:57 PM
How to configure Nginx in Windows? Install Nginx and create a virtual host configuration. Modify the main configuration file and include the virtual host configuration. Start or reload Nginx. Test the configuration and view the website. Selectively enable SSL and configure SSL certificates. Selectively set the firewall to allow port 80 and 443 traffic.
