Yii2 implements rbac permission control
This article mainly introduces the relevant information of Yii2 rbac permission control operation step tutorial. Friends in need can refer to it. I hope it will be helpful to everyone.
The topic of this article is the detailed operation steps of rbac permission control. Please pay attention to the operation steps. Regarding the configuration and establishment of rbac, our tutorial on building a perfect backend and implementing rbac permission control in yii2 cannot be more clear. .
However, according to the feedback from many people, they said that they followed the owner's steps exactly, and they were exactly the same. Why doesn't the menu appear? Why doesn't it appear? Why doesn't it appear? Emma, I finally found the reason when I was helping people debug in the group. It was not easy. The reason is that you have learned how to build but not how to operate. Ah, ah, let’s talk in detail today about how to operate the permission control of rbac! Of course, the premise is that you have successfully built a perfect backend and implemented rbac permission control as we mentioned above.
Take creating the user table and adding permissions to it as an example.
1. Create the user table, and then the creation is completed. It is very simple and we will not go into details.
2. Use gii to generate model+curd. If you If you don’t know how to operate, you can click on the detailed operation steps of yii2-gii to operate
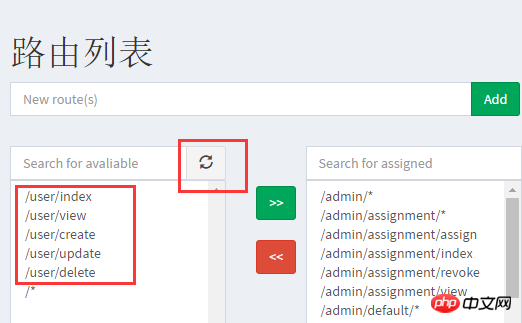
3. We open the routing page/admin/route/index and the interface shown below will probably appear

If the /user/* series of routes in the picture above do not appear on your left menu, please click the refresh button next to it to refresh.
Now we move the /user/* series selection on the left to the right
4. We open the permission interface /admin/permission/index
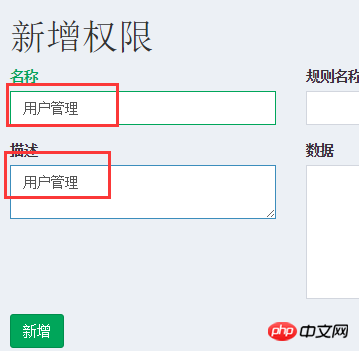
Click the Add Permission button and add a name and description as shown below

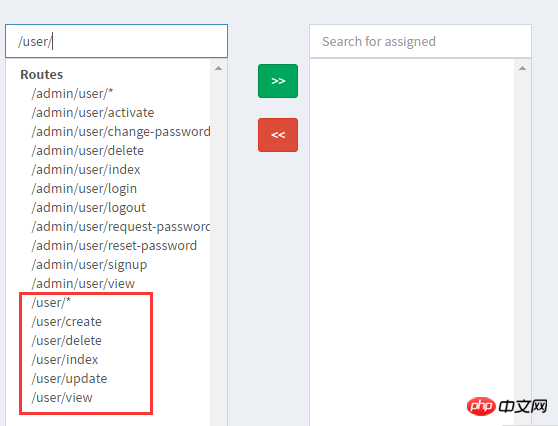
Click Add and you will jump to The details page of this permission, as shown in the picture below, select the /user/* series and move it to the right

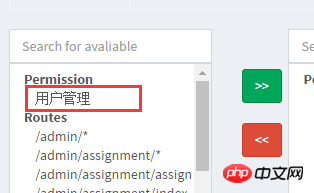
5. We access the role To add a role on the list page/admin/role/index, just fill in the name and description. After the addition is successful, it will jump to the role details page. Then we only need to move the permission "User Management" as shown below

# means that we assign the "User Management" permission to the role we just created. In the fourth step, we have assigned "User Management" /user/* series of permissions.
6. We visit the assignment page /admin/assignment/index to assign the role just added to the current user. Note that it is a role, not a permission. Do not add it repeatedly.
7. If we want the newly added operation "User Management" to be displayed on the menu, we also need to open the menu list page
/admin/menu/ index Click to add a new menu.
Related reading: Yii2 rbac permission control menu menu example tutorial
At this point, we have basically completed the operation of assigning /user permissions to the current user Now, we can visit /user/index and have a look. If it is normal, it will be fine. If it is not still prompted that there is no permission, then it is probably your fault. Please start over and do it a few more times.
Related recommendations:
#The code automatic loading mechanism in Yii2
yii2.0 case sharing of integrating Alibaba Cloud oss (picture)
Sharing of a simple method to implement reversible encryption in Yii2 framework
The above is the detailed content of Yii2 implements rbac permission control. For more information, please follow other related articles on the PHP Chinese website!

Hot AI Tools

Undresser.AI Undress
AI-powered app for creating realistic nude photos

AI Clothes Remover
Online AI tool for removing clothes from photos.

Undress AI Tool
Undress images for free

Clothoff.io
AI clothes remover

Video Face Swap
Swap faces in any video effortlessly with our completely free AI face swap tool!

Hot Article

Hot Tools

Notepad++7.3.1
Easy-to-use and free code editor

SublimeText3 Chinese version
Chinese version, very easy to use

Zend Studio 13.0.1
Powerful PHP integrated development environment

Dreamweaver CS6
Visual web development tools

SublimeText3 Mac version
God-level code editing software (SublimeText3)

Hot Topics
 1386
1386
 52
52
 Using PHP to control the camera: analysis of the entire process from connection to shooting
Jul 30, 2023 pm 03:21 PM
Use PHP to control the camera: Analyze the entire process from connection to shooting. Camera applications are becoming more and more widespread, such as video calls, surveillance systems, etc. In web applications, we often need to control and operate cameras through PHP. This article will introduce how to use PHP to realize the entire process from camera connection to shooting. Confirm the connection status of the camera. Before starting to operate the camera, we first need to confirm the connection status of the camera. PHP provides an extension library video to operate the camera. We can pass the following code
![How to disable media volume control popups [permanently]](https://img.php.cn/upload/article/000/000/164/168493981948502.png?x-oss-process=image/resize,m_fill,h_207,w_330) How to disable media volume control popups [permanently]
May 24, 2023 pm 10:50 PM
How to disable media volume control popups [permanently]
May 24, 2023 pm 10:50 PM
When you use the corresponding shortcut key to fine-tune the volume level, a media volume control pop-up will appear on the screen. This can be annoying, so read on to find out different ways to permanently disable media volume control pop-ups. How to disable media volume control popup? 1. Click the Windows icon on the taskbar in Google Chrome, type chrome in the search bar at the top, and select the relevant search results to launch Google Chrome. Type or copy-paste the following into the address bar and press the key. Enterchrome://flags type media keys in the search box at the top and select Disable in the Hardware Media Key Handling drop-down list. Now exit the Google Chrome app and relaunch it. Google
 How to implement robot control using Java
Jun 16, 2023 am 10:36 AM
In recent years, robotic technology has been widely used, which shows its importance in the field of science and technology. Robot control is also one of the core parts of robot development. Using Java language to realize robot control can achieve fast robot control and provide strong support for the further development of robots. Java is a high-level language that has become a widely used programming language due to its good cross-platform, efficiency and security. It also provides good support in implementing robot control. First of all, you need to understand the robot control
 How to remove jquery in yii2
Feb 17, 2023 am 09:55 AM
How to remove jquery from yii2: 1. Edit the AppAsset.php file and comment out the "yii\web\YiiAsset" value in the variable $depends; 2. Edit the main.php file and add the configuration "'yii" under the field "components" \web\JqueryAsset' => ['js' => [],'sourcePath' => null,]," to remove the jquery script.
 Control Center not working in iPhone: Fix
Apr 17, 2024 am 08:16 AM
Imagine an iPhone without a functioning Control Center. You can't, right? If the buttons on the Control Center don't work properly, you won't be able to use your iPhone properly. The main idea of Control Center is to easily access certain features directly from anywhere on your phone. In this case, these solutions will help to resolve the issue on your phone. Fix 1 – Use a Cloth to Clean Your Phone Sometimes the upper part of the display gets dirty from regular use. This may cause the Control Center to not function properly. Step 1 – Take a soft, clean microfiber cloth and clean the top half of your iPhone screen. You can also use any screen cleaning solution. Step 2 – Make sure to remove any dust, oil, or anything else from your phone’s display. After clearing phone screen
 How to implement API versioning in FastAPI
Jul 29, 2023 am 11:33 AM
How to implement API version control in FastAPI Introduction: With the rapid development of software development, API version control has become more and more important. As our applications continue to evolve and improve, we often need to make updates and modifications to the API. This requires us to be able to smoothly introduce new API versions without affecting the old versions. In this article, we will discuss how to implement API versioning in FastAPI. FastAPI is a modern web framework based on Python that provides fast
 Implementing Role-Based Access Control (RBAC): Using PHP and RBAC
Jun 20, 2023 pm 10:39 PM
With the popularity of Internet applications, we hope to protect data within the application to ensure that sensitive data is not misused or stolen. One of the solutions is to use role-based access control (RBAC). Role-based access control (RBAC) is an access control model based on the relationship between users and roles. The core idea of this model is to link the user's role to the access control operation, rather than linking the access control operation directly to the user. This approach improves the flexibility of access control,
 How to solve distributed locks and concurrency control in PHP development
Oct 10, 2023 am 08:34 AM
How to solve distributed locks and concurrency control in PHP development Introduction: In PHP development, it is often necessary to solve the problem of multiple processes or multiple servers operating shared resources at the same time. In this case, distributed locks and concurrency control need to be used to ensure data consistency and reliability. This article will introduce how to solve the problems of distributed locks and concurrency control in PHP development, and give specific code examples. 1. Implementation of distributed locks: In PHP development, the most common way to implement distributed locks is to use Redis. Red


