

How to use webpack to optimize resource methods and techniques

In the optimization of front-end applications, it is extremely important to control the size of loaded resources. Most of the time what we can do is to control the size, split and reuse resources during the packaging and compilation process. This article mainly introduces how to use webpack to optimize resources. The editor thinks it is quite good. Now I will share it with you and give you a reference. Let’s follow the editor to take a look, I hope it can help everyone.
Preface
This article is mainly based on webpack packaging, using single-page applications developed in React, vue and other ecological environments as examples to illustrate how to process resources and cache from the webpack packaging level. The main thing we need to do is to optimize the configuration of webpack, and also involve a small amount of business code changes.
At the same time, the (webpack-contrib/webpack-bundle-analyzer) plug-in can be used to analyze packaged resources. Of course, there are many optional analysis plug-ins. In this article, this plug-in is mainly used as an example.
TIP: webpack version@3.6.0
1. Packaging environment and code compression
First we have the most basic webpack configuration:
// webpack.config.js
const path = require('path');
const BundleAnalyzerPlugin = require('webpack-bundle-analyzer').BundleAnalyzerPlugin;

const PROJECT_ROOT = path.resolve(__dirname, './');

module.exports = {
 entry: {
  index: './src/index.js'
 },
 output: {
  path: path.resolve(__dirname, 'dist'),
  filename: '[name].[chunkhash:4].js'
 },
 module: {
  rules: [
   {
    test: /\.js[x]?$/,
    use: 'babel-loader',
    include: PROJECT_ROOT,
    exclude: /node_modules/
   }
  ]
 },
 plugins: [
  new BundleAnalyzerPlugin()
 ],
 resolve: {
  extensions: ['.js', '.jsx']
 },
};After executing the package, you can see that the js of a project is more than 1M:
Hash: e51afc2635f08322670b
Version: webpack 3.6.0
Time: 2769ms
    Asset  Size Chunks          Chunk Names
index.caa7.js 1.3 MB    0 [emitted] [big] index
At this time, you only need to add the plug-ins `DefinePlugin` and `UglifyJSPlugin` to reduce a lot of volume. Add in plugins:
// webpack.config.js
...
{
 ...
 plugins: [
  new BundleAnalyzerPlugin(),
  new webpack.DefinePlugin({
   'process.env.NODE_ENV': JSON.stringify(process.env.NODE_ENV || 'production')
  }),
  new UglifyJSPlugin({
   uglifyOptions: {
    ie8: false,
    output: {
     comments: false,
     beautify: false,
    },
    mangle: {
     keep_fnames: true
    },
    compress: {
     warnings: false,
     drop_console: true
    },
   }
  })
 ]
 ...
}You can see the packaging output at this time:
Hash: 84338998472a6d3c5c25
Version: webpack 3.6.0
Time: 9940ms
    Asset  Size Chunks          Chunk Names
index.89c2.js 346 kB    0 [emitted] [big] index
The size of the code has been reduced from 1.3M to 346K.
(1) DefinePlugin
DefinePlugin allows the creation of a global constant that can be configured at compile time. This might be useful to allow different behaviors for development mode and release mode builds. If you are performing logging in a development build, but not a release build, you can use global constants to decide whether to log or not. This is where DefinePlugin comes in, set it up and forget about the rules for development and release builds.
In our business code and third-party package code, we often need to judge `process.env.NODE_ENV` for different processing, but in the production environment we obviously do not need non-`production` processing part.
Here we set `process.env.NODE_ENV` to `JSON.stringify('production')`, which means that the packaging environment is set to the production environment. Then, with the `UglifyJSPlugin` plug-in, you can remove some redundant code when packaging for the production environment.
(2) UglifyJSPlugin
UglifyJSPlugin is mainly used to parse and compress js code. It is based on `uglify-es` to process js code. It has a variety of configuration options: https: //github.com/webpack-contrib/uglifyjs-webpack-plugin.
By compressing the code and removing redundancy, the size of the packaged resources is greatly reduced.
2. Code splitting/on-demand loading
In single-page applications built with React or vue, the control of page routing and views is implemented by the front end, and its corresponding Business logic is all in js code.
When an application design has many pages and logic, the final generated js file resources will also be quite large.
However, when we open a page corresponding to a url, not all the js code is actually needed. All that is needed is only a main runtime code and the business logic code corresponding to the view. After loading Load that part of the code in the next view.
Therefore, the optimization that can be done in this regard is to load js code on demand.
Lazy loading or on-demand loading is a good way to optimize web pages or applications. This method actually separates your code at some logical breakpoints, and then after completing certain operations in some code blocks, immediately references or is about to reference other new code blocks. This speeds up the initial loading of the app and reduces its overall size, since certain blocks of code may never be loaded.
Webpack provides dynamic import technology to implement code splitting. First, you need to configure the configuration of each split sub-module in the webpack configuration:
// webpack.config.js
const path = require('path');
const webpack = require('webpack');
const UglifyJSPlugin = require('uglifyjs-webpack-plugin');
const BundleAnalyzerPlugin = require('webpack-bundle-analyzer').BundleAnalyzerPlugin;

const PROJECT_ROOT = path.resolve(__dirname, './');

module.exports = {
 entry: {
  index: './src/index.js'
 },
 output: {
  path: path.resolve(__dirname, 'dist'),
  filename: '[name].[chunkhash:4].js',
  chunkFilename: '[name].[chunkhash:4].child.js',
 },
 module: {
  rules: [
   {
    test: /\.js[x]?$/,
    use: 'babel-loader',
    include: PROJECT_ROOT,
    exclude: /node_modules/
   }
  ]
 },
 plugins: [
  new BundleAnalyzerPlugin(),
  new webpack.DefinePlugin({
   'process.env.NODE_ENV': JSON.stringify(process.env.NODE_ENV || 'production')
  }),
  new UglifyJSPlugin({
   uglifyOptions: {
    ie8: false,
    output: {
     comments: false,
     beautify: false,
    },
    mangle: {
     keep_fnames: true
    },
    compress: {
     warnings: false,
     drop_console: true
    },
   }
  }),
 ],
 resolve: {
  extensions: ['.js', '.jsx']
 },
};The main thing that needs to be defined is `chunkFilename` in `output`, which is the file name of the exported split code. Here it is set to `[name].[chunkhash:4].child.js`, where `name` corresponds to the module name or id, and `chunkhash` is the hash of the module content.
Later in the business code, webpack provides two ways to dynamically import:
`import('path/to/module') -> Promise`,
`require.ensure(dependencies: String[], callback: function(require), errorCallback: function(error), chunkName: String)`
For the latest version of webpack, it is mainly recommended to use `import()` (note: import uses Promise, so you need to ensure that the code supports the Promise polyfill).
// src/index.js
function getComponent() {
 return import(
  /* webpackChunkName: "lodash" */
  'lodash'
 ).then(_ => {
  var element = document.createElement('p');

  element.innerHTML = _.join(['Hello', 'webpack'], ' ');

  return element;

 }).catch(error => 'An error occurred while loading the component');
}

getComponent().then(component => {
 document.body.appendChild(component);
})You can see the packaging information:
Hash: d6ba79fe5995bcf9fa4d
Version: webpack 3.6.0
Time: 7022ms
        Asset   Size Chunks       Chunk Names
lodash.89f0.child.js 85.4 kB    0 [emitted] lodash
    index.316e.js 1.96 kB    1 [emitted] index
  [0] ./src/index.js 441 bytes {1} [built]
  [2] (webpack)/buildin/global.js 509 bytes {0} [built]
  [3] (webpack)/buildin/module.js 517 bytes {0} [built]
+ 1 hidden moduleYou can see that the packaged code generated two files: `index.316e.js` and `lodash.89f0.child.js` , the latter is split through `import`.
`import` 它接收一个 `path` 参数,指的是该子模块对于的路径,同时还注意到其中可以添加一行注释 `/* webpackChunkName: "lodash" */`,该注释并非是无用的,它定义了该子模块的 name,其对应与 `output.chunkFilename` 中的 `[name]`。
`import` 函数返回一个 Promise,当异步加载到子模块代码是会执行后续操作,比如更新视图等。
(1)React 中的按需加载
在 React 配合 React-Router 开发中,往往就需要代码根据路由按需加载的能力,下面是一个基于 webpack 代码动态导入技术实现的 React 动态载入的组件:
import React, { Component } from 'react';

export default function lazyLoader (importComponent) {
 class AsyncComponent extends Component {
  state = { Component: null }

  async componentDidMount () {
   const { default: Component } = await importComponent();

   this.setState({
    Component: Component
   });
  }

  render () {
   const Component = this.state.Component;

   return Component
    ? <Component {...this.props} />
    : null;
  }
 }

 return AsyncComponent;
};在 `Route` 中:
<Switch>
 <Route exact path="/"
  component={lazyLoader(() => import('./Home'))}
 />
 <Route path="/about"
  component={lazyLoader(() => import('./About'))}
 />
 <Route
  component={lazyLoader(() => import('./NotFound'))}
 />
</Switch>在 `Route` 中渲染的是 `lazyLoader` 函数返回的组件,该组件在 mount 之后会去执行 `importComponent` 函数(既:`() => import('./About')`)动态加载其对于的组件模块(被拆分出来的代码),待加载成功之后渲染该组件。
使用该方式打包出来的代码:
Hash: 02a053d135a5653de985
Version: webpack 3.6.0
Time: 9399ms
     Asset   Size Chunks          Chunk Names
0.db22.child.js 5.82 kB    0 [emitted]
1.fcf5.child.js  4.4 kB    1 [emitted]
2.442d.child.js   3 kB    2 [emitted]
 index.1bbc.js  339 kB    3 [emitted] [big] index
三、抽离 Common 资源
(1)第三方库的长缓存
首先对于一些比较大的第三方库,比如在 React 中用到的 react、react-dom、react-router 等等,我们不希望它们被重复打包,并且在每次版本更新的时候也不希望去改变这部分的资源导致在用户端重新加载。
在这里可以使用 webpack 的 CommonsChunkPlugin 来抽离这些公共资源;
CommonsChunkPlugin 插件,是一个可选的用于建立一个独立文件(又称作 chunk)的功能,这个文件包括多个入口 chunk 的公共模块。通过将公共模块拆出来,最终合成的文件能够在最开始的时候加载一次,便存起来到缓存中供后续使用。这个带来速度上的提升,因为浏览器会迅速将公共的代码从缓存中取出来,而不是每次访问一个新页面时,再去加载一个更大的文件。
首先需要在 entry 中新增一个入口用来打包需要抽离出来的库,这里将 `'react', 'react-dom', 'react-router-dom', 'immutable'` 都给单独打包进 `vendor` 中;
之后在 plugins 中定义一个 `CommonsChunkPlugin` 插件,同时将其 `name` 设置为 `vendor` 是它们相关联,再将 `minChunks` 设置为 `Infinity` 防止其他代码被打包进来。
// webpack.config.js
const path = require('path');
const webpack = require('webpack');
const UglifyJSPlugin = require('uglifyjs-webpack-plugin');
const BundleAnalyzerPlugin = require('webpack-bundle-analyzer').BundleAnalyzerPlugin;

const PROJECT_ROOT = path.resolve(__dirname, './');

module.exports = {
 entry: {
  index: './src0/index.js',
  vendor: ['react', 'react-dom', 'react-router-dom', 'immutable']
 },
 output: {
  path: path.resolve(__dirname, 'dist'),
  filename: '[name].[chunkhash:4].js',
  chunkFilename: '[name].[chunkhash:4].child.js',
 },
 module: {
  rules: [
   {
    test: /\.js[x]?$/,
    use: 'babel-loader',
    include: PROJECT_ROOT,
    exclude: /node_modules/
   }
  ]
 },
 plugins: [
  new BundleAnalyzerPlugin(),
  new webpack.DefinePlugin({
   'process.env.NODE_ENV': JSON.stringify(process.env.NODE_ENV || 'production')
  }),
  new UglifyJSPlugin({
   uglifyOptions: {
    ie8: false,
    output: {
     comments: false,
     beautify: false,
    },
    mangle: {
     keep_fnames: true
    },
    compress: {
     warnings: false,
     drop_console: true
    },
   }
  }),
  new webpack.optimize.CommonsChunkPlugin({
   name: 'vendor',
   minChunks: Infinity,
  }),
 ],
 resolve: {
  extensions: ['.js', '.jsx']
 },
};运行打包可以看到:
Hash: 34a71fcfd9a24e810c21
Version: webpack 3.6.0
Time: 9618ms
     Asset   Size Chunks          Chunk Names
0.2c65.child.js 5.82 kB    0 [emitted]
1.6e26.child.js  4.4 kB    1 [emitted]
2.e4bc.child.js   3 kB    2 [emitted]
 index.4e2f.js 64.2 kB    3 [emitted]     index
 vendor.5fd1.js  276 kB    4 [emitted] [big] vendor
可以看到 `vendor` 被单独打包出来了。
当我们改变业务代码时再次打包:
Hash: cd3f1bc16b28ac97e20a
Version: webpack 3.6.0
Time: 9750ms
     Asset   Size Chunks          Chunk Names
0.2c65.child.js 5.82 kB    0 [emitted]
1.6e26.child.js  4.4 kB    1 [emitted]
2.e4bc.child.js   3 kB    2 [emitted]
 index.4d45.js 64.2 kB    3 [emitted]     index
 vendor.bc85.js  276 kB    4 [emitted] [big] vendor
vendor 包同样被打包出来的,然而它的文件 hash 却发生了变化,这显然不符合我们长缓存的需求。
这是因为 webpack 在使用 CommoChunkPlugin 的时候会生成一段 runtime 代码(它主要用来处理代码模块的映射关系),而哪怕没有改变 vendor 里的代码,这个 runtime 仍然是会跟随着打包变化的并且打入 verdor 中,所以 hash 就会开始变化了。解决方案则是把这部分的 runtime 代码也单独抽离出来,修改之前的 `CommonsChunkPlugin` 为:
// webpack.config.js
...
new webpack.optimize.CommonsChunkPlugin({
 name: ['vendor', 'runtime'],
 minChunks: Infinity,
}),
...执行打包可以看到生成的代码中多了 `runtime` 文件,同时即使改变业务代码,vendor 的 hash 值也保持不变了。
当然这段 `runtime` 实际上非常短,我们可以直接 inline 在 html 中,如果使用的是 `html-webpack-plugin` 插件处理 html,则可以结合 [`html-webpack-inline-source-plugin`](DustinJackson/html-webpack-inline-source-plugin) 插件自动处理其 inline。
(2)公共资源抽离
在我们打包出来的 js 资源包括不同入口以及子模块的 js 资源包,然而它们之间也会重复载入相同的依赖模块或者代码,因此可以通过 CommonsChunkPlugin 插件将它们共同依赖的一些资源打包成一个公共的 js 资源。
// webpack.config.js
plugins: [
 new BundleAnalyzerPlugin(),
 new webpack.DefinePlugin({
  'process.env.NODE_ENV': JSON.stringify(process.env.NODE_ENV || 'production')
 }),
 new UglifyJSPlugin({
  uglifyOptions: {
   ie8: false,
   output: {
    comments: false,
    beautify: false,
   },
   mangle: {
    keep_fnames: true
   },
   compress: {
    warnings: false,
    drop_console: true
   },
  }
 }),
 new webpack.optimize.CommonsChunkPlugin({
  name: ['vendor', 'runtime'],
  minChunks: Infinity,
 }),
 new webpack.optimize.CommonsChunkPlugin({
  // ( 公共chunk(commnons chunk) 的名称)
  name: "commons",
  // ( 公共chunk 的文件名)
  filename: "commons.[chunkhash:4].js",
  // (模块必须被 3个 入口chunk 共享)
  minChunks: 3
 })
],可以看到这里增加了 `commons` 的一个打包,当一个资源被三个以及以上 chunk 依赖时,这些资源会被单独抽离打包到 `commons.[chunkhash:4].js` 文件。
执行打包,看到结果如下:
Hash: 2577e42dc5d8b94114c8
Version: webpack 3.6.0
Time: 24009ms
     Asset   Size Chunks          Chunk Names
0.2eee.child.js 90.8 kB    0 [emitted]
1.cfbc.child.js 89.4 kB    1 [emitted]
2.557a.child.js  88 kB    2 [emitted]
 vendor.66fd.js  275 kB    3 [emitted] [big] vendor
 index.688b.js 64.2 kB    4 [emitted]     index
commons.a61e.js 1.78 kB    5 [emitted]     commons
却发现这里的 `commons.[chunkhash].js` 基本没有实际内容,然而明明在每个子模块中也都依赖了一些相同的依赖。
借助 webpack-bundle-analyzer 来分析一波:
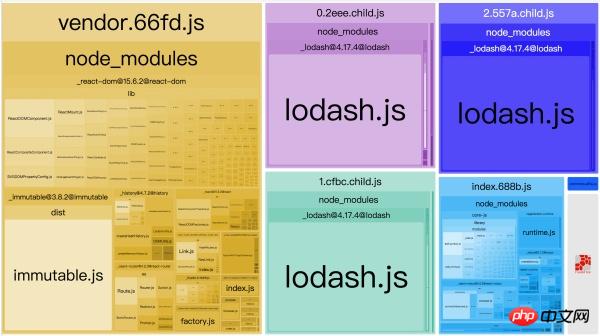
可以看到三个模块都依赖了 `lodash`,然而它并没有被抽离出来。
这是因为 CommonsChunkPlugin 中的 chunk 指的是 entry 中的每个入口,因此对于一个入口拆分出来的子模块(children chunk)是不生效的。
可以通过在 CommonsChunkPlugin 插件中配置 `children` 参数将拆分出来的子模块的公共依赖也打包进 `commons` 中:
// webpack.config.js
plugins: [
 new BundleAnalyzerPlugin(),
 new webpack.DefinePlugin({
  'process.env.NODE_ENV': JSON.stringify(process.env.NODE_ENV || 'production')
 }),
 new UglifyJSPlugin({
  uglifyOptions: {
   ie8: false,
   output: {
    comments: false,
    beautify: false,
   },
   mangle: {
    keep_fnames: true
   },
   compress: {
    warnings: false,
    drop_console: true
   },
  }
 }),
 new webpack.optimize.CommonsChunkPlugin({
  name: ['vendor', 'runtime'],
  minChunks: Infinity,
 }),
 new webpack.optimize.CommonsChunkPlugin({
  // ( 公共chunk(commnons chunk) 的名称)
  name: "commons",
  // ( 公共chunk 的文件名)
  filename: "commons.[chunkhash:4].js",
  // (模块必须被 3个 入口chunk 共享)
  minChunks: 3
 }),
 new webpack.optimize.CommonsChunkPlugin({
  // (选择所有被选 chunks 的子 chunks)
  children: true,
  // (在提取之前需要至少三个子 chunk 共享这个模块)
  minChunks: 3,
 })
],查看打包效果:
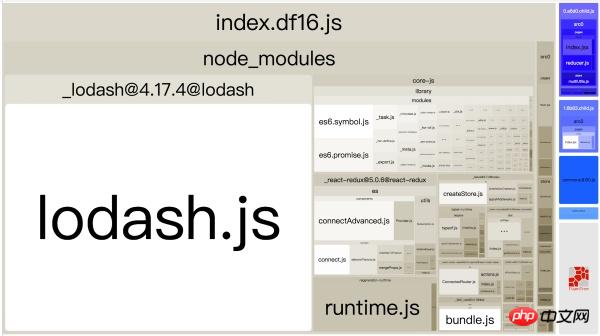
其子模块的公共资源都被打包到 `index` 之中了,并没有理想地打包进 `commons` 之中,还是因为 `commons` 对于的是 entry 中的入口模块,而这里并未有 3 个 entry 模块共用资源;
在单入口的应用中可以选择去除 `commons`,而在子模块的 `CommonsChunkPlugin` 的配置中配置 `async` 为 `true`:
// webpack.config.js
plugins: [
 new BundleAnalyzerPlugin(),
 new webpack.DefinePlugin({
  'process.env.NODE_ENV': JSON.stringify(process.env.NODE_ENV || 'production')
 }),
 new UglifyJSPlugin({
  uglifyOptions: {
   ie8: false,
   output: {
    comments: false,
    beautify: false,
   },
   mangle: {
    keep_fnames: true
   },
   compress: {
    warnings: false,
    drop_console: true
   },
  }
 }),
 new webpack.optimize.CommonsChunkPlugin({
  name: ['vendor', 'runtime'],
  minChunks: Infinity,
 }),
 new webpack.optimize.CommonsChunkPlugin({
  // (选择所有被选 chunks 的子 chunks)
  children: true,
  // (异步加载)
  async: true,
  // (在提取之前需要至少三个子 chunk 共享这个模块)
  minChunks: 3,
 })
],查看效果:
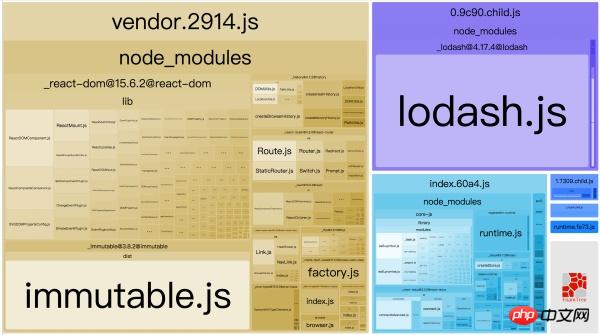
子模块的公共资源都被打包到 `0.9c90.child.js` 中了,该模块则是子模块的 commons。
四、tree shaking
tree shaking 是一个术语,通常用于描述移除 JavaScript 上下文中的未引用代码(dead-code)。它依赖于 ES2015 模块系统中的静态结构特性,例如 import 和 export。这个术语和概念实际上是兴起于 ES2015 模块打包工具 rollup。
在我们引入一个依赖的某个输出的时候,我们可能需要的仅仅是该依赖的某一部分代码,而另一部分代码则是 `unused` 的,如果能够去除这部分代码,那么最终打包出来的资源体积也是可以有可观的减小。
首先,webpack 中实现 tree shaking 是基于 webpack 内部支持的 es2015 的模块机制,在大部分时候我们使用 babel 来编译 js 代码,而 babel 会通过自己的模块加载机制处理一遍,这导致 webpack 中的 tree shaking 处理将会失效。因此在 babel 的配置中需要关闭对模块加载的处理:
// .babelrc
{
 "presets": [
  [
   "env", {
    "modules": false,
   }
  ],
  "stage-0"
 ],
 ...
}然后我们来看下 webpack 是如何处理打包的代码,举例有一个入口文件 `index.js` 和一个 `utils.js` 文件:
// utils.js
export function square(x) {
 return x * x;
}

export function cube(x) {
 return x * x * x;
}
"

"js
// index.js
import { cube } from './utils.js';

console.log(cube(10));
"

打包出来的代码:

"
// index.bundle.js
/* 1 */
/***/ (function(module, __webpack_exports__, __webpack_require__) {

"use strict";
/* unused harmony export square */
/* harmony export (immutable) */ __webpack_exports__["a"] = cube;
function square(x) {
 return x * x;
}

function cube(x) {
 return x * x * x;
}可以看到仅有 `cube` 函数被 `__webpack_exports__` 导出来,而 `square` 函数被标记为 `unused harmony export square`,然而在打包代码中既是 `square` 没有被导出但是它仍然存在与代码中,而如何去除其代码则可以通过添加 `UglifyjsWebpackPlugin` 插件来处理。
相关推荐:
The above is the detailed content of How to use webpack to optimize resource methods and techniques. For more information, please follow other related articles on the PHP Chinese website!

Hot AI Tools

Undresser.AI Undress
AI-powered app for creating realistic nude photos

AI Clothes Remover
Online AI tool for removing clothes from photos.

Undress AI Tool
Undress images for free

Clothoff.io
AI clothes remover

AI Hentai Generator
Generate AI Hentai for free.

Hot Article
Hot Tools

Notepad++7.3.1
Easy-to-use and free code editor

SublimeText3 Chinese version
Chinese version, very easy to use

Zend Studio 13.0.1
Powerful PHP integrated development environment

Dreamweaver CS6
Visual web development tools

SublimeText3 Mac version
God-level code editing software (SublimeText3)
Hot Topics
 1377
1377
 52
52

 VUE3 Getting Started Tutorial: Packaging and Building with Webpack
Jun 15, 2023 pm 06:17 PM
VUE3 Getting Started Tutorial: Packaging and Building with Webpack
Jun 15, 2023 pm 06:17 PM
Vue is an excellent JavaScript framework that can help us quickly build interactive and efficient web applications. Vue3 is the latest version of Vue, which introduces many new features and functionality. Webpack is currently one of the most popular JavaScript module packagers and build tools, which can help us manage various resources in our projects. This article will introduce how to use Webpack to package and build Vue3 applications. 1. Install Webpack
 How to find resources on 115 network disk
Feb 23, 2024 pm 05:10 PM
How to find resources on 115 network disk
Feb 23, 2024 pm 05:10 PM
There will be a lot of resources in the 115 network disk, so how to find resources? Users can search for the resources they need in the software, then enter the download interface, and then choose to save to the network disk. This introduction to the method of finding resources on 115 network disk can tell you the specific content. The following is a detailed introduction, come and take a look. How to find resources on 115 network disk? Answer: Search the content in the software, and then click to save to the network disk. Detailed introduction: 1. First enter the resources you want in the app. 2. Then click the keyword link that appears. 3. Then enter the download interface. 4. Click Save to network disk inside.
 Using Jetty7 for Web server processing in Java API development
Jun 18, 2023 am 10:42 AM
Using Jetty7 for Web server processing in Java API development
Jun 18, 2023 am 10:42 AM
Using Jetty7 for Web Server Processing in JavaAPI Development With the development of the Internet, the Web server has become the core part of application development and is also the focus of many enterprises. In order to meet the growing business needs, many developers choose to use Jetty for web server development, and its flexibility and scalability are widely recognized. This article will introduce how to use Jetty7 in JavaAPI development for We
 Real-time protection against face-blocking barrages on the web (based on machine learning)
Jun 10, 2023 pm 01:03 PM
Real-time protection against face-blocking barrages on the web (based on machine learning)
Jun 10, 2023 pm 01:03 PM
Face-blocking barrage means that a large number of barrages float by without blocking the person in the video, making it look like they are floating from behind the person. Machine learning has been popular for several years, but many people don’t know that these capabilities can also be run in browsers. This article introduces the practical optimization process in video barrages. At the end of the article, it lists some applicable scenarios for this solution, hoping to open it up. Some ideas. mediapipeDemo (https://google.github.io/mediapipe/) demonstrates the mainstream implementation principle of face-blocking barrage on-demand up upload. The server background calculation extracts the portrait area in the video screen, and converts it into svg storage while the client plays the video. Download svg from the server and combine it with barrage, portrait
 Why did Han Xiaoquan suddenly have no resources?
Feb 24, 2024 pm 03:22 PM
Why did Han Xiaoquan suddenly have no resources?
Feb 24, 2024 pm 03:22 PM
Han Xiaoquan is a software that can watch many Korean dramas, so why is there suddenly no resource? This software may have no resources due to network problems, version problems, or copyright issues. This article about the reason why Han Xiaoquan suddenly has no resources can tell you the specific content. The following is a detailed introduction, come and take a look. Why did Han Xiaoquan suddenly have no resources? Answer: Due to network problems, version problems, and copyright issues, detailed introduction: 1. Solution to network problems: You can choose a different network, and then log in to the software again to try. 2. Solution to version problems: Users can download the latest version of this software from the official website. 3. Solutions to copyright issues: Some Korean dramas are removed from the shelves due to copyright issues. You can choose other Korean dramas to watch.
 How to implement form validation for web applications using Golang
Jun 24, 2023 am 09:08 AM
How to implement form validation for web applications using Golang
Jun 24, 2023 am 09:08 AM
Form validation is a very important link in web application development. It can check the validity of the data before submitting the form data to avoid security vulnerabilities and data errors in the application. Form validation for web applications can be easily implemented using Golang. This article will introduce how to use Golang to implement form validation for web applications. 1. Basic elements of form validation Before introducing how to implement form validation, we need to know what the basic elements of form validation are. Form elements: form elements are
 How to enable administrative access from the cockpit web UI
Mar 20, 2024 pm 06:56 PM
How to enable administrative access from the cockpit web UI
Mar 20, 2024 pm 06:56 PM
Cockpit is a web-based graphical interface for Linux servers. It is mainly intended to make managing Linux servers easier for new/expert users. In this article, we will discuss Cockpit access modes and how to switch administrative access to Cockpit from CockpitWebUI. Content Topics: Cockpit Entry Modes Finding the Current Cockpit Access Mode Enable Administrative Access for Cockpit from CockpitWebUI Disabling Administrative Access for Cockpit from CockpitWebUI Conclusion Cockpit Entry Modes The cockpit has two access modes: Restricted Access: This is the default for the cockpit access mode. In this access mode you cannot access the web user from the cockpit
 Explorer.exe crashing in Windows 11 safe mode no longer occurs
Aug 30, 2023 pm 11:09 PM
Explorer.exe crashing in Windows 11 safe mode no longer occurs
Aug 30, 2023 pm 11:09 PM
Explorer.exe crashes in Safe Mode on Windows 11? Not anymore. Microsoft has just released a new patch to the Dev Channel, and while there are no new features in this release, many fixes and improvements are making their way into the Windows Insider program, including an annoying bug where Explorer.exe crashes in Safe Mode. Well, you can say goodbye to it now, at least in the Windows Insider Program. But as with all these updates, they will also be coming to live Windows servers. Fixed an issue that caused Explorer.exe to not work in safe mode. However, there are a few other fixes coming to File Explorer, so Microsoft is keen to get it working
