Angularjs implements timeline effect sharing
This article mainly introduces the sample code of angularjs to achieve the timeline effect. The editor thinks it is quite good, so I will share it with you now and give it as a reference. Let’s follow the editor to take a look, I hope it can help everyone.
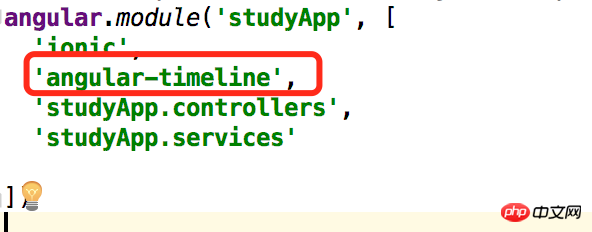
1 Introducing the package
Introduce the angular-timeline package.
Download address: angular-timeline.zip
Introduced into index.html
<link href="lib/angular-timeline/dist/angular-timeline.css" rel="external nofollow" rel="stylesheet">
<script src="lib/angular-timeline/dist/angular-timeline.js"></script>

2 Rewrite css
Rewrite css according to needs, rewrite the core part./* 时间轴 */
.timeline-event {
margin-bottom: 0px !important;
}
timeline-badge.infos {
background-color: #47d09e !important;
}
.timeline:before {
width: 1px !important;
left: 24px !important;
margin-top: 30px !important;
background-color: #47d09e !important;
}
timeline-badge {
left: 16px !important;
width: 15px !important;
height: 15px !important;
top: 15px !important;
box-shadow: none !important;
}
timeline-panel {
float: left !important;
width: 85% !important;
padding: 13px 0px 6px 0px !important;
margin-left: 39px !important;
background: none !important;
border: none !important;
box-shadow: none !important;
}
timeline-panel:before {
visibility: hidden !important;
}
timeline-panel:after {
visibility: hidden !important;
display: none !important;
}
timeline-panel .time {
font-size: 14px;
font-family: 'PingFangSC-Regular';
}
timeline-panel .detail {
display: flex;
display: -webkit-flex;
align-items: center;
-webkit-align-items: center;
justify-content: space-between;
-webkit-justify-content: space-between;
margin-top: 10px;
}
timeline-panel .detail .linename {
font-size: 16px;
max-width: 80%;
color: #1c1c1c;
display: inline-block;
font-family: 'PingFangSC-Medium';
}
timeline-panel .detail .linelevel {
position: absolute;
right: 18%;
border-radius: 4px;
color: white;
padding: 1px 5px 1px 5px;
font-size: 11px;
}
timeline-panel .detail .linelevel-g {
background-color: #f27373;
}
timeline-panel .detail .linelevel-p {
background-color: #e29431;
}
timeline-panel .detail .linenum {
float: right;
font-size: 14px;
color: #323232;
}Three pages
The preparation work is done, the following is the preparation of the page.<!--html页面-->
<ion-view view-title="{{title}}">
<ion-content scroll="true">
<timeline>
<timeline-event ng-repeat="event in teamDataList" side="right">
<timeline-badge class="infos">
</timeline-badge>
<timeline-panel class="infos">
<span class="time">
{{event.hour}}
</span>
<p class="detail" ng-repeat="item in event.data">
<span class="linename">{{item.customerName}}</span>
<p style="float: right;">
<span class="linenum">
{{item.reserveNumber}}人
</span>
</p>
</p>
</timeline-panel>
</timeline-event>
</timeline>
</ion-content>
</ion-view>//controller
angular.module('studyApp.controllers')
.controller('TimeLineCtrl', function ($scope, $rootScope, $location) {
$scope.title = '时间轴';
makeData();
function makeData() {
$scope.teamDataList=[
{
hour:"12:00",
data:[
{
customerName:"中国国旅(江苏)国际旅行社有限公司",
reserveNumber:"12",
id:"aaaabbb12112"
},
{
customerName:"江苏2",
reserveNumber:"122",
id:"aaaabbb12112"
}
]
},
{
hour:"13:00",
data:[{
customerName:"江苏2",
reserveNumber:"112",
id:"aaaabbb12112"
}]
},
{
hour:"14:00",
data:[{
customerName:"江苏3",
reserveNumber:"12",
id:"aaaabbb12112"
}]
},
{
hour:"13:00",
data:[{
customerName:"江苏2",
reserveNumber:"112",
id:"aaaabbb12112"
}]
},
{
hour:"14:00",
data:[{
customerName:"江苏3",
reserveNumber:"12",
id:"aaaabbb12112"
}]
}
];
}
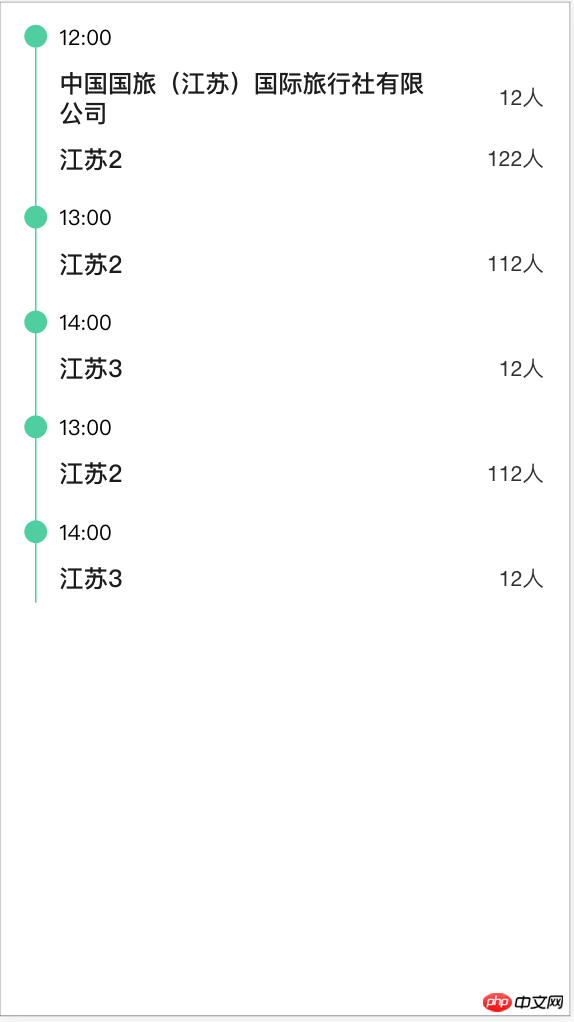
});Four renderings

Several beautiful timeline tutorials implemented by Jquery
About the effect analysis of the timeline,
Use pure CSS3 to implement timeline switching focus map example code
The above is the detailed content of Angularjs implements timeline effect sharing. For more information, please follow other related articles on the PHP Chinese website!

Hot AI Tools

Undresser.AI Undress
AI-powered app for creating realistic nude photos

AI Clothes Remover
Online AI tool for removing clothes from photos.

Undress AI Tool
Undress images for free

Clothoff.io
AI clothes remover

Video Face Swap
Swap faces in any video effortlessly with our completely free AI face swap tool!

Hot Article

Hot Tools

Notepad++7.3.1
Easy-to-use and free code editor

SublimeText3 Chinese version
Chinese version, very easy to use

Zend Studio 13.0.1
Powerful PHP integrated development environment

Dreamweaver CS6
Visual web development tools

SublimeText3 Mac version
God-level code editing software (SublimeText3)

Hot Topics
 1386
1386
 52
52
 How to share Quark Netdisk to Baidu Netdisk?
Mar 14, 2024 pm 04:40 PM
Quark Netdisk and Baidu Netdisk are very convenient storage tools. Many users are asking whether these two softwares are interoperable? How to share Quark Netdisk to Baidu Netdisk? Let this site introduce to users in detail how to save Quark network disk files to Baidu network disk. How to save files from Quark Network Disk to Baidu Network Disk Method 1. If you want to know how to transfer files from Quark Network Disk to Baidu Network Disk, first download the files that need to be saved on Quark Network Disk, and then open the Baidu Network Disk client. , select the folder where the compressed file is to be saved, and double-click to open the folder. 2. After opening the folder, click "Upload" in the upper left corner of the window. 3. Find the compressed file that needs to be uploaded on your computer and click to select it.
 How to share NetEase Cloud Music to WeChat Moments_Tutorial on sharing NetEase Cloud Music to WeChat Moments
Mar 25, 2024 am 11:41 AM
1. First, we enter NetEase Cloud Music, and then click on the software homepage interface to enter the song playback interface. 2. Then in the song playback interface, find the sharing function button in the upper right corner, as shown in the red box in the figure below, click to select the sharing channel; in the sharing channel, click the "Share to" option at the bottom, and then select the first "WeChat Moments" allows you to share content to WeChat Moments.
 How to implement an online speech recognition system using WebSocket and JavaScript
Dec 17, 2023 pm 02:54 PM
How to use WebSocket and JavaScript to implement an online speech recognition system Introduction: With the continuous development of technology, speech recognition technology has become an important part of the field of artificial intelligence. The online speech recognition system based on WebSocket and JavaScript has the characteristics of low latency, real-time and cross-platform, and has become a widely used solution. This article will introduce how to use WebSocket and JavaScript to implement an online speech recognition system.
 WebSocket and JavaScript: key technologies for implementing real-time monitoring systems
Dec 17, 2023 pm 05:30 PM
WebSocket and JavaScript: Key technologies for realizing real-time monitoring systems Introduction: With the rapid development of Internet technology, real-time monitoring systems have been widely used in various fields. One of the key technologies to achieve real-time monitoring is the combination of WebSocket and JavaScript. This article will introduce the application of WebSocket and JavaScript in real-time monitoring systems, give code examples, and explain their implementation principles in detail. 1. WebSocket technology
 How to share files with friends on Baidu Netdisk
Mar 25, 2024 pm 06:52 PM
Recently, Baidu Netdisk Android client has ushered in a new version 8.0.0. This version not only brings many changes, but also adds many practical functions. Among them, the most eye-catching is the enhancement of the folder sharing function. Now, users can easily invite friends to join and share important files in work and life, achieving more convenient collaboration and sharing. So how do you share the files you need to share with your friends? Below, the editor of this site will give you a detailed introduction. I hope it can help you! 1) Open Baidu Cloud APP, first click to select the relevant folder on the homepage, and then click the [...] icon in the upper right corner of the interface; (as shown below) 2) Then click [+] in the "Shared Members" column 】, and finally check all
 Mango tv member account sharing 2023
Feb 07, 2024 pm 02:27 PM
Mango TV has various types of movies, TV series, variety shows and other resources, and users can freely choose to watch them. Mango TV members can not only watch all VIP dramas, but also set the highest definition picture quality to help users watch dramas happily. Below, the editor will bring you some free Mango TV membership accounts for users to use, hurry up and take a look Take a look. Mango TV latest member account free sharing 2023: Note: These are the latest member accounts collected, you can log in directly and use them, do not change the password at will. Account number: 13842025699 Password: qds373 Account number: 15804882888 Password: evr6982 Account number: 13330925667 Password: jgqae Account number: 1703
 JavaScript and WebSocket: Building an efficient real-time weather forecasting system
Dec 17, 2023 pm 05:13 PM
JavaScript and WebSocket: Building an efficient real-time weather forecast system Introduction: Today, the accuracy of weather forecasts is of great significance to daily life and decision-making. As technology develops, we can provide more accurate and reliable weather forecasts by obtaining weather data in real time. In this article, we will learn how to use JavaScript and WebSocket technology to build an efficient real-time weather forecast system. This article will demonstrate the implementation process through specific code examples. We
 Simple JavaScript Tutorial: How to Get HTTP Status Code
Jan 05, 2024 pm 06:08 PM
JavaScript tutorial: How to get HTTP status code, specific code examples are required. Preface: In web development, data interaction with the server is often involved. When communicating with the server, we often need to obtain the returned HTTP status code to determine whether the operation is successful, and perform corresponding processing based on different status codes. This article will teach you how to use JavaScript to obtain HTTP status codes and provide some practical code examples. Using XMLHttpRequest


