This article mainly introduces the sample code of Angular2 imitating WeChat UI to implement the uploading and previewing of 9 images. It is of great practical value. Friends who need it can refer to it. I hope it can help everyone.
What I have been working on for the longest time these days is the image upload/display thumbnail/preview/delete function imitating WeChat UI, which requires 1-9 pictures. Let’s record how to implement WeChat’s picture preview/delete function.
Style--weui.css
The style uses the WeChat official ui, weui.min.css (it is recommended to use this compressed version in a production environment).
Download address weui.css/weui.min.css.
Sample--weui.io
WeChat officially comes with a demo: weui.io.
Main steps
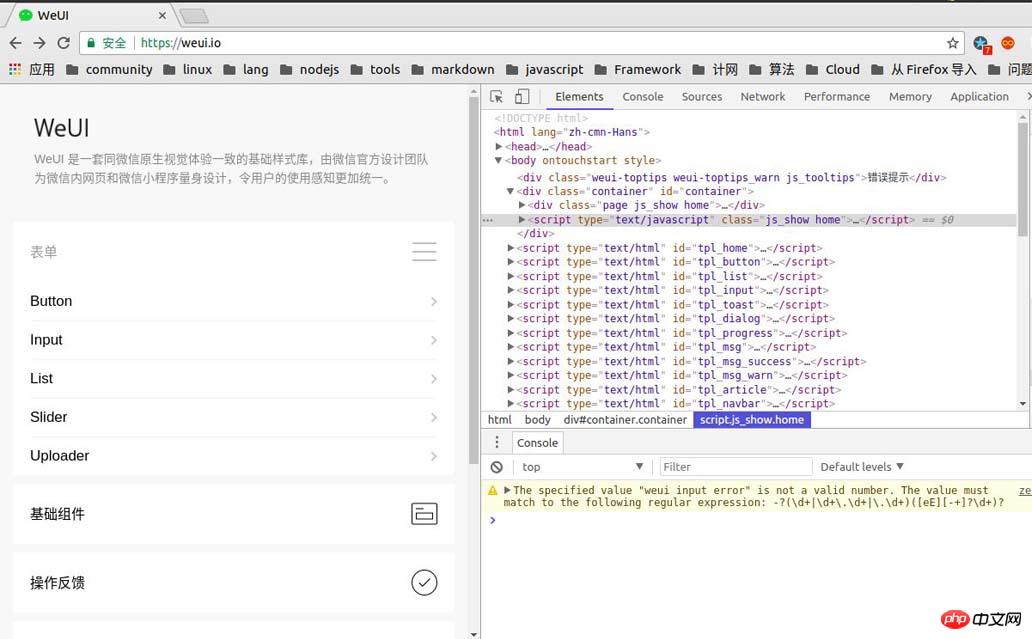
Before officially entering the explanation of each small function, first go to the official demo->weui.io to view the style of the image upload component and source code.
The official UI is shown below, and the UI for image upload is in Uploader.

The source code for image upload is available from the review element as follows:
<p class="page uploader js_show">
  <p class="page__hd">
    <h1 class="page__title">Uploader</h1>
    <p class="page__desc">上传组件,一般配合<a class="link" href=" " rel="external nofollow" >组件Gallery</a >来使用。</p >
  </p>
  <p class="page__bd">
    <p class="weui-gallery" id="gallery" style="opacity: 0; display: none;">
      <span class="weui-gallery__img" id="galleryImg" style="background-image:url(./images/pic_160.png)"></span>
      <p class="weui-gallery__opr">
        <a href="javascript:" rel="external nofollow" rel="external nofollow" rel="external nofollow" class="weui-gallery__del">
          <i class="weui-icon-delete weui-icon_gallery-delete"></i>
        </a >
      </p>
    </p>

    <p class="weui-cells weui-cells_form">
      <p class="weui-cell">
        <p class="weui-cell__bd">
          <p class="weui-uploader">
            <p class="weui-uploader__hd">
              <p class="weui-uploader__title">图片上传</p >
              <p class="weui-uploader__info">0/2</p>
            </p>
            <p class="weui-uploader__bd">
              <ul class="weui-uploader__files" id="uploaderFiles">
                <li class="weui-uploader__file" style="background-image:url(./images/pic_160.png)"></li>
                <li class="weui-uploader__file" style="background-image:url(./images/pic_160.png)"></li>
                <li class="weui-uploader__file" style="background-image:url(./images/pic_160.png)"></li>
                <li class="weui-uploader__file weui-uploader__file_status" style="background-image:url(./images/pic_160.png)">
                  <p class="weui-uploader__file-content">
                    <i class="weui-icon-warn"></i>
                  </p>
                </li>
                <li class="weui-uploader__file weui-uploader__file_status" style="background-image:url(./images/pic_160.png)">
                  <p class="weui-uploader__file-content">50%</p>
                </li>
              </ul>
              <p class="weui-uploader__input-box">
                <input id="uploaderInput" class="weui-uploader__input" type="file" accept="image/*" multiple="">
              </p>
            </p>
          </p>
        </p>
      </p>
    </p>
  </p>
  <p class="page__ft j_bottom">
    <a href="javascript:home()" rel="external nofollow" >< img src="./images/icon_footer_link.png"></a >
  </p>
</p>Observation The above code is directly applied to the outer style. The core function blocks are as follows:
Picture preview/delete part:
<p class="weui-gallery" id="gallery">
 <!--显示预览-->
 <span class="weui-gallery__img" id="galleryImg"></span>
 <!--删除按钮-->
 <p class="weui-gallery__opr">
  <a href="javascript:" rel="external nofollow" rel="external nofollow" rel="external nofollow" class="weui-gallery__del">
   <i class="weui-icon-delete weui-icon_gallery-delete"></i></a >
 </p>
</p>
图片缩略图列表部分:
 <ul class="weui-uploader__files" id="uploaderFiles">
  <!--每张图片是一个<li>标签-->
  <li class="weui-uploader__file" style="background-image:url(./images/pic_160.png)"></li>
</ul>
Yes With the above preparations, you can download and implement the function:
1. Picture thumbnail display
Observing the source code, we can see that the thumbnail of each picture The code structure of the sketch is as follows:
<li class="weui-uploader__file" style="background-image:url(./images/pic_160.png)"></li>
He put the URL of the image directly into the background-img:url() attribute, and the style directly used WeChat’s official UI class. Therefore, we can do this: create an array to store picturesUrl to store the URL of the picture, and use the angular2 instruction *ngFor to dynamically generate a thumbnail list based on the content in the array (note that the format of the elements in picturesUrl is: url (URL of the picture)) :, each element in the image url array is stored in the intermediate variable img in turn, and then uses the angular2 instruction [ngStyle] to generate a preview image based on the value of img. The main code is as follows:
<ul class="weui-uploader__files picture-preview" id="uploaderFiles" >
<li *ngFor="let img of picturesUrl"
class="weui-uploader__file"
[ngStyle]="{'background-image':img}">
</li>
</ul>
<!--img实例-->
<!--'url(http://upload-images.jianshu.io/upload_images/7166236-ed8a621900728c39.jpg?imageMogr2/auto-orient/strip%7CimageView2/2/w/1240)'-->Define the image array in the ts file and give certain simulation data:
##
picturesUrl = [
  'url(http://upload-images.jianshu.io/upload_images/7166236-40ed406c30ef20a0.jpg?imageMogr2/auto-orient/strip%7CimageView2/2/w/1240)',
  'url(http://upload-images.jianshu.io/upload_images/7166236-d79762ed654342bf.jpg?imageMogr2/auto-orient/strip%7CimageView2/2/w/1240)',
  'url(http://upload-images.jianshu.io/upload_images/7166236-64e1a458e5e29d59.jpg?imageMogr2/auto-orient/strip%7CimageView2/2/w/1240)',
  'url(http://upload-images.jianshu.io/upload_images/7166236-9a267a540acb8688.jpg?imageMogr2/auto-orient/strip%7CimageView2/2/w/1240)',
  'url(http://upload-images.jianshu.io/upload_images/7166236-283f5687cb73eea8.jpg?imageMogr2/auto-orient/strip%7CimageView2/2/w/1240)',
 ]; //存储图片Url
 title = 'app';
 shown = false;  //是否显示预览,初始化为否
 selectImageUrl: string; //用于存放选中图片的url
2. Image preview display and disappearance
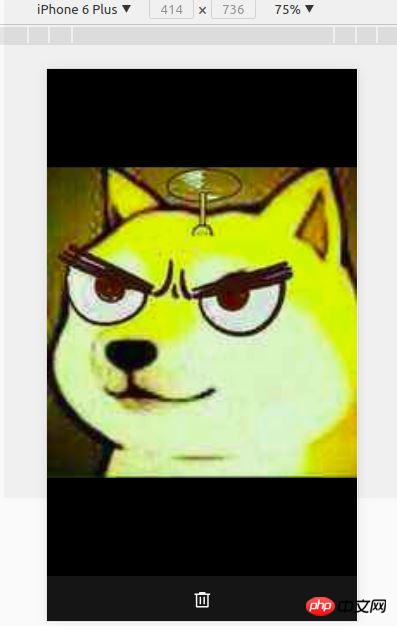
The image preview here uses the native method. WeChat’s approach should be to control the entirestyle through [ngStyle], and I used the same method to generate thumbnails, using The [ngStyle] directive and the *ngIf directive control the display of the preview image, and then bind a click event (click)="touchEvent()" to the range of the preview image to monitor the user's click and implement the function of clicking to exit the preview. The main code is as follows:
<!--预览隐藏的样式-->
<p class="weui-gallery" id="gallery" style="opacity: 0; display: none;">

</p>

<!--预览显示的样式-->
<p class="weui-gallery" id="gallery" style="display: block; opacity: 1;">

</p>
<p class="weui-gallery" id="gallery" style="display: block"
*ngIf="shown">
<span class="weui-gallery__img" (click)="touchEvent()" [ngStyle]="{'background-image':selectImageUrl}"></span>
<p class="weui-gallery__opr">
<a href="javascript:" rel="external nofollow" rel="external nofollow" rel="external nofollow" (click)="onDelete()" class="weui-gallery__del">
<i class="weui-icon-delete weui-icon_gallery-delete"></i>
</a >
</p>
</p>//点击缩略图显示预览
showPicture($event){
console.log("$event.target.backgroundImage:" + $event.target.style.backgroundImage);
this.selectImageUrl = $event.target.style.backgroundImage;
this.shown = true;
}
//点击屏幕退出预览
touchEvent(){
this.shown = false;
}3. Image deletion
Main code for image deletion Nested in the code block of the image preview, just bind a click event ((click)="onDelete()") to the deleted part, delete it and exit the preview when clicked.onDelete(){
if(isUndefined(this.selectImageUrl)){
console.log("查看图片预览,图片url未定义,this.selectImageUrl:" + this.selectImageUrl);
return;
}
//正则去除URL中的双引号
this.selectImageUrl = this.selectImageUrl.replace(/"/g,"");
console.log("(this.picturesUrl.indexOf(this.selectImageUrl):"+this.picturesUrl.indexOf(this.selectImageUrl));
//判断图片URL是否存在
if(this.picturesUrl.indexOf(this.selectImageUrl)!== -1){
this.picturesUrl.splice(this.picturesUrl.indexOf(this.selectImageUrl) , 1);
setTimeout(()=>{
this.shown = false;
},
20);
}else{
console.log("删除图片出错,获取URL或URL格式出错出错:" + this.selectImageUrl )
}
} 

 ##Related recommendations:
The above is the detailed content of Angular2 imitates WeChat to implement 9 image upload and preview example sharing. For more information, please follow other related articles on the PHP Chinese website!


