
 Web Front-end
JS Tutorial
Sharing examples of how to use the validationEngine form validation plug-in
Web Front-end
JS Tutorial
Sharing examples of how to use the validationEngine form validation plug-in
Sharing examples of how to use the validationEngine form validation plug-in

This article will introduce you to the jquery validationEngine form validation plug-in effect with example code. It is very good and has reference value. Friends who need it can refer to it. I hope it can help everyone.
Let me show you the renderings first. If you feel good, please refer to the implementation code:
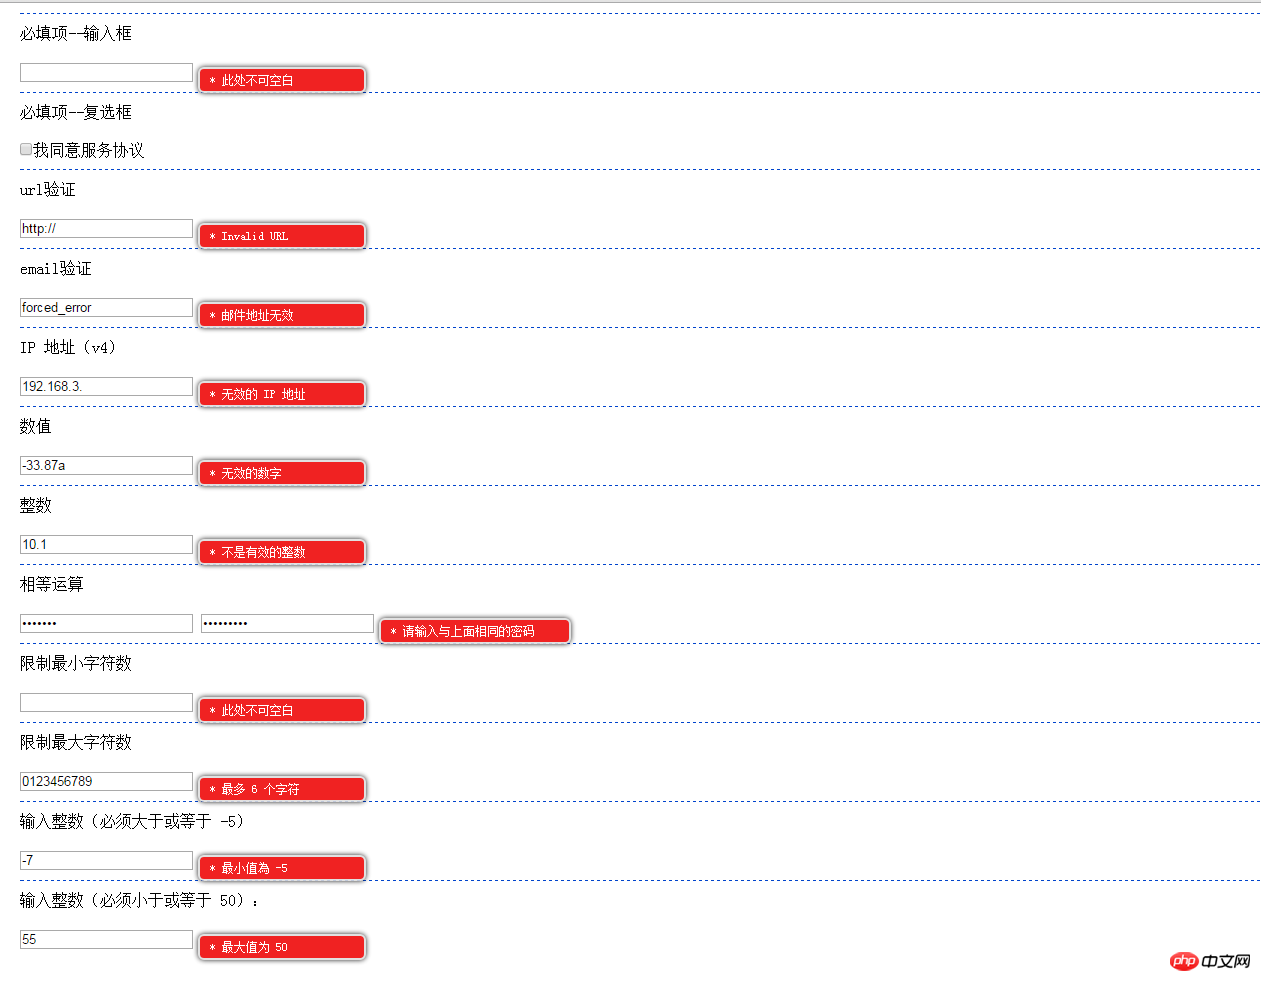
Stop talking nonsense, go directly to the code, you can copy it directly Run:
<!DOCTYPE html>
<html lang="zh">
<head>
<meta charset="UTF-8" />
<meta name="viewport" content="width=device-width, initial-scale=1.0" />
<meta http-equiv="X-UA-Compatible" content="ie=edge" />
<title>validationEngine 插件</title>
<!--<link rel="stylesheet" type="text/css" href="css/validationEngine.jquery.css" rel="external nofollow" />-->
<link href="https://cdn.bootcss.com/jQuery-Validation-Engine/2.6.4/validationEngine.jquery.css" rel="external nofollow" rel="stylesheet">
<style type="text/css">
*{
padding: 0;
margin: 0;
}
#form{
padding-left: 20px;
}
#form .line{
padding: 10px 0;
margin: 10px 0;
border-top: 1px dashed #0044CC;
}
</style>
</head>
<body>
<form action="" method="post" id="form">
<p class='line'>
必填项--输入框
</p>
<input value="" class="validate[required]" type="text" name="req">
<p class='line'>
必填项--复选框
</p>
<input class="validate[required]" type="checkbox" name="agree">我同意服务协议
<p class='line'>
url验证
</p>
<input value="http://" class="validate[required,custom[url]]" type="text" name="url">
<p class='line'>
email验证
</p>
<input value="forced_error" class="validate[required,custom[email]]" type="text" name="email">
<p class='line'>
IP 地址(v4)
</p>
<input value="192.168.3." class="validate[required,custom[ipv4]]" type="text" name="ip">
<p class='line'>
数值
</p>
<input value="-33.87a" class="validate[required,custom[number]]" type="text" name="number">
<p class='line'>
整数
</p>
<input value="10.1" class="validate[required,custom[integer]]" type="text" name="integer">
<p class='line'>
相等运算
</p>
<input value="karnius" class="validate[required]" type="password" name="password" id="password">
<input value="kaniusBAD" class="validate[required,equals[password]]" type="password" name="password2" id="password2">
<p class='line'>
限制最小字符数
</p>
<input value="" class="validate[required,minSize[6]]" type="text" name="minsize">
<p class='line'>
限制最大字符数
</p>
<input value="0123456789" class="validate[optional,maxSize[6]]" type="text" name="maxsize">
<p class='line'>
输入整数(必须大于或等于 -5)
</p>
<input value="-7" class="validate[required,custom[integer],min[-5]]" type="text" name="min">
<p class='line'>
输入整数(必须小于或等于 50):
</p>
<input value="55" class="validate[required,custom[integer],max[50]]" type="text" name="max">
</form>
<!--<script src="../jquery/jquery-1.12.4.min.js" type="text/javascript" charset="utf-8"></script>-->
<script src="https://cdn.bootcss.com/jquery/1.12.4/jquery.min.js"></script>
<!--<script src="js/jquery.validationEngine.min.js" type="text/javascript" charset="utf-8"></script>-->
<script src="https://cdn.bootcss.com/jQuery-Validation-Engine/2.6.4/jquery.validationEngine.min.js"></script>
<!--<script src="js/jquery.validationEngine-zh_CN.min.js" type="text/javascript" charset="utf-8"></script>-->
<script src="https://cdn.bootcss.com/jQuery-Validation-Engine/2.6.4/languages/jquery.validationEngine-zh_CN.min.js"></script>
<script type="text/javascript">
jQuery(document).ready(function() {
jQuery('#form').validationEngine({
scroll: false,
promptPosition: 'centerRight',
maxErrorsPerField: 1,
showOneMessage: true,
addPromptClass: 'formError-noArrow formError-text'
});
});
</script>
</body>
</html>Related recommendations:
JavaScript Introduction to the use of form validation plug-in
jquery form validation plug-in usage example in Yii framework_php example
The above is the detailed content of Sharing examples of how to use the validationEngine form validation plug-in. For more information, please follow other related articles on the PHP Chinese website!

Hot AI Tools

Undresser.AI Undress
AI-powered app for creating realistic nude photos

AI Clothes Remover
Online AI tool for removing clothes from photos.

Undress AI Tool
Undress images for free

Clothoff.io
AI clothes remover

AI Hentai Generator
Generate AI Hentai for free.

Hot Article
Hot Tools

Notepad++7.3.1
Easy-to-use and free code editor

SublimeText3 Chinese version
Chinese version, very easy to use

Zend Studio 13.0.1
Powerful PHP integrated development environment

Dreamweaver CS6
Visual web development tools

SublimeText3 Mac version
God-level code editing software (SublimeText3)
Hot Topics
 1378
1378
 52
52

 How to use DirectX repair tool? Detailed usage of DirectX repair tool
Mar 15, 2024 am 08:31 AM
How to use DirectX repair tool? Detailed usage of DirectX repair tool
Mar 15, 2024 am 08:31 AM
The DirectX repair tool is a professional system tool. Its main function is to detect the DirectX status of the current system. If an abnormality is found, it can be repaired directly. There may be many users who don’t know how to use the DirectX repair tool. Let’s take a look at the detailed tutorial below. 1. Use repair tool software to perform repair detection. 2. If it prompts that there is an abnormal problem in the C++ component after the repair is completed, please click the Cancel button, and then click the Tools menu bar. 3. Click the Options button, select the extension, and click the Start Extension button. 4. After the expansion is completed, re-detect and repair it. 5. If the problem is still not solved after the repair tool operation is completed, you can try to uninstall and reinstall the program that reported the error.
 PyCharm Beginner's Guide: Comprehensive understanding of plug-in installation!
Feb 25, 2024 pm 11:57 PM
PyCharm Beginner's Guide: Comprehensive understanding of plug-in installation!
Feb 25, 2024 pm 11:57 PM
PyCharm is a powerful and popular Python integrated development environment (IDE) that provides a wealth of functions and tools so that developers can write code more efficiently. The plug-in mechanism of PyCharm is a powerful tool for extending its functions. By installing different plug-ins, various functions and customized features can be added to PyCharm. Therefore, it is crucial for newbies to PyCharm to understand and be proficient in installing plug-ins. This article will give you a detailed introduction to the complete installation of PyCharm plug-in.
![Error loading plugin in Illustrator [Fixed]](https://img.php.cn/upload/article/000/465/014/170831522770626.jpg?x-oss-process=image/resize,m_fill,h_207,w_330) Error loading plugin in Illustrator [Fixed]
Feb 19, 2024 pm 12:00 PM
Error loading plugin in Illustrator [Fixed]
Feb 19, 2024 pm 12:00 PM
When launching Adobe Illustrator, does a message about an error loading the plug-in pop up? Some Illustrator users have encountered this error when opening the application. The message is followed by a list of problematic plugins. This error message indicates that there is a problem with the installed plug-in, but it may also be caused by other reasons such as a damaged Visual C++ DLL file or a damaged preference file. If you encounter this error, we will guide you in this article to fix the problem, so continue reading below. Error loading plug-in in Illustrator If you receive an "Error loading plug-in" error message when trying to launch Adobe Illustrator, you can use the following: As an administrator
 What is the Chrome plug-in extension installation directory?
Mar 08, 2024 am 08:55 AM
What is the Chrome plug-in extension installation directory?
Mar 08, 2024 am 08:55 AM
What is the Chrome plug-in extension installation directory? Under normal circumstances, the default installation directory of Chrome plug-in extensions is as follows: 1. The default installation directory location of chrome plug-ins in windowsxp: C:\DocumentsandSettings\username\LocalSettings\ApplicationData\Google\Chrome\UserData\Default\Extensions2. chrome in windows7 The default installation directory location of the plug-in: C:\Users\username\AppData\Local\Google\Chrome\User
 Share three solutions to why Edge browser does not support this plug-in
Mar 13, 2024 pm 04:34 PM
Share three solutions to why Edge browser does not support this plug-in
Mar 13, 2024 pm 04:34 PM
When users use the Edge browser, they may add some plug-ins to meet more of their needs. But when adding a plug-in, it shows that this plug-in is not supported. How to solve this problem? Today, the editor will share with you three solutions. Come and try it. Method 1: Try using another browser. Method 2: The Flash Player on the browser may be out of date or missing, causing the plug-in to be unsupported. You can download the latest version from the official website. Method 3: Press the "Ctrl+Shift+Delete" keys at the same time. Click "Clear Data" and reopen the browser.
 Introduction to HTTP 525 status code: explore its definition and application
Feb 18, 2024 pm 10:12 PM
Introduction to HTTP 525 status code: explore its definition and application
Feb 18, 2024 pm 10:12 PM
Introduction to HTTP 525 status code: Understand its definition and usage HTTP (HypertextTransferProtocol) 525 status code means that an error occurred on the server during the SSL handshake, resulting in the inability to establish a secure connection. The server returns this status code when an error occurs during the Transport Layer Security (TLS) handshake. This status code falls into the server error category and usually indicates a server configuration or setup problem. When the client tries to connect to the server via HTTPS, the server has no
 How to use Baidu Netdisk-How to use Baidu Netdisk
Mar 04, 2024 pm 09:28 PM
How to use Baidu Netdisk-How to use Baidu Netdisk
Mar 04, 2024 pm 09:28 PM
Many friends still don’t know how to use Baidu Netdisk, so the editor will explain how to use Baidu Netdisk below. If you are in need, hurry up and take a look. I believe it will be helpful to everyone. Step 1: Log in directly after installing Baidu Netdisk (as shown in the picture); Step 2: Then select "My Sharing" and "Transfer List" according to the page prompts (as shown in the picture); Step 3: In "Friend Sharing", you can share pictures and files directly with friends (as shown in the picture); Step 4: Then select "Share" and then select computer files or network disk files (as shown in the picture); Fifth Step 1: Then you can find friends (as shown in the picture); Step 6: You can also find the functions you need in the "Function Treasure Box" (as shown in the picture). The above is the editor’s opinion
 Learn to copy and paste quickly
Feb 18, 2024 pm 03:25 PM
Learn to copy and paste quickly
Feb 18, 2024 pm 03:25 PM
How to use the copy-paste shortcut keys Copy-paste is an operation we often encounter when using computers every day. In order to improve work efficiency, it is very important to master the copy and paste shortcut keys. This article will introduce some commonly used copy and paste shortcut keys to help readers perform copy and paste operations more conveniently. Copy shortcut key: Ctrl+CCtrl+C is the shortcut key for copying. By holding down the Ctrl key and then pressing the C key, you can copy the selected text, files, pictures, etc. to the clipboard. To use this shortcut key,
