

Detailed explanation of webpack multi-entry file page packaging

本文主要介绍了webpack多入口文件页面打包配置详解,小编觉得挺不错的,现在分享给大家,也给大家做个参考。一起跟随小编过来看看吧,希望帮助到大家。
大多数情况下,我们使用 webpack来打包单页应用程序,这个时候只需要配置一个入口,一个模板文件,但也不尽是如此,有时候也会碰到多页面的项目,而且以我的经验来看,这种情况出现的频率还不低,例如项目比较大,无法进行全局的把握,或者项目需要多次的更新迭代等,都适合做成多页面程序,这就涉及到了 webpack的多页面文件的打包配置问题。
手动配置
单页应用程序和多页应用程序的 webpack配置文件其实绝大部分都还是相同的,只不过多页的配置需要在单页配置的基础上顾及到多个页面罢了,loader、output、plugins这些基本都不需要改动,需要改动的一般都是入口文件 entry,如果你用到了 抽离css样式的插件 extract-text-webpack-plugin、自动模板插件 html-webpack-plugin的话,那么还需要对这两个插件进行额外的改写,大多数情况下,我们也都只需要改动这三个地方,所以本文就只简单说下这三个位置,如果在实际的项目中还有其他的地方需要改动,参照这三个位置即可。
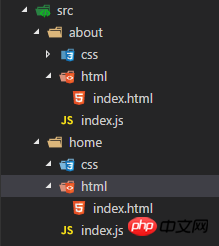
示例的文件目录如下:
entry
单页应用程序的入口配置一般如下所示:
entry: resolve(__dirname, "src/home/index.js")
这个配置就是指定 webpack从 /src/home/index.js这个文件开始进入,进行一系列的打包编译过程。
如果是多页应用程序,则需要多个入口文件,例如:
entry: {
 home: resolve(__dirname, "src/home/index.js"),
 about: resolve(__dirname, "src/about/index.js")
}这样,整个项目就有了两个入口 home和 about
extract-text-webpack-plugin
extract-text-webpack-plugin 插件主要是为了抽离css样式,防止将样式打包在 js中引起页面样式加载错乱的现象,单页程序中,一般这样使用此插件:
plugins: [
 new ExtractTextPlugin('style.[contenthash].css')
]
而到了多页程序,因为存在多个入口文件以及对应的多个页面,每个页面都有自己的 css样式,所以需要为每个页面各自配置一下:
plugins: [
 new ExtractTextPlugin('home/[name].[contenthash].css'),
 new ExtractTextPlugin('about/[name].[contenthash].css')
]
除此之外还需要注意一点,每个页面也只需要自己的 css样式,理论上把别的页面 css样式文件也打包到自己的页面中当然也是可以的,但显然是不合理的,这只会增加冗余代码,还可能会导致不可预测的样式覆盖等问题,所以需要对下面这种 loader配置进行修改:
{
  test: /\.css$/,
  loader: 'style!css!autoprefixer'
},
{
  test: /\.scss$/,
  loaders: [
   'style',
   'css?modules&importLoaders=1&localIdentName=[path]___[name]__[local]___[hash:base64:5]',
   'sass',
   'autoprefixer'
  ]
},上面的配置会把所有编译出来的 css文件打包到同一个文件中,我们要做的就是把这些 css分离开,每个页面都有各自单独的 css样式文件:
// 为每个页面定义一个 ExtractTextPlugin
const homeExtractCss = new ExtractTextPlugin('home/[name].[contenthash].css')
const aboutExtractCss = new ExtractTextPlugin('about/[name].[contenthash].css')
// ...
module: {
  rules: [
   // 每个页面的 ExtractTextPlugin 只处理这个页面的样式文件
  {
    test: /src(\\|\/)home(\\|\/)css(\\|\/).*\.(css|scss)$/,
    use: homePageExtractCss.extract({
     fallback: 'style-loader',
     use: ['css-loader', 'postcss-loader', 'sass-loader']
    })
   },
   {
    test: /src(\\|\/)about(\\|\/)css(\\|\/).*\.(css|scss)$/,
    use: salePersonalCenterExtractCss.extract({
     fallback: 'style-loader',
     use: ['css-loader', 'postcss-loader', 'sass-loader']
    })
   }
 ]
}
// ...
// 每个页面都有各自的 ExtractTextPlugin,所以需要都声明一遍
plugins: [
  homeExtractCss,
  aboutExtractCss
]html-webpack-plugin
html-webpack-plugin插件的使用,在单页应用程序和多页应用程序中的 webpack配置没什么区别
new HtmlWebpackPlugin({
  filename: 'home/home.html',
  template: 'src/home/html/index.html',
  inject: true,
  minify: {
    removeComments: true,
    collapseWhitespace: true
  }
 })
 new HtmlWebpackPlugin({
  filename: 'about/about.html',
  template: 'src/about/html/index.html',
  inject: true,
  minify: {
    removeComments: true,
    collapseWhitespace: true
  }
})有几个页面,就对每个页面进行上述配置即可。
自动配置
上述的配置代码已经可以满足多页面开发需求了,但是有一点似乎有些遗憾,那就是每增加一个页面,就需要更新一遍 entry、extract-text-webpack-plugin、HtmlWebpackPlugin的配置,虽然只是几行代码的问题,而且基本上都是复制粘贴没什么难度,但毕竟代码再少也需要过问,并且需要改的地方比较多,仓促之下可能还会遗漏,要是能一劳永逸,写一遍代码,无论以后增删页面都不需要过问就好了。
稍微观察下这个目录就可以发现,这个目录结构其实是很有规律的:
每个页面都是 src/目录下的一个文件夹,这个文件夹中有两个子目录,分别存放这个页面的模板 html,样式文件 css,还有一个入口文件 index.js
既然有规则,那么肯定是可以进行程序编码的,如果按照这种规则,每个页面都是 ./src下的一个目录,目录名即为页面名,并且这个目录中的结构也都是相同的,那么可以通过一个通用方法来获取所有的页面名称(例如 home、about),这个通用方法的一个示例如下:
function getEntry () {
let globPath = 'src/**/html/*.html'
// (\/|\\\\) 这种写法是为了兼容 windows和 mac系统目录路径的不同写法
let pathDir = 'src(\/|\\\\)(.*?)(\/|\\\\)html'
let files = glob.sync(globPath)
let dirname, entries = []
for (let i = 0; i < files.length; i++) {
dirname = path.dirname(files[i])
entries.push(dirname.replace(new RegExp('^' + pathDir), '$2'))
}
return entries
}借助 glob这个库,遍历 .src/目录下具有这种规律 src/**/html/*.html的子目录,通过正则匹配出这个子目录的名称
获取到了所有的页面名称,下面就好办了。
entry
// entry: resolve(__dirname, "src/home/index.js")
// 改为
entry: addEntry()
//...
function addEntry () {
 let entryObj = {}
 getEntry().forEach(item => {
  entryObj[item] = resolve(__dirname, 'src', item, 'index.js')
 })
 return entryObj
}extract-text-webpack-plugin
// plugins: [
 // new ExtractTextPlugin('home/[name].[contenthash].css'),
 // new ExtractTextPlugin('about/[name].[contenthash].css')
//]
// 改为
const pageExtractCssArray = []
getEntry().forEach(item => {
 pageExtractCssArray.push(new ExtractTextPlugin(item + '/[name].[contenthash].css'))
})
// ...
plugins: [...pageExtractCssArray]module.rules样式相关的两个loaders删掉,改为动态添加:
getEntry().forEach((item, i) => {
 webpackconfig.module.rules.push({
  test: new RegExp('src' + '(\\\\|\/)' + item + '(\\\\|\/)' + 'css' + '(\\\\|\/)' + '.*\.(css|scss)$'),
  use: pageExtractCssArray[i].extract({
   fallback: 'style-loader',
   use: ['css-loader', 'postcss-loader', 'sass-loader']
  })
 })
})
// ...
module.exports = webpackconfightml-webpack-plugin
plugins中无需手动初始化 html-webpack-plugin,改为动态添加:
getEntry().forEach(pathname => {
 let conf = {
  filename: path.join(pathname, pathname) + '.html',
  template: path.join(__dirname, 'src', pathname, 'html', 'index.html')
 }
 webpackconfig.plugins.push(new HtmlWebpackPlugin(conf))
})
// ...
module.exports = webpackconfig完成了上述修改后,以后无论是在项目中添加页面还是删除页面,都无需再对 webpack配置进行手动修改了,虽然开始时开起来似乎这种动态的自动配置代码比较多,而且稍微复杂一点,但是从长期来看,绝对是一劳永逸的好做法。
另外,如果你的项目目录结构和我示例的目录结构不一样,那么就需要你根据自己的目录结构对代码进行少许的修改,但整体解决问题的方法是不变的,一个易于维护的项目,目录结构都该是有律可循的。
相关推荐:
webpack中的hash、chunkhash、contenthash区别分享
The above is the detailed content of Detailed explanation of webpack multi-entry file page packaging. For more information, please follow other related articles on the PHP Chinese website!

Hot AI Tools

Undresser.AI Undress
AI-powered app for creating realistic nude photos

AI Clothes Remover
Online AI tool for removing clothes from photos.

Undress AI Tool
Undress images for free

Clothoff.io
AI clothes remover

AI Hentai Generator
Generate AI Hentai for free.

Hot Article
Hot Tools

Notepad++7.3.1
Easy-to-use and free code editor

SublimeText3 Chinese version
Chinese version, very easy to use

Zend Studio 13.0.1
Powerful PHP integrated development environment

Dreamweaver CS6
Visual web development tools

SublimeText3 Mac version
God-level code editing software (SublimeText3)
Hot Topics
 1371
1371
 52
52

 Share an easy way to package PyCharm projects
Dec 30, 2023 am 09:34 AM
Share an easy way to package PyCharm projects
Dec 30, 2023 am 09:34 AM
Share the simple and easy-to-understand PyCharm project packaging method. With the popularity of Python, more and more developers use PyCharm as the main tool for Python development. PyCharm is a powerful integrated development environment that provides many convenient functions to help us improve development efficiency. One of the important functions is project packaging. This article will introduce how to package projects in PyCharm in a simple and easy-to-understand way, and provide specific code examples. Why package projects? Developed in Python
 Detailed explanation of VSCode functions: How does it help you improve work efficiency?
Mar 25, 2024 pm 05:27 PM
Detailed explanation of VSCode functions: How does it help you improve work efficiency?
Mar 25, 2024 pm 05:27 PM
Detailed explanation of VSCode functions: How does it help you improve work efficiency? With the continuous development of the software development industry, developers' pursuit of work efficiency and code quality have become important goals in their work. In this process, the choice of code editor becomes a key decision. Among many editors, Visual Studio Code (VSCode for short) is loved by the majority of developers for its powerful functions and flexible scalability. This article will introduce some functions of VSCode in detail and discuss
 Is PHP front-end or back-end in web development?
Mar 24, 2024 pm 02:18 PM
Is PHP front-end or back-end in web development?
Mar 24, 2024 pm 02:18 PM
PHP belongs to the backend in web development. PHP is a server-side scripting language, mainly used to process server-side logic and generate dynamic web content. Compared with front-end technology, PHP is more used for back-end operations such as interacting with databases, processing user requests, and generating page content. Next, specific code examples will be used to illustrate the application of PHP in back-end development. First, let's look at a simple PHP code example for connecting to a database and querying data:
 How to enable administrative access from the cockpit web UI
Mar 20, 2024 pm 06:56 PM
How to enable administrative access from the cockpit web UI
Mar 20, 2024 pm 06:56 PM
Cockpit is a web-based graphical interface for Linux servers. It is mainly intended to make managing Linux servers easier for new/expert users. In this article, we will discuss Cockpit access modes and how to switch administrative access to Cockpit from CockpitWebUI. Content Topics: Cockpit Entry Modes Finding the Current Cockpit Access Mode Enable Administrative Access for Cockpit from CockpitWebUI Disabling Administrative Access for Cockpit from CockpitWebUI Conclusion Cockpit Entry Modes The cockpit has two access modes: Restricted Access: This is the default for the cockpit access mode. In this access mode you cannot access the web user from the cockpit
 Transform Python code into an independent application: the alchemy of PyInstaller
Feb 19, 2024 pm 01:27 PM
Transform Python code into an independent application: the alchemy of PyInstaller
Feb 19, 2024 pm 01:27 PM
PyInstaller is an open source library that allows developers to compile Python code into platform-independent self-contained executables (.exe or .app). It does this by packaging Python code, dependencies, and supporting files together to create standalone applications that can run without installing a Python interpreter. The advantage of PyInstaller is that it removes dependency on the Python environment, allowing applications to be easily distributed and deployed to end users. It also provides a builder mode that allows users to customize the application's settings, icons, resource files, and environment variables. Install PyInstal using PyInstaller to package Python code
 What are web standards?
Oct 18, 2023 pm 05:24 PM
What are web standards?
Oct 18, 2023 pm 05:24 PM
Web standards are a set of specifications and guidelines developed by W3C and other related organizations. It includes standardization of HTML, CSS, JavaScript, DOM, Web accessibility and performance optimization. By following these standards, the compatibility of pages can be improved. , accessibility, maintainability and performance. The goal of web standards is to enable web content to be displayed and interacted consistently on different platforms, browsers and devices, providing better user experience and development efficiency.
 Declaration of Independence for Python Applications: PyInstaller's Road to Freedom
Feb 20, 2024 am 09:27 AM
Declaration of Independence for Python Applications: PyInstaller's Road to Freedom
Feb 20, 2024 am 09:27 AM
PyInstaller: Independence of Python applications PyInstaller is an open source python packaging tool that packages Python applications and their dependencies into an independent executable file. This process eliminates dependence on the Python interpreter while allowing applications to run on a variety of platforms, including Windows, MacOS, and Linux. Packaging Process The packaging process of PyInstaller is relatively simple and involves the following steps: pipinstallpyinstallerpyinstaller--onefile--windowedmain.py--onefile option creates a single
 The ultimate evolution of Python applications: PyInstaller emerges from the cocoon and becomes a butterfly
Feb 19, 2024 pm 03:27 PM
The ultimate evolution of Python applications: PyInstaller emerges from the cocoon and becomes a butterfly
Feb 19, 2024 pm 03:27 PM
PyInstaller is a revolutionary tool that empowers Python applications beyond their original scripting form. By compiling Python code into standalone executable files, PyInstaller unlocks a new realm of code distribution, deployment, and maintenance. From a single script to a powerful application In the past, Python scripts only existed in a specific Python environment. Distributing such a script requires users to install Python and the necessary libraries, which is a time-consuming and cumbersome process. PyInstaller introduces the concept of packaging, combining Python code with all required dependencies into a single executable file. The Art of Code Packaging PyInstaller’s Work
