

Sharing examples of jquery imitating WeChat chat interface

This article mainly introduces the relevant code of jquery imitating WeChat chat interface in detail. It has certain reference value. Interested friends can refer to it. I hope it can help everyone.
First take a look at our renderings.
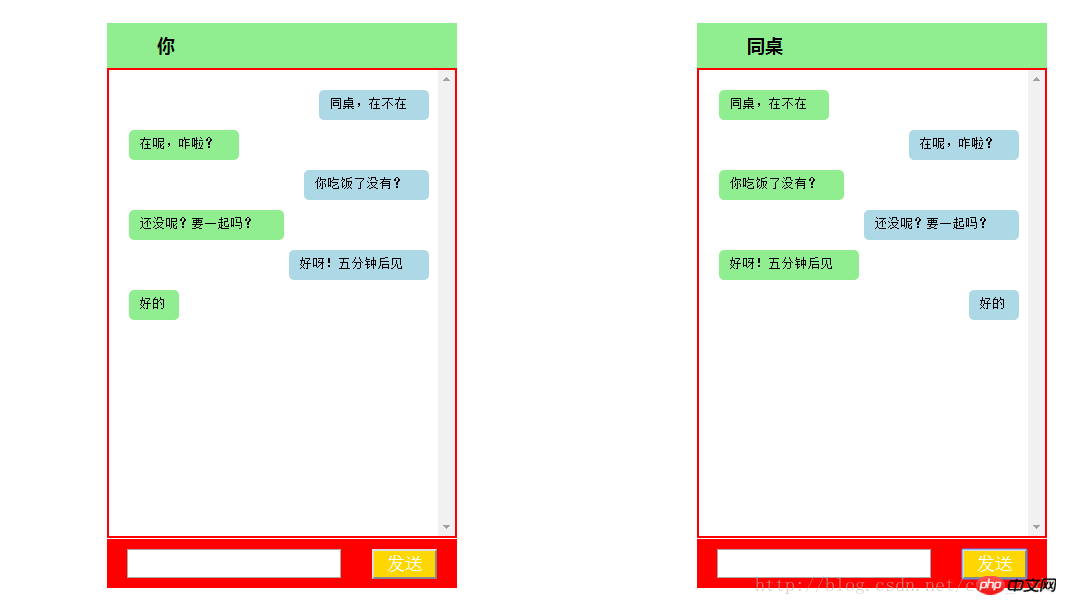
#The color may be a bit inappropriate, but most of the basic functions are achieved. That is, you are talking to your deskmate, and the messages you send are on the left side of your device and on the right side of his device.
First write the overall framework and put two boxes in a large container, which are the left and right interfaces. Then each box contains three parts: header, content area, and bottom. Just write on one side and paste and copy on the other side.
First define a large
to hold the left and right boxes.
<p id = "main">

 //左侧聊天界面
 <p id = "box">
  <p id = "top"><span>你</span></p>
  <p id = "content">
   <select multiple="multiple" id="leftcontent">

   </select>
  </p>
  <p id = "bottom">
   <input type = "text" class = "sendText" id = "leftText" />
   <input type = "button" id = "leftdBtn" class="sendBtn" value = "发送">
  </p>
 </p>

//右侧聊天界面
 <p id = "box">
  <p id = "top"><span>同桌</span></p>
  <p id = "content">
   <select multiple="multiple" id="rightcontent">

   </select>
  </p>
  <p id = "bottom">
   <input type = "text" class = "sendText" id = "rightText" />
   <input type = "button" id = "rightBtn" class="sendBtn" value = "发送">
  </p>
 </p>

</p>
First of all, the codes for these two boxes can be directly copied and pasted. You must also pay attention to the following differences: The ids in
<p id = "content">
   <select multiple="multiple" id="rightcontent">
   </select>
</p>
select are different. We usually use
option1
option2
option3
like this. The select tag is used here when you and your deskmate chat for a whole screen. It has a scroll bar to slide up and down to see what you talked about. Then add some css styles on the basis of the above, so that the interface effect will come out.
The next step is to write the jquery code. First of all, think about whether what you say on your side should appear on the right side of your device and on the left side of your deskmate's device?
We first control sending messages on the left side of your interface. After writing the text, press the send button to make it appear on the right side of your interface and also on the left side of your deskmate's device.
We need to follow the following steps to achieve:
1. Get the contents of the text box you entered.
2. Generate an option tag.
2.1 The style of the generated tag, that is, the generated span tag is positioned and displayed on the right side of your device.
2.2 Insert the content of the generated tag, that is, insert the content in the text box
3. Append the option tag to your select.
4. Position and display the option label on the left side of your deskmate's device.
5. Clear the contents of the text box.
function sendLeft(){

 //1.获得你输入的文本框中的内容。
 var text = $("#leftText").val();

 //2。生成一个span标签。
 var option = $("`<option></option>`");
 // 2.1 生成标签的样式即生成的span标签在你的设备的右侧进行定位并显示。
 var len = text.length;
 option.css("width", len * 15 + "px");
 option.css("marginLeft", 350 - len * 15 - 60 + "px");
  //2.2 生成标签的内容
  option.html(text);

  //3. 将内容追加到select中。
  $("#leftcontent").append(option);

  //4. 追加生成的标签(右侧)
  var option1 = $("<option></option>");
  option1.addClass("optionRight");
  option1.css("width", len * 15 + "px");
  option1.css("marginLeft", 10 +"px");
  option1.html(text);
  $("#rightcontent").append(option1);

  //5. 清除文本框的内容
  $("#leftText").val("");
  }
}Similarly, when you display the equipment at your deskmate, it is similar to the one on the left.
Just write it yourself.
After writing the message functions sent on the left and right sides, the message cannot be sent at this time because the event has not been bound yet. First, there are two ways to send messages:
①. Button sending
Button sending requires binding events to the button
 $("#leftdBtn").bind("click", sendLeft);
$("#rightBtn").bind("click", sendRight);②. Press Enter to send
$(document).keydown(function(event){
   var txt1 = $("#leftText").val();
   var txt2 = $("#rightText").val()
   if(event.keyCode == 13){
    if( txt1.trim() != ""){
     sendLeft();
    }
    if(txt2.trim() != ""){
     sendRight();
    }
   }
});Finally attach the complete source code:
<!DOCTYPE html>
<html>
<head>
<meta charset = "utf-8"/>
 <title>模仿微信聊天</title>
 <script type="text/javascript" src = "http://libs.baidu.com/jquery/1.9.0/jquery.js"></script>
 <style type="text/css">
 *{
  margin: 0px;
  padding: 0px;
 }

 #main{
  width: 90%;
  margin: 10px auto;
 }
 #box{
  float: left;
  margin:20px 120px;
 }

 #top{
  width: 310px;
  padding: 10px 20px;
  color: white;
  background-color: lightgreen;
  font-size: 18px;
  font-family: "微软雅黑";
  font-weight: bold;
 }

 #content{
  background-color: white;
 }

 select{
  width: 350px;
  height: 470px;
  background-color: white;
  padding: 10px;
  border:2px solid red;

 }

 #bottom{
  width: 310px;
  background-color: red;
  padding: 10px 20px;
 }

 .sendText{
  height: 25px;
  width: 210px;
  font-size: 16px;
 }

 .sendBtn{
  width: 65px;
  height: 30px;

  float: right;
  background-color: gold;
  color: white;
  text-align: center;
  font-size: 18px;
  }

 span{
   background-color: lightgreen;
   color: #000;
   padding: 10px 30px;

  }
  option{
   padding: 5px 10px;
   margin-top:10px;
   border-radius:5px;
   width: 10px;
   min-height: 20px;
  }

  .optionRight{
   background-color: lightgreen;
  }

  .optionLeft{
   background-color: lightblue;
  }
 </style>

 <script>
 $(function(){

  $("#leftdBtn").bind("click", sendLeft);
  $("#rightBtn").bind("click", sendRight);

  function sendLeft(){

  //1. 获取输入框中的内容
  var text = $("#leftText").val();
  //2. 生成标签
  var option = $("<option></option>");
  option.addClass("optionLeft");
  //2.1 生成标签的样式
  var len = text.length;
  //option.css("width", len * 15 + "px","marginLeft", 350 - len * 15 - 60 + "px")
   option.css("width", len * 15 + "px");
   option.css("marginLeft", 350 - len * 15 - 60 + "px");
  //2.2 生成标签的内容
  option.html(text);
  //3. 将内容追加到select中。
  $("#leftcontent").append(option);
  //4. 追加生成的标签(右侧)
  var option1 = $("<option></option>");
  option1.addClass("optionRight");
  option1.css("width", len * 15 + "px");
  option1.css("marginLeft", 10 +"px");
  option1.html(text);
  $("#rightcontent").append(option1);

  //5. 清除文本框的内容
  $("#leftText").val("");
  }


 function sendRight(){

  //1. 获取输入框中的内容
  var text = $("#rightText").val();
  //2. 生成标签
  var option = $("<option></option>");
  option.addClass("optionLeft");
  //2.1 生成标签的样式
  var len = text.length;
  //option.css("width", len * 15 + "px","marginLeft", 350 - len * 15 - 60 + "px")
   option.css("width", len * 15 + "px");
   option.css("marginLeft", 350 - len * 15 - 60 + "px");
  //2.2 生成标签的内容
  option.html(text);
  //3. 将内容追加到select中。
  $("#rightcontent").append(option);
  //4. 追加生成的标签(右侧)
  var option1 = $("<option></option>");
  option1.addClass("optionRight");
  option1.css("width", len * 15 + "px");
  option1.css("marginLeft", 10 +"px");
  option1.html(text);
  $("#leftcontent").append(option1);

  $("#rightText").val("");
  }


  $(document).keydown(function(event){

   var txt1 = $("#leftText").val();
   var txt2 = $("#rightText").val()
   if(event.keyCode == 13){
    if( txt1.trim() != ""){
     sendLeft();
    }
    if(txt2.trim() != ""){
     sendRight();
    }
   }
  });
 })
 </script>
</head>
<body>
<p id = "main">
 <p id = "box">
  <p id = "top"><span>你</span></p>
  <p id = "content">
   <select multiple="multiple" id="leftcontent">

   </select>
  </p>
  <p id = "bottom">
   <input type = "text" class = "sendText" id = "leftText" />
   <input type = "button" id = "leftdBtn" class="sendBtn" value = "发送">
  </p>
 </p>

  <p id = "box">
  <p id = "top"><span>同桌</span></p>
  <p id = "content">
   <select multiple="multiple" id="rightcontent">

   </select>
  </p>
  <p id = "bottom">
   <input type = "text" class = "sendText" id = "rightText" />
   <input type = "button" id = "rightBtn" class="sendBtn" value = "发送">
  </p>
 </p>
</p>
</body>
</html>Related recommendations:
Examples to explain how to imitate WeChat chat bubbles using CSS3
js original sound to implement a simple WeChat chat function
CSS3 Example of imitating WeChat chat bubble code
The above is the detailed content of Sharing examples of jquery imitating WeChat chat interface. For more information, please follow other related articles on the PHP Chinese website!

Hot AI Tools

Undresser.AI Undress
AI-powered app for creating realistic nude photos

AI Clothes Remover
Online AI tool for removing clothes from photos.

Undress AI Tool
Undress images for free

Clothoff.io
AI clothes remover

Video Face Swap
Swap faces in any video effortlessly with our completely free AI face swap tool!

Hot Article
Hot Tools

Notepad++7.3.1
Easy-to-use and free code editor

SublimeText3 Chinese version
Chinese version, very easy to use

Zend Studio 13.0.1
Powerful PHP integrated development environment

Dreamweaver CS6
Visual web development tools

SublimeText3 Mac version
God-level code editing software (SublimeText3)
Hot Topics
 1386
1386
 52
52

 How to share Quark Netdisk to Baidu Netdisk?
Mar 14, 2024 pm 04:40 PM
How to share Quark Netdisk to Baidu Netdisk?
Mar 14, 2024 pm 04:40 PM
Quark Netdisk and Baidu Netdisk are very convenient storage tools. Many users are asking whether these two softwares are interoperable? How to share Quark Netdisk to Baidu Netdisk? Let this site introduce to users in detail how to save Quark network disk files to Baidu network disk. How to save files from Quark Network Disk to Baidu Network Disk Method 1. If you want to know how to transfer files from Quark Network Disk to Baidu Network Disk, first download the files that need to be saved on Quark Network Disk, and then open the Baidu Network Disk client. , select the folder where the compressed file is to be saved, and double-click to open the folder. 2. After opening the folder, click "Upload" in the upper left corner of the window. 3. Find the compressed file that needs to be uploaded on your computer and click to select it.
 How to share NetEase Cloud Music to WeChat Moments_Tutorial on sharing NetEase Cloud Music to WeChat Moments
Mar 25, 2024 am 11:41 AM
How to share NetEase Cloud Music to WeChat Moments_Tutorial on sharing NetEase Cloud Music to WeChat Moments
Mar 25, 2024 am 11:41 AM
1. First, we enter NetEase Cloud Music, and then click on the software homepage interface to enter the song playback interface. 2. Then in the song playback interface, find the sharing function button in the upper right corner, as shown in the red box in the figure below, click to select the sharing channel; in the sharing channel, click the "Share to" option at the bottom, and then select the first "WeChat Moments" allows you to share content to WeChat Moments.
 How to share files with friends on Baidu Netdisk
Mar 25, 2024 pm 06:52 PM
How to share files with friends on Baidu Netdisk
Mar 25, 2024 pm 06:52 PM
Recently, Baidu Netdisk Android client has ushered in a new version 8.0.0. This version not only brings many changes, but also adds many practical functions. Among them, the most eye-catching is the enhancement of the folder sharing function. Now, users can easily invite friends to join and share important files in work and life, achieving more convenient collaboration and sharing. So how do you share the files you need to share with your friends? Below, the editor of this site will give you a detailed introduction. I hope it can help you! 1) Open Baidu Cloud APP, first click to select the relevant folder on the homepage, and then click the [...] icon in the upper right corner of the interface; (as shown below) 2) Then click [+] in the "Shared Members" column 】, and finally check all
 How to use PUT request method in jQuery?
Feb 28, 2024 pm 03:12 PM
How to use PUT request method in jQuery?
Feb 28, 2024 pm 03:12 PM
How to use PUT request method in jQuery? In jQuery, the method of sending a PUT request is similar to sending other types of requests, but you need to pay attention to some details and parameter settings. PUT requests are typically used to update resources, such as updating data in a database or updating files on the server. The following is a specific code example using the PUT request method in jQuery. First, make sure you include the jQuery library file, then you can send a PUT request via: $.ajax({u
 Solve the problem that Discuz WeChat sharing cannot be displayed
Mar 09, 2024 pm 03:39 PM
Solve the problem that Discuz WeChat sharing cannot be displayed
Mar 09, 2024 pm 03:39 PM
Title: To solve the problem that Discuz WeChat shares cannot be displayed, specific code examples are needed. With the development of the mobile Internet, WeChat has become an indispensable part of people's daily lives. In website development, in order to improve user experience and expand website exposure, many websites will integrate WeChat sharing functions, allowing users to easily share website content to Moments or WeChat groups. However, sometimes when using open source forum systems such as Discuz, you will encounter the problem that WeChat shares cannot be displayed, which brings certain difficulties to the user experience.
 jQuery Tips: Quickly modify the text of all a tags on the page
Feb 28, 2024 pm 09:06 PM
jQuery Tips: Quickly modify the text of all a tags on the page
Feb 28, 2024 pm 09:06 PM
Title: jQuery Tips: Quickly modify the text of all a tags on the page In web development, we often need to modify and operate elements on the page. When using jQuery, sometimes you need to modify the text content of all a tags in the page at once, which can save time and energy. The following will introduce how to use jQuery to quickly modify the text of all a tags on the page, and give specific code examples. First, we need to introduce the jQuery library file and ensure that the following code is introduced into the page: <
 Share two installation methods for HP printer drivers
Mar 13, 2024 pm 05:16 PM
Share two installation methods for HP printer drivers
Mar 13, 2024 pm 05:16 PM
HP printers are essential printing equipment in many offices. Installing the printer driver on the computer can perfectly solve problems such as the printer being unable to connect. So how to install HP printer driver? The editor below will introduce you to two HP printer driver installation methods. The first method: download the driver from the official website 1. Search the HP China official website in the search engine, and in the support column, select [Software and Drivers]. 2. Select the [Printer] category, enter your printer model in the search box, and click [Submit] to find your printer driver. 3. Select the corresponding printer according to your computer system. For win10, select the driver for win10 system. 4. After downloading successfully, find it in the folder
 Use jQuery to modify the text content of all a tags
Feb 28, 2024 pm 05:42 PM
Use jQuery to modify the text content of all a tags
Feb 28, 2024 pm 05:42 PM
Title: Use jQuery to modify the text content of all a tags. jQuery is a popular JavaScript library that is widely used to handle DOM operations. In web development, we often encounter the need to modify the text content of the link tag (a tag) on the page. This article will explain how to use jQuery to achieve this goal, and provide specific code examples. First, we need to introduce the jQuery library into the page. Add the following code in the HTML file:
