Graphical analysis of AJAX principle sharing
This article mainly shares with you the principle of graphic and text analysis AJAX. The working principle of Ajax is equivalent to adding an intermediate layer (AJAX engine) between the user and the server, so that the user operation and the server response are asynchronous. There are many principles for introducing ajax on the Internet, I hope it can help everyone.
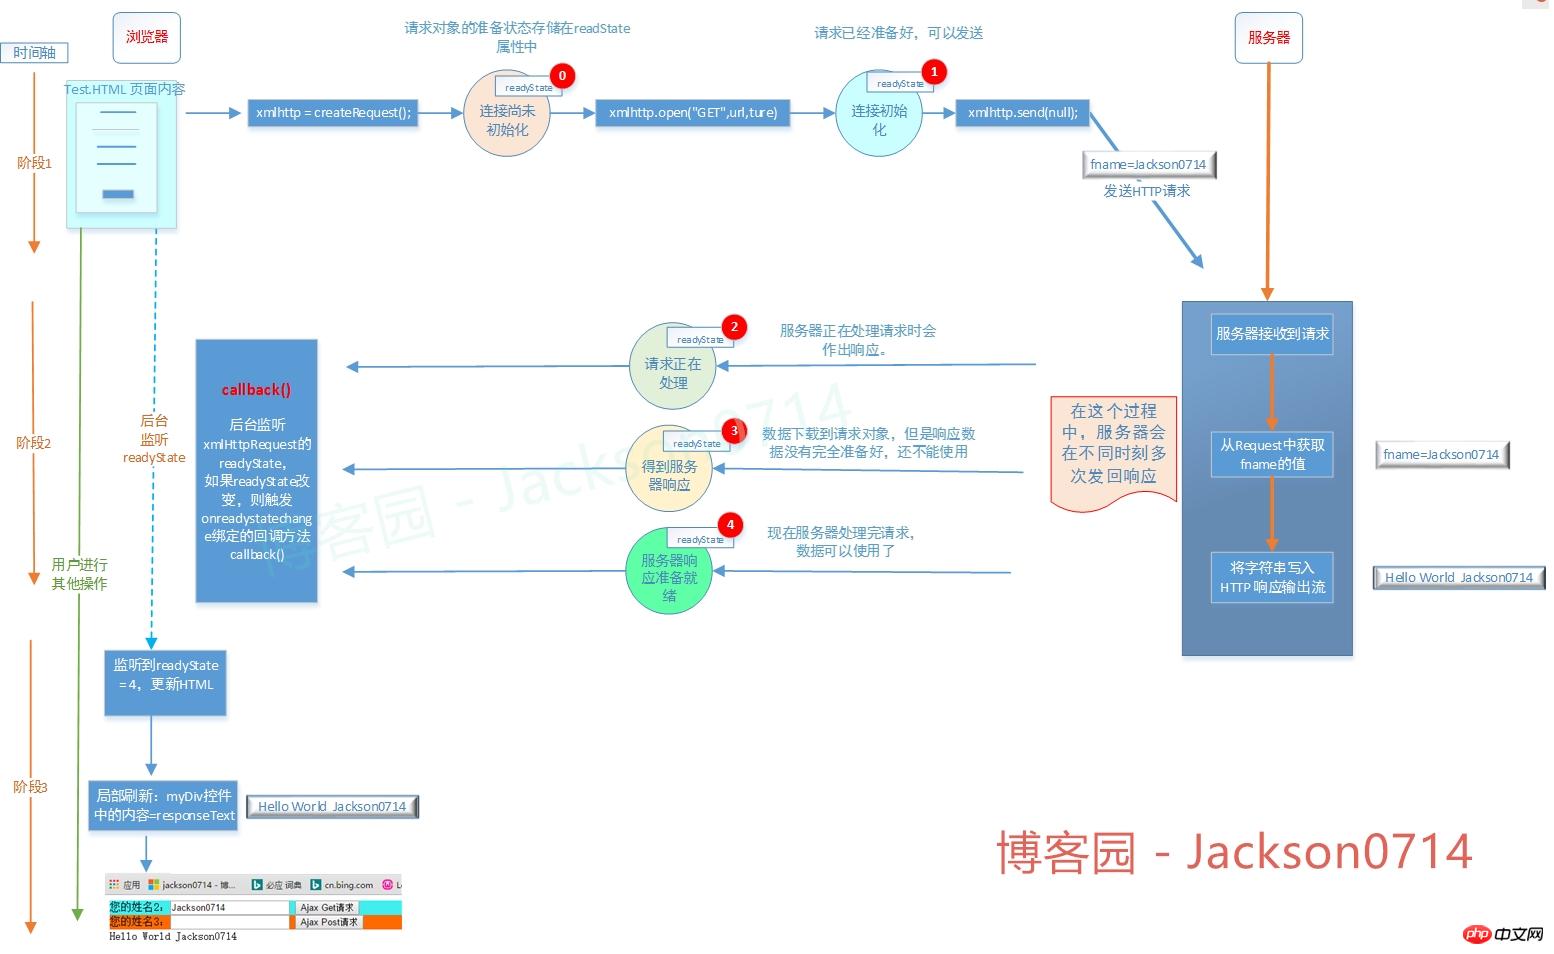
First the schematic diagram:
Background:
1. For traditional Web websites, submitting a form requires reloading the entire page.
2. If the server fails to return Response for a long time, the client will become unresponsive and the user experience will be very poor.
3. After the server returns the Response, the browser needs to load the entire page, which is also a heavy burden on the browser.
4. After the browser submits the form, a large amount of data is sent, causing network performance problems.
Question:
1. How to improve?
2.What is AJAX?
3. What are the advantages?
4. What are the disadvantages?
1. What is AJAX
1. Why is AJAX needed
When you need to obtain data from the server and refresh the page, if you do not use For AJAX, you need to submit the entire form. When the form is submitted, a request is sent to the server. The page needs to wait for the server to send the response before the page can resume operations.
2. The concept of AJAX:
1.AJAX = Asynchronous JavaScript and XML.
2.AJAX is a technology used to create fast dynamic web pages.
3. By exchanging a small amount of data with the server in the background, the web page can be updated asynchronously.
4. You can update certain parts of the web page without reloading the entire web page.
3. What is asynchronous
The current page sends a request to the server. The current page does not need to wait for the server response to operate the web page. After sending the request, the current page can continue to be browsed and operated.
4. What is partial refresh
We can achieve partial refresh in two ways.
1. How to reload iframe pages.
Although this method achieves partial refresh, it is a reload of the page, so it will also cause performance problems.
Step1. Define an Iframe in the page
<iframe id="indexFrame" name="index" width="1000" height="800"
frameborder="0" marginwidth="0" marginheight="0" scrolling="yes" style="margin-top:100px;"></iframe>Step2. Set the src of the Iframe
var indexFrame = document.getElementById("indexFrame");
indexFrame.src = "introduction.php";Step3. Add a button click event. When the button is clicked, re- Set the src of the Iframe to refresh the page in the iframe. Content outside the Iframe is not refreshed.
<button id="room" onclick='IndexClick("room")'>Click Me!</button>function IndexClick(moduleKey) {
var indexFrame = document.getElementById("indexFrame");
if(indexFrame == null)
{
indexFrame = parent.document.getElementById("indexFrame");
}
var url = "introduction.php";
switch (moduleKey) {
case "introduction":
url = "introduction.php";
break;
case "room":
url = "room.php";
break;
default:
{
}
}
indexFrame.src = url;
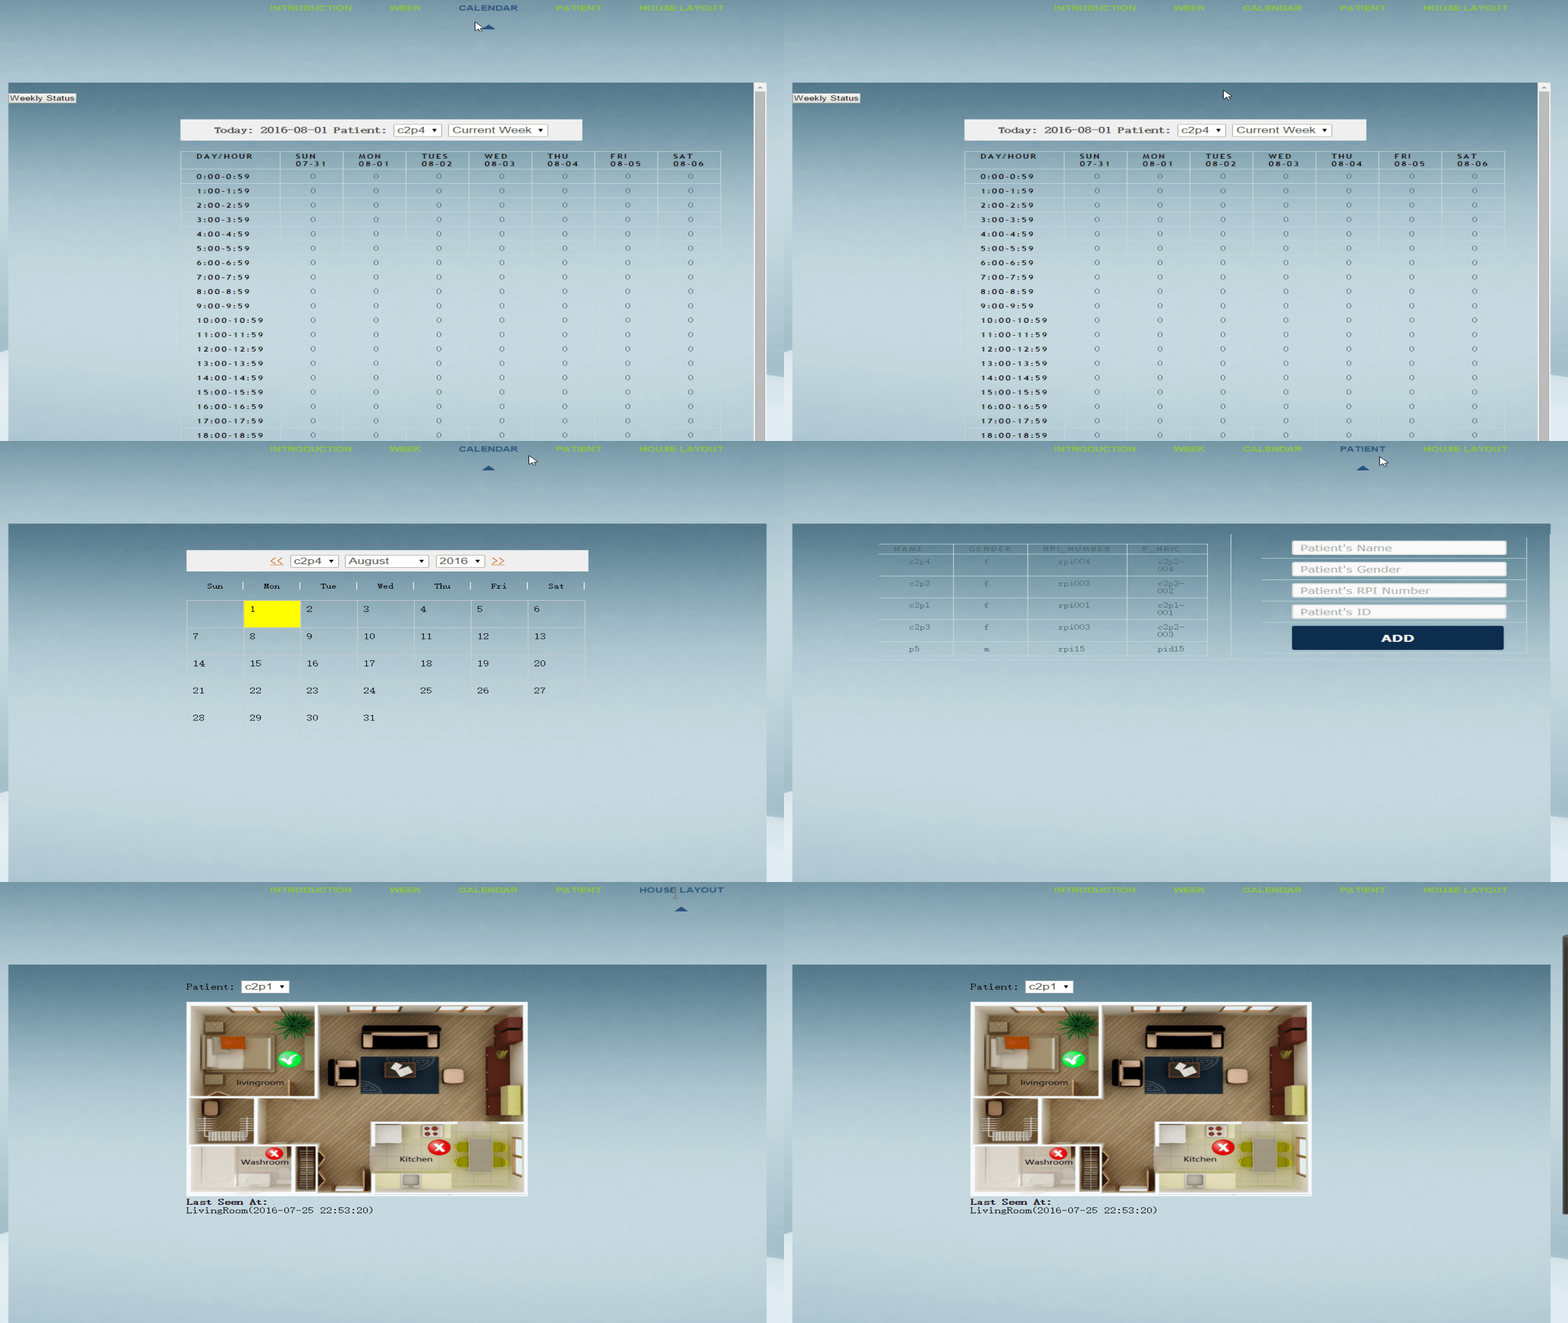
}In this way we can implement the function of a navigation bar:
2.AJAX method
Step1.JavaScrpit sends asynchronously Request
Step2. The server queries the database and returns data
Step3. The server returns Response
Step4. The client uses JavaScript to operate the DOM based on the returned Response.
Look at the following example:
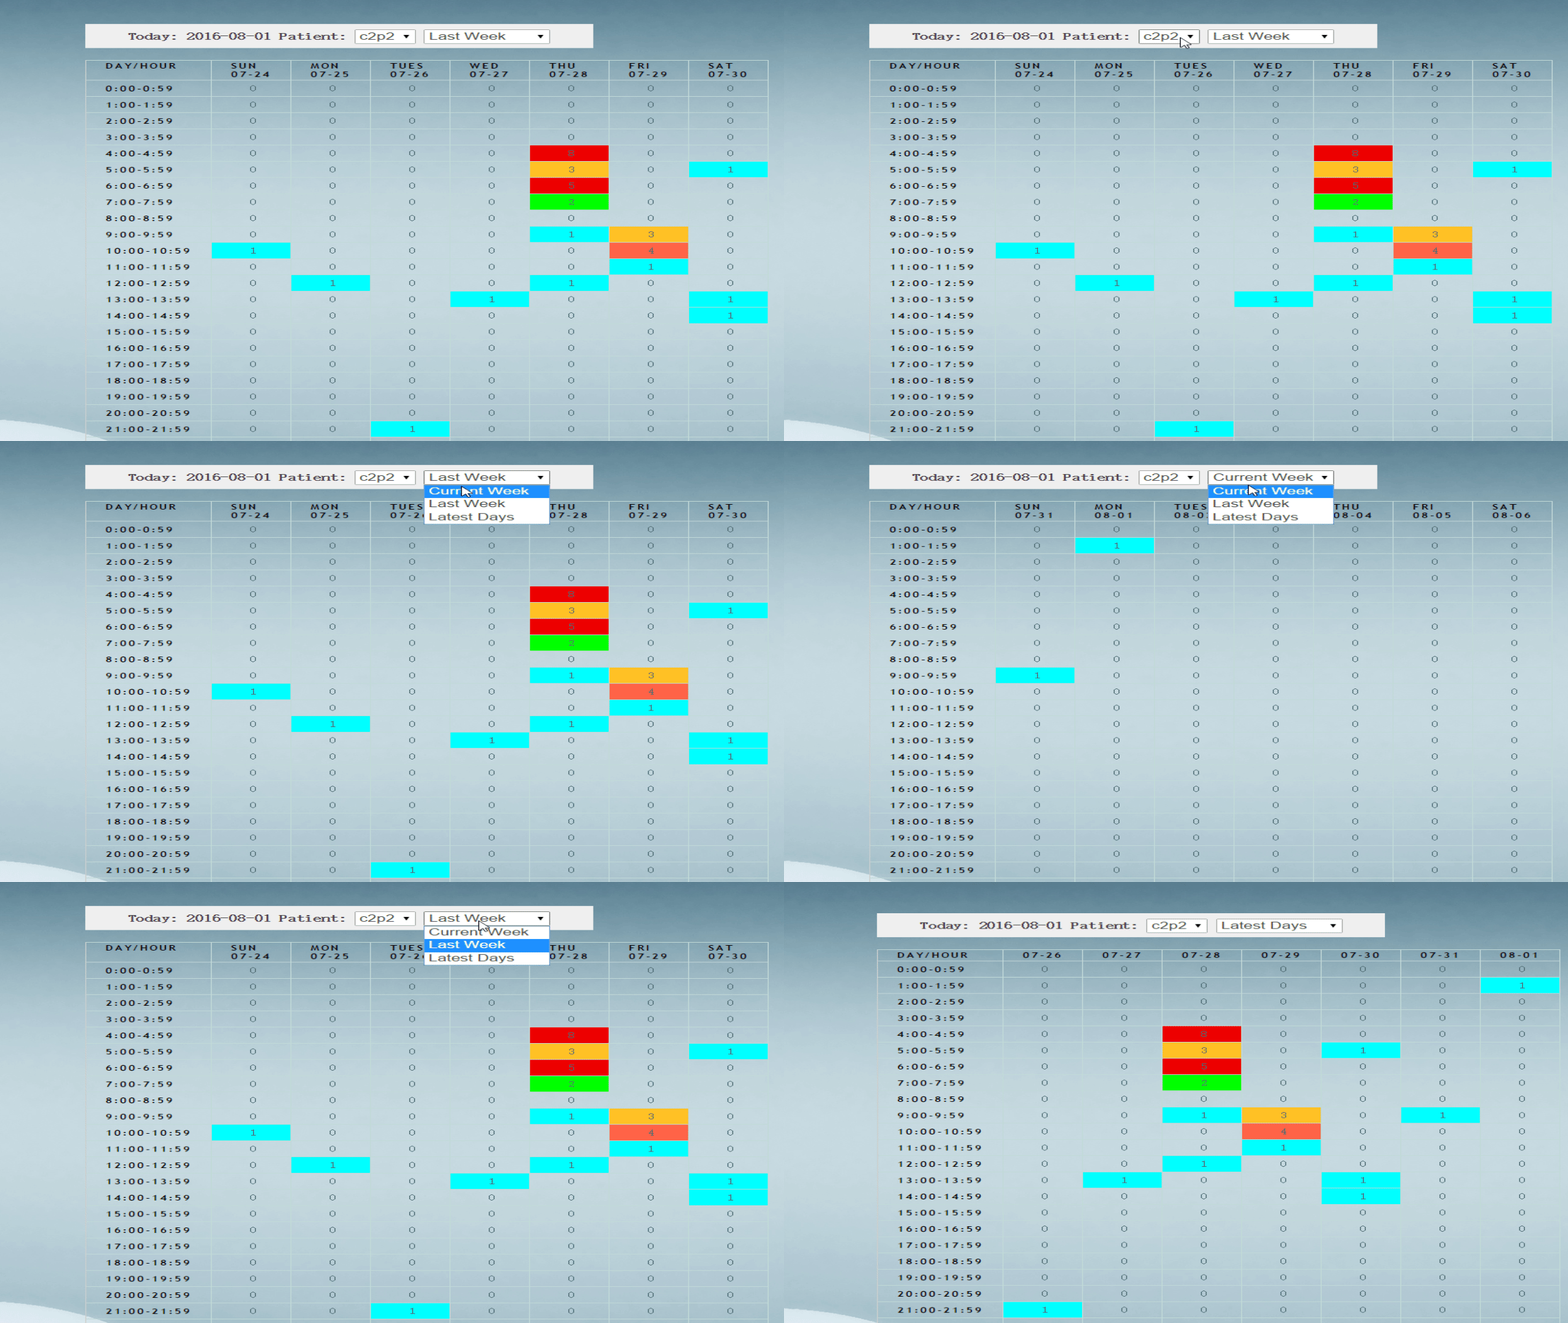
When we switch the Item in the DropDownList, JavaScript sends an asynchronous request to the Server side, the Server side returns the data, and then JavaScript The data is parsed, a Table is assembled, and the Table is presented on the page.
2. Principle of submitting Form form
1. Code
Client code:
<form id="form1" action="Test.ashx" method="get">
   您的姓名1:<input type="text" name="fname" size="20" />
   <input type="submit" name="submit" value="Sumbit">
 </form>
Server code:
public void ProcessRequest (HttpContext context)
{
  //Delay
  for (int i = 0; i < 2; i++)
  {
   System.Threading.Thread.Sleep(1000);
  }

   //从Requset.Form中获取fname的值。使用Form获取请求的键值对的值的前提条件是HTTP request Content-Type 值必须是"application/x-www-form-urlencoded" 或 "multipart/form-data".
  string fname = context.Request["fname"];

  context.Response.ContentType = "text/plain";
 //将字符串写入 HTTP 响应输出流。
  context.Response.Write("Hello World " + fname);
}2. Deploy the code to IIS

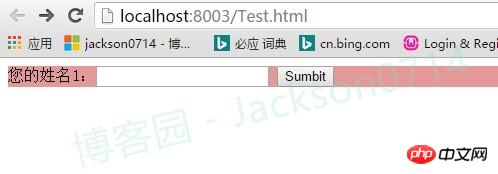
3. Open the site:
http://localhost:8003/Test.html
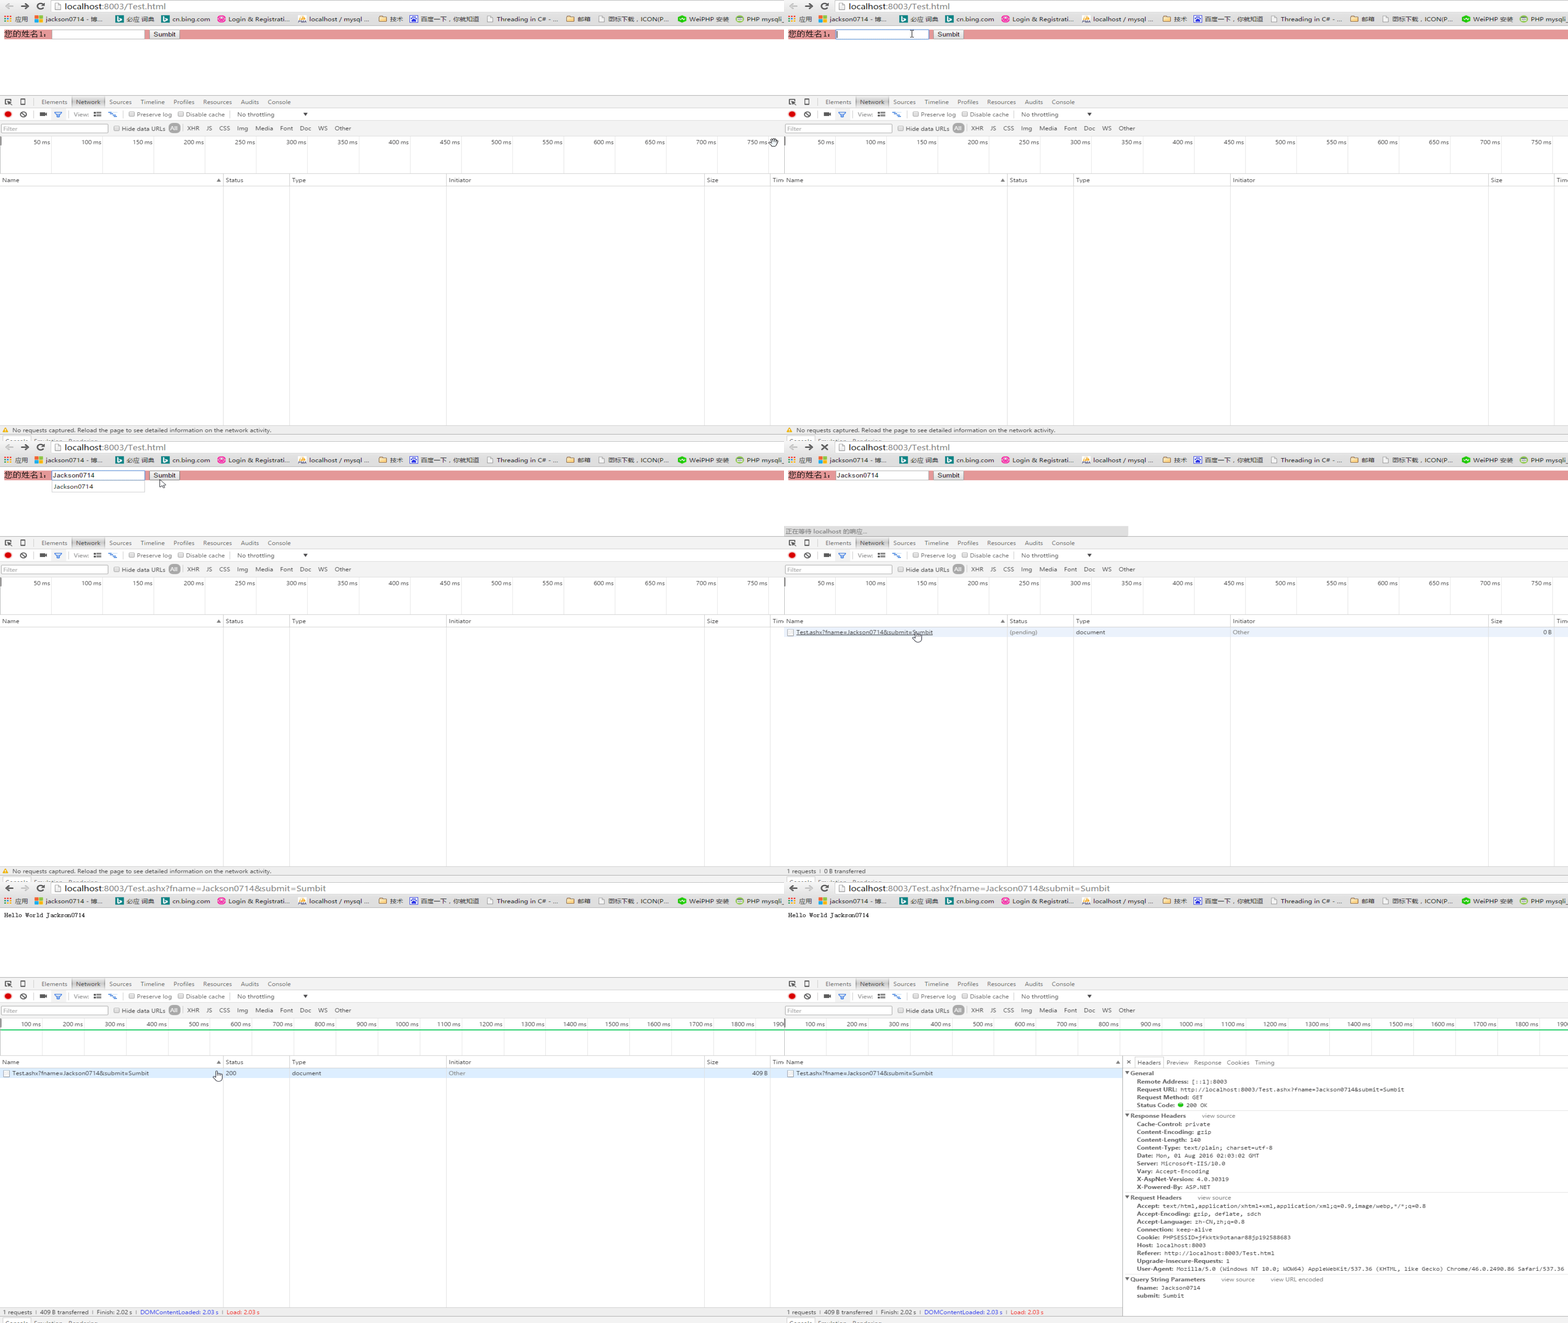
<!DOCTYPE html>

<html lang="en" xmlns="http://www.w3.org/1999/xhtml">
<head>
 <meta charset="utf-8" />
 <title></title>
 <script type="text/javascript" src="Ajax.js"></script>

</head>
<body>
 <p id="Test" style="background-color:#40eeee">
  您的姓名2:<input type="text" id="testGetName" size="20" />
  <button type="button" onclick="testGet();">Ajax Get请求</button>
 </p>

 <p id="Test" style="background-color:#ff6a00">
  您的姓名3:<input type="text" id="testPostName" size="20" />
  <button type="button" onclick="testPost();">Ajax Post请求</button>
 </p>

 <p id="myp" />

</body>
</html>
var xmlhttp = createRequest();

function testGet() {
 var fname = document.getElementById("testGetName").value;
 xmlhttp.open("GET", "Test.ashx?fname=" + fname + "&random=" + Math.random() , true);
 xmlhttp.onreadystatechange = callback;
 xmlhttp.send(null);
}

function testPost() {
 var fname = document.getElementById("testPostName").value;
 xmlhttp.open("POST", "Test.ashx?" + "&random=" + Math.random() , true);
 xmlhttp.setRequestHeader("Content-Type", "application/x-www-form-urlencoded;charset=UTF-8");
 xmlhttp.onreadystatechange = callback;
 xmlhttp.send("fname="+fname);

}

function createRequest() {
 var xmlhttp;
 if (window.XMLHttpRequest) {
  // code for IE7+, Firefox, Chrome, Opera, Safari
  xmlhttp = new XMLHttpRequest();
 }
 else {
  // code for IE6, IE5
  xmlhttp = new ActiveXObject("Microsoft.XMLHTTP");
 }
 return xmlhttp
}

function callback() {
 if (xmlhttp.readyState == 4 && xmlhttp.status == 200) {
  document.getElementById("myp").innerHTML = xmlhttp.responseText;
 }
}1.让服务端能够操作这个变量,如果定义成局部变量,则服务端返回response时,不能对xmlhttp的属性赋值。回调函数要求request是全局的,才能访问这个变量和它的属性值。
2.定义成全局变量后,可能出现两个请求或多个请求共享同一个请求对象。而这个请求对象只能存放一个回调函数来处理服务器响应。当服务器返回两个请求的Response后,可能会调用后指定的回调函数。所以可能有两个完全不同的服务器响应由同一个回调函数处理,而这可能并不是正确的处理。解决办法是创建两个不同的请求对象。
服务端代码不变。
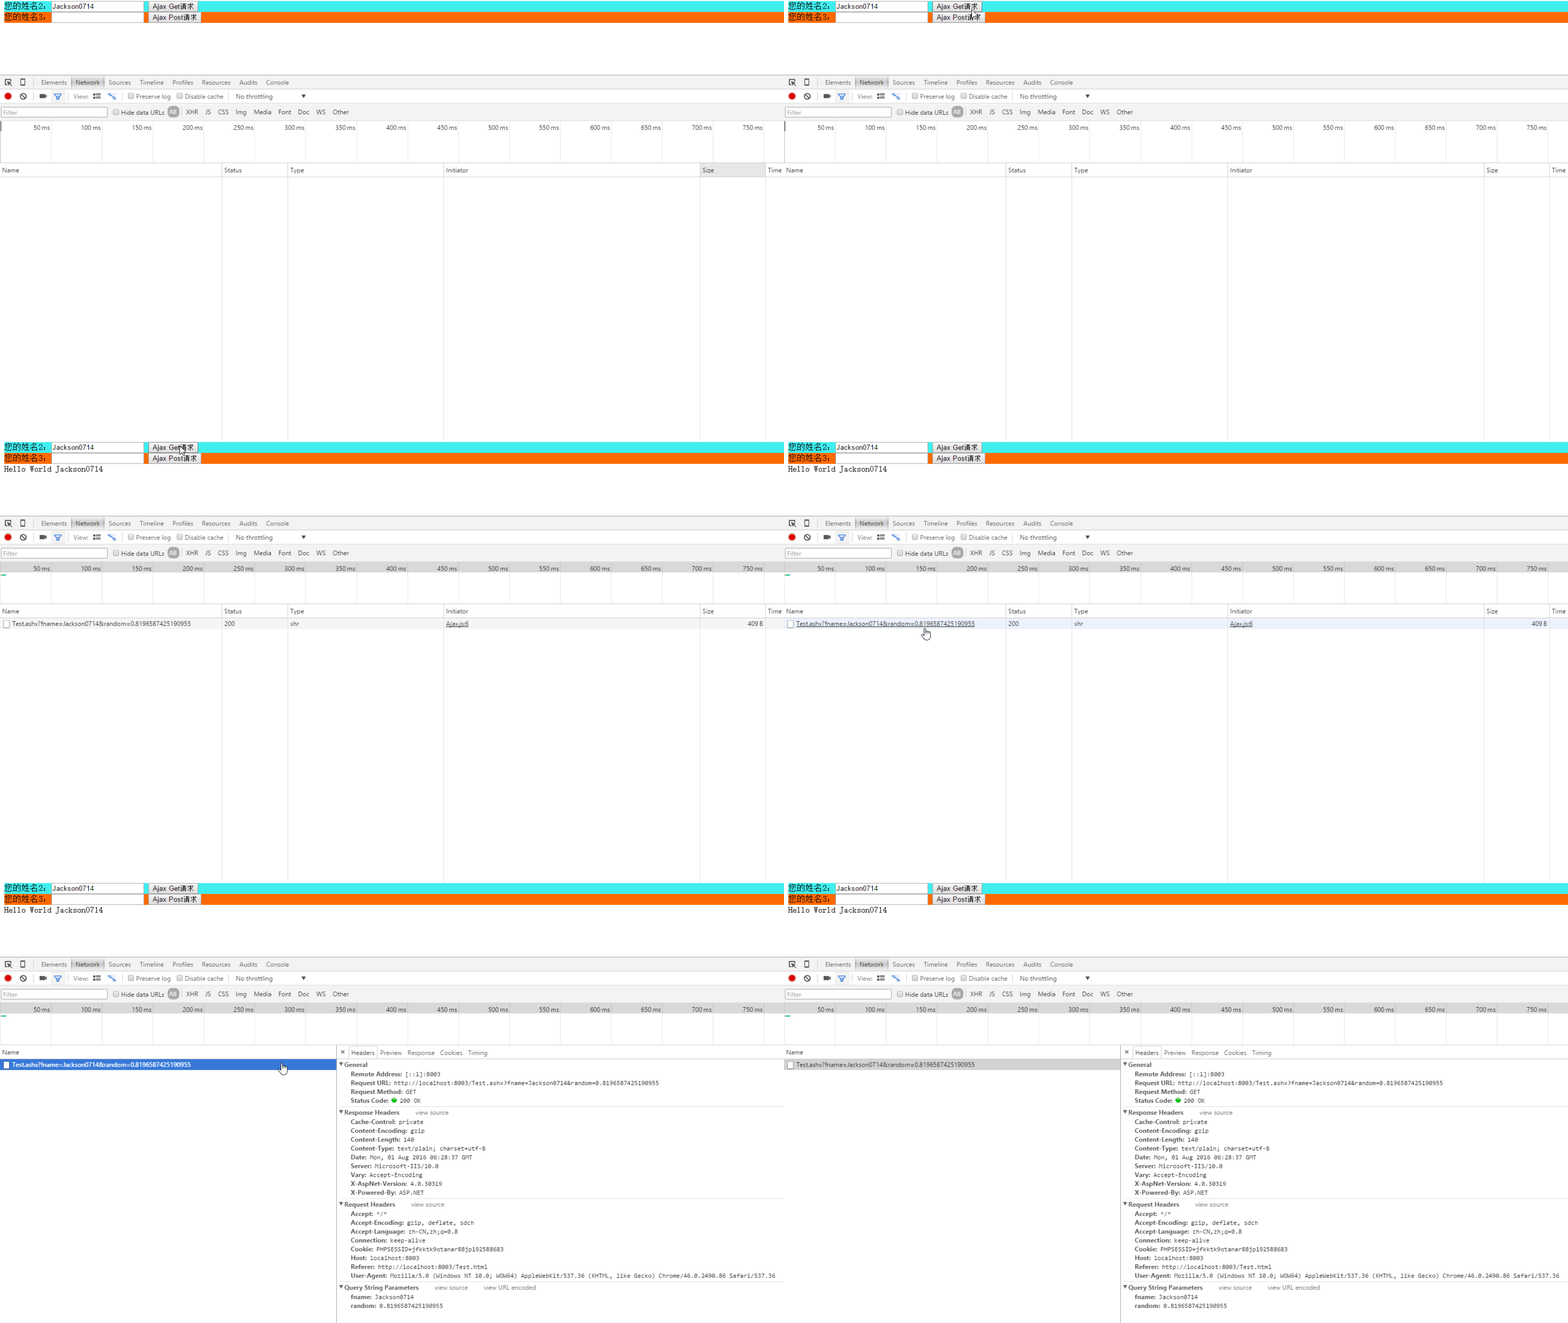
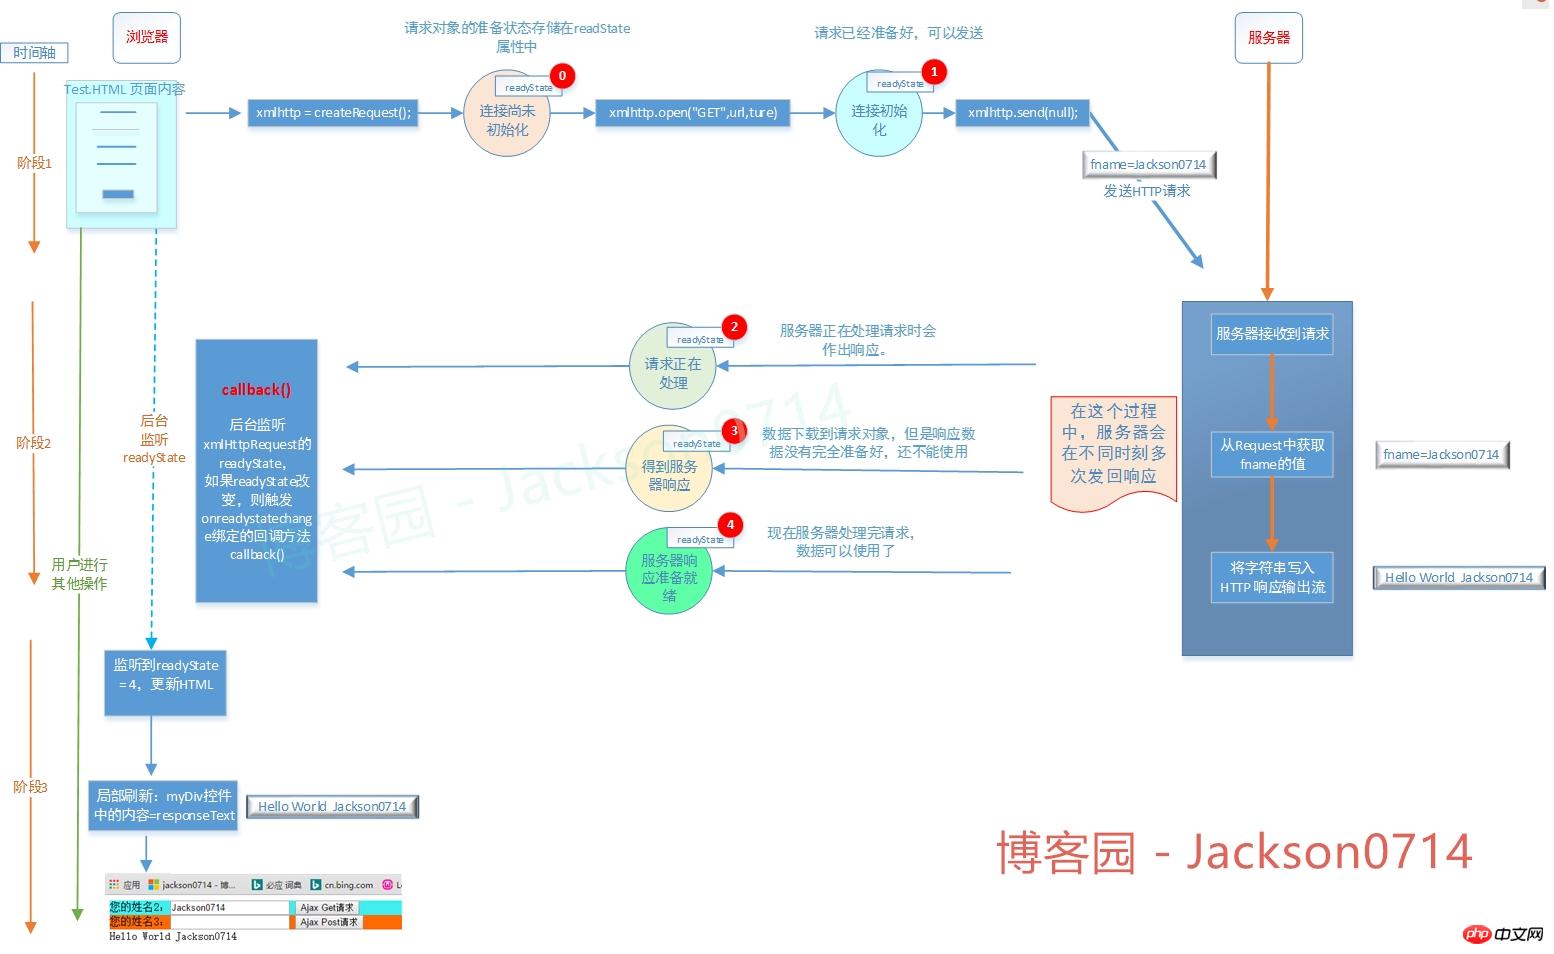
2.输入“Jackson0714”然后点击Sumbit按钮,页面不会刷新,在最下面显示"Hello World Jackson0714"
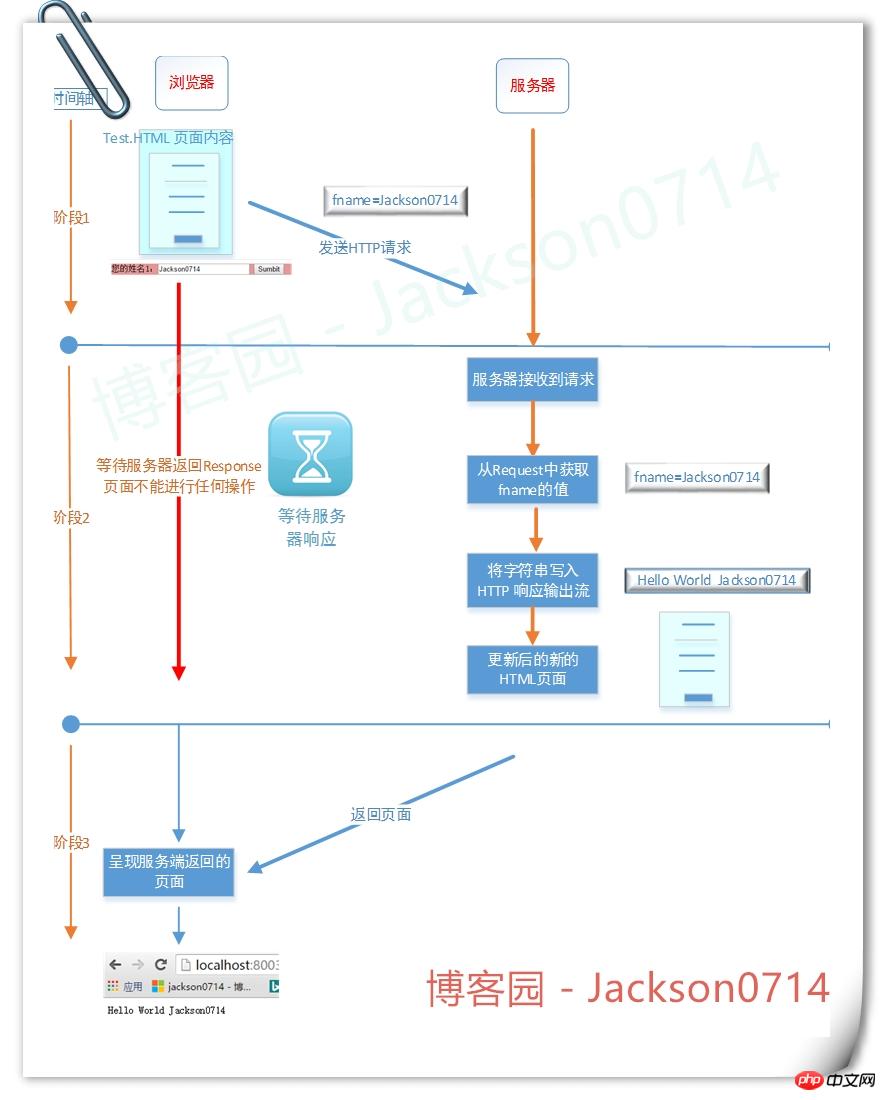
3.AJAX发送请求和服务端返回响应的流程
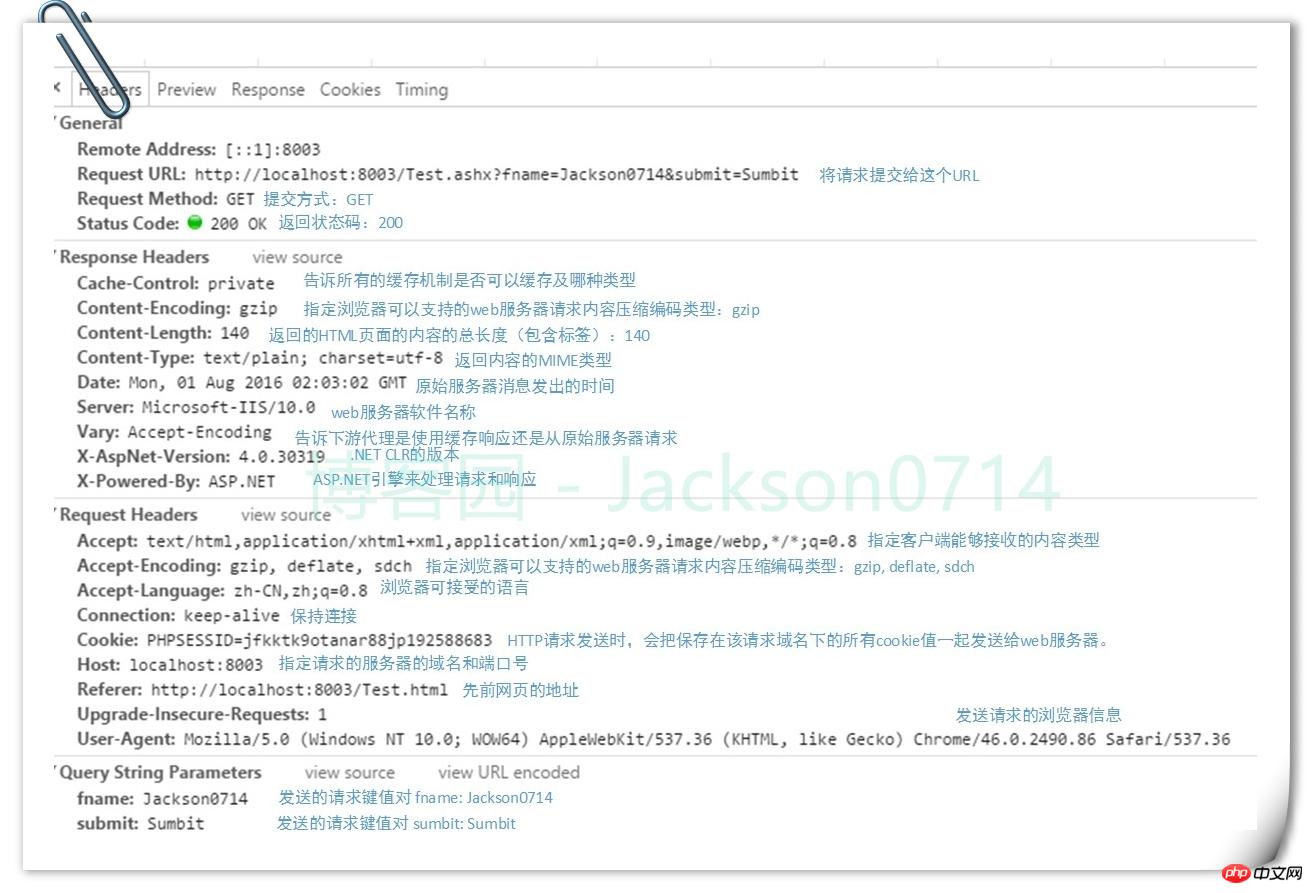
4.通过抓包,我们可以得到HTTP Headers
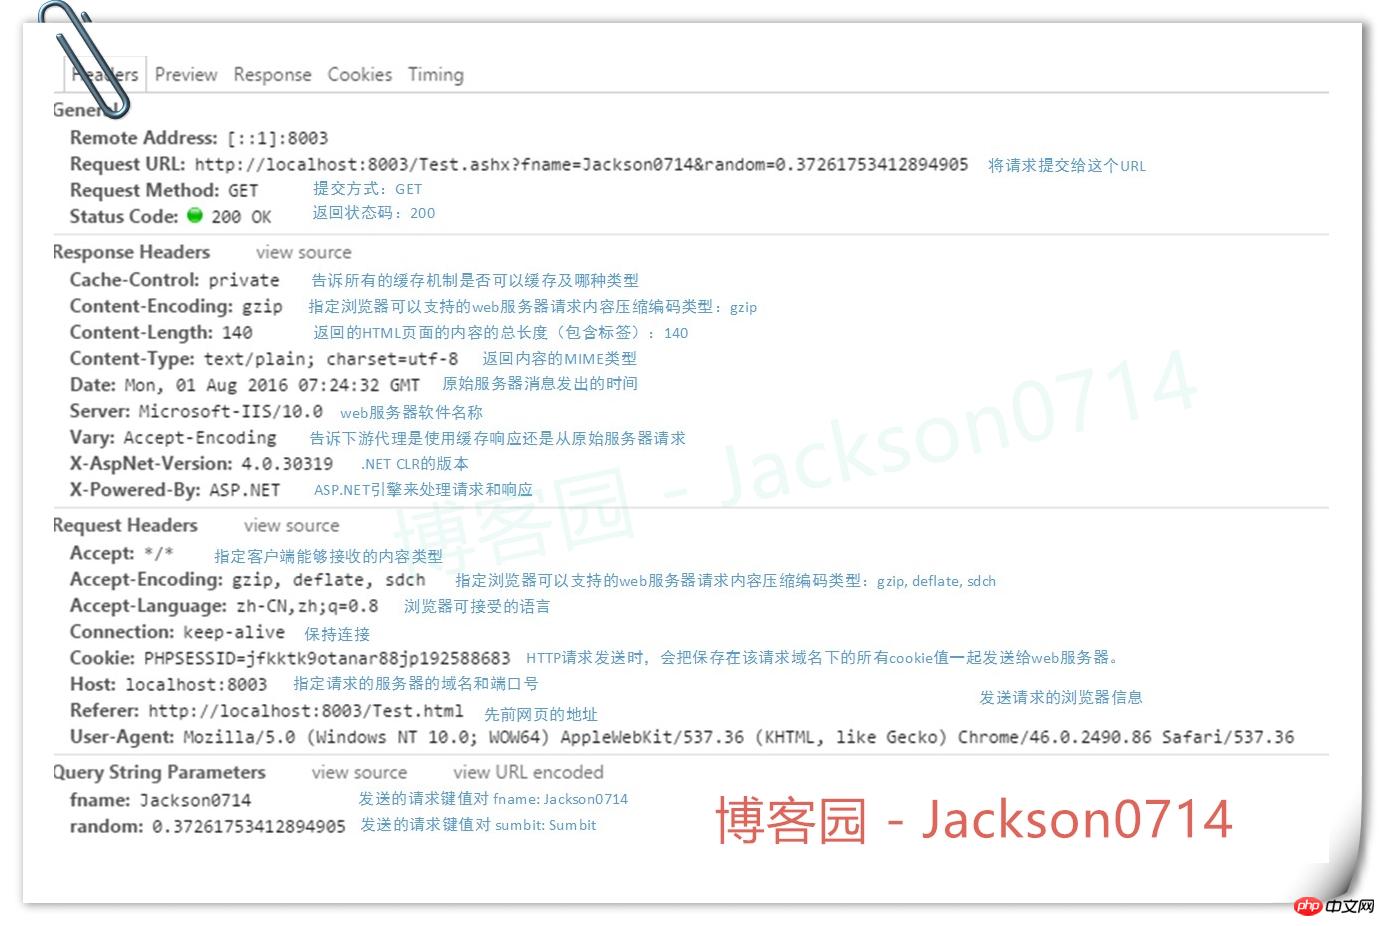
浏览器发送HTTP给服务端,采取的协议是HTTP协议。
在传输过程中,我们可以看下HTTP Headers:
5.AJAX GET和POST方式区别
AJAX发送请求和POST发送请求的代码如下:
//GET方式
function testGet() {
 var fname = document.getElementById("testGetName").value;
 xmlhttp.open("GET", "Test.ashx?fname=" + fname + "&random=" + Math.random() , true);
xmlhttp.onreadystatechange = callback;
 xmlhttp.send(null);
}

//POST方式
function testPost() {
 var fname = document.getElementById("testPostName").value;
 xmlhttp.open("POST", "Test.ashx?" + "&random=" + Math.random() , true);
 xmlhttp.setRequestHeader("Content-Type", "application/x-www-form-urlencoded;charset=UTF-8");
 xmlhttp.onreadystatechange = callback;
 xmlhttp.send("fname="+fname);

}四、XMLHttpRequest 对象的知识
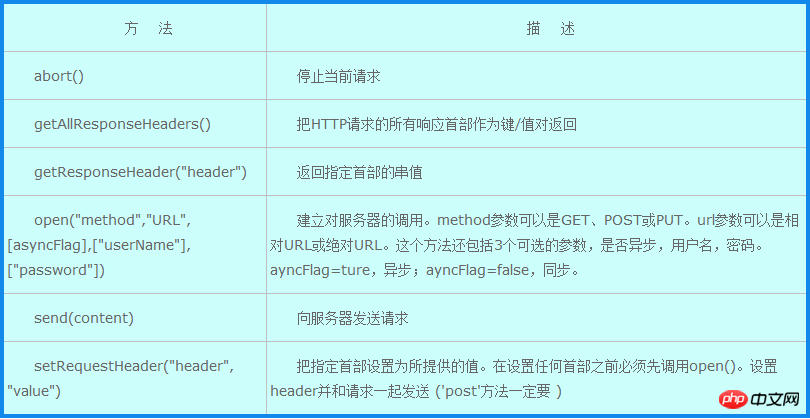
1.XMLHttpRequest 对象的方法
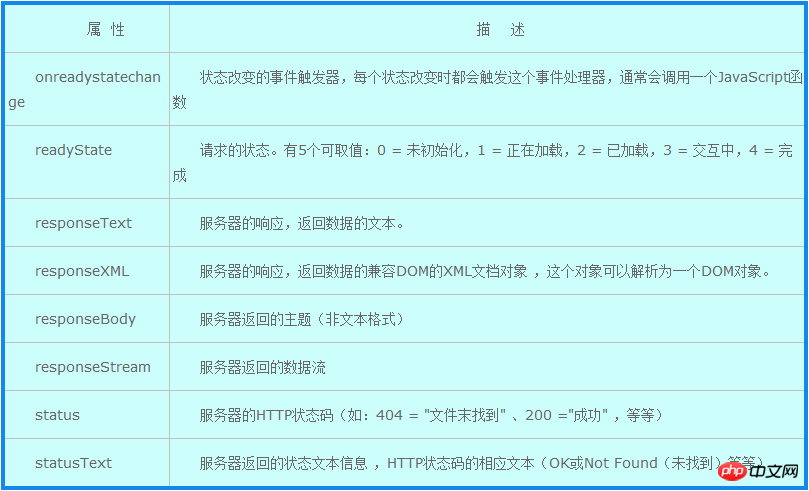
2.XMLHttpRequest 对象的属性
五、JQuery实现AJAX
下面的代码实现了当切换DropDownList的item时,触发getWeeklyCalendar方法,用JQuery的类库方法$.ajax来发送AJAX请求。
客户端JQuery代码
function getWeeklyCalendar(name,currentDate,mode){
$.ajax({
type:'POST',
url:'weekProcess.php',data:'func=getWeeklyCalender&name='+name+'¤tDate='+currentDate+'& mode='+mode,
success:function(data){
paintWeeklyCandler(data);
}
});
}后台成功返回Response后,执行paintWeeklyCandler(data)方法
后台PHP代码
<?php<br> //定义返回的Response的格式为JSON格式
 header('Content-type: text/json');<br> //引入自定义的数据库连接文件
 include 'dbConfig.php';<br> //引入自定义的设置session的文件
 include_once 'session.php';
 /*
 * Function requested by Ajax
 */
 if(isset($_POST['func']) && !empty($_POST['func']))
 {
  switch($_POST['func']){
    case 'getWeeklyCalender':
      getWeeklyCalender($_POST['name'],$_POST['currentDate'],$_POST['mode']);
       break;
     case 'getWeeklyStatus':
      getWeeklyStatus($_POST['name'],$_POST['currentDate'],$_POST['mode']);
      break;
     case 'getEvents':
      getEvents($_POST['date'],$_POST['name']);
      break;
    default:
      break;
 }
}
 function getWeeklyCalender($name = '',$currentDate = '',$mode = '')
 {
  //逻辑代码<br>    <br>  <br>    //返回JSON格式的Response
  echo json_encode(array('result'=>$DaysOfWeekResultsArray));
}<br>?>六、优势
1.使用异步方式与服务器通信,页面不需要重新加载,页面无刷新
2.按需取数据,减少服务器的负担
3.使得Web应用程序更为迅捷地响应用户交互
4.AJAX基于标准化的并被广泛支持的技术,不需要下载浏览器插件或者小程序,但需要客户允许JavaScript在浏览器上执行
5.浏览器的内容和服务端代码进行分离。页面的内容全部由JAVAScript来控制,服务端负责逻辑的校验和从数据库中拿数据。
七、缺点
1.安全问题:将服务端的方法暴露出来,黑客可利用这一点进行攻击
2.大量JS代码,容易出错
3.Ajax的无刷新重载,由于页面的变化没有刷新重载那么明显,所以容易给用户带来困扰——用户不太清楚现在的数据是新的还是已经更新过的;现有的解决有:在相关位置提示、数据更新的区域设计得比较明显、数据更新后给用户提示等
4.可能破坏浏览器后退按钮的正常行为;
5.一些手持设备(如手机、PAD等)自带的浏览器现在还不能很好的支持Ajax
八、应用场景
1.对数据进行过滤和操纵相关数据的场景
2.添加/删除树节点
3.添加/删除列表中的某一行记录
4.切换下拉列表item
5.注册用户名重名的校验
九、不适用场景
1.整个页面内容的保存
2.导航
十、总结
以上就是本文的全部内容,文章写的很详细,希望对大家学习ajax能有所帮助哦。
相关推荐:
The above is the detailed content of Graphical analysis of AJAX principle sharing. For more information, please follow other related articles on the PHP Chinese website!

Hot AI Tools

Undresser.AI Undress
AI-powered app for creating realistic nude photos

AI Clothes Remover
Online AI tool for removing clothes from photos.

Undress AI Tool
Undress images for free

Clothoff.io
AI clothes remover

AI Hentai Generator
Generate AI Hentai for free.

Hot Article

Hot Tools

Notepad++7.3.1
Easy-to-use and free code editor

SublimeText3 Chinese version
Chinese version, very easy to use

Zend Studio 13.0.1
Powerful PHP integrated development environment

Dreamweaver CS6
Visual web development tools

SublimeText3 Mac version
God-level code editing software (SublimeText3)

Hot Topics
 How to share Quark Netdisk to Baidu Netdisk?
Mar 14, 2024 pm 04:40 PM
Quark Netdisk and Baidu Netdisk are very convenient storage tools. Many users are asking whether these two softwares are interoperable? How to share Quark Netdisk to Baidu Netdisk? Let this site introduce to users in detail how to save Quark network disk files to Baidu network disk. How to save files from Quark Network Disk to Baidu Network Disk Method 1. If you want to know how to transfer files from Quark Network Disk to Baidu Network Disk, first download the files that need to be saved on Quark Network Disk, and then open the Baidu Network Disk client. , select the folder where the compressed file is to be saved, and double-click to open the folder. 2. After opening the folder, click "Upload" in the upper left corner of the window. 3. Find the compressed file that needs to be uploaded on your computer and click to select it.
 How to share NetEase Cloud Music to WeChat Moments_Tutorial on sharing NetEase Cloud Music to WeChat Moments
Mar 25, 2024 am 11:41 AM
1. First, we enter NetEase Cloud Music, and then click on the software homepage interface to enter the song playback interface. 2. Then in the song playback interface, find the sharing function button in the upper right corner, as shown in the red box in the figure below, click to select the sharing channel; in the sharing channel, click the "Share to" option at the bottom, and then select the first "WeChat Moments" allows you to share content to WeChat Moments.
 How to share files with friends on Baidu Netdisk
Mar 25, 2024 pm 06:52 PM
Recently, Baidu Netdisk Android client has ushered in a new version 8.0.0. This version not only brings many changes, but also adds many practical functions. Among them, the most eye-catching is the enhancement of the folder sharing function. Now, users can easily invite friends to join and share important files in work and life, achieving more convenient collaboration and sharing. So how do you share the files you need to share with your friends? Below, the editor of this site will give you a detailed introduction. I hope it can help you! 1) Open Baidu Cloud APP, first click to select the relevant folder on the homepage, and then click the [...] icon in the upper right corner of the interface; (as shown below) 2) Then click [+] in the "Shared Members" column 】, and finally check all
 Analysis of the function and principle of nohup
Mar 25, 2024 pm 03:24 PM
Analysis of the role and principle of nohup In Unix and Unix-like operating systems, nohup is a commonly used command that is used to run commands in the background. Even if the user exits the current session or closes the terminal window, the command can still continue to be executed. In this article, we will analyze the function and principle of the nohup command in detail. 1. The role of nohup: Running commands in the background: Through the nohup command, we can let long-running commands continue to execute in the background without being affected by the user exiting the terminal session. This needs to be run
 How to get variables from PHP method using Ajax?
Mar 09, 2024 pm 05:36 PM
Using Ajax to obtain variables from PHP methods is a common scenario in web development. Through Ajax, the page can be dynamically obtained without refreshing the data. In this article, we will introduce how to use Ajax to get variables from PHP methods, and provide specific code examples. First, we need to write a PHP file to handle the Ajax request and return the required variables. Here is sample code for a simple PHP file getData.php:
 Share two installation methods for HP printer drivers
Mar 13, 2024 pm 05:16 PM
HP printers are essential printing equipment in many offices. Installing the printer driver on the computer can perfectly solve problems such as the printer being unable to connect. So how to install HP printer driver? The editor below will introduce you to two HP printer driver installation methods. The first method: download the driver from the official website 1. Search the HP China official website in the search engine, and in the support column, select [Software and Drivers]. 2. Select the [Printer] category, enter your printer model in the search box, and click [Submit] to find your printer driver. 3. Select the corresponding printer according to your computer system. For win10, select the driver for win10 system. 4. After downloading successfully, find it in the folder
 How to solve the problem of jQuery AJAX error 403?
Feb 23, 2024 pm 04:27 PM
How to solve the problem of jQueryAJAX error 403? When developing web applications, jQuery is often used to send asynchronous requests. However, sometimes you may encounter error code 403 when using jQueryAJAX, indicating that access is forbidden by the server. This is usually caused by server-side security settings, but there are ways to work around it. This article will introduce how to solve the problem of jQueryAJAX error 403 and provide specific code examples. 1. to make
 An in-depth analysis of the functions and working principles of the Linux chage command
Feb 24, 2024 pm 03:48 PM
The chage command in the Linux system is a command used to modify the password expiration date of a user account. It can also be used to modify the longest and shortest usable date of the account. This command plays a very important role in managing user account security. It can effectively control the usage period of user passwords and enhance system security. How to use the chage command: The basic syntax of the chage command is: chage [option] user name. For example, to modify the password expiration date of user "testuser", you can use the following command


