
 Web Front-end
JS Tutorial
Detailed explanation of webpack-dev-server using http-proxy to solve cross-domain problems
Web Front-end
JS Tutorial
Detailed explanation of webpack-dev-server using http-proxy to solve cross-domain problems
Detailed explanation of webpack-dev-server using http-proxy to solve cross-domain problems

This article mainly introduces the detailed explanation of webpack-dev-server's use of http-proxy to solve cross-domain problems. The editor thinks it is quite good, so I will share it with you now and give it as a reference. Let’s follow the editor to take a look, I hope it can help everyone.
Documentation information
webpack's official introduction to webpack-dev-server opening proxy
Vue-cli proxyTable solves development Cross-domain issues in the environment - although this article is written about vue, it is also used on webpack-dev-server.
http-proxy-middleware - implementation of webpack-dev-server The method is actually to encapsulate this
Configure http-proxy
Configure in the webpack configuration file (webpack.config.js)
module.exports = {
 ...此处省略一万字

 // webpack-dev-server的配置
 devServer: {
 historyApiFallback: true,
 hot: true,
 inline: true,
 progress: true,
 port: 3000,
 host: '10.0.0.9',
 proxy: {
 '/test/*': {
 target: 'http://localhost',
 changeOrigin: true,
 secure: false
 }
 }
 },

 ...此处省略一万字
};In the above configuration, the only thing about http-proxy is the value in proxy: {...}
Calling interface
For the sake of convenience, the following uses the ajax function encapsulated by jquery for demonstration
$.ajax({
 // url: 'http://10.0.0.9:3000/test/testFetch/Login.php', // 这样不行
 url: '/test/testFetch/Login.php', // 这样行
 type: 'post',
 data: {
 app_id: '13751313169',
 password: '123456',
 user_name: 'Nicholas'
 },
 success: function(data) {
 console.log(data);
 }
});Part of the parameter description in proxy
'/ test/*' and target: 'http://localhost'
As you can see from the name, this actually redirects the domain name of the API matching the format of '/test/*' to ' http://localhost'
Combined with the above "call interface", it can be seen that the sentence url: '/test/testFetch/Login.php' will actually automatically add the prefix , that is to say, url: '/test/testFetch/Login.php' is equivalent to url: 'http://10.0.0.9:3000/test/testFetch/Login.php'
-
However, we use http-proxy for redirection. In this case, url: '/test/testFetch/Login.php' is equivalent to url: 'http://localhost/test/testFetch/Login.php'
changeOrigin
true/false, Default: false - changes the origin of the host header to the target URL
The local virtual server will receive your request and send the request on your behalf - this is what others say
I tried it For a moment, even if this parameter is set to false, it is possible in some cases. The specific reason is unknown, so it is better to set it to true.
secure
true/false, if you want to verify the SSL Certs
##pathRewrite
- Example: pathRewrite: {'^/api': ''}
- Object-keys will be used as RegExp to match paths
- I guess, '^/api' is replaced by '' here (it's just my guess, it didn't work, I guess it's because my regular expression is not good)
Attached is the code for using the Fetch API
The above code has the same effect as using $.ajax() in the "Calling Interface"let testAsync = async function () {
var feeling = {
app_id: '13751313169',
password: '123456',
user_name: 'Nicholas'
};
var fetchParams = {
method: 'post',
headers: {
'Accept': 'application/json',
'Content-Type': 'application/json'
},
credentials: 'include', // 将凭证也带上(例如cookies)
body: JSON.stringify(feeling),
};
let temp = await fetch('/test/testFetch/Login.php', fetchParams).then(response => response.text());
console.log(temp); // 这个就是一个json对象
return temp;
};
let data = testAsync(); // async函数返回值是一个Promise对象
console.log(data); // 这个是一个Promise对象About vue2.0 setting proxyTable to use axios for cross-domain requests
php detect proxy instance code
Detailed explanation of how Python crawlers use proxy to crawl web pages
The above is the detailed content of Detailed explanation of webpack-dev-server using http-proxy to solve cross-domain problems. For more information, please follow other related articles on the PHP Chinese website!

Hot AI Tools

Undresser.AI Undress
AI-powered app for creating realistic nude photos

AI Clothes Remover
Online AI tool for removing clothes from photos.

Undress AI Tool
Undress images for free

Clothoff.io
AI clothes remover

AI Hentai Generator
Generate AI Hentai for free.

Hot Article
Hot Tools

Notepad++7.3.1
Easy-to-use and free code editor

SublimeText3 Chinese version
Chinese version, very easy to use

Zend Studio 13.0.1
Powerful PHP integrated development environment

Dreamweaver CS6
Visual web development tools

SublimeText3 Mac version
God-level code editing software (SublimeText3)
Hot Topics
 1377
1377
 52
52

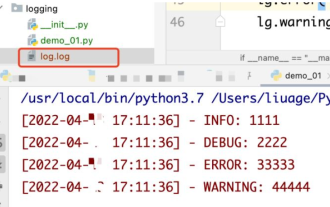 How to use python+Flask to realize real-time update and display of logs on web pages
May 17, 2023 am 11:07 AM
How to use python+Flask to realize real-time update and display of logs on web pages
May 17, 2023 am 11:07 AM
1. Log output to file using module: logging can generate a custom level log, and can output the log to a specified path. Log level: debug (debug log) = 5) {clearTimeout (time) // If all results obtained 10 consecutive times are empty Log clearing scheduled task}return}if(data.log_type==2){//If a new log is obtained for(i=0;i
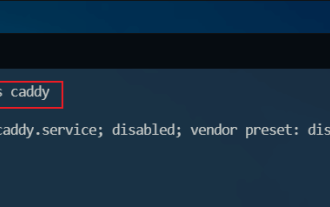 How to use Nginx web server caddy
May 30, 2023 pm 12:19 PM
How to use Nginx web server caddy
May 30, 2023 pm 12:19 PM
Introduction to Caddy Caddy is a powerful and highly scalable web server that currently has 38K+ stars on Github. Caddy is written in Go language and can be used for static resource hosting and reverse proxy. Caddy has the following main features: Compared with the complex configuration of Nginx, its original Caddyfile configuration is very simple; it can dynamically modify the configuration through the AdminAPI it provides; it supports automated HTTPS configuration by default, and can automatically apply for HTTPS certificates and configure it; it can be expanded to data Tens of thousands of sites; can be executed anywhere with no additional dependencies; written in Go language, memory safety is more guaranteed. First of all, we install it directly in CentO
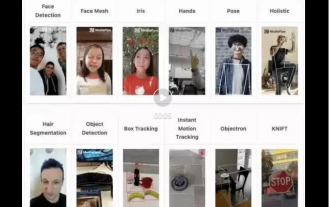 Real-time protection against face-blocking barrages on the web (based on machine learning)
Jun 10, 2023 pm 01:03 PM
Real-time protection against face-blocking barrages on the web (based on machine learning)
Jun 10, 2023 pm 01:03 PM
Face-blocking barrage means that a large number of barrages float by without blocking the person in the video, making it look like they are floating from behind the person. Machine learning has been popular for several years, but many people don’t know that these capabilities can also be run in browsers. This article introduces the practical optimization process in video barrages. At the end of the article, it lists some applicable scenarios for this solution, hoping to open it up. Some ideas. mediapipeDemo (https://google.github.io/mediapipe/) demonstrates the mainstream implementation principle of face-blocking barrage on-demand up upload. The server background calculation extracts the portrait area in the video screen, and converts it into svg storage while the client plays the video. Download svg from the server and combine it with barrage, portrait
 Using Jetty7 for Web server processing in Java API development
Jun 18, 2023 am 10:42 AM
Using Jetty7 for Web server processing in Java API development
Jun 18, 2023 am 10:42 AM
Using Jetty7 for Web Server Processing in JavaAPI Development With the development of the Internet, the Web server has become the core part of application development and is also the focus of many enterprises. In order to meet the growing business needs, many developers choose to use Jetty for web server development, and its flexibility and scalability are widely recognized. This article will introduce how to use Jetty7 in JavaAPI development for We
 How to implement form validation for web applications using Golang
Jun 24, 2023 am 09:08 AM
How to implement form validation for web applications using Golang
Jun 24, 2023 am 09:08 AM
Form validation is a very important link in web application development. It can check the validity of the data before submitting the form data to avoid security vulnerabilities and data errors in the application. Form validation for web applications can be easily implemented using Golang. This article will introduce how to use Golang to implement form validation for web applications. 1. Basic elements of form validation Before introducing how to implement form validation, we need to know what the basic elements of form validation are. Form elements: form elements are
 How to configure nginx to ensure that the frps server and web share port 80
Jun 03, 2023 am 08:19 AM
How to configure nginx to ensure that the frps server and web share port 80
Jun 03, 2023 am 08:19 AM
First of all, you will have a doubt, what is frp? Simply put, frp is an intranet penetration tool. After configuring the client, you can access the intranet through the server. Now my server has used nginx as the website, and there is only one port 80. So what should I do if the FRP server also wants to use port 80? After querying, this can be achieved by using nginx's reverse proxy. To add: frps is the server, frpc is the client. Step 1: Modify the nginx.conf configuration file in the server and add the following parameters to http{} in nginx.conf, server{listen80
 How to enable administrative access from the cockpit web UI
Mar 20, 2024 pm 06:56 PM
How to enable administrative access from the cockpit web UI
Mar 20, 2024 pm 06:56 PM
Cockpit is a web-based graphical interface for Linux servers. It is mainly intended to make managing Linux servers easier for new/expert users. In this article, we will discuss Cockpit access modes and how to switch administrative access to Cockpit from CockpitWebUI. Content Topics: Cockpit Entry Modes Finding the Current Cockpit Access Mode Enable Administrative Access for Cockpit from CockpitWebUI Disabling Administrative Access for Cockpit from CockpitWebUI Conclusion Cockpit Entry Modes The cockpit has two access modes: Restricted Access: This is the default for the cockpit access mode. In this access mode you cannot access the web user from the cockpit
 What are web standards?
Oct 18, 2023 pm 05:24 PM
What are web standards?
Oct 18, 2023 pm 05:24 PM
Web standards are a set of specifications and guidelines developed by W3C and other related organizations. It includes standardization of HTML, CSS, JavaScript, DOM, Web accessibility and performance optimization. By following these standards, the compatibility of pages can be improved. , accessibility, maintainability and performance. The goal of web standards is to enable web content to be displayed and interacted consistently on different platforms, browsers and devices, providing better user experience and development efficiency.
