

Detailed explanation of abstract Vue public components

This article mainly introduces how to abstract a Vue public component. Taking a numeric keyboard component as an example, it has certain reference value. Interested friends can refer to it. I hope it can help everyone.
I have always wanted to write an essay about abstract Vue components, but I have never thought of a good example. It happened that I recently made a numeric keyboard component for a company project, so I used this as an example to talk about how to abstract Vue components.
First upload the Demo and source code. (The demo is best viewed in mobile browser mode)
Before talking about the specific implementation, I would like to share what I think the ideal public component looks like:
1. Black box, that is, other developers besides yourself can get started immediately after quickly reading the usage documentation, without caring about your internal implementation;
2. Independence, that is, decoupling, no There are too many connections with the parent component;
3 Customization, appropriately expose some input interfaces or methods to the outside for customization, and also set the default values of these properties when they are not input externally.
Let’s first use a black box to see how the numeric keyboard component in the demo is called (non-critical parts of the code have been omitted).
App.vue
<template>
......
<keyboard @submit-event='handleSubmit' @change-event='handleChange'></keyboard>
</template>
<script>
import keyboard from 'Keyboard.vue';
export default {
data() {
return {
value: ''
};
},
methods: {
handleChange(value, currentValue) {
console.log(value, currentValue);
this.value = value;
},
handleSubmit() {
console.log('submit: ' + this.value);
}
}
}
</script>As above, the most basic call is completed. The effect is as follows:
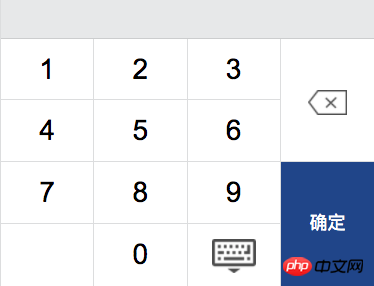
#Then, click 1-6 and "OK". If it is as follows:

#You can see that the numeric keyboard has worked as expected. Next, analyze all the input items of the numeric keyboard component.
@change-event: This event is a custom event. The parent component registers for listening through v-on, and the child component is triggered internally through $emit (for more information about custom events, please refer to: Vue official tutorial) .
This event will be triggered every time you click the numeric keys and the backspace key, which passes two parameters: value, the accumulated clicked character combination; currentValue, the currently clicked character. The parent component receives the callback content of this event through the handleChange method.
@submit-event: This event will be triggered when the "OK" button is clicked. It does not pass parameters and just tells the parent component "My OK button was clicked. It is up to you what you want to do." Well, the number clicked previously has been passed to you through change-event." The parent component receives the callback through the handleSubmit method.
It would be too insincere to only write these two methods. I also wrote the following custom attributes based on some scenarios.
max: Maximum input length. The excess length will not trigger the change-event event. There is no limit by default.
<keyboard max='6'></keyboard>
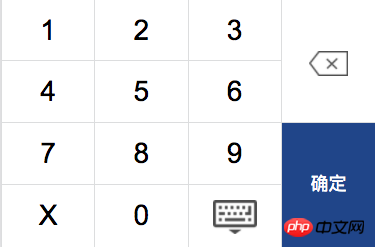
sp-key: Customized special characters, such as "X" when entering the ID card, will be added to the blank space in the lower left corner, default is none.
<keyboard sp-key='X'></keyboard>
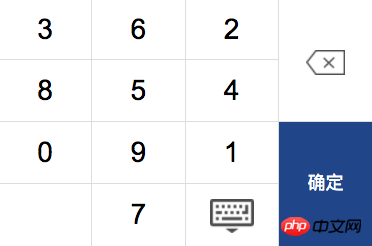
random: Whether to disrupt the order of numbers. This is often seen when entering bank accounts or passwords. The default is false.
<keyboard random='true'></keyboard>
From the above custom properties and events, we roughly know how the parent component passes values to the child components and monitors changes in the child components, but the parent component How to directly call the function inside the subcomponent? Let's look at the following scene.
The keyboard icon on the numeric keyboard will hide the numeric keyboard when clicked. There is a method keyboardToggle(true|false) inside the component to control the pop-up and retraction of the keyboard. So what if you also want to call this method outside the component? For example, when the input in the parent component gets focus.
You can obtain the component reference of the keyboard through the ref attribute in Vue to call its internal methods, as follows:
$refs.[refName].keyboardToggle(true|false)
<template>
<input type='text' @focus='handleShowKeyboard($event)' />
<keyboard ref='kbref'></keyboard>
</template>
<script>
import keyboard from 'Keyboard';
export default {
//...
methods: {
handleShowKeyboard(e) {
e && e.preventDefault();
this.$refs.kbref.keyboardToggle(true);
}
}
}
</script>In the above form, you can call methods in the child component in the context of the parent component.
$refs.[refName].handleInit()
Initialization method inside the numeric keyboard component, used to re-render the component. If the random property is true, the numeric keys will refresh the random arrangement.
$refs.[refName].handleClear()
Clear the previously entered character combination, trigger change-event and return an empty string.
All the external properties and events of this component are shared above. It can be found that we have not seen a line of code inside the component, but we can already use it completely. Let’s talk about the internal implementation.
First let’s take a look at the layout. I divided the keyboard into left and right parts. Needless to say, the right part is a key bit array generated through a v-for loop.
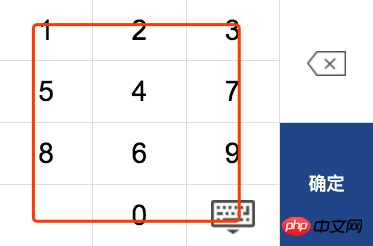
So how to make a space between 0 and 9 empty? Let’s take a look at the method of initializing the keyboard component.
keyboard.vue
handleInit()
<template>
<p>
<p class='kb-left'>
<p class='kb-item' v-for='item in keyArr'>{{item}}</p>
<p class='kb-item kb-toggle'></p> //键盘图标
</p>
<p class='kb-right'>
//...
</p>
</p>
</template>
<script>
export default {
data() {
return {
baseArr: []
}
},
computed: {
keyArr() {
this.handleInit();
return this.baseArr;
}
},
methods: {
handleInit() {
this.baseArr = ['1', '2', '3', '4', '5', '6', '7', '8', '9', '0'];
this.baseArr.splice(this.baseArr.length - 1, 0, '');
}
}
}
</script>That is, insert a null character in the second to last position of the key array, and then generate keys in a loop. Let’s take a look at how custom parameters take effect.
sp-key
<script>
export default {
  props: ['spKey'],
  data() {
    return {
      baseArr: []
    }
  },
  //....
  methods: {
    handleInit() {
      let spKey = this.spKey;
      this.baseArr = ['1', '2', '3', '4', '5', '6', '7', '8', '9', '0'];

       this.baseArr.splice(this.baseArr.length - 1, 0, spKey);
    }
  }
}
</script>在组件内部通过 props 属性接收父组件传递的 spKey,之后就可在组件内的属性和方法中通过 this.spKey 进行访问。首先判断 spKey 值是否有效,并代替空字符插入键位数组倒数第二项。
random
<script>
export default {
  props: ['spKey', 'random'],
  data() {
    return {
      baseArr: []
    }
  },
  //....
  methods: {
    handleInit() {
      let spKey = this.spKey;
      this.baseArr = ['1', '2', '3', '4', '5', '6', '7', '8', '9', '0'];

      if (this.random && this.random != 'false') {
        this.baseArr.sort(function() {
         return Math.random() - Math.random();
        });
      }

      this.baseArr.splice(this.baseArr.length - 1, 0, spKey);
    }
  }
}
</script>将键位打乱顺序其实也很简单,只要通过数组的 sort 方法。sort 方法可以接收一个函数作为参数,若函数返回正数则交换前后两项的位置,若函数返回负数则不作交换。所以将两个随机数相减的结果返回,即可将键位数组随机排序。
下面看看在组件内部是如何触发 change-event 的。
handleInput()
<template>
<p>
<p class='kb-left'>
<p @click='handleInput(item)' class='kb-item' v-for='item in keyArr'>{{item}}</p>
<p class='kb-item kb-toggle'></p> //键盘图标
</p>
//...
</p>
</template>
<script>
export default {
data() {
return {
inputStr: ''
}
},
//...
methods: {
handleInput(value) {
this.inputStr += value;
this.$emit('change-event', this.inputStr, value);
}
}
}
</script>增加了 max 属性后修改方法如下:
handleInput(value) {
  let max = Number(this.max);
  if (!isNaN(max) && this.inputStr.length+1 > max) {
    return;
  }

  this.inputStr += value;
  this.$emit('change-event', this.inputStr, value);
}最后看看退格删除是如何实现的。
handleDelete()
handleDelete() {
  let str = this.inputStr;
   if (!str.length) return;

  this.inputStr = str.substring(0, str.length - 1);
  this.$emit('change-event', this.inputStr);
}上面的例子都是些核心代码的片段,并且其他辅助函数并未列出,想查看完整的代码请看源码。
相关推荐:
The above is the detailed content of Detailed explanation of abstract Vue public components. For more information, please follow other related articles on the PHP Chinese website!

Hot AI Tools

Undresser.AI Undress
AI-powered app for creating realistic nude photos

AI Clothes Remover
Online AI tool for removing clothes from photos.

Undress AI Tool
Undress images for free

Clothoff.io
AI clothes remover

AI Hentai Generator
Generate AI Hentai for free.

Hot Article
Hot Tools

Notepad++7.3.1
Easy-to-use and free code editor

SublimeText3 Chinese version
Chinese version, very easy to use

Zend Studio 13.0.1
Powerful PHP integrated development environment

Dreamweaver CS6
Visual web development tools

SublimeText3 Mac version
God-level code editing software (SublimeText3)
Hot Topics
 1384
1384
 52
52

 How to install the Windows 10 old version component DirectPlay
Dec 28, 2023 pm 03:43 PM
How to install the Windows 10 old version component DirectPlay
Dec 28, 2023 pm 03:43 PM
Many users always encounter some problems when playing some games on win10, such as screen freezes and blurred screens. At this time, we can solve the problem by turning on the directplay function, and the operation method of the function is also Very simple. How to install directplay, the old component of win10 1. Enter "Control Panel" in the search box and open it 2. Select large icons as the viewing method 3. Find "Programs and Features" 4. Click on the left to enable or turn off win functions 5. Select the old version here Just check the box
 Detailed explanation of obtaining administrator rights in Win11
Mar 08, 2024 pm 03:06 PM
Detailed explanation of obtaining administrator rights in Win11
Mar 08, 2024 pm 03:06 PM
Windows operating system is one of the most popular operating systems in the world, and its new version Win11 has attracted much attention. In the Win11 system, obtaining administrator rights is an important operation. Administrator rights allow users to perform more operations and settings on the system. This article will introduce in detail how to obtain administrator permissions in Win11 system and how to effectively manage permissions. In the Win11 system, administrator rights are divided into two types: local administrator and domain administrator. A local administrator has full administrative rights to the local computer
 Detailed explanation of division operation in Oracle SQL
Mar 10, 2024 am 09:51 AM
Detailed explanation of division operation in Oracle SQL
Mar 10, 2024 am 09:51 AM
Detailed explanation of division operation in OracleSQL In OracleSQL, division operation is a common and important mathematical operation, used to calculate the result of dividing two numbers. Division is often used in database queries, so understanding the division operation and its usage in OracleSQL is one of the essential skills for database developers. This article will discuss the relevant knowledge of division operations in OracleSQL in detail and provide specific code examples for readers' reference. 1. Division operation in OracleSQL
 Detailed explanation of the role and usage of PHP modulo operator
Mar 19, 2024 pm 04:33 PM
Detailed explanation of the role and usage of PHP modulo operator
Mar 19, 2024 pm 04:33 PM
The modulo operator (%) in PHP is used to obtain the remainder of the division of two numbers. In this article, we will discuss the role and usage of the modulo operator in detail, and provide specific code examples to help readers better understand. 1. The role of the modulo operator In mathematics, when we divide an integer by another integer, we get a quotient and a remainder. For example, when we divide 10 by 3, the quotient is 3 and the remainder is 1. The modulo operator is used to obtain this remainder. 2. Usage of the modulo operator In PHP, use the % symbol to represent the modulus
 Angular components and their display properties: understanding non-block default values
Mar 15, 2024 pm 04:51 PM
Angular components and their display properties: understanding non-block default values
Mar 15, 2024 pm 04:51 PM
The default display behavior for components in the Angular framework is not for block-level elements. This design choice promotes encapsulation of component styles and encourages developers to consciously define how each component is displayed. By explicitly setting the CSS property display, the display of Angular components can be fully controlled to achieve the desired layout and responsiveness.
 Detailed explanation of the linux system call system() function
Feb 22, 2024 pm 08:21 PM
Detailed explanation of the linux system call system() function
Feb 22, 2024 pm 08:21 PM
Detailed explanation of Linux system call system() function System call is a very important part of the Linux operating system. It provides a way to interact with the system kernel. Among them, the system() function is one of the commonly used system call functions. This article will introduce the use of the system() function in detail and provide corresponding code examples. Basic Concepts of System Calls System calls are a way for user programs to interact with the operating system kernel. User programs request the operating system by calling system call functions
 How to open the settings of the old version of win10 components
Dec 22, 2023 am 08:45 AM
How to open the settings of the old version of win10 components
Dec 22, 2023 am 08:45 AM
Win10 old version components need to be turned on by users themselves in the settings, because many components are usually closed by default. First we need to enter the settings. The operation is very simple. Just follow the steps below. Where are the win10 old version components? Open 1. Click Start, then click "Win System" 2. Click to enter the Control Panel 3. Then click the program below 4. Click "Enable or turn off Win functions" 5. Here you can choose what you want to open
 Detailed explanation of Linux curl command
Feb 21, 2024 pm 10:33 PM
Detailed explanation of Linux curl command
Feb 21, 2024 pm 10:33 PM
Detailed explanation of Linux's curl command Summary: curl is a powerful command line tool used for data communication with the server. This article will introduce the basic usage of the curl command and provide actual code examples to help readers better understand and apply the command. 1. What is curl? curl is a command line tool used to send and receive various network requests. It supports multiple protocols, such as HTTP, FTP, TELNET, etc., and provides rich functions, such as file upload, file download, data transmission, proxy
