This article mainly introduces the relevant information of Vue.js simple installation and quick start in detail. It has certain reference value. Interested friends can refer to it. I hope it can help everyone.
We introduced the Vue.js framework in the previous section. In this section, we can try to write some small code.
1 Simple installation
To use Vue.js, we must first install it into our project. Simple installation is explained. It is definitely the simplest method. Forget about the complicated and time-consuming installation methods, directly introduce a js file and type the code first.
<head>
    <meta charset="UTF-8">
    <title>简易安装 Vue.js</title>
    <script src="vue.js"></script>
</head>The official website provides a place to download the Vue.js source code: https://cdn.jsdelivr.net/vue/2.1.3/vue.js
If you don’t want to download it locally, you can directly use CDN to introduce online resources, the same can be done:
<script src="https://xx/vue.js"></script>
In this way, we will We successfully introduced Vue.js into our project in the simplest way. As for those fancy installation methods such as npm and Bower, we will look at them later.
2 After the data-driven view
is introduced, we can use it. I heard that the most awesome thing about it is the data-driven view, which frees up DOM operations so that you no longer need to perform complex and performance-consuming DOM operations. So, let’s see how it plays out!
Assume that we now want to render the value of a variable in the js object on the page. The traditional method is to first use getElementById to obtain the DOM node object, and then innerHTML sets its content.
Now, in Vue.js, you need to do this:
<p id="app">
  公众号:{{ name }}
 </p>
 <script>
   let vm = new Vue({
     el:"#app",
     data:{
       name:"web前端教程",
     }
   });
</script>We create an instance vm through new Vue(), and the parameter is a json Object, the attribute el provides a DOM element (id='app') that exists on the page, indicating that this instance is associated with the specified DOM node.
On the DOM node, we can use the syntax of double curly braces {{ }} to render the attribute values that already exist in the Vue instance object data, such as the value of the name attribute in the above case." "Web front-end tutorial" will be rendered into the page, replace {{ name }} and the display will be: "web front-end tutorial".

In this process, we have not written code to operate DOM nodes. Moreover, as we mentioned in the previous section, the viewModel in the MVVM mode acts as a monitor. If the role monitors that the model data has changed, it will notify the view to update it. This process does not require your participation.

(Review mvvm)
Let’s try it. Let’s change the value in name to: “hello word” without adding any code. , whether the page view will automatically update.
Look at the gif below, let’s demonstrate it through the chrome browser:

(Slow down, wait until the gif is loaded)
As shown in the figure above, once the value of name is changed, the page changes immediately, without you needing to write innerHTML to update the view.
This is the data-driven view of Vue.js.
3 Two-way binding
More conveniently, Vue.js also provides convenient syntax instructions to achieve two-way binding of views and data. In other words, not only changes in data can drive the view, but also the data in the model layer can be easily updated when the user performs some operations on the page.
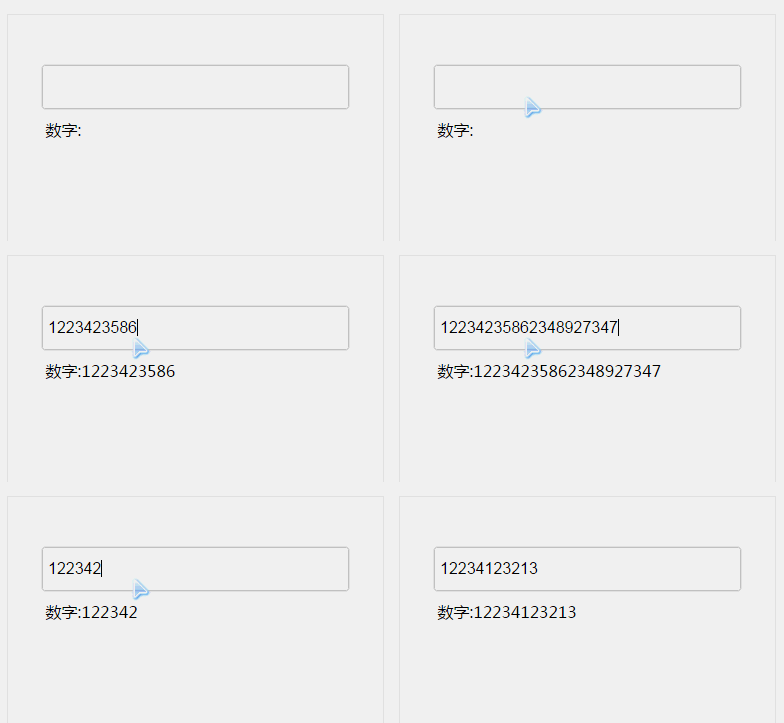
Example: Monitor the content entered by the user in the page input box, and then update it on the page in real time.
In Vue we can easily achieve this by using the v-model directive. (Don’t worry about what v-model is, it will be introduced in detail in the following chapters).
<p id="app">
   <input v-model="number">
   <p>数字:{{ number }}</p>
 </p>
 <script>
   let vm = new Vue({
     el:"#app",
     data:{
       number:"",
     }
   });
</script>The effect is as follows:

(Slow down and wait for the gif to finish loading)
In the case, we do not need to write code to monitor the content changes of the input control. The content entered by the user will update the value of the data attribute number in the vm instance in real time. Once the number is updated, the view will also be updated accordingly. . Because all of this is done for you by Vue.js.
4 Components
Above we demonstrated the data driver of Vu.jse, don’t forget, we mentioned Vue.js in the previous section An important core is: Componentization.
Componentization is to extract specific blocks from the page independently and encapsulate them into a component that can be easily reused.
Example: Suppose there are multiple identical cards on the page:

传统的办法,我们可以要写三份同样的HTML布局:
 <p id="app">
  <!--第1个卡片-->
  <p class="card">
    <img src="logo.png" alt="">
    <h2>web前端教程</h2>
    <p>这里是描述,很长的描述</p>
    <button>我是按钮</button>
  </p>

  <!--第2个卡片-->
  <p class="card">
    <img src="logo.png" alt="">
    <h2>web前端教程</h2>
    <p>这里是描述,很长的描述</p>
    <button>我是按钮</button>
  </p>

  <!--第3个卡片-->
  <p class="card">
    <img src="logo.png" alt="">
    <h2>web前端教程</h2>
    <p>这里是描述,很长的描述</p>
    <button>我是按钮</button>
  </p>
</p>如果我们把每个卡片看作一个可复用的区域的话,那么它就可以封装成一个组件。
在Vue.js中,我们试着把卡片封装成一个组件。
<p id="app">
<card></card>
<card></card>
<card></card>
</p>
<script>
//注册一个名叫card的组件
Vue.component('card',{
template:`<p>
<img src="logo.png" alt="">
<h2>web前端教程</h2>
<p>这里是描述,很长的描述</p>
<button>我是按钮</button>
</p>`
});
new Vue({
el:"#app"
});
</script>我们用Vue.component(tagName, options)注册了一个名字叫card的组件,这样,在需要复用这个组件的地方,我们只需要使用
可能你会说,组件里面的显示的内容不可能全都一样。放心,Vue为组件提供了props属性来接受传递进来的参数,后面我们会有专门的章节来介绍组件的详细用法。
5 本节小结
看到这里,你已经了解了Vue.js的数据驱动和组件化两大核心了,你已经入门了。后面的章节都是围绕这两个核心点来展开讲解。
相关推荐:
The above is the detailed content of Detailed explanation of Vue.js simple installation and quick start. For more information, please follow other related articles on the PHP Chinese website!


