

Three.js basic introductory learning tutorial

This article mainly introduces the Three.js basic learning tutorial in detail. It has certain reference value. Interested friends can refer to it. I hope it can help everyone.
1. Three.js official website and three necessary conditions for using Three.js
1.Three.js official website https://threejs.org/
2. Three necessary conditions for using Three.js
(To actually be able to display anything with Three.js, we need three things: A scene, a camera, and a renderer so we can render the scene with the camera.)
roughly means that anything displayed can be achieved using three.js, and three conditions must be met: a scene, a camera, a renderer. All three are indispensable.
2. The relationship between the three necessary conditions for using Three.js (a scene scene, a camera camera, a renderer renderer)

As shown in the picture above, to illustrate the relationship between a scene, a camera, and a renderer renderer[/code]
1.Scene scene is a container of objects [popularly understood as holding things]. Developers can put the required characters into the scene, such as apples and grapes. At the same time, the character itself also manages its position in the scene.
2.The function of camera camera is to face the scene, pick a suitable scene in the scene, and take a photo of it. [You can imagine the eyes of an adult]
3.The function of renderer is to put the pictures taken by the camera into the browser to display
3. Use the above theory to practice the official website case
The rendering is as follows

<html>
 <head>
 <title>My first three.js app</title>
 <style>
  body { margin: 0; }
  canvas { width: 100%; height: 100% }
 </style>
 </head>
 <body>
 <script src="./lib/three.js"></script>
 <script>
  //创建一个场景对象
  var scene = new THREE.Scene();
  //创建一个相机对象
  var camera = new THREE.PerspectiveCamera( 75, window.innerWidth/window.innerHeight, 0.1, 1000 );

  //创建一个渲染器对象
  var renderer = new THREE.WebGLRenderer();
  //设置画布尺寸
  renderer.setSize( window.innerWidth, window.innerHeight );
  //设置画布色
   renderer.setClearColor(0x00AABB, 1.0);
   //将渲染画布添加到浏览器中,以便后面剩放相机拍下的景
  document.body.appendChild( renderer.domElement );

  //创建一个几何体长、宽、高分别为1几何体对象
  var geometry = new THREE.BoxGeometry( 1, 1, 1 );
  //材料、皮肤
  var material = new THREE.MeshBasicMaterial( { color: 0x00ff00 } );
  //将material材料添加到几何体geometry,产生新的对象几何体cube
  var cube = new THREE.Mesh( geometry, material );
  //将几何体添加至场景中
  scene.add( cube );
  //设置相机z轴,垂直电脑屏幕位置
  camera.position.z = 5;

  var render = function () {
  /*requestAnimationFrame( render ); //循环渲染
  cube.rotation.x += 0.1; //x轴每秒旋转60次
  cube.rotation.y += 0.1;//y轴每秒旋转60次*/
  renderer.render(scene, camera); //实时将相机拍下的几何体渲染到场景中
  };
  render();
</script>
 </body>
</html> Negative direction of z-axis? ? ? Therefore, it is necessary to talk about the three-dimensional coordinates here (as shown below)
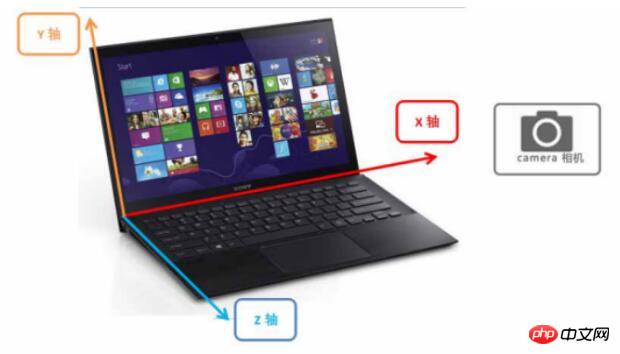
The camera points to the origin? ? ? Let’s talk about the camera camera (very important!! Imagine what it feels like when people can’t see things).
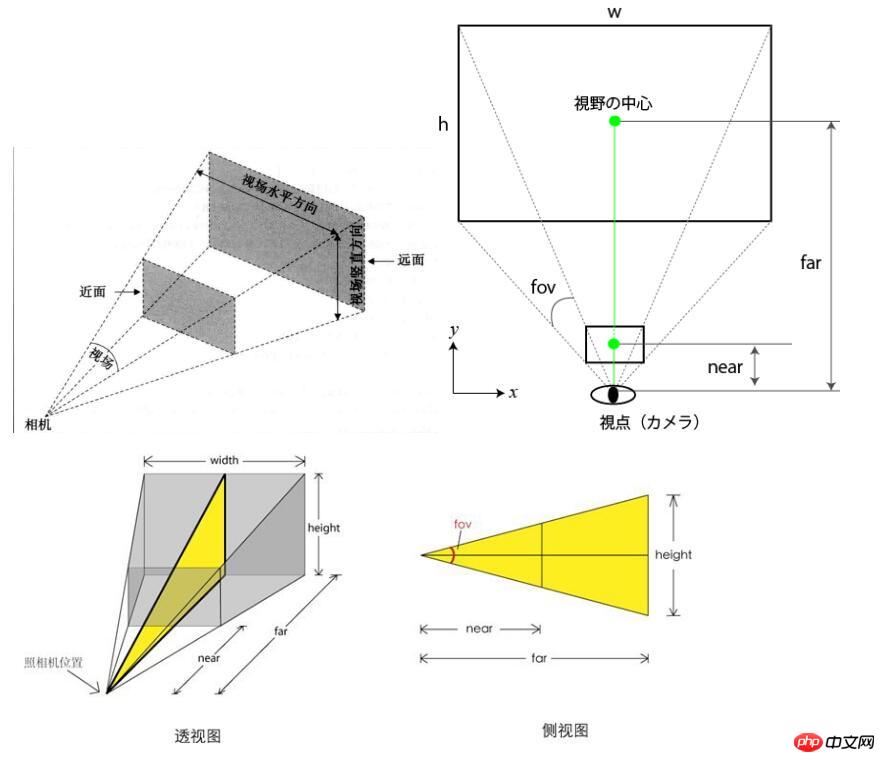
Viewing angle: fov Here viewing angle (some places (called shooting distance)), the smaller the objects in the scene, the smaller the field of view angle, the larger the objects in the scene
Aspect ratio: aspectThe closest distance between the camera and the viewing volume: near
The camera is away from the viewing volume The farthest distance of the volume: far
In summary, I believe that it should be very simple to understand the camera based on the above three-dimensional coordinates and camera diagram. Next, modify the above case (explain the mouse scrolling to zoom in and out in the following case) , three-dimensional rotation are all based on the camera)
Use the [lookAt] method to set the camera center of vision. The parameter of "lookAt()" is an object whose attributes include center coordinates "x", "y" and "z".
Set the upward direction of the camera to the positive y-axis camera.up.x = 0; camera.up.y = 1/*Camera orientation--The upper direction of the camera is the y-axis*/; camera. up.z = 0;
Rotation animation principle The camera rotates around the y-axis and continuously modifies the camera's x and z-axis positions. And keep the objects in the scene in the camera's field of view, put the pictures taken by the camera in real time and display them in the browser
##//相机围绕y轴旋转,不断修改相机x、z轴位置,并且保持场景中的物体一直再相机的视野中
//实时渲染成像
function animation(){
var timer = Date.now()*0.0001;
camera.position.x = Math.cos(timer)*100;
camera.position.z = Math.sin(timer)*100;
camera.lookAt(scene.position); //设置相机视野中心
renderer.render(scene, camera);
requestAnimationFrame(animation);//渲染回调函数
}The effect diagram is as follows
Rotating Cube - Case Source Code
<!DOCTYPE html>
<html>
<head>
<meta charset="UTF-8">
<title>旋转立方体 </title>
<style>
#canvas-frame {
width: 100%;
height: 600px;
}
</style>
</head>
<body onload="threeStart()">
<p id="canvas-frame" ></p>
</body>
<script type="text/javascript" src="./lib/three.js" ></script>
<script type="text/javascript">
var renderer, //渲染器
width = document.getElementById('canvas-frame').clientWidth, //画布宽
height = document.getElementById('canvas-frame').clientHeight; //画布高
//初始化渲染器
function initThree(){
renderer = new THREE.WebGLRenderer({
antialias : true
//canvas: document.getElementById('canvas-frame')
});
renderer.setSize(width, height);
renderer.setClearColor(0xFFFFFF, 1.0);
document.getElementById('canvas-frame').appendChild(renderer.domElement);
renderer.setClearColor(0xFFFFFF, 1.0);
}
//初始化场景
var scene;
function initScene(){
scene = new THREE.Scene();
}
var camera;
function initCamera() { //透视相机
camera = new THREE.PerspectiveCamera(45, width/height , 1, 10000);
camera.position.x = 50;
camera.position.y = 150;
camera.position.z =150;
camera.up.x = 0;
camera.up.y = 1; //相机朝向--相机上方为y轴
camera.up.z = 0;
camera.lookAt({ //相机的中心点
x : 0,
y : 0,
z : 0
});
// camera 正交相机
/*camera = new THREE.OrthographicCamera(-300, 300, 100, -100, 1, 10000);
camera.position.x = 250;
camera.position.y = 100;
camera.position.z = 1800;
camera.up.x = 0;
camera.up.y = 1; //相机朝向--相机上方为y轴
camera.up.z = 0;
camera.lookAt({ //相机的中心点
x : 0,
y : 0,
z : 0
});*/
}
function initLight(){
// light--这里使用环境光
//var light = new THREE.DirectionalLight(0xffffff); /*方向性光源*/
//light.position.set(600, 1000, 800);
var light = new THREE.AmbientLight(0xffffff); //模拟漫反射光源
light.position.set(600, 1000, 800); //使用Ambient Light时可以忽略方向和角度,只考虑光源的位置
scene.add(light);
}
function initObject(){ //初始化对象
//初始化地板
initFloor();
}
function initGrid(){ //辅助网格
var helper = new THREE.GridHelper( 1000, 50 );
helper.setColors( 0x0000ff, 0x808080 );
scene.add( helper );
}
function initFloor(){
//创建一个立方体
var geometry = new THREE.BoxGeometry(80, 20, 80);
for ( var i = 0; i < geometry.faces.length; i += 2 ) {
var hex = Math.random() * 0xffffff;
geometry.faces[ i ].color.setHex( hex );
geometry.faces[ i + 1 ].color.setHex( hex );
}
var material = new THREE.MeshBasicMaterial( { vertexColors: THREE.FaceColors} );
//将material材料添加到几何体geometry
var mesh = new THREE.Mesh(geometry, material);
mesh.position = new THREE.Vector3(0,0,0);
scene.add(mesh);
}
//初始化页面加载
function threeStart(){
//初始化渲染器
initThree();
//初始化场景
initScene();
//初始透视化相机
initCamera();
//初始化光源
//initLight();
//模型对象
initObject();
//初始化网格辅助线
initGrid();
//renderer.render(scene, camera);
//实时动画
animation();
}
/*
* 旋转原理
* 相机围绕y轴旋转
* 不断修改相机x、z轴位置,并且保持场景中的物体一直再相机的视野中,
* 实时将相机拍摄下来的图片,放到浏览器中去显示
*/
function animation(){
//渲染成像
var timer = Date.now()*0.0001;
camera.position.x = Math.cos(timer)*100; //相机位置x轴方向
camera.position.z = Math.sin(timer)*100; //相机位置y轴方向
//设置相机视野中心
camera.lookAt(scene.position);
//渲染成像
renderer.render(scene, camera);
//渲染回调animation函数
requestAnimationFrame(animation);
}
</script>
</html>This is complete, attached is a personal drawing flowchart
related suggestion: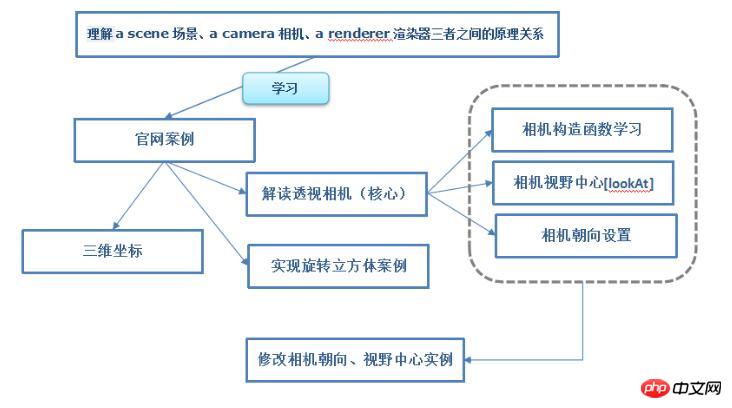
JS library Three.js basic introduction
How to run three.js locally Detailed explanation
Three.js implements 3D model display
Three.js entry hello world and how to draw lines
The above is the detailed content of Three.js basic introductory learning tutorial. For more information, please follow other related articles on the PHP Chinese website!

Hot AI Tools

Undresser.AI Undress
AI-powered app for creating realistic nude photos

AI Clothes Remover
Online AI tool for removing clothes from photos.

Undress AI Tool
Undress images for free

Clothoff.io
AI clothes remover

Video Face Swap
Swap faces in any video effortlessly with our completely free AI face swap tool!

Hot Article
Hot Tools

Notepad++7.3.1
Easy-to-use and free code editor

SublimeText3 Chinese version
Chinese version, very easy to use

Zend Studio 13.0.1
Powerful PHP integrated development environment

Dreamweaver CS6
Visual web development tools

SublimeText3 Mac version
God-level code editing software (SublimeText3)
Hot Topics
 1387
1387
 52
52

 How to implement an online speech recognition system using WebSocket and JavaScript
Dec 17, 2023 pm 02:54 PM
How to implement an online speech recognition system using WebSocket and JavaScript
Dec 17, 2023 pm 02:54 PM
How to use WebSocket and JavaScript to implement an online speech recognition system Introduction: With the continuous development of technology, speech recognition technology has become an important part of the field of artificial intelligence. The online speech recognition system based on WebSocket and JavaScript has the characteristics of low latency, real-time and cross-platform, and has become a widely used solution. This article will introduce how to use WebSocket and JavaScript to implement an online speech recognition system.
 WebSocket and JavaScript: key technologies for implementing real-time monitoring systems
Dec 17, 2023 pm 05:30 PM
WebSocket and JavaScript: key technologies for implementing real-time monitoring systems
Dec 17, 2023 pm 05:30 PM
WebSocket and JavaScript: Key technologies for realizing real-time monitoring systems Introduction: With the rapid development of Internet technology, real-time monitoring systems have been widely used in various fields. One of the key technologies to achieve real-time monitoring is the combination of WebSocket and JavaScript. This article will introduce the application of WebSocket and JavaScript in real-time monitoring systems, give code examples, and explain their implementation principles in detail. 1. WebSocket technology
 How to use JavaScript and WebSocket to implement a real-time online ordering system
Dec 17, 2023 pm 12:09 PM
How to use JavaScript and WebSocket to implement a real-time online ordering system
Dec 17, 2023 pm 12:09 PM
Introduction to how to use JavaScript and WebSocket to implement a real-time online ordering system: With the popularity of the Internet and the advancement of technology, more and more restaurants have begun to provide online ordering services. In order to implement a real-time online ordering system, we can use JavaScript and WebSocket technology. WebSocket is a full-duplex communication protocol based on the TCP protocol, which can realize real-time two-way communication between the client and the server. In the real-time online ordering system, when the user selects dishes and places an order
 How to implement an online reservation system using WebSocket and JavaScript
Dec 17, 2023 am 09:39 AM
How to implement an online reservation system using WebSocket and JavaScript
Dec 17, 2023 am 09:39 AM
How to use WebSocket and JavaScript to implement an online reservation system. In today's digital era, more and more businesses and services need to provide online reservation functions. It is crucial to implement an efficient and real-time online reservation system. This article will introduce how to use WebSocket and JavaScript to implement an online reservation system, and provide specific code examples. 1. What is WebSocket? WebSocket is a full-duplex method on a single TCP connection.
 JavaScript and WebSocket: Building an efficient real-time weather forecasting system
Dec 17, 2023 pm 05:13 PM
JavaScript and WebSocket: Building an efficient real-time weather forecasting system
Dec 17, 2023 pm 05:13 PM
JavaScript and WebSocket: Building an efficient real-time weather forecast system Introduction: Today, the accuracy of weather forecasts is of great significance to daily life and decision-making. As technology develops, we can provide more accurate and reliable weather forecasts by obtaining weather data in real time. In this article, we will learn how to use JavaScript and WebSocket technology to build an efficient real-time weather forecast system. This article will demonstrate the implementation process through specific code examples. We
 Simple JavaScript Tutorial: How to Get HTTP Status Code
Jan 05, 2024 pm 06:08 PM
Simple JavaScript Tutorial: How to Get HTTP Status Code
Jan 05, 2024 pm 06:08 PM
JavaScript tutorial: How to get HTTP status code, specific code examples are required. Preface: In web development, data interaction with the server is often involved. When communicating with the server, we often need to obtain the returned HTTP status code to determine whether the operation is successful, and perform corresponding processing based on different status codes. This article will teach you how to use JavaScript to obtain HTTP status codes and provide some practical code examples. Using XMLHttpRequest
 How to use insertBefore in javascript
Nov 24, 2023 am 11:56 AM
How to use insertBefore in javascript
Nov 24, 2023 am 11:56 AM
Usage: In JavaScript, the insertBefore() method is used to insert a new node in the DOM tree. This method requires two parameters: the new node to be inserted and the reference node (that is, the node where the new node will be inserted).
 JavaScript and WebSocket: Building an efficient real-time image processing system
Dec 17, 2023 am 08:41 AM
JavaScript and WebSocket: Building an efficient real-time image processing system
Dec 17, 2023 am 08:41 AM
JavaScript is a programming language widely used in web development, while WebSocket is a network protocol used for real-time communication. Combining the powerful functions of the two, we can create an efficient real-time image processing system. This article will introduce how to implement this system using JavaScript and WebSocket, and provide specific code examples. First, we need to clarify the requirements and goals of the real-time image processing system. Suppose we have a camera device that can collect real-time image data
