
 Web Front-end
JS Tutorial
Sharing of value transfer and communication methods between different components in Angular
Web Front-end
JS Tutorial
Sharing of value transfer and communication methods between different components in Angular
Sharing of value transfer and communication methods between different components in Angular

This article mainly introduces the methods of value transfer and communication between different components in Angular. The editor thinks it is quite good, so I will share it with you now and give it as a reference. Let’s follow the editor to take a look, I hope it can help everyone.
Parameters and communication methods between parent and child components
Use event communication (EventEmitter, @Output):
Scenario: Yes To communicate between parent and child components, the child component is generally used to pass messages to the parent component;
Steps:
The child component creates an event EventEmitter object and uses @output to expose it Go out;
The parent component listens to the @output method of the child component, and then handles the event.
Code:
// child 组件
@Component({
selector: 'app-child',
template: '',
styles: [``]
})
export class AppChildComponent implements OnInit {
@Output() onVoted: EventEmitter<any> = new EventEmitter();
ngOnInit(): void {
this.onVoted.emit(1);
}
}
// parent 组件
@Component({
selector: 'app-parent',
template: `
<app-child (onVoted)="onListen($event)"></app-child>
`,
styles: [``]
})
export class AppParentComponent implements OnInit {
ngOnInit(): void {
throw new Error('Method not implemented.');
}
onListen(data: any): void {
console.log('TAG' + '---------->>>' + data);
}
}Using @ViewChild and @ViewChildren:
Scenario : Generally used for parent components to pass information to child components, or for parent components to call methods of child components;
Steps:
Use child components in parent components;
Use @ViewChild in the parent component to obtain the child component object.
The parent component uses the child component object to control the child component; (pass information or call methods).
Code:
// 子组件
@Component({
selector: 'app-child',
template: '',
styles: [``]
})
export class AppChildComponent2 implements OnInit {
data = 1;
ngOnInit(): void {
}
getData(): void {
console.log('TAG' + '---------->>>' + 111);
}
}
// 父组件
@Component({
selector: 'app-parent2',
template: `
<app-child></app-child>
`,
styles: [``]
})
export class AppParentComponent2 implements OnInit {
@ViewChild(AppChildComponent2) child: AppChildComponent2;
ngOnInit(): void {
this.child.getData(); // 父组件获得子组件方法
console.log('TAG'+'---------->>>'+this.child.data);// 父组件获得子组件属性
}
}Non-parent-child component parameter passing and communication method
Through routing parameters
Scenario: One component can jump to another component through routing, such as: list and edit
Steps:
A component jumps to B component through routerLink or router.navigate or router.navigateByUrl
- ##B component accepts these parameters
<a routerLink=["/exampledetail",id]></a>
routerLink=["/exampledetail",{queryParams:object}]
routerLink=["/exampledetail",{queryParams:'id':'1','name':'yxman'}];this.router.navigate(['/exampledetail',id]);
this.router.navigate(['/exampledetail'],{queryParams:{'name':'yxman'}});this.router.navigateByUrl('/exampledetail/id');
this.router.navigateByUrl('/exampledetail',{queryParams:{'name':'yxman'}});import { ActivateRoute } from '@angular/router';
public data: any;
export class ExampledetailComponent implements OnInit {
constructor( public route: ActivateRoute ) { };
ngOnInit(){
this.data = this.route.snapshot.params['id'];
};
}import { ActivateRoute } from '@angular/router';
export class ExampledetailComponent implements OnInit {
public data: any;
constructor( public activeRoute:ActivateRoute ) { };
ngOnInit(){
this.activeRoute.queryParams.subscribe(params => {
this.data = params['name'];
});
};Use service Service to communicate, that is: two components inject a certain service at the same time
Scenario: The two components that need to communicate are not parent-child components or are not adjacent components; of course, also Can be any component. Steps:- Create a new service, and component A and component B inject the service at the same time;
- Component A starts from the service Obtain data, or want to transmit data to the service
- Component B obtains data from the service, or wants to transmit data to the service.
  // 组件A
  @Component({
   selector: 'app-a',
   template: '',
   styles: [``]
  })
  export class AppComponentA implements OnInit {
   constructor(private message: MessageService) {
   }
   ngOnInit(): void {
    // 组件A发送消息3
    this.message.sendMessage(3);
    const b = this.message.getMessage(); // 组件A接收消息;
   }
  }
  // 组件B
  @Component({
   selector: 'app-b',
   template: `
    <app-a></app-a>
   `,
   styles: [``]
  })
  export class AppComponentB implements OnInit {
   constructor(private message: MessageService) {
   }
   ngOnInit(): void {
    // 组件B获得消息
    const a = this.message.getMessage();
    this.message.sendMessage(5); // 组件B发送消息
   }
}Message service module
Scenario: This involves A project needs to implement the possibility of communication between all components, or a component needs to communicate with several components, and parameters cannot be passed through routing. Design method:- Use RxJs to define a service module MessageService, and all information is registered with the service;
- Where you need to send a message, call the method of the service;
- Use it where you need to receive information, call the method of receiving the information, obtain a Subscription object, and then monitor the information;
- Of course, when each component is Destroyed,
this.subscription.unsubscribe();
// 消息中专服务
@Injectable()
export class MessageService {
private subject = new Subject<any>();
/**
* content模块里面进行信息传输,类似广播
* @param type 发送的信息类型
* 1-你的信息
* 2-你的信息
* 3-你的信息
* 4-你的信息
* 5-你的信息
*/
sendMessage(type: number) {
console.log('TAG' + '---------->>>' + type);
this.subject.next({type: type});
}
/**
* 清理消息
*/
clearMessage() {
this.subject.next();
}
/**
* 获得消息
* @returns {Observable<any>} 返回消息监听
*/
getMessage(): Observable<any> {
return this.subject.asObservable();
}
}
// 使用该服务的地方,需要注册MessageService服务;
constructor(private message: MessageService) {
}
// 消息接受的地方;
public subscription: Subscription;
ngAfterViewInit(): void {
this.subscription = this.message.getMessage().subscribe(msg => {
// 根据msg,来处理你的业务逻辑。
})
}
// 组件生命周期结束的时候,记得注销一下,不然会卡;
ngOnDestroy(): void {
this.subscription.unsubscribe();
}
// 调用该服务的方法,发送信息;
send():void {
this.message.sendMessage(‘我发消息了,你们接受下'); // 发送信息消息
}Share the simple implementation method of page reverse transfer value in vue
Realize session in PHP And cookie data value transfer function
#Introduction to the method of passing value in php
The above is the detailed content of Sharing of value transfer and communication methods between different components in Angular. For more information, please follow other related articles on the PHP Chinese website!

Hot AI Tools

Undresser.AI Undress
AI-powered app for creating realistic nude photos

AI Clothes Remover
Online AI tool for removing clothes from photos.

Undress AI Tool
Undress images for free

Clothoff.io
AI clothes remover

AI Hentai Generator
Generate AI Hentai for free.

Hot Article
Hot Tools

Notepad++7.3.1
Easy-to-use and free code editor

SublimeText3 Chinese version
Chinese version, very easy to use

Zend Studio 13.0.1
Powerful PHP integrated development environment

Dreamweaver CS6
Visual web development tools

SublimeText3 Mac version
God-level code editing software (SublimeText3)
Hot Topics
 1377
1377
 52
52

 How to write a novel in the Tomato Free Novel app. Share the tutorial on how to write a novel in Tomato Novel.
Mar 28, 2024 pm 12:50 PM
How to write a novel in the Tomato Free Novel app. Share the tutorial on how to write a novel in Tomato Novel.
Mar 28, 2024 pm 12:50 PM
Tomato Novel is a very popular novel reading software. We often have new novels and comics to read in Tomato Novel. Every novel and comic is very interesting. Many friends also want to write novels. Earn pocket money and edit the content of the novel you want to write into text. So how do we write the novel in it? My friends don’t know, so let’s go to this site together. Let’s take some time to look at an introduction to how to write a novel. Share the Tomato novel tutorial on how to write a novel. 1. First open the Tomato free novel app on your mobile phone and click on Personal Center - Writer Center. 2. Jump to the Tomato Writer Assistant page - click on Create a new book at the end of the novel.
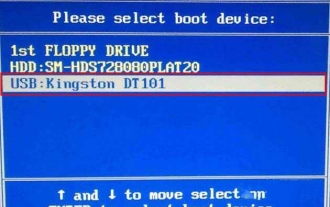 How to enter bios on Colorful motherboard? Teach you two methods
Mar 13, 2024 pm 06:01 PM
How to enter bios on Colorful motherboard? Teach you two methods
Mar 13, 2024 pm 06:01 PM
Colorful motherboards enjoy high popularity and market share in the Chinese domestic market, but some users of Colorful motherboards still don’t know how to enter the bios for settings? In response to this situation, the editor has specially brought you two methods to enter the colorful motherboard bios. Come and try it! Method 1: Use the U disk startup shortcut key to directly enter the U disk installation system. The shortcut key for the Colorful motherboard to start the U disk with one click is ESC or F11. First, use Black Shark Installation Master to create a Black Shark U disk boot disk, and then turn on the computer. When you see the startup screen, continuously press the ESC or F11 key on the keyboard to enter a window for sequential selection of startup items. Move the cursor to the place where "USB" is displayed, and then
 How to recover deleted contacts on WeChat (simple tutorial tells you how to recover deleted contacts)
May 01, 2024 pm 12:01 PM
How to recover deleted contacts on WeChat (simple tutorial tells you how to recover deleted contacts)
May 01, 2024 pm 12:01 PM
Unfortunately, people often delete certain contacts accidentally for some reasons. WeChat is a widely used social software. To help users solve this problem, this article will introduce how to retrieve deleted contacts in a simple way. 1. Understand the WeChat contact deletion mechanism. This provides us with the possibility to retrieve deleted contacts. The contact deletion mechanism in WeChat removes them from the address book, but does not delete them completely. 2. Use WeChat’s built-in “Contact Book Recovery” function. WeChat provides “Contact Book Recovery” to save time and energy. Users can quickly retrieve previously deleted contacts through this function. 3. Enter the WeChat settings page and click the lower right corner, open the WeChat application "Me" and click the settings icon in the upper right corner to enter the settings page.
 New generation of optical fiber broadband technology - 50G PON
Apr 20, 2024 pm 09:22 PM
New generation of optical fiber broadband technology - 50G PON
Apr 20, 2024 pm 09:22 PM
In the previous article (link), Xiao Zaojun introduced the development history of broadband technology from ISDN, xDSL to 10GPON. Today, let’s talk about the upcoming new generation of optical fiber broadband technology-50GPON. █F5G and F5G-A Before introducing 50GPON, let’s talk about F5G and F5G-A. In February 2020, ETSI (European Telecommunications Standards Institute) promoted a fixed communication network technology system based on 10GPON+FTTR, Wi-Fi6, 200G optical transmission/aggregation, OXC and other technologies, and named it F5G. That is, the fifth generation fixed network communication technology (The5thgenerationFixednetworks). F5G is a fixed network
 The secret of hatching mobile dragon eggs is revealed (step by step to teach you how to successfully hatch mobile dragon eggs)
May 04, 2024 pm 06:01 PM
The secret of hatching mobile dragon eggs is revealed (step by step to teach you how to successfully hatch mobile dragon eggs)
May 04, 2024 pm 06:01 PM
Mobile games have become an integral part of people's lives with the development of technology. It has attracted the attention of many players with its cute dragon egg image and interesting hatching process, and one of the games that has attracted much attention is the mobile version of Dragon Egg. To help players better cultivate and grow their own dragons in the game, this article will introduce to you how to hatch dragon eggs in the mobile version. 1. Choose the appropriate type of dragon egg. Players need to carefully choose the type of dragon egg that they like and suit themselves, based on the different types of dragon egg attributes and abilities provided in the game. 2. Upgrade the level of the incubation machine. Players need to improve the level of the incubation machine by completing tasks and collecting props. The level of the incubation machine determines the hatching speed and hatching success rate. 3. Collect the resources required for hatching. Players need to be in the game
 How to install Angular on Ubuntu 24.04
Mar 23, 2024 pm 12:20 PM
How to install Angular on Ubuntu 24.04
Mar 23, 2024 pm 12:20 PM
Angular.js is a freely accessible JavaScript platform for creating dynamic applications. It allows you to express various aspects of your application quickly and clearly by extending the syntax of HTML as a template language. Angular.js provides a range of tools to help you write, update and test your code. Additionally, it provides many features such as routing and form management. This guide will discuss how to install Angular on Ubuntu24. First, you need to install Node.js. Node.js is a JavaScript running environment based on the ChromeV8 engine that allows you to run JavaScript code on the server side. To be in Ub
 How to set font size on mobile phone (easily adjust font size on mobile phone)
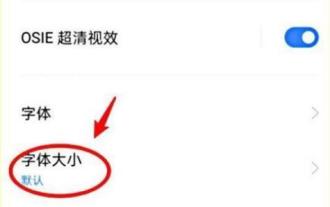
May 07, 2024 pm 03:34 PM
How to set font size on mobile phone (easily adjust font size on mobile phone)
May 07, 2024 pm 03:34 PM
Setting font size has become an important personalization requirement as mobile phones become an important tool in people's daily lives. In order to meet the needs of different users, this article will introduce how to improve the mobile phone use experience and adjust the font size of the mobile phone through simple operations. Why do you need to adjust the font size of your mobile phone - Adjusting the font size can make the text clearer and easier to read - Suitable for the reading needs of users of different ages - Convenient for users with poor vision to use the font size setting function of the mobile phone system - How to enter the system settings interface - In Find and enter the "Display" option in the settings interface - find the "Font Size" option and adjust it. Adjust the font size with a third-party application - download and install an application that supports font size adjustment - open the application and enter the relevant settings interface - according to the individual
 Quickly master: How to open two WeChat accounts on Huawei mobile phones revealed!
Mar 23, 2024 am 10:42 AM
Quickly master: How to open two WeChat accounts on Huawei mobile phones revealed!
Mar 23, 2024 am 10:42 AM
In today's society, mobile phones have become an indispensable part of our lives. As an important tool for our daily communication, work, and life, WeChat is often used. However, it may be necessary to separate two WeChat accounts when handling different transactions, which requires the mobile phone to support logging in to two WeChat accounts at the same time. As a well-known domestic brand, Huawei mobile phones are used by many people. So what is the method to open two WeChat accounts on Huawei mobile phones? Let’s reveal the secret of this method. First of all, you need to use two WeChat accounts at the same time on your Huawei mobile phone. The easiest way is to
