

vue.js quickly builds an example of a book management platform

Vue.js is a very popular JavaScript MVVM (Model-View-ViewModel) library. It is built with data-driven and component-based ideas. Compared with Angular.js, Vue.js provides a simpler and easier-to-understand API, allowing us to quickly get started and use Vue.js. In this article, we mainly share with you examples of quickly building a library management platform with vue.js, hoping to help everyone.
1. DEMO style
First we need to build a simple demo style. It is recommended that you use bootstrap, which can quickly build a clear and concise page.
Let me share with you a piece of my code.
<p class="container">
  <p class="col-md-6 col-md-offset-3">
  <h1>Vue demo</h1>

  <p id="app">
   <table class="table table-hover ">
    <caption></caption>
   <thead>
    <tr>
    <th>序号</th>
    <th>书名</th>
    <th>作者</th>
    <th>价格</th>
    <th>操作</th>
    </tr>
   </thead>
   </table>

   <p id="add-book">
   <legend>添加书籍</legend>
   <p class="form-group">
    <label for="group">书名</label>
    <input type="text" class="form-control" id="group">
   </p>
   <p class="form-group">
    <label for="author">作者</label>
    <input type="text" class="form-control" id="author">
   </p>
   <p class="form-group">
    <label for="price">价格</label>
    <input type="text" class="form-control" id="price">
   </p>
   <button class="btn btn-primary btn-block">添加</button>
   <button class="btn btn-primary btn-block">查询</button>
   </p>

   <p id="update-book">
   <legend>修改书籍</legend>
   <p class="form-group">
    <label for="group1">书名</label>
    <input type="text" class="form-control" id="group1">
   </p>
   <p class="form-group">
    <label for="author1">作者</label>
    <input type="text" class="form-control" id="author1">
   </p>
   <p class="form-group">
    <label for="price1">价格</label>
    <input type="text" class="form-control" id="price1">
   </p>
   <button class="btn btn-primary btn-block">完成</button>
   </p>
  </p>
  </p>
</p>Using bootstrap’s grid system and some simple components, it is not only simple and fast, but also automatically responsive.
And the effect is not ugly, it is quite neat.
Let me show you the initial renderings.
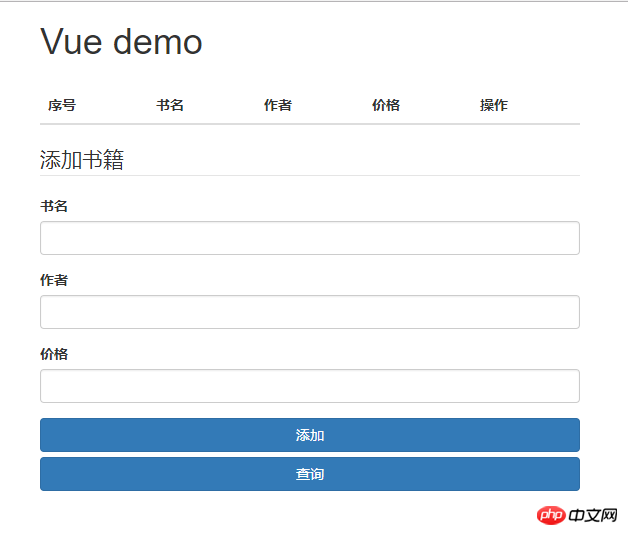
If you don’t understand this CSS framework, it doesn’t matter if you write the style yourself.
2. Create a vue instance
Next, we import our own JS file and create a vue instance.
new Vue({
 el: '#app',
 data: {
 book: {
  id: 0,
  author: '',
  name: '',
  price: ''
 },
 books: [{
  id: 1,
  author: '曹雪芹',
  name: '红楼梦',
  price: 32.0
 }, {
  id: 2,
  author: '施耐庵',
  name: '水浒传',
  price: 30.0
 }, {
  id: '3',
  author: '罗贯中',
  name: '三国演义',
  price: 24.0
 }, {
  id: 4,
  author: '吴承恩',
  name: '西游记',
  price: 20.0
 }]
 }
});Data contains some initial data, which can be filled in at will.
3. Add various instructions to HTML
We have said that the core of vue focuses on the view layer, so instructions are the most important step. Let’s point out A little bit.
However, because the instructions are distributed in a messy manner, I attach all the codes directly, and then I explain them one by one.
<p id="app">
   <table class="table table-hover ">
    <caption></caption>
   <thead>
    <tr>
    <th>序号</th>
    <th>书名</th>
    <th>作者</th>
    <th>价格</th>
    <th>操作</th>
    </tr>
   </thead>
   <tbody>
    <tr v-cloak v-for="book in books">
    <td>{{book.id}}</td>
    <td>{{book.name}}</td>
    <td>{{book.author}}</td>
    <td>{{book.price}}</td>
    <template v-if="book.id%2==0">
     <td class="text-left">
     <button type="button" class="btn btn-success" @click="delBook(book)" class="del">删除</button>
     <button type="button" class="btn btn-success" @click="updateBook(book)">修改</button>
     </td>
    </template>
    <template v-else>
     <td class="text-left">
     <button type="button" class="btn btn-danger" @click="delBook(book)" class="del">删除</button>
     <button type="button" class="btn btn-danger" @click="updateBook(book)">修改</button>
     </td>
    </template>
    </tr>
   </tbody>
   </table>

   <p id="add-book">
   <legend>添加书籍</legend>
   <p class="form-group">
    <label for="group">书名</label>
    <input type="text" class="form-control" id="group" v-model="book.name">
   </p>
   <p class="form-group">
    <label for="author">作者</label>
    <input type="text" class="form-control" id="author" v-model="book.author">
   </p>
   <p class="form-group">
    <label for="price">价格</label>
    <input type="text" class="form-control" id="price" v-model="book.price">
   </p>
   <button class="btn btn-primary btn-block" v-on:click="addBook()">添加</button>
   <button class="btn btn-primary btn-block" v-on:click="searchBook()">查询</button>
   </p>

   <p id="update-book">
   <legend>修改书籍</legend>
   <p class="form-group">
    <label for="group1">书名</label>
    <input type="text" class="form-control" id="group1" v-model="book.name">
   </p>
   <p class="form-group">
    <label for="author1">作者</label>
    <input type="text" class="form-control" id="author1" v-model="book.author">
   </p>
   <p class="form-group">
    <label for="price1">价格</label>
    <input type="text" class="form-control" id="price1" v-model="book.price">
   </p>
   <button class="btn btn-primary btn-block" v-on:click="updatesBook()">完成</button>
   </p>
</p>First, mount the vue instance with the id app to the DOM node. If you don’t understand these basic contents, you can read my previous article Blog, which introduces the basic knowledge about Vue in detail.
The following table uses a v-for loop in tr to load all the data in the vue instance data into the table.
Careful readers should have noticed that I wrote a v-cloak before v-for. What does this do?
Anyone who has used frameworks like Angular and Vue should know that when we use {{}} to bind data, when the page is refreshed, the original code will flash by.
When the amount of information is relatively large, this experience is undoubtedly very bad. At this time, the v-cloak instruction remains on the element until the associated instance is compiled.
When used with CSS rules such as [v-cloak] { display: none }, this directive can hide uncompiled Mustache tags until the instance is ready.
This solves the problem of a large number of garbled characters appearing on the page at the moment of refreshing.
The v-if and v-else below are just for practicing various instructions, so that when our button is generated, we can generate two colors in turn~
And v-model is for When entering content in input, the input content can be dynamically obtained.
Again, if you don’t know these basic instructions, you can go to my last blog to check them out.
The functions bound to v-on:click will be explained in detail one by one in a moment. Now let’s take a look at the effects.
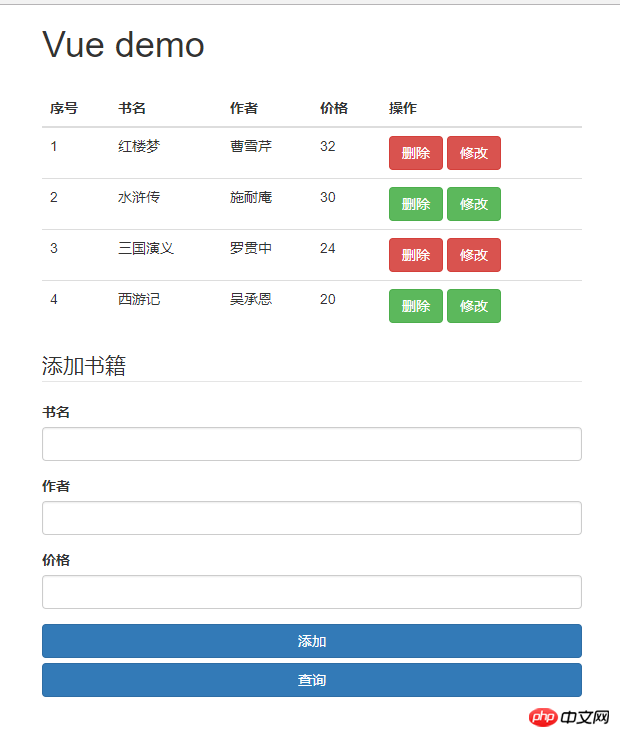
Not bad~ Next, let’s start talking about each function.
addBook: function() {
  //计算书的id
  this.book.id = this.books.length + 1;
  this.books.push(this.book);
  //将input中的数据重置
  this.book = {};
}This is to add a function. You can go above to take a look at the code in the data in the vue instance.
In fact, with just a few lines of code, the power of vue has been fully demonstrated.
Because we have bound v-model in the input box, the content we input will be dynamically synchronized with the book object.
The principle of this function is to assign a value to the id of the book object, and then push the data dynamically bound to the input box through v-model, that is, the data we input, into the books array.
Finally, clear the book object, which means clearing our input box.
With just 3 lines of code, the information entry is completed. Isn’t it amazing?
Oh, by the way, in the vue instance, this points to the vue instance itself. If you don’t understand the concept of object-oriented, I suggest you search Baidu for this pointing issue.
Let’s take a look at deletion
delBook: function(book) {
  var blength = this.books.length;
  this.books.splice(book.id-1, 1);
  for( var i = 0; i < blength ; i++) {
  if(book.id < this.books[i].id) {
   this.books[i].id -= 1;
  }
  }
}The principle of deletion is to get the length of the current books array, and the subscript of the currently selected one is its id -1, use the splice method to delete it.
Then through a loop, subtract 1 from the IDs of items whose IDs are larger than the deleted data to maintain the continuity of the sequence numbers.
The next step is to modify
updateBook: function(book) {
  $("#add-book").css("display","none");
  $("#update-book").css("display","block");
  id = book.id;
 },
 updatesBook:function(book) {
  this.book.id = id;
  this.books.splice(id-1,1,this.book);
  $("#add-book").css("display","block");
  $("#update-book").css("display","none");
this.book = {};The first function is to pop up the modification box, hide the added box, and then bind the id that needs to be modified. Set it to a global variable~
Then the first function is the real modification command.
Assign the global variable just bound to the current id, and then use the splice method to replace the original content with the input content~
Then still the same, input the book object The box is cleared.
End
Such a simple information entry platform is completed. Although there is not much code, it is enough to make us deeply feel about vue of strength.
The development trend of future pages must not avoid this design idea.
Related recommendations:
Detailed explanation of the example of Linux shell implementation of library management system
Vue implementation of library management example Explain the detailed steps of
vue.js to build a book management platform
The above is the detailed content of vue.js quickly builds an example of a book management platform. For more information, please follow other related articles on the PHP Chinese website!

Hot AI Tools

Undresser.AI Undress
AI-powered app for creating realistic nude photos

AI Clothes Remover
Online AI tool for removing clothes from photos.

Undress AI Tool
Undress images for free

Clothoff.io
AI clothes remover

AI Hentai Generator
Generate AI Hentai for free.

Hot Article
Hot Tools

Notepad++7.3.1
Easy-to-use and free code editor

SublimeText3 Chinese version
Chinese version, very easy to use

Zend Studio 13.0.1
Powerful PHP integrated development environment

Dreamweaver CS6
Visual web development tools

SublimeText3 Mac version
God-level code editing software (SublimeText3)
Hot Topics
 1378
1378
 52
52

 How to implement an online speech recognition system using WebSocket and JavaScript
Dec 17, 2023 pm 02:54 PM
How to implement an online speech recognition system using WebSocket and JavaScript
Dec 17, 2023 pm 02:54 PM
How to use WebSocket and JavaScript to implement an online speech recognition system Introduction: With the continuous development of technology, speech recognition technology has become an important part of the field of artificial intelligence. The online speech recognition system based on WebSocket and JavaScript has the characteristics of low latency, real-time and cross-platform, and has become a widely used solution. This article will introduce how to use WebSocket and JavaScript to implement an online speech recognition system.
 WebSocket and JavaScript: key technologies for implementing real-time monitoring systems
Dec 17, 2023 pm 05:30 PM
WebSocket and JavaScript: key technologies for implementing real-time monitoring systems
Dec 17, 2023 pm 05:30 PM
WebSocket and JavaScript: Key technologies for realizing real-time monitoring systems Introduction: With the rapid development of Internet technology, real-time monitoring systems have been widely used in various fields. One of the key technologies to achieve real-time monitoring is the combination of WebSocket and JavaScript. This article will introduce the application of WebSocket and JavaScript in real-time monitoring systems, give code examples, and explain their implementation principles in detail. 1. WebSocket technology
 How to use JavaScript and WebSocket to implement a real-time online ordering system
Dec 17, 2023 pm 12:09 PM
How to use JavaScript and WebSocket to implement a real-time online ordering system
Dec 17, 2023 pm 12:09 PM
Introduction to how to use JavaScript and WebSocket to implement a real-time online ordering system: With the popularity of the Internet and the advancement of technology, more and more restaurants have begun to provide online ordering services. In order to implement a real-time online ordering system, we can use JavaScript and WebSocket technology. WebSocket is a full-duplex communication protocol based on the TCP protocol, which can realize real-time two-way communication between the client and the server. In the real-time online ordering system, when the user selects dishes and places an order
 How to implement an online reservation system using WebSocket and JavaScript
Dec 17, 2023 am 09:39 AM
How to implement an online reservation system using WebSocket and JavaScript
Dec 17, 2023 am 09:39 AM
How to use WebSocket and JavaScript to implement an online reservation system. In today's digital era, more and more businesses and services need to provide online reservation functions. It is crucial to implement an efficient and real-time online reservation system. This article will introduce how to use WebSocket and JavaScript to implement an online reservation system, and provide specific code examples. 1. What is WebSocket? WebSocket is a full-duplex method on a single TCP connection.
 JavaScript and WebSocket: Building an efficient real-time weather forecasting system
Dec 17, 2023 pm 05:13 PM
JavaScript and WebSocket: Building an efficient real-time weather forecasting system
Dec 17, 2023 pm 05:13 PM
JavaScript and WebSocket: Building an efficient real-time weather forecast system Introduction: Today, the accuracy of weather forecasts is of great significance to daily life and decision-making. As technology develops, we can provide more accurate and reliable weather forecasts by obtaining weather data in real time. In this article, we will learn how to use JavaScript and WebSocket technology to build an efficient real-time weather forecast system. This article will demonstrate the implementation process through specific code examples. We
 Simple JavaScript Tutorial: How to Get HTTP Status Code
Jan 05, 2024 pm 06:08 PM
Simple JavaScript Tutorial: How to Get HTTP Status Code
Jan 05, 2024 pm 06:08 PM
JavaScript tutorial: How to get HTTP status code, specific code examples are required. Preface: In web development, data interaction with the server is often involved. When communicating with the server, we often need to obtain the returned HTTP status code to determine whether the operation is successful, and perform corresponding processing based on different status codes. This article will teach you how to use JavaScript to obtain HTTP status codes and provide some practical code examples. Using XMLHttpRequest
 How to use insertBefore in javascript
Nov 24, 2023 am 11:56 AM
How to use insertBefore in javascript
Nov 24, 2023 am 11:56 AM
Usage: In JavaScript, the insertBefore() method is used to insert a new node in the DOM tree. This method requires two parameters: the new node to be inserted and the reference node (that is, the node where the new node will be inserted).
 How to get HTTP status code in JavaScript the easy way
Jan 05, 2024 pm 01:37 PM
How to get HTTP status code in JavaScript the easy way
Jan 05, 2024 pm 01:37 PM
Introduction to the method of obtaining HTTP status code in JavaScript: In front-end development, we often need to deal with the interaction with the back-end interface, and HTTP status code is a very important part of it. Understanding and obtaining HTTP status codes helps us better handle the data returned by the interface. This article will introduce how to use JavaScript to obtain HTTP status codes and provide specific code examples. 1. What is HTTP status code? HTTP status code means that when the browser initiates a request to the server, the service
